
Beliebte Kategorien
Suchen Sie nach einem Garn?


Kommentare / Fragen (114)
Lorraine hat geschrieben:
Thankyou heaps for your prompt reply. I am in Australia and didn't know when I thought you may respond. Now I can confidently finish my beanie. Love your site!
23.06.2016 - 09:21Lorraine hat geschrieben:
I love this hat. Had to concentrate to understand working of pattern but all has come together great. I am now up to rounds 1-18 of final decreases. Could you please tell me on row 8-13 continue in stocking stitch, knitting in the round would these rows be all knitted or knit 1 row purl 1 row repeated.Thankyou for a wonderful pattern.
23.06.2016 - 08:28DROPS Design hat geantwortet:
Dear Lorraine, when working stocking st in the round, you K all sts on every round. Happy knitting!
23.06.2016 - 09:09
![]() Fanny hat geschrieben:
Fanny hat geschrieben:
Ma question était pour les tours suivants : les 2 premières mailles du 12e rang sont bien deux m. env. Mais est-ce que les 2 premières mailles des tours suivants seront toujours des m.env., ou alors on respecte le motif A2 (et donc des m.end aux tours 14 et 15) ?
17.05.2016 - 14:50DROPS Design hat geantwortet:
Bonjour Fanny, on tricote en début de rang les 2 dernières m de A.2, ainsi, on a 2 m env x 2 tours, puis 2 m end x 2 tours et ainsi de suite. On tricote bien A.2 sur ces 2 premières m, mais en suivant les 2 dernières m du diagramme pour que le motif tombe juste tout le tour. Bon tricot!
17.05.2016 - 16:06
![]() Fanny hat geschrieben:
Fanny hat geschrieben:
Bonjour, j'ai fini les côtes, et je commence les motifs A2. On les commence dès le 11e tour. Est-ce qu'aux tours suivants, on suit la consigne "commencer le rang par les 2 dernières mailles de A2" ou alors on tricote de façon à obtenir le motif A2 dès les 2 premières mailles du rang ? Merci pour votre aide.
17.05.2016 - 11:42DROPS Design hat geantwortet:
Bonjour Fanny, on commence A.2 par les 2 dernières m du diagramme soit 2 m env pour commencer, puis on répète A.2 (2 m end, 2 m env). Bon tricot!
17.05.2016 - 12:00
![]() John hat geschrieben:
John hat geschrieben:
Naald 19 is weggevallen in de vertaling naar het Nederlands
27.03.2016 - 14:22DROPS Design hat geantwortet:
Hoi John. Je hebt gelijk. Ik heb het patroon aangepast. Bedankt voor het melden.
29.03.2016 - 15:48
![]() Le DANG hat geschrieben:
Le DANG hat geschrieben:
Je pense qu'il y a des fautes dans l'explication du tour 1 et tour 13 pour les diminutions. Si l'on fait 1 diminution sur 2 groupes, cela ne donnera pas 19 diminutions mais seulement 9 ou 10.
30.01.2016 - 11:38DROPS Design hat geantwortet:
Bonjour Mme Le Dang, les explications ont été corrigées - après A.X pour que les diminutions tombent juste. Merci. Bon tricot!
18.02.2016 - 16:29Masome hat geschrieben:
Hello. you can't believe where i made the big mistake! I think I should knit rib and then start the pattern A.1.but your explanation help me so much. i don't know how to say thanks to you! thank you sooooooooo much!
28.01.2016 - 19:47Maria hat geschrieben:
Hello,I want to knitt this hat with strange needle not C-N. my question is about pattern A.1 , A.2 , A.X: all rows on pattern shows RS rows or odd rows show WS and other rows show RS??? thanks a lot
27.01.2016 - 22:00DROPS Design hat geantwortet:
Dear Maria, 1 square in diagram = 1 st x 1 round, if you want to work the hat in rows (= back and forth), you will have to read from RS from the right towards the left and from WS from left towards the right - make sure that cables are done on a RS row. Happy knitting!
28.01.2016 - 13:16Masome hat geschrieben:
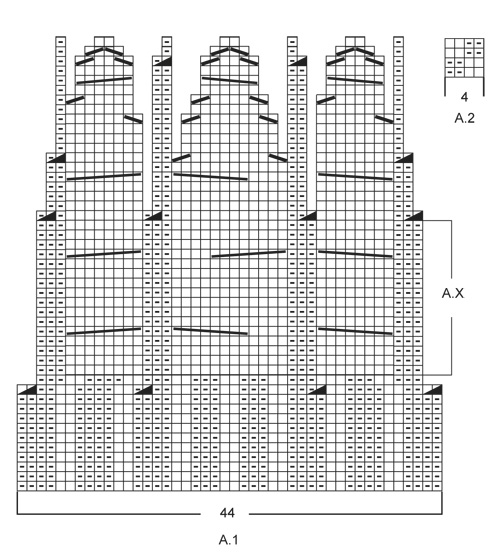
Your can't believe how much I'm sorry, but I must ask this question again.I think your description and the picture aren't the same.I can't find the first 10 round of pattern in the picture.in the picture as soon as rib finish, the 12th round of pattern A.1start.I don't know what is in the picture next to pattern A.1, it isn't like rib.please help me.I love this hat and I try to knit it, even by my so poor knowledge of knitting.😞😞😞😞😞
27.01.2016 - 21:01DROPS Design hat geantwortet:
Dear Mrs Masone, on the picture you can see A.1 from the beg, then you have rib around (round starts with K2, then *P3, K2* repeat from *-* and finish round with A.1). After 10 rounds worked like this, work next round dec 1 st in every other P-section in rib + work 11th round in A.1. Then work last 2 sts in A.2 (= P2), repeat A.2 over next 76 sts and finish with A.1 (continue A.1 with 12th round). Happy knitting!
28.01.2016 - 13:14Masome hat geschrieben:
Hello So sorry!I'm confused. After rib, we should repeat 16 more times this: k2,p3,k2 and then A.1.but I see some thing else in picture.in the right side of it I see an unknown pattern.would you please explain it! And one more question: every other section means the second section? Thanks a lot!
27.01.2016 - 00:03DROPS Design hat geantwortet:
Dear Mrs Masome, after 10 rounds in rib and A.1 you work a dec round (= 118 sts remain), then work with larger needle: the last 2 sts in A.2 over the first 2 sts on round, repeat A.2 over the next 76 st, and A.1 over the remaining sts. A.2 is the small diagram the top corner on the right side of A.1. Decrease in every other P section means 1 P-section without dec and 1 P-section with dec. Happy knitting!
27.01.2016 - 10:19
|
||||||||||||||||||||||||||||
Finnley's Hat |
||||||||||||||||||||||||||||
|
|
||||||||||||||||||||||||||||
Gestrickte DROPS Mütze für Herren in ”Lima” mit Zopfmuster und Strukturmuster.
DROPS Extra 0-1133 |
||||||||||||||||||||||||||||
|
MUSTER: Siehe Diagramme A.1 und A.2. ABNAHMETIPP: 1 M abnehmen, indem 2 M li zusgestr werden. ---------------------------------------------------------- MÜTZE: Die Arb wird in Runden auf der Rundnadel gestr, im Laufe der Abnahmen nach Bedarf zum Nadelspiel wechseln. 131 M auf Rundnadel Nr. 3,5 mit Lima anschlagen. Wie folgt im Rippenmuster str: 2 M re, * 3 M li, 2 M re *, von *-* noch weitere 16 x wdh, A.1 (= 44 M). In dieser Weise weiterstr, bis insgesamt 10 Rd gestr wurden. In der nächsten Rd bei den ersten 87 M in jeder 2. Linksrippe 1 M abnehmen - ABNAHMETIPP lesen! (= 9 M abgenommen), die restlichen M weiter im Muster A.1 mit der 11. Rd weiterstricken (= 118 M). Zu Rundnadel Nr. 4 wechseln. Wie folgt weiterstr: Die letzten 2 M von Muster A.2, die nächsten 76 M im Muster A.2, die restlichen M im Muster A.1. In dieser Weise weiterstr, bis A.X 3 x in der Höhe gearb wurde. MASCHENPROBE BEACHTEN! Die Arb hat nun eine Gesamtlänge von ca. 21 cm. Nun bis zum fertigen Maß alle Rd im Muster A.1 str, GLEICHZEITIG über die 78 M im Muster A.2 gestrickten M wie folgt stricken: Bitte beachten: Die nächste Runde ist die 2. Runde im Muster A.2! 1. RD: In jeder Linksrippe 2 M li zusstr (= 20 M abgenommen) = 94 M (58 M +A.1). 2. RD: li über re Maschen und re über li Maschen stricken. 3. RD: li über li Maschen und re über re Maschen stricken. 4. RD: li über re Maschen und re über li Maschen stricken. 5. RD: li über li Maschen und re über re Maschen stricken. 6. RD: li über re Maschen und re über li Maschen stricken. 7. RD: 2 M li zusstr in den restlichen Bereichen mit 2 M li (= 19 M abgenommen) = 71 M (39 M + A.1). 8.-13. RD: über die 39 M glatt re stricken (A.1 wie zuvor stricken) 14. RD: glatt re str und gleichmässig verteilt 15 M abn, indem man 2 M re zusstr = insgesamt 48 M (24 M + A.1) 15.-17. RD: über die 24 M glatt re stricken (A.1 wie zuvor stricken) 18. RD: stets 2 M re zusstr = insgesamt 22 M (12 M + A.1) 19. RD: glatt re str, den Faden durch die restlichen M fädeln, zusammenziehen und gut vernähen. |
||||||||||||||||||||||||||||
Erklärungen zum Diagramm |
||||||||||||||||||||||||||||
|
||||||||||||||||||||||||||||
 |
||||||||||||||||||||||||||||
Haben Sie diese Anleitung nachgearbeitet?Dann taggen Sie Ihre Fotos mit #dropspattern oder schicken Sie sie an die #dropsfan Galerie Brauchen Sie Hilfe bei dieser Anleitung?Sie finden 12 Videotutorials, einen Kommentar/Fragen-Bereich und vieles mehr, wenn sie die Anleitung bei garnstudio.com aufrufen. © 1982-2026 DROPS Design A/S. Wir besitzen alle Rechte. Dieses Dokument, einschließlich aller Untersektionen, hat Urheberrechte. Mehr dazu, was Sie mit unseren Anleitungen machen können, finden Sie ganz unten auf der Seite zu jeder Anleitung. |
||||||||||||||||||||||||||||


Mit über 40 Jahren Tätigkeit im Entwerfen von Strick- und Häkelmustern bietet Ihnen DROPS Design eine der umfangreichsten Sammlungen von kostenlosen Anleitungen im Internet - in 17 Sprachen übersetzt. Zum jetzigen Zeitpunkt haben wir insgesamt 324 Handarbeitshefte und 12290 Anleitungen auf Deutsch. 12202
Unser Ziel ist es, Ihnen die besten Angebote zum Stricken und Häkeln, Inspirationen und Ratschläge sowie qualitativ hochstehende Garne zu unglaublichen Preisen zu bieten! Möchten Sie unsere Anleitungen nicht nur für den persönlichen Gebrauch nutzen? Unsere Copyright Bedingungen finden Sie bei allen unseren Anleitungen ganz unten auf der jeweiligen Seite. Viel Spaß beim Handarbeiten!
Kommentieren Sie die Anleitung DROPS Extra 0-1133
Wir würden gerne Ihre Meinung zu diesem Modell erfahren!
Wenn Sie eine Frage stellen möchten, prüfen Sie bitte, dass Sie die richtige Kategorie im unten stehenden Formular gewählt haben - so bekommen Sie schneller eine Antwort. Die obligatorischen Felder sind mit einem * gekennzeichnet.