
Beliebte Kategorien
Suchen Sie nach einem Garn?


Kommentare / Fragen (50)
![]() Niva hat geschrieben:
Niva hat geschrieben:
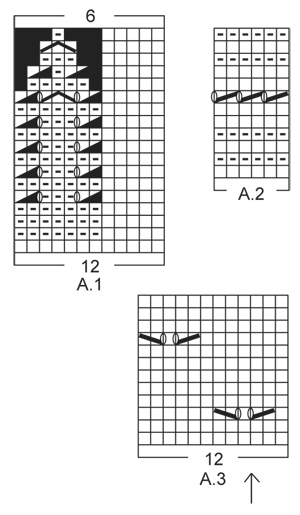
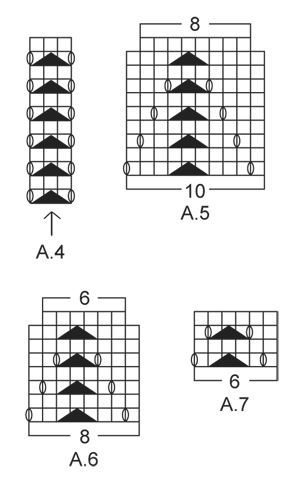
Must admit this is the most confusing pattern I’ve ever tried and I’m an accomplished knitter. I’ve read it so many times to work it out and I’m almost there. Does the A4 pattern stop after the 12 rows in the graph?
08.04.2021 - 04:33DROPS Design hat geantwortet:
Dear Niva, A.4 will be repeated in height until all decreases for raglan are done. Happy knitting!
08.04.2021 - 07:51
![]() Nova hat geschrieben:
Nova hat geschrieben:
At the beginning of the A4 graph is the YO between the last stitch on the body and the first stitch on the sleeve?
07.04.2021 - 13:43DROPS Design hat geantwortet:
Dear Nova, the stitch with the arrow in A.4 should be the one with the marker at the transitions, so that you will have 1 yarn over, the double decrease with marker in the middle stitch, 1 yarn over; this means there will be one hole (yarn over) on body and on sleeve. Happy knitting!
07.04.2021 - 14:26
![]() Nova hat geschrieben:
Nova hat geschrieben:
After attaching the sleeves for size L and beginning middle back for the first round, it says to start on the same row for the sleeve as for the body. Does this mean if I’m on row 4 on the body (A1) that I start on row 4 for the sleeves (A3)? Also A1 the arrow designates the middle of the sleeve but the graph starts with A4 which is 3 stitches and A3 is another 3 sts total 6 sts wouldn't the middle be half of 68 sts which is 34 sts?
06.04.2021 - 14:03DROPS Design hat geantwortet:
Dear Nova, you should finish the sleeves 8adjust its length) so you will end up in the same row if the pattern as on the body, so you can continue the pattern without disrupting it. The arrow should match the middle of the sleeves, the upper middle line, put the stitch marked there, and count outwards to find out where you should start. Happy Knitting!
06.04.2021 - 14:26
![]() Nova hat geschrieben:
Nova hat geschrieben:
This is becoming a real challenge but I’m not going to give up! I am attaching the sleeves to the body but notice you don’t mention double pointed needles in your materials needed for this project. How are you supposed to knit these sleeves together with the body without them? It won’t work.
25.03.2021 - 01:52DROPS Design hat geantwortet:
Dear Nova, when you have knitted the sleeves, you put all the stitches on one curcular needle, (back, sleeve, fron, sleeve), and knot the circular needle on the round. You don't knit "together" as a three needle bind off, but along with the body, in one big circle, that is getting decreased as you get to the neckline. Happy Knitting!
25.03.2021 - 02:26
![]() Nova hat geschrieben:
Nova hat geschrieben:
Hi again. I’m up to the yoke and I’m really confused about this section of the pattern. The fact that there are 3 graphs to be worked is a challenge in itself. The confusion is in the A4 graph between the body and the sleeves, does this have to do with the shaping of the raglan?
09.03.2021 - 13:31DROPS Design hat geantwortet:
Dear Nova, pattern A.4 is between each body and sleeve, right at the raglan line. Shaping happens before and after this pattern. Happy Knitting!
09.03.2021 - 13:57
![]() Nova hat geschrieben:
Nova hat geschrieben:
When you get to the side where the first increases have been worked you have two extra stitches so to keep the eyelet pattern uniform, the space between the next eyelet is 9 stitches and that throws the whole eyelet pattern out. I don’t know how you can keep the eyelet pattern 7 stitches between with these increases on the side. The new repeat would make more sense at the beginning of the round.
26.02.2021 - 23:15DROPS Design hat geantwortet:
See answer below - if you can't work a part of decrease (K2 tog, YO), over the new stitches, just work these stitches in stocking stitch without the lace pattern. You shoulud have the correct number of sts between each eyelet in width. Hope this will help. Happy knitting!
01.03.2021 - 08:00
![]() Nova hat geschrieben:
Nova hat geschrieben:
The beginning of the round the increases can be worked out but it’s the increases halfway on the side marker those stitches throw the whole eyelet pattern out. You can’t do 7 stitches between the pattern it doesn’t work out I’ve tried it
26.02.2021 - 22:52DROPS Design hat geantwortet:
Dear Nova, if you don't have enough stitches to work the whole lace pattern on the side, this means there are not enough stitches yet, just work these stitches in stocking stitch. Work the lace pattern over the new stitches only if you have enough stitches to work them. This means each lace pattern should be worked with 7 knit stitches in between. Happy knitting!
01.03.2021 - 07:58
![]() Nova hat geschrieben:
Nova hat geschrieben:
Are you saying to read the graph from left to right and then right to left alternately and the added stitches will work out with the eyelet pattern?
26.02.2021 - 16:33DROPS Design hat geantwortet:
Hi Nova, when working in the round all rounds are worked from the right side, and the diagram is read solely from right to left. When starting a new round, simply start working the first symbol on the next row in diagram. Happy knitting!
28.02.2021 - 21:14
![]() Nova hat geschrieben:
Nova hat geschrieben:
For example on the 3rd round after the first increases there are 4 stitches left at the end of the round and I’m not sure whether to knit those stitches as normal or do the pattern.
26.02.2021 - 15:19DROPS Design hat geantwortet:
Dear Nova, see previous answer, make always sure that the eyelet pattern fit in height, it shouldn't be displaced. Happy knitting!
26.02.2021 - 16:17
![]() Nova hat geschrieben:
Nova hat geschrieben:
When doing the body and the A3 and making the increases on either side of the markers I notice that those extra stitches will throw the alternate pattern out where the holes should be. Is that how it’s supposed to be?
26.02.2021 - 15:08DROPS Design hat geantwortet:
Dear Nova, the increased stitches should be worked in A.3, this means at the beg of A.3 work the new stitches as a new repeat reading diagram from the left towards the right (= there should be always 7 sts before the next K2 tog, YO in the lace pattern. And at the end of A.3, work the new stitches as a new repeat of A.3 (reading from the right towards the left). Hope this will help. Happy knitting!
26.02.2021 - 16:16
|
||||||||||||||||||||||||||||
White Romance#whiteromancetop |
||||||||||||||||||||||||||||
 |
 |
|||||||||||||||||||||||||||
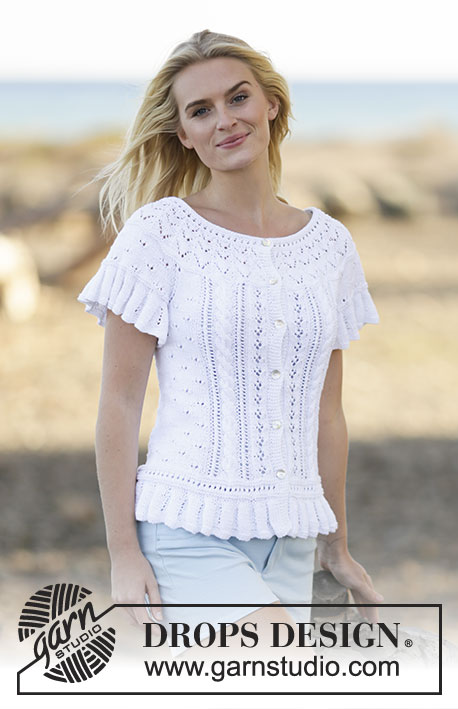
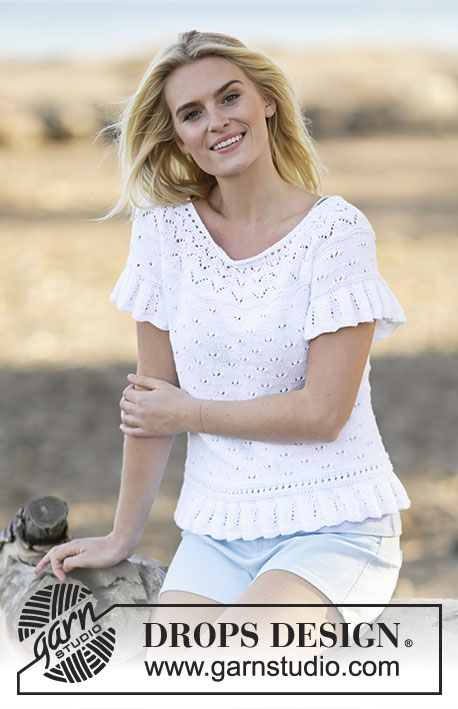
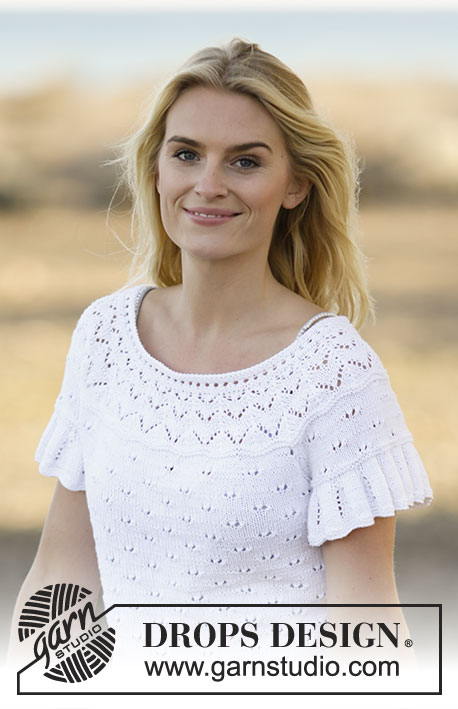
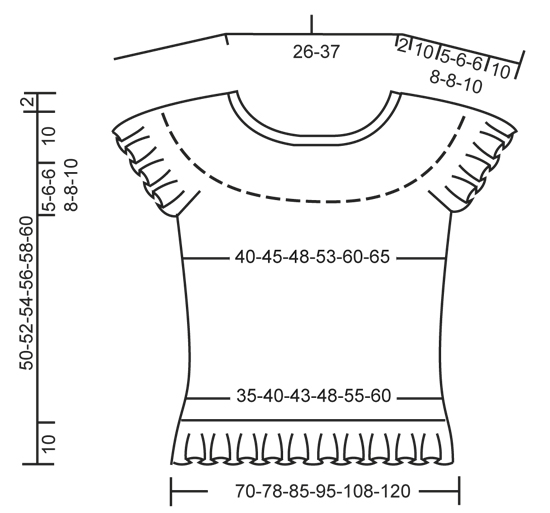
Gestricktes DROPS Top in ”Safran” mit Lochmuster, kurzen Ärmeln und Rundpasse. Größe S - XXXL.
DROPS 159-12 |
||||||||||||||||||||||||||||
|
KRAUSRIPPEN (in Runden): 1 Krausrippe = 2 Rd kraus re = 1 Rd re und 1 Rd li. MUSTER: Siehe Diagramme A.1 bis A.7. Die Diagramme zeigen alle Muster-Rd, wie sie auf der Vorderseite erscheinen. ZUNAHMETIPP: 1 M zunehmen, indem 1 Umschlag gearb wird. In der nächsten Rd den Umschlag verschr str, um ein Loch zu vermeiden - die zugenommenen M glatt re str. RAGLANABNAHMEN: Beidseitig jedes A.4 an jedem Übergang zwischen Rumpfteil und Ärmeln wird abgenommen. Wie folgt nach A.4 abnehmen: 1 M wie zum Rechtsstr abheben, 1 M re, die abgehobene M überziehen. Wie folgt vor A.4 abnehmen, dabei 2 M vorher beginnen: 2 M re zusstr. ---------------------------------------------------------- RUMPFTEIL: Die Arb wird in Runden auf der Rundnadel gestr. 336-372-408-456-516-576 M auf Rundnadel Nr. 2,5 mit Safran anschlagen. In Rd 2 KRAUSRIPPEN (= 4 Rd kraus re, siehe oben) str. Zu Rundnadel Nr. 3 wechseln und im Muster A.1 str. Wenn A.1 1 x in der Höhe gestr wurde, sind 168-186-204-228-258-288 M auf der Nadel. Im Muster A.2 str. Wenn A.2 1 x in der Höhe gestr wurde, 2 Rd re str und GLEICHZEITIG in der letzten Rd 0-6-0-0-6-0 M gleichmäßig verteilt zunehmen (= 168-192-204-228-264-288 M). Zu Beginn der Rd 1 Markierer setzen und nach 84-96-102-114-132-144 M 1 Markierer setzen (= Seiten des Tops). Im Muster A.3 str. MASCHENPROBE BEACHTEN! GLEICHZEITIG bei einer Gesamtlänge von 12 cm beidseitig jedes Markierers je 1 M zunehmen – ZUNAHMETIPP lesen (= 4 M zugenommen). Diese Zunahmen alle 4-4-4-5-5-5 cm insgesamt 6 x arb (= 192-216-228-252-288-312 M) – BITTE BEACHTEN: Die zugenommenen M glatt re str. Bis zu einer Gesamtlänge von 35-36-38-38-40-40 cm str, dann die nächste Rd wie folgt arb: 5-5-5-6-6-6 M für den Armausschnitt abketten, 86-98-104-114-132-144 M str (= Vorderteil), 10-10-10-12-12-12 M für den Armausschnitt abketten (d. h. je 5-5-5-6-6-6 M beidseitig des Markierers), 86-98-104-114-132-144 M str (= Rückenteil) und die restlichen 5-5-5-6-6-6 M für den Armausschnitt abketten. Die Arb zur Seite legen und die Ärmel str. ÄRMEL: Die Arb wird in Runden auf der Rundnadel gestr. 144-156-156-168-168-180 M auf Rundnadel Nr. 2,5 mit Safran anschlagen. In Rd 2 Krausrippen (= 4 Rd kraus re) str. Zu Rundnadel Nr. 3 wechseln und im Muster A.1 str. Wenn A.1 zu Ende gestr wurde, sind 72-78-78-84-84-90 M auf der Nadel. 2 Krausrippen (= 4 Rd kraus re) str, GLEICHZEITIG in der letzten Rd 10-10-10-12-12-12 M an der unteren Ärmelmitte abketten (= 62-68-68-72-72-78 M übrig). Die Arb zur Seite legen und den 2. Ärmel ebenso str. PASSE: Die Ärmel-M an den beiden Stellen, an denen beim Rumpfteil für die Armausschnitte abgekettet wurde, auf dieselbe Nadel wie die Rumpfteil-M legen (ohne die M dabei zu str) (= 296-332-344-372-408-444 M), GLEICHZEITIG jeweils an der ersten und der letzten M jedes Ärmels 1 Markierer anbringen (= 4 Markierer). An der hinteren Mitte beginnen und in Rd am Rumpfteil im Muster wie zuvor str, GLEICHZEITIG Muster A.3 auch an den Ärmeln str (der Pfeil im Diagramm muss mit der Mitte des Ärmels übereinstimmen, in derselben R des Diagramms wie beim Rumpfteil beginnen). Zusätzlich an jedem Übergang zwischen Rumpfteil und Ärmeln A.4 str (der Pfeil im Diagramm muss mit der markierten M übereinstimmen). Wenn 2 Rd über alle M gestr wurden, mit den RAGLANABNAHMEN (siehe oben) beginnen (= 8 M abgenommen). Diese Abnahmen in jeder 4. Rd insgesamt 4-5-5-7-7-8 x arb (= 264-292-304-316-352-380 M). 2 Krausrippen (= 4 Rd kraus re) über alle M str, GLEICHZEITIG in der 1. Rd 4-12-4-6-12-10 M gleichmäßig verteilt abnehmen (= 260-280-300-310-340-370 M). 2 Rd re str. Nun im Muster A.5 str, darin sind die Abnahmen für die Rundpasse enthalten (= 26-28-30-31-34-37 Rapporte von A.5 in der Rd – BITTE BEACHTEN: im Laufe der Abnahmen zur kürzeren Rundnadel wechseln, sobald nötig). Wenn A.5 1 x in der Höhe gestr wurde, A.6 statt A.5 str. Wenn A.6 1 x in der Höhe gestr wurde, sind 156-168-180-186-204-222 M auf der Nadel. Nun A.7 statt A.6 str. Wenn A.7 1 x in der Höhe gestr wurde, werden im Nacken verkürzte R gestr, damit der hintere Halsrand höher wird. Dafür 1 Markierer in die vordere Mitte setzen, an der hinteren Mitte beginnen und re str, bis noch 14-14-16-16-18-20 M vor dem Markierer übrig sind. Wenden, re zurückstr, bis noch 14-14-16-16-18-20 M an der anderen Seite vor dem Markierer übrig sind. Wenden, re str, bis noch 30-30-34-34-38-42 M vor dem Markierer übrig sind. Wenden, re zurückstr, bis noch 30-30-34-34-38-42 M an der anderen Seite vor dem Markierer übrig sind. Wenden, re str, bis noch 46-46-52-52-58-64 M vor dem Markierer übrig sind. Wenden, re zurückstr, bis noch 46-46-52-52-58-64 M an der anderen Seite vor dem Markierer übrig sind. Wenden, re str, bis noch 62-62-70-70-76-86 M vor dem Markierer übrig sind. Wenden, re zurückstr, bis noch 62-62-70-70-76-86 M an der anderen Seite vor dem Markierer übrig sind. Wenden und bis zum Rd-Beginn re str. HALSBLENDE: Zu Rundnadel Nr. 2,5 wechseln und in Rd im Muster A.2 über alle M str, GLEICHZEITIG in der 1. Rd 22-24-24-26-30-32 M gleichmäßig verteilt abnehmen (= 134-144-156-160-174-190 M). Nach A.2 locker re abketten. Das Top hat eine Gesamtlänge von ca. 52-54-56-58-60-62 cm ab der Schulter. FERTIGSTELLEN: Die Öffnungen unter den Armen schließen. |
||||||||||||||||||||||||||||
Erklärungen zum Diagramm |
||||||||||||||||||||||||||||
|
||||||||||||||||||||||||||||
 |
||||||||||||||||||||||||||||
 |
||||||||||||||||||||||||||||
 |
||||||||||||||||||||||||||||
Haben Sie diese Anleitung nachgearbeitet?Dann taggen Sie Ihre Fotos mit #dropspattern #whiteromancetop oder schicken Sie sie an die #dropsfan Galerie Brauchen Sie Hilfe bei dieser Anleitung?Sie finden 30 Videotutorials, einen Kommentar/Fragen-Bereich und vieles mehr, wenn sie die Anleitung bei garnstudio.com aufrufen. © 1982-2026 DROPS Design A/S. Wir besitzen alle Rechte. Dieses Dokument, einschließlich aller Untersektionen, hat Urheberrechte. Mehr dazu, was Sie mit unseren Anleitungen machen können, finden Sie ganz unten auf der Seite zu jeder Anleitung. |
||||||||||||||||||||||||||||


Mit über 40 Jahren Tätigkeit im Entwerfen von Strick- und Häkelmustern bietet Ihnen DROPS Design eine der umfangreichsten Sammlungen von kostenlosen Anleitungen im Internet - in 17 Sprachen übersetzt. Zum jetzigen Zeitpunkt haben wir insgesamt 324 Handarbeitshefte und 12290 Anleitungen auf Deutsch. 12202
Unser Ziel ist es, Ihnen die besten Angebote zum Stricken und Häkeln, Inspirationen und Ratschläge sowie qualitativ hochstehende Garne zu unglaublichen Preisen zu bieten! Möchten Sie unsere Anleitungen nicht nur für den persönlichen Gebrauch nutzen? Unsere Copyright Bedingungen finden Sie bei allen unseren Anleitungen ganz unten auf der jeweiligen Seite. Viel Spaß beim Handarbeiten!
Kommentieren Sie die Anleitung DROPS 159-12
Wir würden gerne Ihre Meinung zu diesem Modell erfahren!
Wenn Sie eine Frage stellen möchten, prüfen Sie bitte, dass Sie die richtige Kategorie im unten stehenden Formular gewählt haben - so bekommen Sie schneller eine Antwort. Die obligatorischen Felder sind mit einem * gekennzeichnet.