
Catégories populaires
Vous cherchez un fil?


Commentaires / Questions (53)
![]() Cathie a écrit:
Cathie a écrit:
I have been crocheting for 50 years. I do not know how to read a diagram. I only use written instructions. However, I have no clue what you are talking about after the 2nd row. What is A.4 over the next 4 stitches, etc? What is the A. ? Help please. I am so lost!
08.03.2020 - 03:40DROPS Design a répondu:
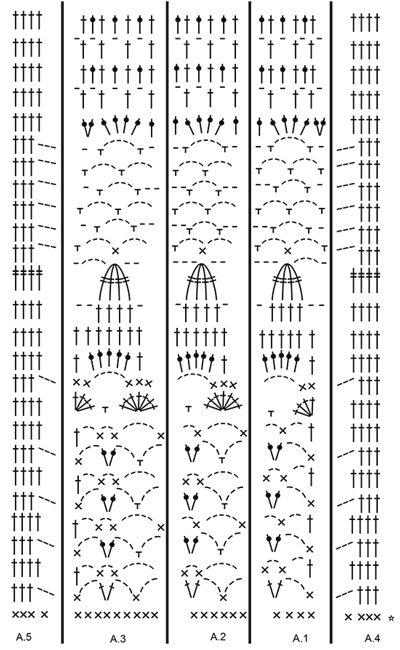
Dear Cathie, it is well worth the time and effort to figure out how to read pattern diagrams, because they not only tell you what to do at the very next step, but also show you how the stitches AND the rows relate to each other. In this case pattern A.4 shows you the trebles stitches at the right of the diagram. HERE you can find a lesson on how to read crochet diagrams, and do not forget, that you can always ask for help (in person or over teh phone) for help in the store where you bought your DROPS yarn from. Happy Crafting!
08.03.2020 - 22:56
![]() Imelda Parra Suarez a écrit:
Imelda Parra Suarez a écrit:
Quisiera elaborar el poncho con patron de calados en Paris pero no entiendo las abreviasiones que colocan me gustaría algo más claro o una fotografia donde se observe claramente las puntadas. Muchas gracias por su atención quedo atenta.
14.11.2019 - 21:03DROPS Design a répondu:
Hola Imelda. No disponemos de más fotos que las que están publicadas de este modelo. Tienes bajo el patrón varios vídeos explicativos y el diccionario de abreviaturas está en este link https://www.garnstudio.com/dictionary.php?lang=es
17.11.2019 - 19:34
![]() Phoebe Musa a écrit:
Phoebe Musa a écrit:
Kindly give us the pattern in writing, diagrams are kind of confusing
15.10.2019 - 10:15DROPS Design a répondu:
Dear Mrs Musa, when there are only diagrams in a pattern, such as this one for example, you will find help with crochet diagrams here. Happy crocheting!
15.10.2019 - 10:25
![]() Birgitta a écrit:
Birgitta a écrit:
Hej. Jag skulle vilja veta bredden på "halsduken". Mvh Birgitta
26.08.2019 - 11:08DROPS Design a répondu:
Hej. Du hittar alla mått i de olika storlekarna på måttskissen längst ner på mönstret. Lycka till!
27.08.2019 - 08:15
![]() SAROJ a écrit:
SAROJ a écrit:
Hi there Is there any way I can get this pattern fully written out, I get extremely confused reading a diagram. Please assist.
23.07.2019 - 11:20DROPS Design a répondu:
Dear Mrs Saroj, there are only diagrams to this pattern but you will find here how to read crochet diagrams, should you need any further assistance reading diagrams, feel free to contact your DROPS store even per mail or telephone. Happy crocheting!
06.08.2019 - 09:45
![]() Carrie a écrit:
Carrie a écrit:
Hello again! I’m just about to finish the first part of the diagram. When starting the diagram again, to get the length, do I start with the rows of single crochets at the very bottom, or do I start with the second row of 3 dc, chain 3 on top of the top most row of dc? Thank you! I think I’m going to like diagrams much better than the US way of writing every line out! :)
14.06.2019 - 02:57DROPS Design a répondu:
Dear Carrie, when repeating the diagrams in height, start from 2nd row in diagram, ie skip the single crochets row from the very bottom. Happy crocheting!
14.06.2019 - 07:27
![]() Carrie a écrit:
Carrie a écrit:
I have gotten up to the 4th row above the row of single crochets and have torn it out 3 times. Where does the 4th DC in stitch go? The first of the chain 3 below? I am assuming that this row goes from A4-A5. I can’t tell where single crochets go between A1 and A2. Do they go into each of the DC around chain below? The diagram looks like one DC in the first DC around and the second in the first of chain 3. That just doesn’t seem right. Thank you, Carrie
11.06.2019 - 02:20DROPS Design a répondu:
Dear Carrie, on row 3 (5, 7..) in A.4/A.5 the 4th dc (in A.4) and the first dc (in A.5) will be worked in the first chain (A.4)/last chain (= next to the dc) in A.5. So that there are either 3 or 4 dc in A.4/A.5. Happy crocheting!
11.06.2019 - 12:32
![]() Hedi a écrit:
Hedi a écrit:
Ich möchte wissen wie ich dieses teil zusammen nähe
02.05.2019 - 21:49DROPS Design a répondu:
Liebe Hedi, dieses Video zeigt wie man einen gestrickten Poncho zusammennäht - beim gehäkelten wird es die gleiche Technik. Viel Spaß beim häkeln!
03.05.2019 - 09:00
![]() Gemma a écrit:
Gemma a écrit:
Leuk patroon. Om de juiste hoogte, 84 cm voor maat XXL, te krijgen, veronderstel ik dat ik na de gegeven toeren ik weer ergens aan het begin van de tekening werder moet haken. Klopt dat? Bij welke toer moet ik dan weer verder haken? Alvast bedankt voor jullie antwoord.
20.04.2019 - 21:50DROPS Design a répondu:
Dag Gemma,
Je kan inderdaad, nadat je A.x 1 keer in de hoogte hebt gebreid, gewoon weer opnieuw beginnen onderaan, dus bij de eerste toer na de toer met het sterretje.
21.04.2019 - 16:51
![]() Silvia a écrit:
Silvia a écrit:
The video doesn't help...but thanks
20.03.2019 - 15:25
|
|||||||||||||||||||||||||||||||
Sky Love#skyloveponcho |
|||||||||||||||||||||||||||||||
 |
 |
||||||||||||||||||||||||||||||
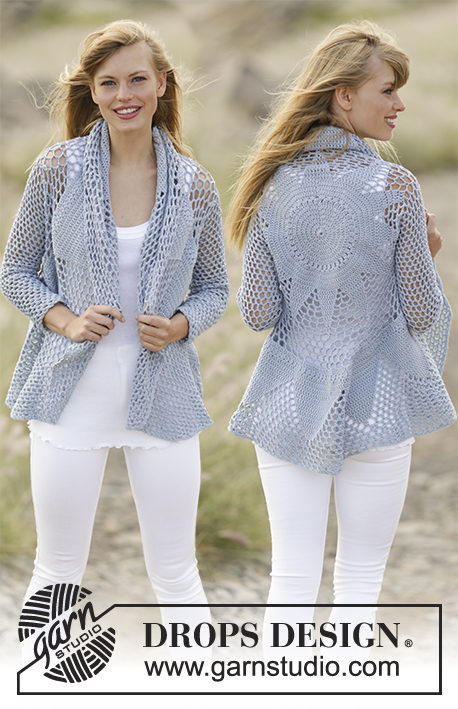
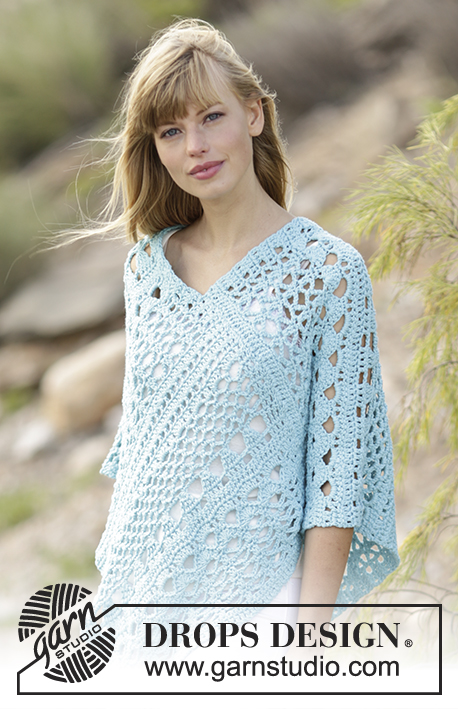
Poncho ajouré DROPS au crochet, en ”Paris”. Du S au XXXL.
DROPS 168-13 |
|||||||||||||||||||||||||||||||
|
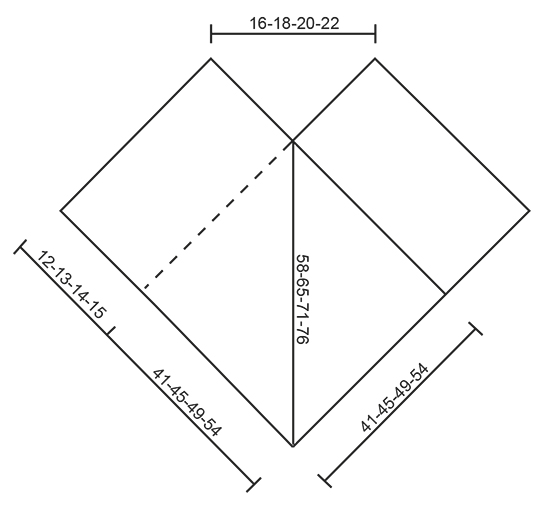
INFO CROCHET: Commencer tous les rangs de ms par 1 ml (remplace la 1ère ms). Commencer tous les rangs de B par 3 ml (remplacent la 1ère B). Commencer tous les rangs de DB par 4 ml (remplacent la 1ère DB). POINT FANTAISIE: Voir diagrammes A.1 à A.5. ---------------------------------------------------------- PONCHO: L'ouvrage est fait comme 2 écharpes assemblées ensemble pour former un poncho. Monter une chaînette de 77-85-93-101 ml avec le crochet 5 en Paris. Crocheter 1 B dans la 4ème ml à partir du crochet (= 2 B), 1 B dans la ml suivante, *sauter 1 ml, 1 B dans chacune des 3 ml suiv*, répéter de *-* tout le rang = 57-63-69-75 B. Crocheter ensuite 1 ms dans chaque B (= sur l'envers) – voir INFO CROCHET = 57-63-69-75 ms. Continuer ensuite ainsi: A.4 sur les 4 premières ms, A.1 sur les 4 ms suivantes, A.2 sur les 36-42-48-54 ms suivantes (= 6-7-8-9 fois en largeur), A.3 sur les 9 ms suivantes, terminer par A.5 sur les 4 dernières ms. PENSER À BIEN CONSERVER LA MÊME TENSION QUE POUR L'ÉCHANTILLON! Continuer ainsi jusqu'à ce que l'ouvrage mesure 65-71-77-84 cm, terminer par 1 rang de B dans le diagramme, arrêter. Crocheter une autre pièce identique. ASSEMBLAGE: Placer le dernier rang de la 1ère partie contre le côté droit de la grande longueur de la 2ème partie - en bas côté chaînette de base et en remontant sur 41-45-49-54 cm – veiller à ne pas trop étirer l'ouvrage. Coudre les 2 pièces entre elles à petits points soignés. Assembler ensuite de la même façon le dernier rang de la 2ème partie au côté droit de la 1ère partie. |
|||||||||||||||||||||||||||||||
Légende diagramme(s) |
|||||||||||||||||||||||||||||||
|
|||||||||||||||||||||||||||||||
 |
|||||||||||||||||||||||||||||||
 |
|||||||||||||||||||||||||||||||
Vous avez terminé ce modèle?Alors taguez vos photos avec #dropspattern #skyloveponcho ou bien présentez-les dans la galerie #dropsfan Vous avez besoin d'aide pour ce modèle ?Vous trouverez 8 tutoriels vidéo, une rubrique commentaires/questions et plus encore en vous rendant sur la page du modèle sur garnstudio.com © 1982-2026 DROPS Design A/S. Tous droits réservés. Ce document, y compris ces sous-sections, est protégé par les droits d'auteur (copyright). Apprenez-en davantage sur ce que vous pouvez faire avec nos modèles en bas de chacune des pages de notre site. |
|||||||||||||||||||||||||||||||


Avec plus de 40 ans dans la conception de modèles tricot et crochet, DROPS Design offre l'une des plus vastes collections de modèles gratuits sur internet - traduits dans 17 langues. À ce jour, on compte 324 catalogues et 12290 modèles en français.
Nous nous efforçons de vous apporter le meilleur de ce que le tricot et le crochet peuvent vous offrir, inspiration et conseils mais également des fils de haute qualité à des prix incroyables! Vous souhaiteriez utiliser nos modèles autrement que pour un usage personnel? Vous pouvez lire ce que vous êtes autorisés à faire dans le Copyright en bas de page de chacun de nos modèles. Bon tricot!
Poster un commentaire sur le modèle DROPS 168-13
Nous aimerions connaître votre avis sur ce modèle !
Si vous souhaitez poser une question, merci de bien vouloir vérifier que vous avez choisi la bonne catégorie dans le formulaire ci-dessous afin d'accélérer la réponse. Les champs obligatoires sont indiqués par une *.