
Catégories populaires
Vous cherchez un fil?


Commentaires / Questions (61)
![]() Adriana a écrit:
Adriana a écrit:
Ciao. Volevo sapere cosa si intende per aumento ogni 3 giri. Cioè faccio 2 giri e aumento sul terzo o faccio 3 giri e aumento sul quarto? Grazie mille
27.10.2019 - 23:36DROPS Design a répondu:
Buongiorno Adriana. Lavora due giri senza aumenti e poi aumenta al terzo. Buon lavoro!
28.10.2019 - 07:17
![]() Maryla a écrit:
Maryla a écrit:
Nie mogę zrozumieć jak wykonać : W TYM SAMYM CZASIE dodać z każdej strony wszystkich (1 o.l., 3 o.p., 1 o.l.) – PATRZ DODAWANIE OCZEK = 8 dodatkowych o. Przer. dodawane o. na praw. Przeciez 1ol, 3op. 1o.l z dwóch stron to 10 oczek a nie 8. Gdzie zacząć je dodawać i od jakiego zacząć. To nie jest zrozumiałe
22.10.2019 - 16:57DROPS Design a répondu:
Witaj Marylo! W całym okrążeniu sekwencja (1 o.l., 3 o.p., 1 o.l.) występuje 4 razy > jest to w miejscach linii reglanów (tak jakbyś wykonywała sweter). Jeżeli dodasz po 1 o. z każdej strony tej sekwencji oczek to otrzymasz 8 dodatkowych oczek w okrążeniu (4x2=8). Później co 3 okrążenia powtarzasz to samo jeszcze 15-16-16 razy (w zależności od rozmiaru). Miłej pracy!
23.10.2019 - 08:27
![]() Anfal Wedaa a écrit:
Anfal Wedaa a écrit:
Thanks ,how I could send to you the photo of the poncho after finishing it ? And one more question When we increase every 3rnd It will be p1 k4 p1 and increase like that or we increase the k11 to be k 15 ?
08.07.2019 - 14:10DROPS Design a répondu:
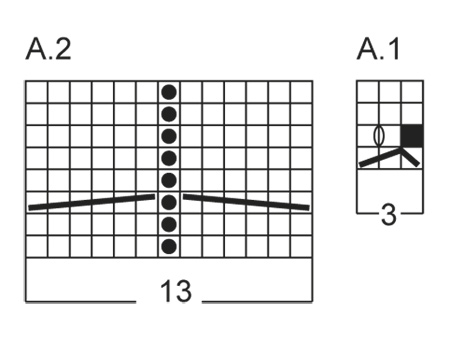
Dear Mrs Wedaa, when inc on each side of P1,k3,P1 you will increase in the K section on each side, so that in 2nd and 3rd size you will get after 1st increase: at the beg of the repeat: K12 (P1, K3,P1) K3, P1, A.1 ... and A.1, K3, (P1, K3, P1), K12 at the end of the repeat. You can tag us in the social medias with #dropsfan - read more here and join us in the DROPS Workshop. Happy knitting!
08.07.2019 - 14:37
![]() Anfal Wedaa a écrit:
Anfal Wedaa a écrit:
Thanks for video but can I ask more one question! When I finish the row one on k11 .. start the second row with k11 or p1 ?
08.07.2019 - 09:20DROPS Design a répondu:
Dear Mrs Wedaa, you have to work all rounds as follows: * K11-11, P 1, K 3, P 1, K 2-2, P 1, A.1 (= 3 sts), P 2, A.2 (= 13 sts), ** P 2, A.1 **, repeat from **-** 0-1 more time, P 2, A.2, P 2, A.1, P 1, K 2-2, P 1, K 3, P 1, K 11-11 *, repeat from *-* 1 more time, ie work all stitches on the round as explained above, at the same time work row 1 in each diagram. On next round (=2nd round, work the stitches K over K and P over P and work row 2 in diagrams). Happy knitting!
08.07.2019 - 10:52
![]() Nathalie Bourassa a écrit:
Nathalie Bourassa a écrit:
Bonjour, merci pour vos magnifiques patrons. Je réalise présentement le modèle 157-15 , j’ai montré le cou à 138 mailles maintenant je dois augmenter de 24 mailles ce qui donne une augmentation au 5,75 mailles. Alors j’augmente à la 5ième et 6ième ou seulement à la 6ième mailles? Merci beaucoup!
15.10.2018 - 00:56DROPS Design a répondu:
Bonjour Mme Bourrassa, augmentez après alternativement chaque 5ème et chaque 6ème m, mais veillez à bien vérifier votre nombre de mailles - voir aussi ici. Bon tricot!
15.10.2018 - 10:51
![]() Germana a écrit:
Germana a écrit:
Buonasera nelle spiegazioni degli intrecci mi manca 1 maglia .....dice trasferirire 3 m sul ferro ausiliario lavorare 3 m a dritto e 2 m dir dal ferro ausiliario .....ma le maglie in tutto non sono 6? Grazieeee
09.10.2018 - 21:00DROPS Design a répondu:
Buonasera Germana. Abbiamo corretto il testo. La ringraziamo per la segnalazione. Buon lavoro!
09.10.2018 - 21:05
![]() Amurtiger a écrit:
Amurtiger a écrit:
1 Kraus Rippe in Hin und Rückreihen = 2 Reihen rechts Fehler: 1 Reihe rechts
04.05.2017 - 17:32DROPS Design a répondu:
Lieber Frau Amurtiger, wenn mann 1 Kraus Rippe hin und zurück strickt, muss man 2 Reihe rechts stricken (1 Hinreiche rechts + 1 Rückreihe rechts). Viel Spaß beim stricken!
11.05.2017 - 14:30
![]() Eurydice a écrit:
Eurydice a écrit:
Please help, I am trying to do the poncho & when I do increases the pattern does not describe how to work the additional stitches that fall into the cable pattern. Am I just to do increases around the cable patterns so that it does not interfere with the cable pattern? Or do I work the increases into the cable pattern which will adjust the overall look of the garment? Please help. I am lost with this pattern as it does not provide much detail with the poncho.
01.02.2017 - 23:58DROPS Design a répondu:
Dear Eurydice, inc for poncho are worked on either side of (P1,K3,P1) worked a total of 4 times in the round as raglan lines, work the inc sts in stocking st, so that inc will be worked before or after cable patterns and will not interfere the patterns. Happy knitting!
02.02.2017 - 10:11
![]() Eurydice a écrit:
Eurydice a écrit:
I made the headband but it did not come out the same as it is pictured on your site. I would like to know if I am suppose to work charts A.1 and A.2 front and back from starting with row 1-8 for A.2 and 1-4 for A.1? If so, I am also to work chart A.1 repeatedly over chart A.2? Please help.
31.01.2017 - 21:03DROPS Design a répondu:
Dear Eurydice, when working the headband, you'll work the diagrams on same row, ie: K 2, P 1, A.1 (= 3 sts), P 2, A.2 (= 13 sts), P 2, A.1, P 1, K 2. When A.1 has been worked 1 time in height, repeat A.1 from row 1. When A.2 has been worked 1 time in height you have worked 2 repeats of A.1 in height. Happy knitting!
01.02.2017 - 09:24
![]() Eurydice a écrit:
Eurydice a écrit:
Also, for the poncho when doing the increases the pattern does not describe or detail how to work the additional stitches that fall into the cable pattern. Am I just to do increases around the cable patterns so that it does not interfere with the cable? Or do I work the increases into the cable pattern which will adjust the overall look of the garment? Please help. I am lost with this pattern as it does not provide much detail with the poncho.
31.01.2017 - 21:00DROPS Design a répondu:
Dear Eurydice, you are working ( P 1, K 3, P 1) a total of 4 times in the round (like raglan lines), and the inc have to be worked on either side of these sts: inc, P1,K3,P1, inc. Inc will not affect the cable patterns. Happy knitting!
01.02.2017 - 09:17
|
||||||||||||||||||||||
Cold Springs#coldspringsset |
||||||||||||||||||||||
|
|
||||||||||||||||||||||
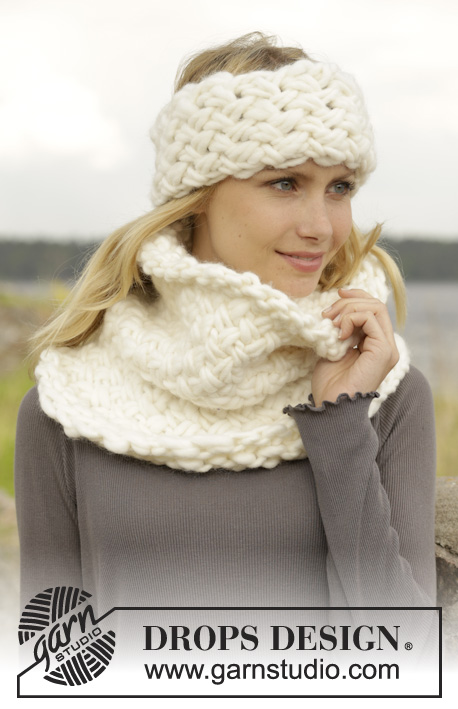
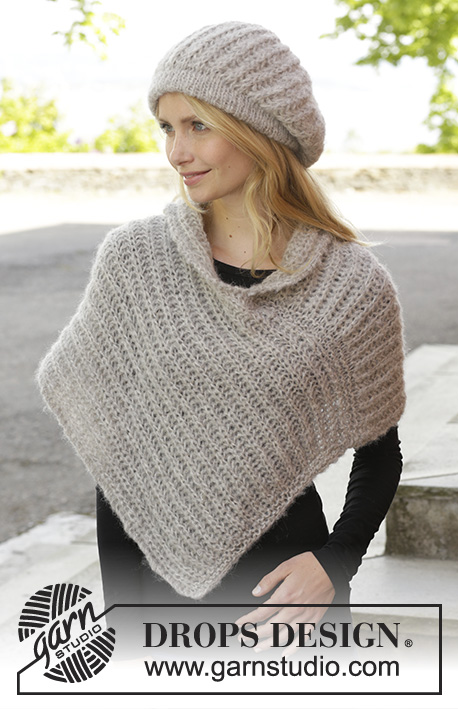
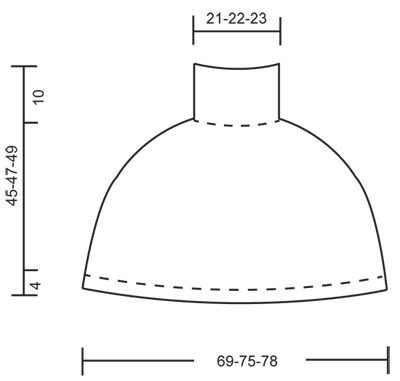
Poncho et bandeau DROPS avec torsades, tricoté de haut en bas (ʺ top down ʺ), en ”Alaska”. Du S au XXXL.
DROPS 157-15 |
||||||||||||||||||||||
|
POINT FANTAISIE : Voir les diagrammes A.1-A.2. Les diagrammes montrent tous les rangs du point fantaisie, vus sur l'endroit. POINT MOUSSE (en rond sur aiguille circulaire): Tricoter: *1 tour end, 1 tour env*, répéter de *-*. 1 côte mousse = 2 tours. POINT MOUSSE (en allers et retours): Tricoter tous les rangs à l'end. 1 côte mousse = 2 m rangs end. AUGMENTATIONS: Pour augmenter 1 m, faire 1 jeté. Au tour suivant, tricoter le jeté torse à l'end (c'est-à-dire piquer le brin arrière au lieu du brin avant) pour éviter les trous. ---------------------------------------------------------- PONCHO: Se tricote en rond sur aiguille circulaire, de haut en bas. Monter 132-138-144 m avec l'aiguille circulaire 4 en Alaska. Tricoter 1 tour end et continuer ensuite en côtes (3 m end/3 m env). À 10 cm de hauteur totale, tricoter 1 côte au POINT MOUSSE - voir ci-dessus, EN MÊME TEMPS, répartir 18-24-28 augmentations au 1er rang = 150-162-172 m. Continuer avec l'aiguille circulaire 5. PENSER À BIEN CONSERVER LA MÊME TENSION QUE POUR L'ÉCHANTILLON! Le tour commence maintenant sur un côté de l'ouvrage. Tricoter : *9-11-11 m end, 1 m env, 3 m end, 1 m env, 1-2-2 m end, 1 m env, A.1 (= 3 m), 2 m env, A.2 (= 13 m), **2 m env, A.1**, répéter de **-** encore 0-0-1 fois, 2 m env, A.2, 2 m env, A.1, 1 m env, 1-2-2 m end, 1 m env, 3 m end, 1 m env, 9-11-11 m end*, répéter de *-* encore 1 fois. EN MÊME TEMPS, augmenter de chaque côté de chaque section (1 m env, 3 m end, 1 m env) – VOIR AUGMENTATIONS = 8 m en plus. Tricoter les augmentations à l'end. Répéter ces augmentations 16-17-17 fois au total tous les 3 tours = 278-298-308 m. Continuer ainsi. À 41-43-45 cm de hauteur totale, continuer avec l'aiguille circulaire 4 et tricoter 1 côte mousse sur toutes les mailles, EN MÊME TEMPS, répartir 4-2-4 augmentations = 282-300-312 m. Continuer ensuite en côtes 3 m end/3 m env jusqu'à ce que l'ouvrage mesure 45-47-49 cm. Rabattre les mailles comme elles se présentent. ---------------------------------------------------------- BANDEAU: Se tricote en allers et retours. Monter 23 m avec les aiguilles 5 en Alaska. Tricoter 1 côte au POINT MOUSSE - voir ci-dessus, EN MÊME TEMPS, au dernier rang, répartir 6 augmentations = 29 m. Continuer ensuite ainsi sur l'endroit: 2 m end, 1 m env, A.1 (= 3 m), 2 m env, A.2 (= 13 m), 2 m env, A.1, 1 m env, 2 m end. Continuer en point fantaisie ainsi. PENSER À BIEN CONSERVER LA MÊME TENSION QUE POUR L'ÉCHANTILLON! À 47 cm de hauteur totale, tricoter 1 côte mousse sur toutes les mailles, EN MÊME TEMPS, au 1er rang, répartir 6 diminutions = 23 m. Rabattre. Coudre le bandeau au milieu dos. |
||||||||||||||||||||||
Légende diagramme(s) |
||||||||||||||||||||||
|
||||||||||||||||||||||
 |
||||||||||||||||||||||
 |
||||||||||||||||||||||
Vous avez terminé ce modèle?Alors taguez vos photos avec #dropspattern #coldspringsset ou bien présentez-les dans la galerie #dropsfan Vous avez besoin d'aide pour ce modèle ?Vous trouverez 16 tutoriels vidéo, une rubrique commentaires/questions et plus encore en vous rendant sur la page du modèle sur garnstudio.com © 1982-2026 DROPS Design A/S. Tous droits réservés. Ce document, y compris ces sous-sections, est protégé par les droits d'auteur (copyright). Apprenez-en davantage sur ce que vous pouvez faire avec nos modèles en bas de chacune des pages de notre site. |
||||||||||||||||||||||


Avec plus de 40 ans dans la conception de modèles tricot et crochet, DROPS Design offre l'une des plus vastes collections de modèles gratuits sur internet - traduits dans 17 langues. À ce jour, on compte 324 catalogues et 12290 modèles en français.
Nous nous efforçons de vous apporter le meilleur de ce que le tricot et le crochet peuvent vous offrir, inspiration et conseils mais également des fils de haute qualité à des prix incroyables! Vous souhaiteriez utiliser nos modèles autrement que pour un usage personnel? Vous pouvez lire ce que vous êtes autorisés à faire dans le Copyright en bas de page de chacun de nos modèles. Bon tricot!
Poster un commentaire sur le modèle DROPS 157-15
Nous aimerions connaître votre avis sur ce modèle !
Si vous souhaitez poser une question, merci de bien vouloir vérifier que vous avez choisi la bonne catégorie dans le formulaire ci-dessous afin d'accélérer la réponse. Les champs obligatoires sont indiqués par une *.