
Catégories populaires
Vous cherchez un fil?


Commentaires / Questions (68)
![]() Darlene a écrit:
Darlene a écrit:
I Have never knitted a pattern that is so confusing it it knitted on round needles or on 2 double needles please help if you can.
16.09.2014 - 19:49DROPS Design a répondu:
Dear Darlene, you start working leg in the round on double pointed needle, then work the top of foot back and forth, pick up sts each side of the middle upper foot and continue in the round over all sts dec for shaping. The edge around the leg is then worked back and forth and sew to the leg. Happy knitting!
17.09.2014 - 08:57
![]() Andrea a écrit:
Andrea a écrit:
A great pattern. Quick and easy to knit, comfy and cozy to wear. Would definitely make again.
14.09.2014 - 03:45
![]() Helene a écrit:
Helene a écrit:
Just the ticket for warm toes on a frosty winter's night! I would sew a leather sole onto the bottom of the slipper for durability.
04.07.2014 - 22:35
![]() Tordis Skurdal a écrit:
Tordis Skurdal a écrit:
Ser tøffe ut, og varmer godt oppover leggen
25.06.2014 - 22:15
![]() Isabel Campos a écrit:
Isabel Campos a écrit:
Fantásticas para andar em casa
21.06.2014 - 21:12
![]() Martina Herold a écrit:
Martina Herold a écrit:
Möchte ich auf jeden Fall im Winter nicht vermissen !!!
15.06.2014 - 21:04Amalia Briceño a écrit:
Las quiero tejer para mis 5 hijas y 7 nietas
15.06.2014 - 16:52
![]() Fatemeh a écrit:
Fatemeh a écrit:
Varm og god, for kalde vinter dager
05.06.2014 - 13:41
|
|||||||
One Step Ahead#onestepaheadslippers |
|||||||
 |
 |
||||||
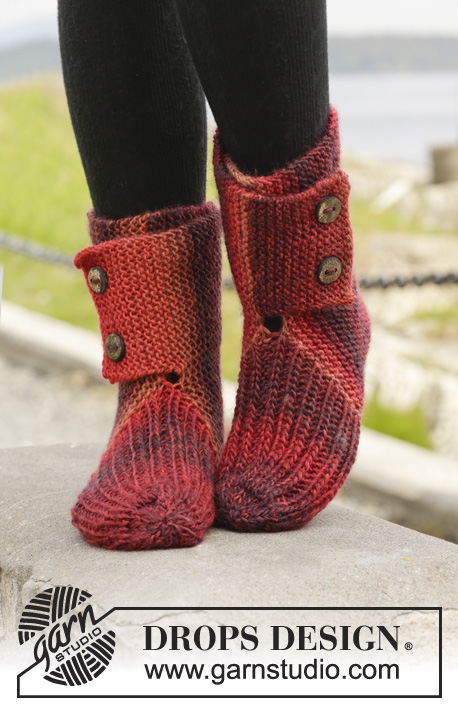
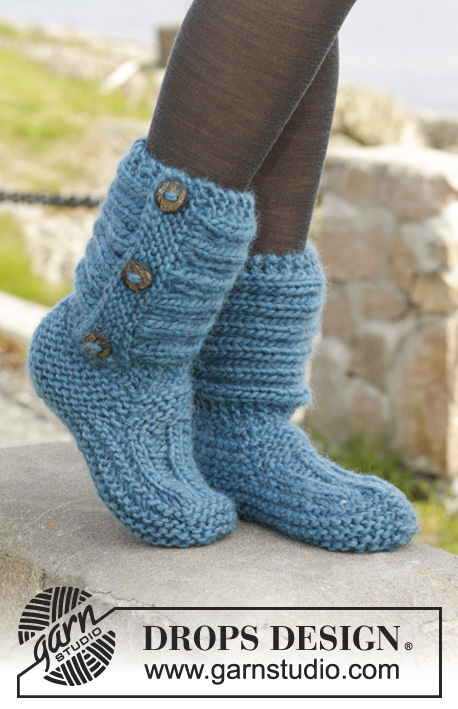
Chaussons DROPS au point mousse avec côtes, en "Andes".
DROPS 158-47 |
|||||||
|
POINT MOUSSE (en rond sur aiguilles doubles pointes): Tricoter: *1 tour end, 1 tour env*, répéter de *-*. 1 côte mousse = 2 tours. POINT MOUSSE (en allers et retours): Tricoter tous les rangs à l'endroit. 1 côte mousse = 2 rangs end. POINT FANTAISIE: Voir diagramme A.1. POINT FANTAISIE 2: Rang 1 (= sur l'endroit): *2 m end, 2 m env*, répéter de *-* jusqu'à ce qu'il reste 2 m, 2 m end. Rang 2 (= sur l'envers): Tricoter les m end à l'end et les m env à l'env. Répéter le rang 2 ---------------------------------------------------------- CHAUSSONS: Tricoter d'abord une bordure en bas de la jambe, puis le pied. Terminer par la bordure autour de la jambe. JAMBE: Monter 37-37-39 m avec les aiguilles doubles pointes 6 en Andes. Tricoter au POINT MOUSSE en rond - voir ci-dessus - jusqu'à ce que l'ouvrage mesure environ 4 cm, terminer après 1 tour env. PENSER À BIEN CONSERVER LA MÊME TENSION QUE POUR L'ÉCHANTILLON! PIED: Continuer en allers et retours. Garder maintenant sur l'aiguille les 10 premières m sur les aiguilles, glisser les 27-27-29 m restantes sur un arrêt de mailles. Tricoter maintenant les 10 m de la partie centrale en POINT FANTAISIE 2 – voir ci-dessus – EN MÊME TEMPS, à la fin des 2 rangs suivants monter 1 m lis (tricoter les m lis au POINT MOUSSE - voir ci-dessus) = 12 m. Quand la partie centrale mesure 7-8½-10 cm, diminuer 1 m lis de chaque côté = 10 m. Reprendre ensuite les mailles en attente et relever 12-14-16 m de chaque côté de la partie centrale (à 1 m des bords) = 61-65-71 m. MESURER MAINTENANT À PARTIR D'ICI! Placer 1 marqueur au milieu des 10 m de la partie centrale (= au niveau devant, côté pointe du pied) et 1 autre marqueur dans la maille au dos du talon, on a 30-32-35 m entre les marqueurs de chaque côté. Continuer maintenant en rond, au point mousse. À 2 cm, tricoter tous les 2 tours 2 m ens à l'end de chaque côté de chaque marqueur (= 4 m en moins par tour). Continuer ces diminutions jusqu'à ce que l'ouvrage mesure 5-5-6 cm. Rabattre les mailles restantes. Faire la couture sous le pied dans le brin le plus à l'extérieur des mailles pour éviter une couture trop épaisse. BORDURE AUTOUR DE LA JAMBE: Se tricote en allers et retours. Monter 22 m avec les aiguilles 6 en Andes. Tricoter 4 côtes mousse, EN MÊME TEMPS, au dernier rang, répartir 6 augmentations = 28 m. Tricoter en suivant A.1 (= 28 m) jusqu'à ce que l'ouvrage mesure environ 35-36-38 cm. Tricoter ensuite 4 côtes mousse, EN MÊME TEMPS, au 1er rang, répartir 6 diminutions = 22 m. Rabattre. Placer les mailles rabattues au-dessus des mailles montées, et coudre 3 boutons dans les côtes mousse de la bordure. ASSEMBLAGE Coudre la bordure de la jambe au rang de montage de la jambe (c'est-à-dire les mailles montées pour la jambe, au début des explications). Placer la bordure de sorte que les boutons soient placés sur l'extérieur, l'ouverture vers l'arrière, côté talon – coudre sur l'envers pour que la couture soit invisible. Tricoter un autre chausson identique, veiller à ce que l'ouverture de la bordure soit bien de l'autre côté. |
|||||||
Légende diagramme(s) |
|||||||
|
|||||||
 |
|||||||
Vous avez terminé ce modèle?Alors taguez vos photos avec #dropspattern #onestepaheadslippers ou bien présentez-les dans la galerie #dropsfan Vous avez besoin d'aide pour ce modèle ?Vous trouverez 18 tutoriels vidéo, une rubrique commentaires/questions et plus encore en vous rendant sur la page du modèle sur garnstudio.com © 1982-2026 DROPS Design A/S. Tous droits réservés. Ce document, y compris ces sous-sections, est protégé par les droits d'auteur (copyright). Apprenez-en davantage sur ce que vous pouvez faire avec nos modèles en bas de chacune des pages de notre site. |
|||||||


Avec plus de 40 ans dans la conception de modèles tricot et crochet, DROPS Design offre l'une des plus vastes collections de modèles gratuits sur internet - traduits dans 17 langues. À ce jour, on compte 324 catalogues et 12290 modèles en français.
Nous nous efforçons de vous apporter le meilleur de ce que le tricot et le crochet peuvent vous offrir, inspiration et conseils mais également des fils de haute qualité à des prix incroyables! Vous souhaiteriez utiliser nos modèles autrement que pour un usage personnel? Vous pouvez lire ce que vous êtes autorisés à faire dans le Copyright en bas de page de chacun de nos modèles. Bon tricot!
Poster un commentaire sur le modèle DROPS 158-47
Nous aimerions connaître votre avis sur ce modèle !
Si vous souhaitez poser une question, merci de bien vouloir vérifier que vous avez choisi la bonne catégorie dans le formulaire ci-dessous afin d'accélérer la réponse. Les champs obligatoires sont indiqués par une *.