
Catégories populaires
Vous cherchez un fil?


Commentaires / Questions (15)
![]() Gabriella a écrit:
Gabriella a écrit:
Buonasera, voglio realizzare lo scialle Himalaya con lana Snow (previsti g. 200 di lana) ma per sbaglio ne ho acquistata g. 250; sapreste dirmi di quanto posso allungare lo scialle se uso g. 250 di Snow ? (il vostro modello prevede larghezza in alto circa 150 cm) Grazie. Cordiali saluti Gabriella
02.12.2022 - 18:51DROPS Design a répondu:
Buonasera Gabriella, per un'assistenza così personalizzata può rivolgersi al suo rivenditore DROPS di fiducia. Buon lavoro!
03.12.2022 - 16:17
![]() Sonca a écrit:
Sonca a écrit:
I don't understand the instructions for this hat. It states that the earlaps are worked with 2 thread of white then finish with 1 thread. Does this mean you are knitting both earlaps are the same time? Can you use circular needles to make the earlaps?
19.10.2022 - 03:11DROPS Design a répondu:
Hi Sonca, The ear flaps are worked with 2 strands to make them warmer, as is the first ridge on the hat itself. Each ear flap is worked back and forth separately to begin with, then they are placed on the same circular needle, stitches are cast on for the rest of the hat, which is continued first back and forth from mid-back then finished in the round. Happy knitting!
19.10.2022 - 06:55
![]() Nicoletta a écrit:
Nicoletta a écrit:
Buonasera, non riesco a capire come fare i paraorecchie. Il gettato per l'aumento va fatto prima di iniziare il giro dopo il primo ferro una volta avviate le maglie? Non riesco proprio a fare il 2. a specchio. Quando inizio gli aumenti? Sempre prima del 2. ferro? In questo modo però non mi trovo col dritto del lavoro. Infine i 6 punti da avviare fra i paraorecchie vanno avviati attaccati a uno dei paraorecchie o separati? Vi ringrazio per la pazienza
02.09.2021 - 23:16DROPS Design a répondu:
Buonasera, gli aumenti iniziano dopo il promo giro e deve lavorare 1 gettato a entrambi i lati: inoltre, sul 1° paraorecchie deve avviare le maglie alla fine di un ferro dal diritto del lavoro, verso il dietro; per il secondo paraorecchie deve avviare le maglie alla fine di un ferro dal rovescio del lavoro e aumentare verso il centro davanti all'inizio di un ferro dal diritto del lavoro invece di un ferro dal rovescio del lavoro. Buon lavoro!
04.09.2021 - 21:15
![]() Estela a écrit:
Estela a écrit:
Solamente puedo tejer la orejera de la que explica el patron. Como podria tejer la otra orejera de lado contrario. Me podrian explicar porfavor. O hacer un tutorial porfavor. Gracias
30.11.2019 - 02:36DROPS Design a répondu:
Hola Estela. Los dos orejeras se trabajan antes de empezar el gorro. Cuando se termina la primera orejera, dejar la labor en espera y empezar la otra orejera, pero trabajando los aumentos a la inversa. Lee atentamente el patrón.
30.11.2019 - 19:13
![]() Lindsay a écrit:
Lindsay a écrit:
Hello, how do I connect the ear pieces? Do the ear pieces gonnext to each other with the 16 new cast ons next, where the forehead will be? I was confused why the pattern kept referring to start mid back. Thank you!
23.11.2017 - 03:00DROPS Design a répondu:
Dear Lindsay, mid back will be the side of ear flaps where you cast on 5 sts on each ear flap - when joining both ear pieces together, start on mid back on 1st ear flap (sts on needle = the 5 sts cast on are at the beg of this row), then cast on 16 sts between both pieces for front piece and work 2nd ear flap (sts put aside, the 5 sts are at the end of piece). Happy knitting!
23.11.2017 - 08:38
![]() Valerie a écrit:
Valerie a écrit:
After further review of the shawl pattern, it appears that on the edge, I should slip the first stitch (as if to knit, I'm assuming...it doesn't specify) and then YO. Is that a correct interpretation of that first tip and instruction? Thank you, again!
19.01.2016 - 14:31DROPS Design a répondu:
Dear Valerie, that's correct - happy knitting!
19.01.2016 - 16:36
![]() Valerie a écrit:
Valerie a écrit:
Your shawl pattern states: "inc 1 st at beg of every row from RS - inc by working 1 YO inside 1 edge st" - does this mean "create a yo at the first edge stitch on the RS"? Meaning, to me, on the RS, knit the first stitch, then YO. Correct? Then, on the next row (WS) P YO the YO that was created on the previous row. Thank you!
19.01.2016 - 11:50DROPS Design a répondu:
Dear Valerie, that's right: you inc at the beg of every row from RS= 1 edge st, 1 YO, etc and on next row from WS work the YO into back of loop to avoid hole. Happy knitting!
19.01.2016 - 16:33
![]() Katy a écrit:
Katy a écrit:
Hello, thank you for your help. I still don't understand. I know it has to be cast on towards the back but how do I do that if my working yarn is on the other side. I would have to add a row and after that the ear flap is going to be longer than the first one. I was hoping that you could give me row by row instructions.
12.01.2016 - 17:18DROPS Design a répondu:
Dear Katy, work reversed will mean you will make on the opposite side what you made on one side for the firt piece. For 1st earfla, you cast on sts at the end of row from RS -towards back) for 2nd piece, you will cast on sts at the end of row from WS. So that both pieces will be reversed. Happy knitting!
13.01.2016 - 10:30
![]() Katy a écrit:
Katy a écrit:
Hello, Could you please give me a full instruction for making a second (reversed) ear flap? Thank you!
12.01.2016 - 01:35DROPS Design a répondu:
Dear Katy, to work the 2nd earflap reversed, cast on the sts towards back piece at the end of a row from WS (instead of at the end of a row from RS for 1st earflap), and inc towards mid front at the beg of a row from RS instead of at the beg of a row from WS. Happy knitting!
12.01.2016 - 10:02
![]() Alessandro a écrit:
Alessandro a écrit:
Buongiorno, ho bisogno di un chiarimento per gli aumenti a lavoro iniziato nel cappello. Date indicazione di un video per gli aumenti a lavoro iniziato, in cui illustrate due tecniche..La prima mi sembra non adatta perché fa un bordo molto morbido, la seconda tecnica non riesco ad applicarla perché ho il filo dalla parte opposta del lavoro...come consigliate di fare? grazie
27.02.2015 - 18:24DROPS Design a répondu:
Buongiorno Alessandro. La seconda tecnica presentata può essere usata per aumentare le m sia sul rovescio che sul diritto del lavoro. Le m vanno aumentate all'inizio del ferro. Ci riscriva se non abbiamo capito correttamente la sua domanda. Buon lavoro!
28.02.2015 - 23:07
|
|||||||
Himalaya#himalayaset |
|||||||
 |
 |
||||||
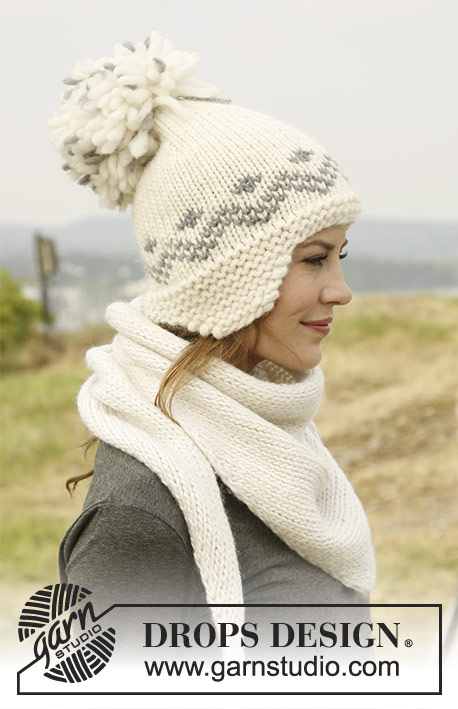
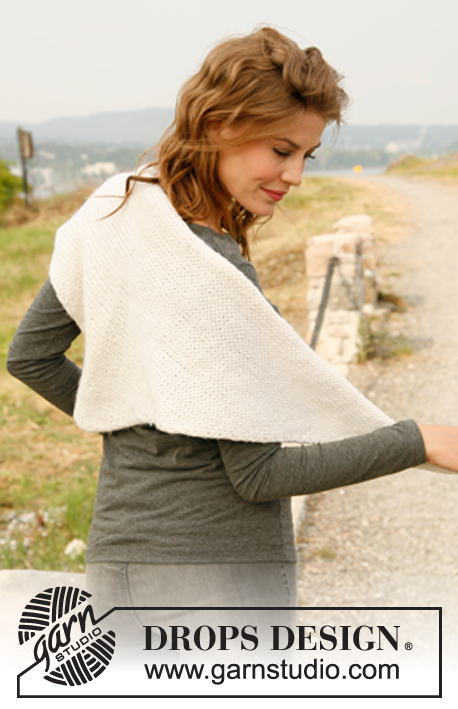
Bonnet DROPS avec cache-oreilles, et châle en ”Snow”.
DROPS 131-21 |
|||||||
|
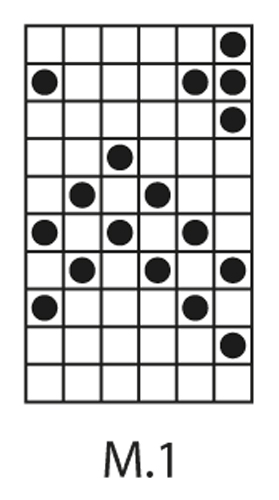
POINT MOUSSE (en allers et retours) : Tricoter tous les rangs à l'endroit. AUGMENTATIONS pour le bonnet : Augmenter en faisant 1 jeté, au rang suivant tricoter les jetés torse à l'end (c'est-à-dire tricoter le brin arrière au lieu du brin avant) pour éviter les trous. ASTUCE TRICOT pour le châle : Pour que la bordure soit plus joli, glisser la 1ère m au début de chaque rang. -------------------------------------------------------- -------------------------------------------------------- BONNET : Les cache-oreilles et les premiers rangs au point mousse du bonnet se tricotent avec 2 fils écru, puis on continue avec 1 seul fil. Monter 7 m avec les aiguilles 8 et 2 fils Snow. Tricoter au point mousse - en même temps après 1 rang, augmenter 3 fois 1 m de chaque côté tous les 2 rangs – voir augmentations = 13 m. Au rang suivant, monter 5 m côté milieu dos = 18 m. Tricoter 1 rang end sur toutes les mailles jusqu'à ce qu'il reste 1 m (côté milieu devant), et augmenter ensuite 1 m en faisant 1 jeté avant la dernière m = 19 m. Tricoter 1 rang end. Mettre en attente. Tricoter l'autre cache-oreille en sens inverse c'est-à-dire : veiller à bien faire les augmentations du bon côté pour le devant et le dos. Reprendre les cache-oreilles sur la même aiguille – commencer au milieu dos et monter 16 m entre les 2 cache-oreilles pour le devant de la tête = 54 m. Tricoter ensuite en allers retours à partir du milieu dos. Tricoter 4 rangs au point mousse sur toutes les mailles. Continuer avec les aiguilles doubles pointes 8 et terminer le bonnet en rond à partir du milieu dos avec 1 seul fil. Tricoter en suivant le diagramme M.1 et terminer ensuite en jersey écru. NE PAS OUBLIER DE BIEN CONSERVER LA MÊME TENSION QUE POUR L'ÉCHANTILLON ! À 16 cm de hauteur totale - mesurer au milieu devant – tricoter le tour suivant :*2 m ens à l'end, 7 m end*, répéter de *-*. Tricoter 1 tour end. Tricoter ensuite le tour suivant ainsi : *2 m ens à l'end, 6 m end*, répéter de *-*. Continuer à diminuer ainsi tous les 2 tours avec 1 m en moins entre chaque diminution jusqu'à ce qu'il reste 9 m. Le bonnet mesure environ 26 cm à partir du milieu devant. Couper le fil et le passer dans les mailles restantes, serrer et arrêter. Coudre la bordure au point mousse au milieu dos dans le brin avant des mailles les plus à l'extérieur pour que la couture soit invisible. Confectionner un grand pompon écru avec un peu de gris moyen et le coudre au sommet du bonnet. CHÂLE : Monter 3 m avec les aiguilles 8 et 1 fil Snow. Voir ASTUCE TRICOT. Tricoter en jersey en même temps, augmenter 1 m au début de chaque rang sur l'endroit – augmenter en faisant 1 jeté à 1 m lis du bord, au rang suivant, tricoter le jeté torse à l'env pour éviter les trous (c'est-à-dire tricoter le brin arrière au lieu du brin avant). NE PAS OUBLIER DE BIEN CONSERVER LA MÊME TENSION QUE POUR L'ÉCHANTILLON ! À 75 cm de hauteur totale, on a tricoté la moitié du châle. Tricoter 2 rangs sans augmenter. Diminuer ensuite du même côté que les augmentations précédentes en tricotant les 3 premières mailles ainsi : 1 m lis, glisser 1 m à l'end, 1 m end, passer la m glissée par-dessus la m tricotée. Continuer et diminuer ainsi tous les rangs sur l'endroit jusqu'à ce qu'il reste 3 m - l'ouvrage mesure environ 150 cm. Rabattre. |
|||||||
Légende diagramme(s) |
|||||||
|
|||||||
 |
|||||||
Vous avez terminé ce modèle?Alors taguez vos photos avec #dropspattern #himalayaset ou bien présentez-les dans la galerie #dropsfan Vous avez besoin d'aide pour ce modèle ?Vous trouverez 14 tutoriels vidéo, une rubrique commentaires/questions et plus encore en vous rendant sur la page du modèle sur garnstudio.com © 1982-2026 DROPS Design A/S. Tous droits réservés. Ce document, y compris ces sous-sections, est protégé par les droits d'auteur (copyright). Apprenez-en davantage sur ce que vous pouvez faire avec nos modèles en bas de chacune des pages de notre site. |
|||||||


Avec plus de 40 ans dans la conception de modèles tricot et crochet, DROPS Design offre l'une des plus vastes collections de modèles gratuits sur internet - traduits dans 17 langues. À ce jour, on compte 324 catalogues et 12290 modèles en français.
Nous nous efforçons de vous apporter le meilleur de ce que le tricot et le crochet peuvent vous offrir, inspiration et conseils mais également des fils de haute qualité à des prix incroyables! Vous souhaiteriez utiliser nos modèles autrement que pour un usage personnel? Vous pouvez lire ce que vous êtes autorisés à faire dans le Copyright en bas de page de chacun de nos modèles. Bon tricot!
Poster un commentaire sur le modèle DROPS 131-21
Nous aimerions connaître votre avis sur ce modèle !
Si vous souhaitez poser une question, merci de bien vouloir vérifier que vous avez choisi la bonne catégorie dans le formulaire ci-dessous afin d'accélérer la réponse. Les champs obligatoires sont indiqués par une *.