
Catégories populaires
Vous cherchez un fil?


Commentaires / Questions (40)
![]() Nicolle a écrit:
Nicolle a écrit:
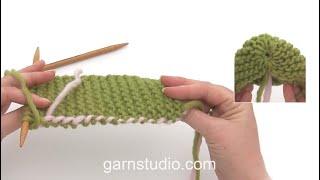
Hi, I was wondering how to do kitchener stitches according to the video tutorial that uses two rows both on knitting needles, when in my knitting the first original row is already off the needle? Then i am left with two pieces, one on the needle (the last row) and the one off the needle (first row) to graft together. Or is there another way of doing it? Thanks in advance, Nicolle
29.08.2024 - 10:01DROPS Design a répondu:
Dear Nicolle, you have to make a mix of 2 techniques: grafting for the stitches on needle on one side and this technique for the stitches of the cast on edge. Happy knitting!
30.08.2024 - 07:46
![]() Moira a écrit:
Moira a écrit:
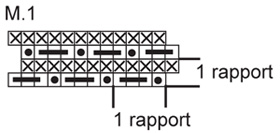
Hello, could you please help me understand the set of 16 stitches for M1. It says to knit on wrong side in the chart oh, but I don't understand that because I'm still on the right side? Could you please advise right from the start? (After cast on) Continue as follows from RS: 52-58-64 garter sts, 16-16-20 sts in M.1. Insert a marker after st no 42-48-54 from RS. Thank you, I LOVE Drops!
02.03.2021 - 17:07DROPS Design a répondu:
Dear Moira, on first row you are working from right side of sock: 52-58-64 sts in garter stitch, and 16 or 20 sts as shown in M.1,: *Work 3 sts in first st (= P1, YO, P1), P3 sts, psso 1st st then 2nd st over last st = 1 st remain*, repeat from *to* a total of 8 or 10 times. From WS knit all stitches (= the 16-20 sts of M.1) and the remaining sts (garter stitch). On next row from RS work 3rd row in M.1 over the last 16-20 sts: *P3 sts, psso 1st st then 2nd st over last st , (P1, YO, P1) in next st* repeat from *-* and knit remaining sts. Hope this will help, happy knitting!
03.03.2021 - 06:52
![]() Nicole a écrit:
Nicole a écrit:
Ich habe Probleme mit M1. Die erste Reihe habe ich gestrickt, wie angegeben von der Vorderseite. Die nächste Reihe ( also die Rückreihe) zeigt laut Diagramm (x im Kästchen) "re. Von der Vorderseite ". Mir ist unklar, wie ich diese Maschen stricken soll, weil ich mich doch auf der Rückseite befinde.
18.01.2021 - 15:20DROPS Design a répondu:
Liebe Nicole, hier sollte es "recht bei den Rückreihen" sein, eine Korrektur erfolt so bald wie möglich. D.h. bei den Rückreihen (= Rückseite) stricken Sie alle Maschen in A.1 rechts. Viel Spaß beim stricken!
18.01.2021 - 15:27
![]() Diana a écrit:
Diana a écrit:
I have done a lot of patterns but l just can't figure it out. Is there a way you can explain the first paragraph a different or other way? I love the slippers and would like to make them. Thank you for any help.
16.10.2019 - 18:07DROPS Design a répondu:
Dear Diana, work 4 rows with: 52-58-64 sts garter st, 16-16-20 sts as in M.1, on 5th row (= from RS), start decrease on each side of the marker for the heel. At the same time, you will work short rows for toe: every 4th row (= every other row from WS), work until 8-10-12 sts in garter st remain and turn (= short rows). Hope it helps, happy knitting!
17.10.2019 - 09:51
![]() Odeth a écrit:
Odeth a écrit:
El patrón no lo veo claro en la parte del talón gracias
21.09.2019 - 04:39DROPS Design a répondu:
Hola Odeth. El talón lo formamos trabajando disminuciones (2 puntos juntos de derecho a cada lado del marcapuntos) un total de 10 veces.
17.10.2019 - 19:45
![]() Lyly a écrit:
Lyly a écrit:
Je ne comprends pas les explications concernant les rangs raccourcis de la pointe : au 6e rg, sur l\\\'env du travail, on ne tricote pas les 8 dernières mailles pour la taille S ? Combien de fois doit-on laisser ces mailles en attente ? Je ne comprends absolument pas comment faire la pointe du chausson.les rgs raccourcis se font sur l\\\'endroit ou l\\\'envers du travail ?
08.04.2019 - 23:30DROPS Design a répondu:
Bonjour Lyly, les rangs raccourcis pour la pointe vont se tricoter en commençant sur l'envers: tricotez le rang jusqu'à ce qu'il reste 8 m (= pointe), tournez et tricotez le rang suivant sur l'endroit (diminuez sur l'endroit si besoin), tournez et tricotez le rang suivant sur toutes les mailles, tournez et tricotez le rang suivant sur toutes les mailles - n'oubliez pas les diminutions si besoin - continuez ainsi, les 8 m de la fin du rang ne sont simplement plus travaillées = rangs raccourcis; cf vidéo. Bon tricot!
09.04.2019 - 09:24
![]() Emmah a écrit:
Emmah a écrit:
Min socka har väldigt dålig passform (stor) från hälen och hela vägen upp på skaftet. Resten av socken sitter perfekt. Vad har jag gjort för fel?
26.12.2018 - 17:35DROPS Design a répondu:
hei Emmah. Denne modellen er en del løsere rundt ankelen enn tradisjonelle sokker, du kan se det på bildet også om du ser etter. Så den skal være sånn. Om du gjerne vil ha den strammere kan du feks prøve å feste et bånd som du kan knyte rundt ankelen? God fornøyelse.
08.01.2019 - 14:44Erica a écrit:
I\'m stuck again 😞 I\'m doing the middle size. Continue until piece measures 15cm. I\'ve done that but no idea how to do the next paragraph: work 38 garter st and 16 sts of m1 and increase for heel. I don\'t know which sue is the heel! I have 44sts of pattern and a separate 10sts of garter stitch for the toe...
13.12.2018 - 13:38DROPS Design a répondu:
Dear Erica, when piece measures 15 cm from the last dec, work now: the first 38 sts seen from RS in garter st and the last 16 sts in M.1, now increase for heel on each side of the marker placed in the 38th st from RS. Happy knitting!
13.12.2018 - 14:40Erica a écrit:
Im confused about how to p into same stitch. Pattern = p1, yo, p1 all in same stitch but my sts are decreasing. I did p1, yo and then I slipped the yo onto other needle and purled that. Where am I going wrong?!
07.12.2018 - 11:39DROPS Design a répondu:
Dear Erica, y ou have to work the same stitch a total of 3 times, purl next stitch on the left needle without dropping this off the needle, make a YO on right needle, then purl the same stitch on left needle one more time and drop it from left needle = you should have now 3 sts on the right needle. The next 3 sts will be purled together = the number of stitches keep constant. Happy knitting!
07.12.2018 - 11:59
![]() Dufour Arlette a écrit:
Dufour Arlette a écrit:
Je reviens vers vous, je vous ai posée une question hier je tenais a vous dire qu'après avoir fait et refait j'ai trouvée ,je vous remercie Mme Dufour
27.09.2018 - 08:22
|
||||||||||
Cotton Patch#cottonpatchsocks |
||||||||||
 |
 |
|||||||||
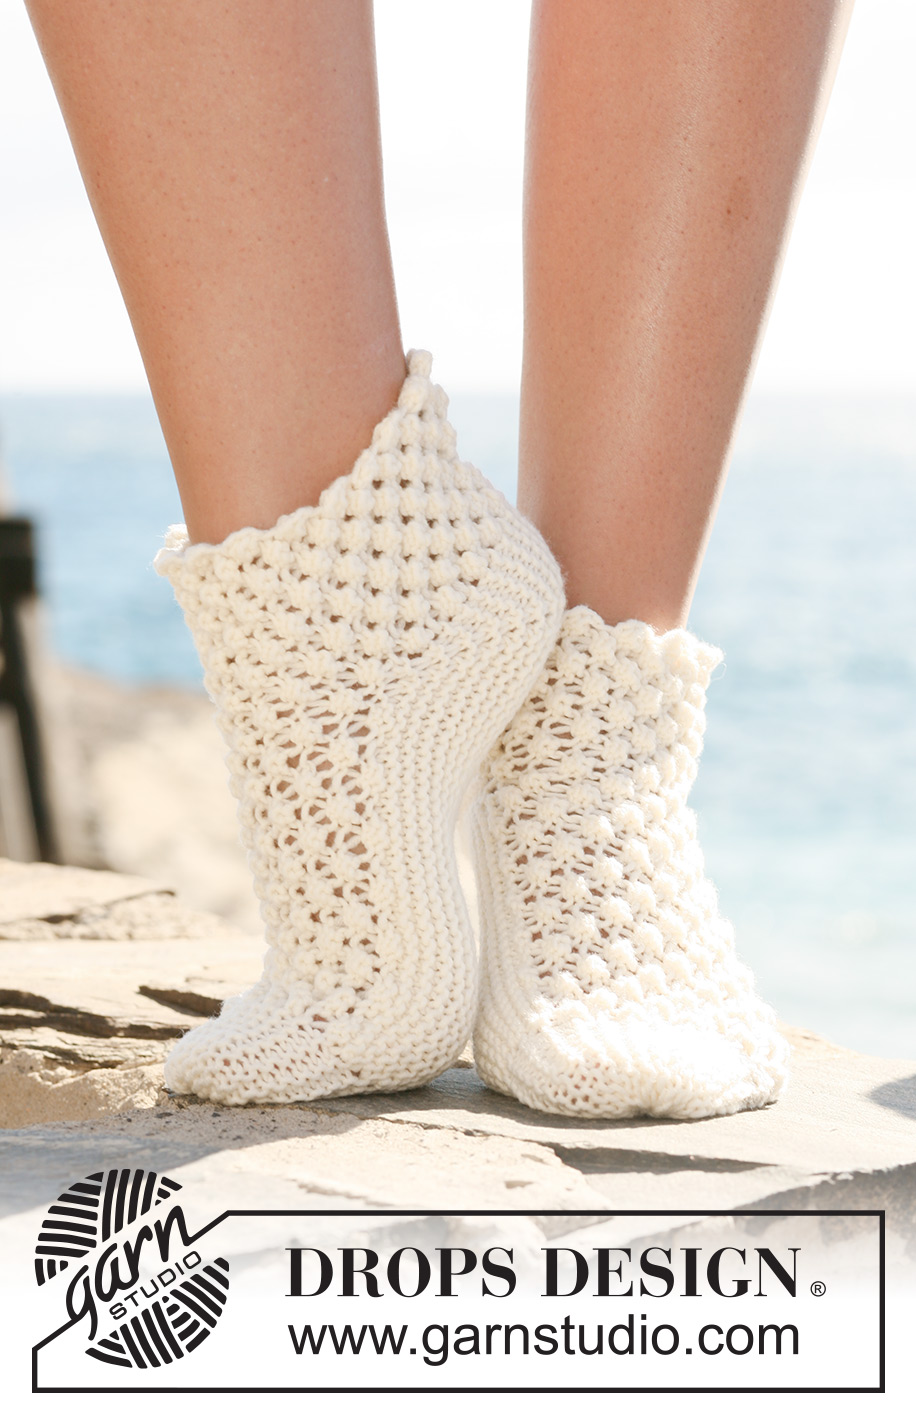
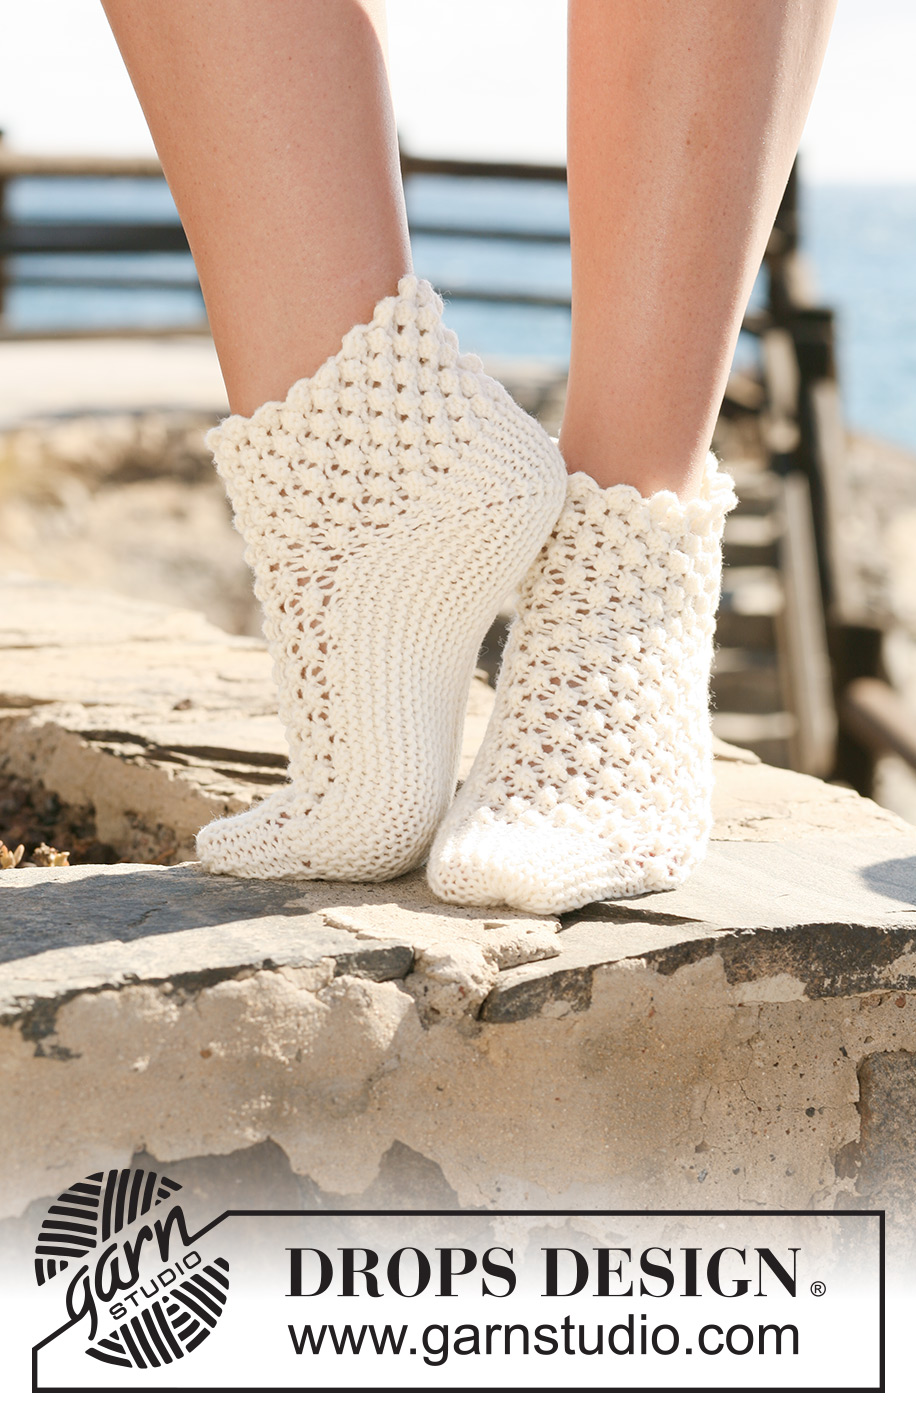
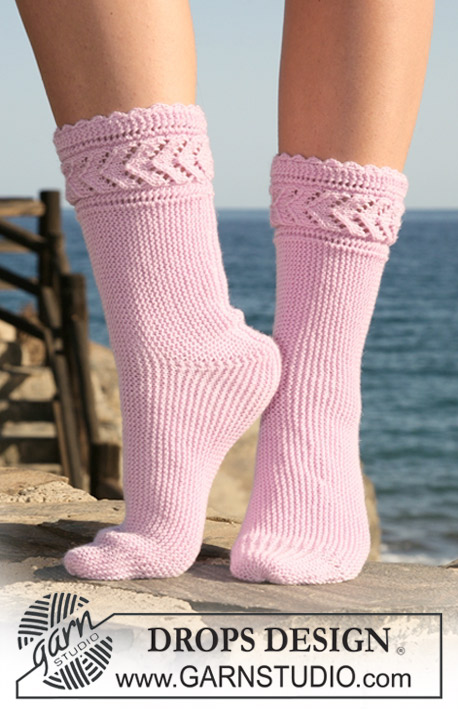
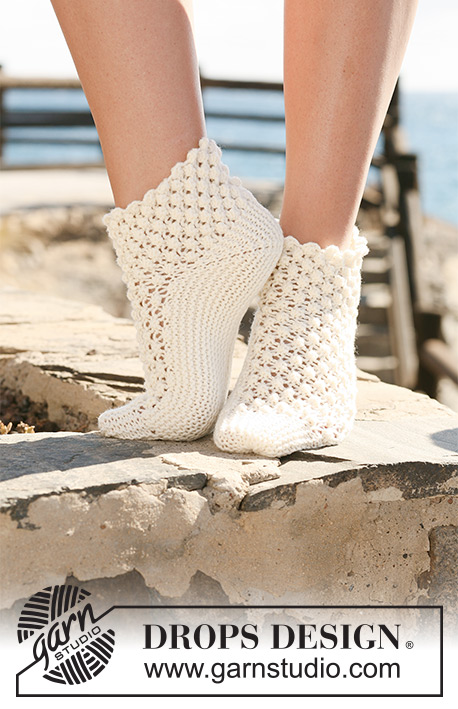
Chaussettes DROPS tricotées dans le sens de la longueur au point d'astrakan en "Merino Extra Fine".
DROPS 119-32 |
||||||||||
|
POINT MOUSSE (en allers retours) : Tricoter tous les rangs à l'endroit ASTUCE TRICOT : Quand on tourne l'ouvrage en cours de rang, glisser la 1ère m à l'end, serrer le fil et tricoter le rang suivant (pour éviter un trou à la transition). POINT FANTAISIE : Voir diagramme M1. Le diagramme montre le motif sur l'endroit. 1er rang = endroit. ASTUCE ASSEMBLAGE : Insérer un fil dans les brins les plus à l'extérieur des mailles côté pointe et laisser ce fil suivre l'ouvrage, il servira ensuite à resserrer la pointe. ----------------------------------------------------------- CHAUSSETTES : Se tricotent en allers retours, à partir du milieu sous le pied, on tricote ensuite le dessus du pied pour terminer au milieu sous le pied. Quand on fait les diminutions et les augmentations du talon, tricoter également en rangs raccourcis sur les mailles de la pointe ainsi : tous les 2 rangs côté pointe (soit tous les 4 rangs) tourner quand il reste 8-10-12 m et tricoter le rang suivant – voir ASTUCE TRICOT ! La pointe se trouve en début de rang sur l'endroit. PENSER À BIEN CONSERVER LA MÊME TENSION QUE POUR L'ÉCHANTILLON ! Avec le fil Merino et les aiguilles 4 monter 68-74-84 m. Continuer ainsi sur l'endroit : 52-58-64 m point mousse, 16-16-20 m de M1. Placer un marqueur après la 42-48-54 ème m sur l'endroit. Continuer en point fantaisie ainsi, EN MÊME TEMPS, au 5ème rang, diminuer pour le talon ainsi (ne pas oublier les rangs raccourcis côté pointe) : 2 m ens à l'end des 2 côtés du marqueur 10 fois au total tous les 2 rangs = 48-54-64 m. Continuer ensuite ainsi sur l'endroit (ne pas tricoter les rangs raccourcis côté pointe) : 8-10-12 m point mousse (= pointe), M1 sur les mailles restantes. Continuer ainsi jusqu'à 13-15-17 cm de hauteur après la dernière diminution – NOTE : mesurer au milieu au dessus des diminutions. Tricoter ensuite 32-38-44 m point mousse et 16-16-20 m de M1. Augmenter ensuite pour le talon (et les rangs raccourcis côté pointe) : placer un marqueur dans la 32-38-44 ème m sur l'endroit. Augmenter 1 m des 2 côtés du marqueur 10 fois au total tous les 2 rangs – augmenter en faisant 1 jeté, tricoter le jeté torse au rang suivant pour éviter un trou – tricoter les augmentations au point mousse = 68-74-84 m. Tricoter 4 rangs sur toutes les mailles avec 52-58-64 m point mousse et 16-16-20 m de M1. Glisser les mailles sur un arrêt de mailles. Tricoter la 2ème chaussette. ASSEMBLAGE : Assembler en grafting les mailles de l'arrêt de mailles au rang de montage. La couture se trouve juste sous le pied et remonte au dos de la jambe. Serrer la pointe – voir ASTUCE ASSEMBLAGE – et sécuriser le fil. |
||||||||||
Légende diagramme(s) |
||||||||||
|
||||||||||
 |
||||||||||
Vous avez terminé ce modèle?Alors taguez vos photos avec #dropspattern #cottonpatchsocks ou bien présentez-les dans la galerie #dropsfan Vous avez besoin d'aide pour ce modèle ?Vous trouverez 17 tutoriels vidéo, une rubrique commentaires/questions et plus encore en vous rendant sur la page du modèle sur garnstudio.com © 1982-2026 DROPS Design A/S. Tous droits réservés. Ce document, y compris ces sous-sections, est protégé par les droits d'auteur (copyright). Apprenez-en davantage sur ce que vous pouvez faire avec nos modèles en bas de chacune des pages de notre site. |
||||||||||


Avec plus de 40 ans dans la conception de modèles tricot et crochet, DROPS Design offre l'une des plus vastes collections de modèles gratuits sur internet - traduits dans 17 langues. À ce jour, on compte 324 catalogues et 12290 modèles en français.
Nous nous efforçons de vous apporter le meilleur de ce que le tricot et le crochet peuvent vous offrir, inspiration et conseils mais également des fils de haute qualité à des prix incroyables! Vous souhaiteriez utiliser nos modèles autrement que pour un usage personnel? Vous pouvez lire ce que vous êtes autorisés à faire dans le Copyright en bas de page de chacun de nos modèles. Bon tricot!
Poster un commentaire sur le modèle DROPS 119-32
Nous aimerions connaître votre avis sur ce modèle !
Si vous souhaitez poser une question, merci de bien vouloir vérifier que vous avez choisi la bonne catégorie dans le formulaire ci-dessous afin d'accélérer la réponse. Les champs obligatoires sont indiqués par une *.