
Categorie popolari
State cercando un filato?


Commenti / Domande (38)
![]() Anne ha scritto:
Anne ha scritto:
Hej Når symbolerne i diagrammet er tegnet oveni hinanden, betyder det så at der skal hækles to nye masker i én maske fra den tidligere omgang?Hilsen Anne
13.12.2021 - 23:21DROPS Design ha risposto:
Hei Anne. Ja, da økes det. mvh DROPS Design
14.12.2021 - 14:07
![]() Loreto Pedreros ha scritto:
Loreto Pedreros ha scritto:
Bonjour, Voilà ma question: a la fin de A2, j'obtiens 88 brides ou doubles brides + 3 mailles en l'air correspondantes au début de chaque rang. C'est bien ça ? Merci d'avance et je tiens aussi à vous remercier pour tant de jolis modèles, explications et belles vidéos qui m'ont permis de progresser. Merci mille fois! Loreto
24.11.2021 - 18:33DROPS Design ha risposto:
Bonjour Loreto et merci! Tout à fait, lorsque A.2 est terminé, vous avez bien 88 mailles (brides ou double-brides) + les 3 ml du début du tour si vous avez choisi de les faire en plus ou bien 88 mailles: 3 ml au début du tour pour remplacer la 1ère bride + 87 brides/double-brides. Bonne continuation!
25.11.2021 - 08:45
![]() Lupe Vasquez ha scritto:
Lupe Vasquez ha scritto:
Do you have written instructions to the "deep December fjords crochet hat"?
06.09.2021 - 22:30DROPS Design ha risposto:
Dear Mrs Vasquez, there are only diagrams to this pattern, but this lesson will help you understanding how to read crochet diagrams. Happy crocheting!
07.09.2021 - 08:23
![]() Nina ha scritto:
Nina ha scritto:
1.Hvordan starter man med en relieffmaske i runde fire? Videoen viser relieffmønster hvor man starter med tre luftmasker. 2. hva er forskjellen på å hekle relieffmaske i en stav (runde 4) og det å hekle stav og så relieffmaske slik man ser i feks runde 5? Hvordan gjør man det? 3. hva menes med 11-12 ganger rundt på omgangen? «…. A.2 totalt 11-12 ganger rundt på omgangen.» 4. hvorfor kan dere ikke legge ut video som viser hvordan man hekler denne lua?
28.08.2021 - 18:45DROPS Design ha risposto:
Hei Nina. 1) Runde 4, mener du da 2. omgang i A.2? Da hekler du 3 staver (les Hekleinformasjon) + 1 relieff-dobbelstav i neste maske. 2) Runde 4 og 5, mener du da 2.og 3. omgang i A.2? I omgang 4 hekles det 2 masker (1 stav+1 relieff-dobbeltstav) i samme maske, men det i 5. omgang hekles det 1 stav i 1 maske og 1 relieff-dobbeltstav i neste maske). 3) Hekler du str. S/M gjentar du A.2 11 ganger rundt på omgangen, mens hekler du str. M/L gjentar du A.2 12 ganger rundt på omgangen. 4) Å lage en hjelpevideo til hvordan man hekler denne luen vil bli altfor lang, så til denne luen har vi lagt til 8 video som vi mener er til god hjelp. Mvh DROPS design
30.08.2021 - 14:31
![]() Laura ha scritto:
Laura ha scritto:
Hej, jeg har et spørgsmål til A. 3. Altså man vender først huen, så mønsteret dvs. retsiden vender ind af og vrangsiden ud af. Jeg er dog i tvivl om hækleretningen? Skal man også lave de tre luftmasker og en kædemaske inden man starter eller hvordan? Skal man holde på huen så siden man hækle vender væk fra dig eller ind imod dig?
12.03.2021 - 14:32DROPS Design ha risposto:
Hei Laura. Ja, hekle de 3 luftmaskene og kjedemaskene du tidligere har heklet i begynnelsen og slutten av hver omgang. Når du vender arbeidet må du også vri på luen slik at du nå får vrangen/nålen nærmest mot deg og du hekler videre som vanlig, - fra høyre til venstre. mvh DROPS design
15.03.2021 - 13:39
![]() Natasja ha scritto:
Natasja ha scritto:
Tak for hjælpen tidligere. Jeg fandt ud af det, men jeg har et spørgsmål i forhold til de 21-23cm, som arbejdet skal måle før man går til A. 3. Er de 21-13cm i diameteren på huen eller fra top til bund?
09.03.2021 - 22:51DROPS Design ha risposto:
Hej Natasja, de 21-23 cm er fra toppen og ned i hækleretningen :)
10.03.2021 - 15:45
![]() Natasja ha scritto:
Natasja ha scritto:
Hej. Jeg forstår ikke helt, hvordan der kun skal være fire luftmasker i den inderste ring, når der er 11 stangmasker i næste række (A.1)?
07.03.2021 - 22:08DROPS Design ha risposto:
Hej Natasja, jo det stemmer, du hækler de 11 stangmasker rundt om ringen som består af 4 luftmasker. Hækler du i DROPS Merino Extra Fine? :)
08.03.2021 - 14:40
![]() Maja ha scritto:
Maja ha scritto:
Dzień dobry. Czy schemat A3 również zaczynamy 3 oczkami łańcuszka i kończymy oczkiem ścisłym? Dziękuję.
15.02.2021 - 06:29DROPS Design ha risposto:
Witaj Maju, dokładnie tak. Zobacz WSKAZÓWKĘ, która znajduje się na początku objaśnień do wzoru. Pozdrawiamy!
15.02.2021 - 09:49
![]() Sara ha scritto:
Sara ha scritto:
Hvordan skal man begynne på rad 4, når det er en relieffmaske..?
03.02.2021 - 02:32DROPS Design ha risposto:
Hej Sara, da hækler du 1 dobbeltstangmaske rundt om stangmasken fra forrige omgang. Se gerne vores video nederst i opskriften. God fornøjelse!
03.02.2021 - 15:28
![]() Gosia ha scritto:
Gosia ha scritto:
Czy dobrze rozumiem, że słupki nawijane mają być robione od przodu? Robiłam zgodnie z oznaczeniem tylne słupki reliefowe, ale wtedy wzorek czapki pojawia się wewnątrz robótki, zamiast na zewnątrz. Czy u Was te symbole są używane odwrotnie?
25.01.2021 - 10:51DROPS Design ha risposto:
Gosiu, później wyłożysz dół czapki na prawą stronę i wzorek pojawi się na prawej stronie. Pozdrawiamy!
25.01.2021 - 11:03
|
||||||||||||||||
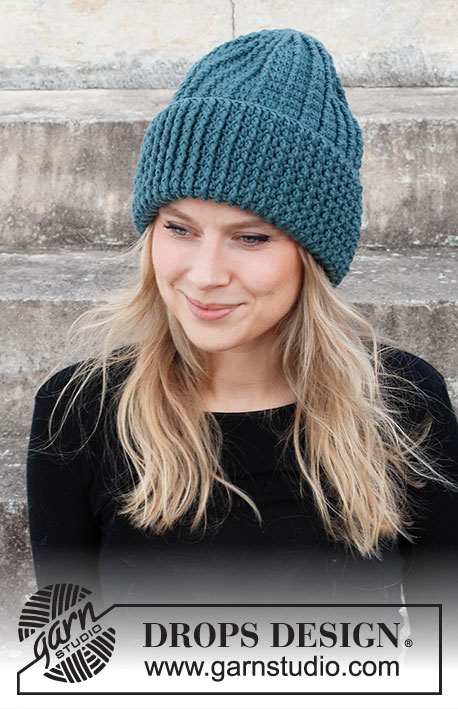
Deep December Fjords#deepdecemberfjordshat |
||||||||||||||||
 |
 |
|||||||||||||||
Cappello all’uncinetto in DROPS Merino Extra Fine. Lavorato dall’alto verso il basso con maglie in rilievo.
DROPS 214-38 |
||||||||||||||||
|
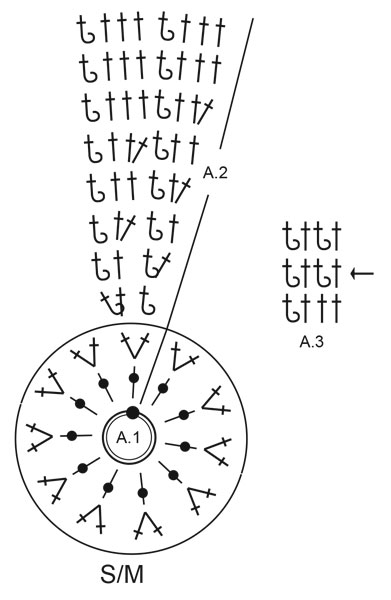
------------------------------------------------------- TECNICHE IMPIEGATE: ------------------------------------------------------- CATENELLE: Se si lavora solo sulla punta dell’uncinetto, la catenella sarà troppo stretta; 1 catenella deve essere lunga come la larghezza di una maglia alta. MOTIVO: Vedere i diagrammi da A.1 a A.3. Seguire il diagramma corrispondente alla propria taglia (per i diagrammi A.1 e A.2). INFORMAZIONI PER IL LAVORO: All’inizio di ogni giro di maglie alte, lavorare 3 catenelle per sostituire la prima maglia alta; quindi saltare la prima maglia alta / maglia bassa del giro precedente. Il giro finisce con 1 maglia bassissima nella 3a catenella dall’inizio del giro. ------------------------------------------------------- TECNICHE IMPIEGATE: ------------------------------------------------------- CAPPELLO – BREVI INDICAZIONI PER IL LAVORO: Si lavora in tondo, dall’alto verso il basso. CAPPELLO: Con l’uncinetto n° 4 ed il filato Merino Extra Fine, avviare 4 catenelle – vedere CATENELLE e formare un anello con 1 maglia bassissima nella prima catenella. Proseguire seguendo il diagramma A.1 – vedere le INFORMAZIONI PER IL LAVORO. Dopo aver completato il diagramma A.1, lavorare il diagramma A.2 in tutto 11-12 volte in larghezza. RICORDARSI DI MANTENERE LA CORRETTA TENSIONE DEL LAVORO! Dopo aver completato il diagramma A.2, ci sono 88-96 maglie sul giro. Ripetere ora gli ultimi 2 giri del diagramma finché il lavoro non misura 21-23 cm. Girare il lavoro con il rovescio del lavoro sull’esterno (in modo che il risvolto si trovi sul diritto del lavoro, quando ripiegato). Lavorare il diagramma A.3 in tondo, a partire dalla freccia. Quando il cappello misura 33-35 cm dall’alto verso il basso, è finito. Tagliare e fermare il filo. Il cappello misura circa 23-25 cm con circa 10 cm di risvolto. |
||||||||||||||||
Spiegazioni del diagramma |
||||||||||||||||
|
||||||||||||||||
 |
||||||||||||||||
 |
||||||||||||||||
Avete terminato questo modello?Allora taggate le vostre foto con #dropspattern #deepdecemberfjordshat o inviatele alla #dropsfan gallery. Avete bisogno di aiuto con questo modello?Troverete 8 video tutorial, una sezione per i commenti/domande e molto altro guardando il modello su www.garnstudio.com © 1982-2026 DROPS Design A/S. Ci riserviamo tutti i diritti. Questo documento, compreso tutte le sue sotto-sezioni, è protetto dalle leggi sul copyright. Potete leggere quello che potete fare con i nostri modelli alla fine di ogni modello sul nostro sito. |
||||||||||||||||


Con oltre 40 anni di esperienza nel design di modelli di maglia e uncinetto, DROPS Design offre la più estesa collezione di modelli gratuiti su internet - tradotti in 17 lingue. Ad oggi vi possiamo fornire 324 cataloghi e 12290 modelli - 9561 dei quali sono tradotti in Italiano.
Ci stiamo impegnando molto per darvi il meglio che vi possiamo offrire in termini di maglia e uncinetto, ispirazioni e consigli così come filati di grande qualità ad un prezzo incredibile! Volete utilizzare i nostri modelli per qualcosa d'altro oltre al vostro uso personale? Potete leggere tutto ciò che è consentito nel testo sul Copyright in basso su tutte le pagine dei nostri modelli. Buon lavoro!
Lasciare un commento sul modello DROPS 214-38
Noi saremmo felici di ricevere i tuoi commenti e opinioni su questo modello!
Se vuoi fare una domanda, fai per favore attenzione a selezionare la categoria corretta nella casella qui sotto per velocizzare il processo di risposta. I campi richiesti sono indicati da *.