
Categorie popolari
State cercando un filato?


Commenti / Domande (85)
![]() Jacqueline Last ha scritto:
Jacqueline Last ha scritto:
Als ik de foto van het hoedje bekijk Iet het er anders uit met het aantal stokjes dan op het diagram. Ik heb in rij 8 , 3 st 2 lossen 10 st. 2 lossen, 3 st 2 lossen etc. Op de foto is de punt tussen de 2 lossen boogjes 4, 3 en 2 's stokjes. De hoedje wordt zo heel wijd
05.06.2023 - 21:47DROPS Design ha risposto:
Dag Jacqueline,
Eerlijk gezegd snap ik niet helemaal wat je bedoeld met dat de punt tussen 2 lossenboogjes 4, 3 en 2 stokjes zijn op de foto. In dezelfde toer (dus toer 8) zie ik op de foto ook steeds 3 stokjes er tussen zitten.
07.06.2023 - 08:54
![]() Anna ha scritto:
Anna ha scritto:
Dzień dobry Jakiego drucika najlepiej użyć i gdzie się w niego zaopatrzyć? No i jak potem czyścić kapelusz, kiedy umieści się w nim drucik? Pozdrawiam - Anna
15.02.2023 - 16:28DROPS Design ha risposto:
Witaj Aniu, szukaj drucika w sklepie budowlano-dekoracyjnym, są również dostępne druciki w osłonce. Przed czyszczeniem kapelusza drucik trzeba będzie wyjąć. Pozdrawiamy!
17.02.2023 - 07:50
![]() Åsa ha scritto:
Åsa ha scritto:
Jag har även samma fråga som Heidi hade den 9/2 som hon inte fått svar på. Kan ni vara snäll och svara på hennes fråga. Bra om nu svara både på danska och svenska.
04.09.2022 - 22:30DROPS Design ha risposto:
Hej Åsa, de första 2 smygmaskorna skall endast virkas första gången, när diagrammet upprepas, virkas 2 lm, hoppa över 2 st, 14 st, 2 lm, hoppa över 2 st, 14 st osv :)
07.09.2022 - 08:48
![]() Åsa Zellin ha scritto:
Åsa Zellin ha scritto:
Läser man ert tips på hur ett diagram läses står det att A2 innehåller både börjar och slutet på varvet men om jag läser så får jag inte det att gå ihop. Det blir fel i virkningen så då kan man inte läsa diagrammet som ni tipsar. Tex att de 3 luftmaskorna ska vara i början på varvet och smygmaskan i slutet med de övriga stolparna i A2? Ska de virkas i början eller i slutet av varvet eller ska de alltid virkas tillsammans med A1?
04.09.2022 - 00:46DROPS Design ha risposto:
Hei Åsa. Du skal hekle A.1 og A.2 6 ganger i bredden, Men under HEKLEINFORMASJON står det at første stav på omgangen (ikke første stav i hver A.2) skal erstattes med 3 luftmasker, altså kun første gang av de 6 gangene, og når du har heklet A.1 og A.2 6 ganger avslutter du omgangen med 1 kjedemaske i den 3. luftmasken. mvh DROPS Design
05.09.2022 - 14:18
![]() Beanca ha scritto:
Beanca ha scritto:
Je begint eerst met het haken van A1 en A2. En dat 6 maal. Ik snap de streep er tussen niet. Betekend dit dat je A2 alleen bij het begin van de toer haakt, of herhaal je deze steken ook 5 x? Dus is de derde toer : 3 lossen (=1 stokje), 2 stokjes, meerderen, 1 stokje en dan de herhaling 3 stokjes, meerderen 1 stokje of 3 lossen (= 1 stokje), 1 stokje “1 stokje, meerderen, 1 stokje” en alleen tussen “ en “ herhalen?
27.06.2022 - 16:03DROPS Design ha risposto:
Dag Beanca,
De streep ertussen geeft aan waar A.2 eindigt en A.1 begint. Je haakt dus A.2 en dan A.1 en vervolgens herhaal je dit. Dus na A.2 haak je opnieuw A.1 en A,2, enzovoort.
03.07.2022 - 13:47
![]() Thea De Raes ha scritto:
Thea De Raes ha scritto:
Volgens mij staat er nog een fout in het Nederlandstalig patroon. Er staat: Haak * A.2, A.2 *, haak van *-* 6 keer in totaal in de breedte (er zijn geen steken in A.2 op de eerste toer). En dat moet volgens mij zijn: Haak * A.1, A.2 *, haak van *-* 6 keer in totaal in de breedte (er zijn geen steken in A.2 op de eerste toer). Met vriendelijke groeten, Thea
21.06.2022 - 10:38
![]() Angi ha scritto:
Angi ha scritto:
Hallo, ich habe Probleme mit der 7. Reihe (A2/A1) Mache ich hier LM Bogen (mit 2Lm) und mache das nächste Stäbchen in die übernächste Masche (also nur 1 auslassen)? Wieviel Maschen sollte ich nach Reihe 6 haben? Reihe 7 geht sich bei mir irgendwie nicht aus.. Danke! Kg
10.06.2022 - 14:31DROPS Design ha risposto:
Liebe Angi, 6. Runde war: *1 KM in das nächste Stb, 3 Lm (=1. Stb), 1Stb in je die 2 nächsten Stb (= A.2), 1 Stb in je die 4 nächsten Stb, 2 Lm, 2 Stb in das nächste Stb, 2 Lm (= A.1) * von *bis* häkeln Sie insgesamt 6 Mal; 7. Runde: *1 Km in das nächste Stb, 1 Stb in das nächste Stb (A.2), 1 Stb in die 3 nächsten Stb, 2 Lm, 2 Stb im Lm-Bogen, 1 Stb in je die 2 nächsten Stb, 2 Stb im Lm-Bogen, 2 Lm (A.1)*, von *-* häkeln Sie insgesamt 6 Mal; Viel Spaß beim häkeln!
13.06.2022 - 08:19
![]() Daniella ha scritto:
Daniella ha scritto:
I agree with other posters. Without a stitch count at the end of each row, this pattern is very hard to follow.
12.04.2022 - 17:13
![]() Methida ha scritto:
Methida ha scritto:
Hi! How many double crochet i have to make on the second round after i form the ring? can you show the exact number how many sticht i need to make in each round? - Thank you :)
26.03.2022 - 12:03DROPS Design ha risposto:
Dear Methida, we don't make personalised patterns. In the first round, you work 12 double crochet (6 repeats of A.1). From the 2nd row on, you work 6 repeats of A.1, A.2. You can check the following lesson on how to read crochet diagrams: https://www.garnstudio.com/lesson.php?id=69&cid=19 Happy crochetting!
26.03.2022 - 20:22
![]() Renate ha scritto:
Renate ha scritto:
Hallo Ich habe Schwierigkeiten in den ersten 3 Runden. Muss man in der 3.Runde nur am Anfang drei Luftmaschen von A2 machen oder die ganze Runde. Also drei Luftmaschen ein Stäbchen in die dritte Luftmaschen dann weiter zu A1 mit Stäbchen dann zwei Stäbchen in eine Masche und wieder Stäbchen dann 3 Luftmaschen? und in die dritte Luftmaschen ein Stäbchen und weiter mit A1. Liebe Grüße Renate
26.02.2022 - 19:34DROPS Design ha risposto:
Liebe Renate, ab der 2. Runde häkeln Sie (A.2, A.1), dann bei der 3. Runde häkeln Sie (3 Lm, 1 Stb in die 3 Lm von Anfang der vorrigen Runde) = A.2, und (1 Stb in das nächste Stb, 2 Stb in das nächste Stb und 1 Stb in das nächste Stb) und so A.2 und A.1 wiederholen (bei den nächsten A.2 häkeln Sie 1 Stb anstatt die 3 Lm). Kann das Ihnen helfen? Viel Spaß beim häkeln!
28.02.2022 - 09:49
|
||||||||||||||||||||||||||||
Always Bright#alwaysbrighthat |
||||||||||||||||||||||||||||
 |
 |
|||||||||||||||||||||||||||
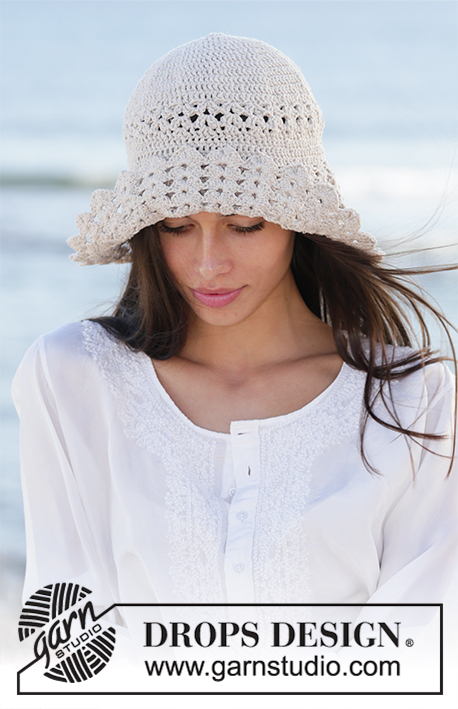
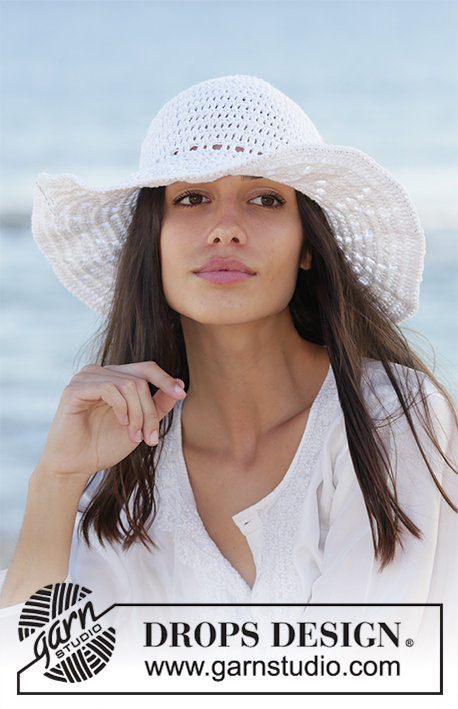
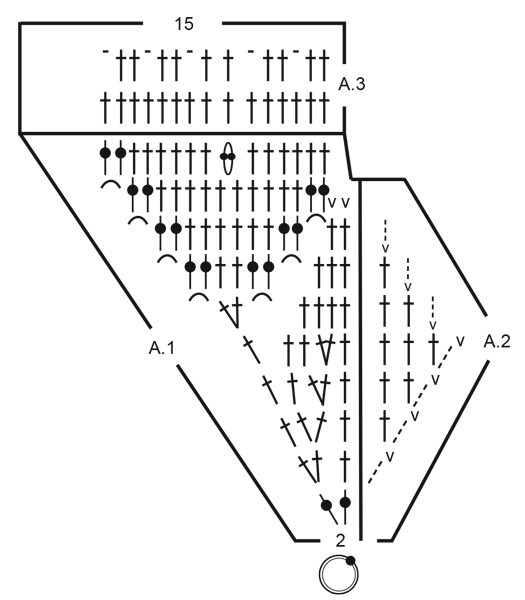
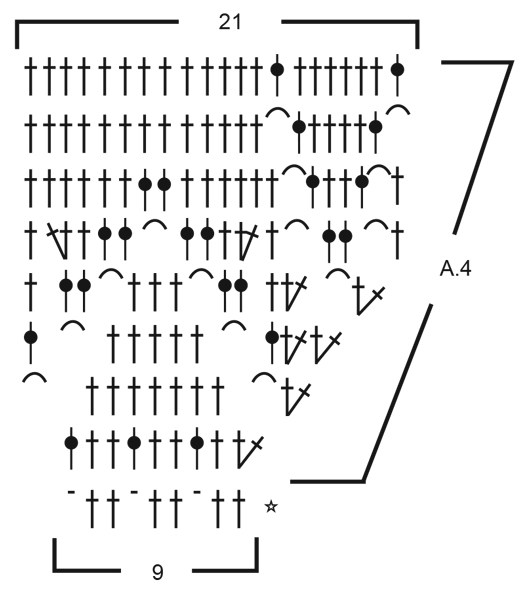
Cappello all’uncinetto lavorato dall’alto verso il basso, a maglie alte e con un motivo traforato in DROPS Bomull-Lin oppure in DROPS Paris.
DROPS 199-14 |
||||||||||||||||||||||||||||
|
---------------------------------------------------------- TECNICHE IMPIEGATE: ---------------------------------------------------------- MOTIVO: Vedere i diagrammi da A.1 a A.4. INFORMAZIONI PER IL LAVORO: Sostituire la prima maglia alta del giro con 3 catenelle. Finire il giro con 1 maglia bassissima nella terza catenella dall’inizio del giro. Durante le ripetizioni di A.2, lavorare le 3 catenelle come 1 maglia alta. SUGGERIMENTO PER LE DIMINUZIONI: Per diminuire 1 maglia alta, lavorare le 2 maglie alte successive insieme, come segue: lavorare 1 maglia alta, ma non fare l’ultimo gettato (= 2 maglie sull’uncinetto), lavorare poi la maglia alta successiva e passare l’ultimo gettato attraverso tutte e 3 le maglie sull’uncinetto. SUGGERIMENTO PER GLI AUMENTI: Per aumentare 1 maglia alta, lavorare 2 maglie alte nella stessa maglia alta. ---------------------------------------------------------- IL LAVORO INIZIA QUI: ---------------------------------------------------------- CAPPELLO - BREVI INDICAZIONI PER IL LAVORO: Si lavora in tondo dall’alto verso il basso. CAPPELLO: Con l’uncinetto n° 3,5 ed il filato Bomull-Lin oppure con il filato Paris, avviare 4 catenelle e formare un anello con 1 maglia bassissima nella prima catenella. Vedere le INFORMAZIONI PER IL LAVORO ! Lavorare * A.2, A.1 *, ripetere da *-* 6 volte in tutto in larghezza (non ci sono maglie nel diagramma A.2 sul primo giro). RICORDARSI DI MANTENERE LA CORRETTA TENSIONE DEL LAVORO! Dopo aver lavorato i diagrammi A.1 e A.2 in verticale, ci sono 90 maglie alte sul giro. Lavorare il primo giro del diagramma A.3 e ripetere questo giro finché il lavoro non misura circa 16 cm dalla cima del cappello verso il basso. Lavorare l’ultimo giro del diagramma A.3 (= giro traforato). Lavorare ora la tesa come spiegato di seguito: TESA: Lavorare il diagramma A.4 in tondo (= 10 ripetizioni di 9 maglie). Dopo aver completato il diagramma A.4 in verticale, ci sono 210 maglie sul giro. Mettere un filo di acciaio sottile lungo il bordo della tesa. Lavorare 1 maglia bassa in ogni maglia alta su tutto il giro e, ALLO STESSO TEMPO, lavorare intorno al filo di acciaio. In questo modo il bordo risulterà rigido. Regolare la lunghezza del filo in base alla misura del bordo. Avvolgere le estremità del filo tra loro e nasconderle nelle maglie. Tagliare e fermare il filo. |
||||||||||||||||||||||||||||
Spiegazioni del diagramma |
||||||||||||||||||||||||||||
|
||||||||||||||||||||||||||||
 |
||||||||||||||||||||||||||||
 |
||||||||||||||||||||||||||||
Avete terminato questo modello?Allora taggate le vostre foto con #dropspattern #alwaysbrighthat o inviatele alla #dropsfan gallery. Avete bisogno di aiuto con questo modello?Troverete 13 video tutorial, una sezione per i commenti/domande e molto altro guardando il modello su www.garnstudio.com © 1982-2026 DROPS Design A/S. Ci riserviamo tutti i diritti. Questo documento, compreso tutte le sue sotto-sezioni, è protetto dalle leggi sul copyright. Potete leggere quello che potete fare con i nostri modelli alla fine di ogni modello sul nostro sito. |
||||||||||||||||||||||||||||


Con oltre 40 anni di esperienza nel design di modelli di maglia e uncinetto, DROPS Design offre la più estesa collezione di modelli gratuiti su internet - tradotti in 17 lingue. Ad oggi vi possiamo fornire 325 cataloghi e 12298 modelli - 9569 dei quali sono tradotti in Italiano.
Ci stiamo impegnando molto per darvi il meglio che vi possiamo offrire in termini di maglia e uncinetto, ispirazioni e consigli così come filati di grande qualità ad un prezzo incredibile! Volete utilizzare i nostri modelli per qualcosa d'altro oltre al vostro uso personale? Potete leggere tutto ciò che è consentito nel testo sul Copyright in basso su tutte le pagine dei nostri modelli. Buon lavoro!
Lasciare un commento sul modello DROPS 199-14
Noi saremmo felici di ricevere i tuoi commenti e opinioni su questo modello!
Se vuoi fare una domanda, fai per favore attenzione a selezionare la categoria corretta nella casella qui sotto per velocizzare il processo di risposta. I campi richiesti sono indicati da *.