
Categorie popolari
State cercando un filato?


Commenti / Domande (85)
![]() Veronika ha scritto:
Veronika ha scritto:
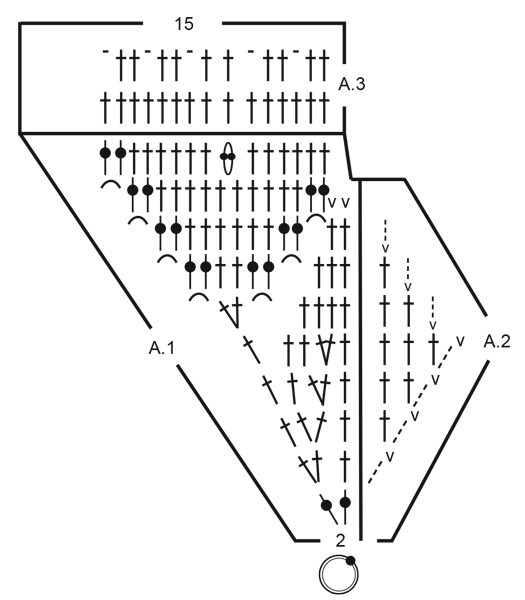
Wie soll man bei 4 Luftmaschen zu Beginn die Musterfolge A2,A1 (= 2 Stäbchen) 6x in der ersten Runde häkeln?
28.08.2025 - 14:48DROPS Design ha risposto:
Liebe Veronika, bei der 1. Runde wird man nur die 2 Stäbchen A.1 6 Mal wiederholen; bei der 2. Runde beginnt A.2: (A.2 häkeln, dann A.1) und so weiterhäkeln, dh: (3 Luftmaschen = A.2, 1 Stäbchen in die nächste Masche, 2 Stäbchen in die nächste Masche = A.1); dann (1 Stäbchen in die nächste Masche = A.2; 1 Stäbchen in die selbe Masche + 2 Stäbchen in die nächste Masche = A.1), und so weiterhäkeln. Viel Spaß beim Häkeln!
29.08.2025 - 07:55
![]() R C ha scritto:
R C ha scritto:
Hej Er det rigtig forstået at fra anden omgang (a2+a1) hækles a2= 3 luftmaske + a1 =3 stangmasker, igen a2= 3 luftmasker +a1 3 stangmasker gentag helevejen rundt? og hvor mange masker skal der så være? MVH R C
22.08.2025 - 13:42DROPS Design ha risposto:
Hei R C. Det stemmer. Du hekler A.2 + A.1 totalt 6 ganger i bredden. Så på 2. omgang vil man ha 3 luftmasker x 6 (A.2) og 3 staver x 6 (A.1). Og f.eks på 5. omgang vil man ha 3 luftmasker + 3 staver x 6 (A.2) og 6 staver x 6 (A.1). mvh DROPS Design
15.09.2025 - 14:07
![]() Loren ha scritto:
Loren ha scritto:
Bonjour Pouvez-Vous m’aider ? Je n’arrive pas à comprendre le 6ème rang. Lorsqu’on fait les 2 mailles en l’air il faut toujours sauter une bride du rang précédent ? Merci
20.07.2025 - 16:44DROPS Design ha risposto:
Bonjour Loren, de quel diagramme parlez-vous?
21.07.2025 - 13:05
![]() Grit ha scritto:
Grit ha scritto:
Hallo, ich habe für den Hut 100% Baumwolle genommen. Hast du den gestärkt mit Sprühstärke oder ähnlichem? Sodass er die Form schön hält. LG Grit
15.07.2025 - 15:13DROPS Design ha risposto:
Liebe Grit, das können Sie machen oder einfach diese Technik benutzen. Viel Spaß beim Fertigstellen!
24.07.2025 - 14:38
![]() Małgorzata ha scritto:
Małgorzata ha scritto:
Proszę mi powiedzieć ile oczek powinno być w drugim okrążeniu. Jeżeli w trzecim ma być 30 plus 3 oczka łańcuszka zamiast pierwszego słupka, tzn. Że w kolejnych powtórzeniach tego okrążenia nie przerabiamy słupka zamiast trzech oczek? Wg. Schematu wychodzi w trzecim okrążeniu 36 słupków. Z wcześniejszych odpowiedzi rozumiem że w drugim okrążeniu jest 12 słupków
04.07.2025 - 22:44DROPS Design ha risposto:
Witaj Małgorzato, właśnie skorygowałam poprzednią odpowiedź. Zatem: 2-gie okrążenie: 4x6=24 sł (w tym 3 początkowe oł). 3-cie okr.: 6x6=36 sł (w tym 3 początkowe oł). 4-te okr.: 8x6=48sł (w tym początkowe oł). 5-te okr.: 10x6=60 sł (w tym 3 początkowe oł). Pozdrawiamy!
08.07.2025 - 12:47
![]() Monika ha scritto:
Monika ha scritto:
Dziękuję za odpowiedź, ale skąd biorą się te "+3" słupki? W kazdym okrążeniu? Bardzo bym chciała zrobić ten kapelusz, ale nie mogę rozczytać tego początku
03.07.2025 - 11:32DROPS Design ha risposto:
Witaj Moniko, to nie są 3 słupki, tylko 1 słupek (3 oczka łańcuszka zwykle zastępują pierwszy słupek). Na schemacie A.2 oznaczony jako 3 krótkie kreseczki jedna nad drugą. Zobacz jeszcze wskazówkę: 'gdy powtarzamy schemat A.2 należy przerobić 1 słupek na początku - zamiast 3 oczek łańcuszka'. Pozdrawiamy!
03.07.2025 - 13:06
![]() Monika ha scritto:
Monika ha scritto:
Czy możecie podać, ile powinno być słupków w 3, 4 i 5 okrążeniu?
03.07.2025 - 00:06DROPS Design ha risposto:
Witaj Moniko, 3-cie okr.: 6x6=36 sł (w tym 3 początkowe oł). 4-te okr.: 8x6=48sł (w tym początkowe oł). 5-te okr.: 10x6=60 sł (w tym 3 początkowe oł). Pozdrawiamy!
03.07.2025 - 09:10
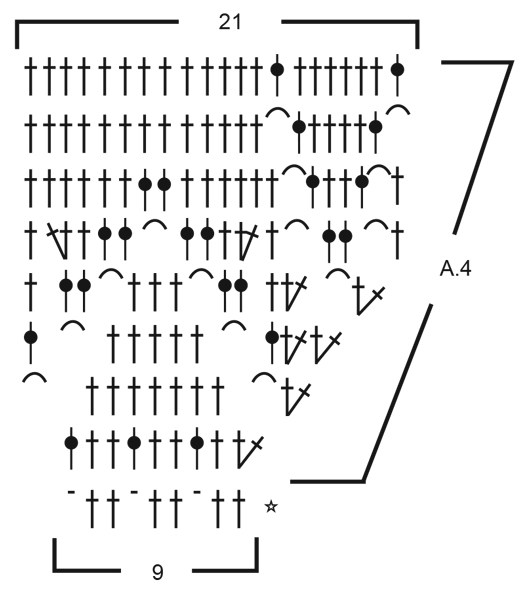
![]() Lilianne ha scritto:
Lilianne ha scritto:
In Charts A3 and A4 there are no 3 chains and ss to start or end a row ,in 2nd last row am supposed to start with 2 chains how ?Am just asking out of curiosity cause i know how to solve the issue.
10.06.2025 - 20:21DROPS Design ha risposto:
Dear Lilianne, remember the CROCHET INFO at the beginning of the pattern: you should replace the first treble crochet (UK English terminology) with 3 chains at the beginning of every round. On the next to last row in A.4 you can consider these 3 chains being the last treble crochet of the round or make them extra as you prefer. Happy crocheting!
11.06.2025 - 07:59
![]() Valeria ha scritto:
Valeria ha scritto:
Crochet patterns in general are very easy to follow and understand, here I found myself adjusting and counting how to make it work. In the end I used it more as inspiration. Please consider for future hat projects to present the full circle of the first part of the hat, in order for us to be able to make it work. Thank you!
18.05.2025 - 12:50
![]() Silke Reischl ha scritto:
Silke Reischl ha scritto:
Hallo, welche Stärke wird denn für den Draht der Krempe empfohlen?
27.04.2025 - 20:11DROPS Design ha risposto:
Liebe Frau Reischl, vielleicht kann Ihnen dieses Video helfen? Viel Spaß beim Häkeln!
28.04.2025 - 08:42
|
||||||||||||||||||||||||||||
Always Bright#alwaysbrighthat |
||||||||||||||||||||||||||||
 |
 |
|||||||||||||||||||||||||||
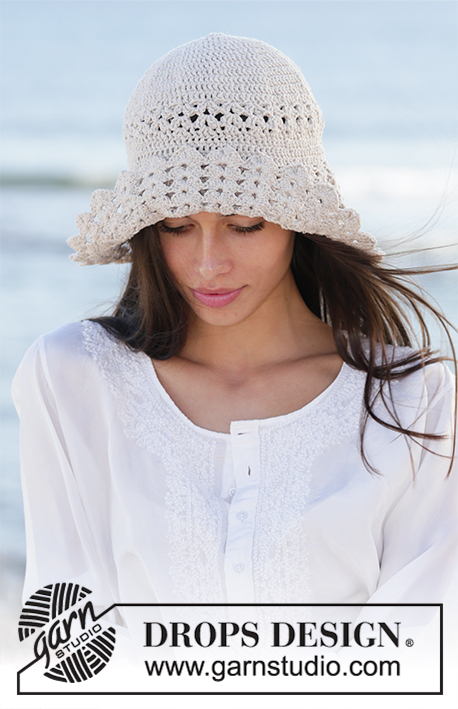
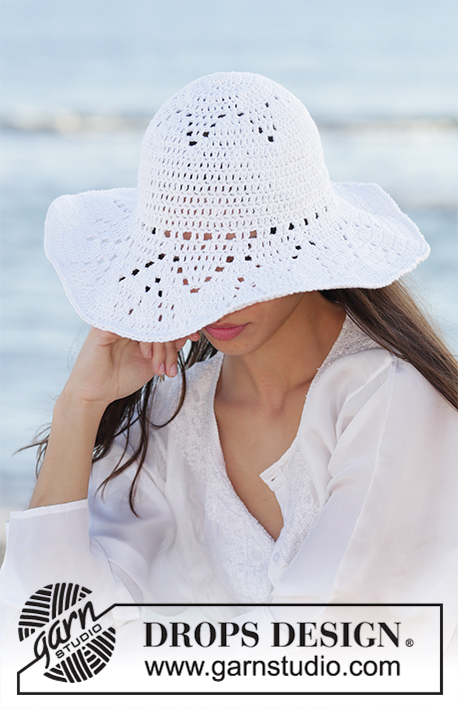
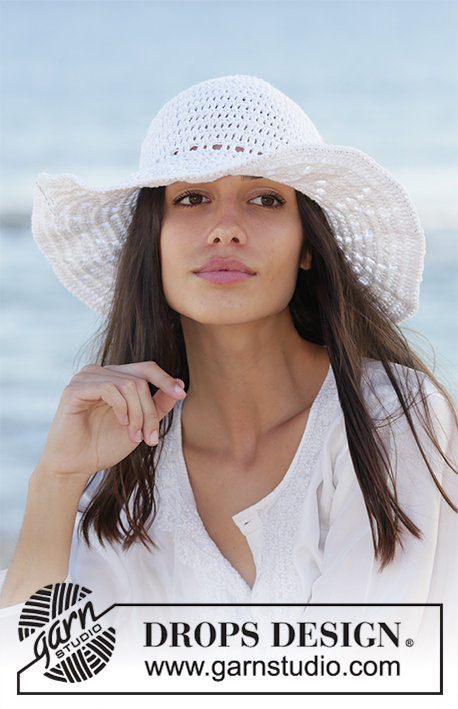
Cappello all’uncinetto lavorato dall’alto verso il basso, a maglie alte e con un motivo traforato in DROPS Bomull-Lin oppure in DROPS Paris.
DROPS 199-14 |
||||||||||||||||||||||||||||
|
---------------------------------------------------------- TECNICHE IMPIEGATE: ---------------------------------------------------------- MOTIVO: Vedere i diagrammi da A.1 a A.4. INFORMAZIONI PER IL LAVORO: Sostituire la prima maglia alta del giro con 3 catenelle. Finire il giro con 1 maglia bassissima nella terza catenella dall’inizio del giro. Durante le ripetizioni di A.2, lavorare le 3 catenelle come 1 maglia alta. SUGGERIMENTO PER LE DIMINUZIONI: Per diminuire 1 maglia alta, lavorare le 2 maglie alte successive insieme, come segue: lavorare 1 maglia alta, ma non fare l’ultimo gettato (= 2 maglie sull’uncinetto), lavorare poi la maglia alta successiva e passare l’ultimo gettato attraverso tutte e 3 le maglie sull’uncinetto. SUGGERIMENTO PER GLI AUMENTI: Per aumentare 1 maglia alta, lavorare 2 maglie alte nella stessa maglia alta. ---------------------------------------------------------- IL LAVORO INIZIA QUI: ---------------------------------------------------------- CAPPELLO - BREVI INDICAZIONI PER IL LAVORO: Si lavora in tondo dall’alto verso il basso. CAPPELLO: Con l’uncinetto n° 3,5 ed il filato Bomull-Lin oppure con il filato Paris, avviare 4 catenelle e formare un anello con 1 maglia bassissima nella prima catenella. Vedere le INFORMAZIONI PER IL LAVORO ! Lavorare * A.2, A.1 *, ripetere da *-* 6 volte in tutto in larghezza (non ci sono maglie nel diagramma A.2 sul primo giro). RICORDARSI DI MANTENERE LA CORRETTA TENSIONE DEL LAVORO! Dopo aver lavorato i diagrammi A.1 e A.2 in verticale, ci sono 90 maglie alte sul giro. Lavorare il primo giro del diagramma A.3 e ripetere questo giro finché il lavoro non misura circa 16 cm dalla cima del cappello verso il basso. Lavorare l’ultimo giro del diagramma A.3 (= giro traforato). Lavorare ora la tesa come spiegato di seguito: TESA: Lavorare il diagramma A.4 in tondo (= 10 ripetizioni di 9 maglie). Dopo aver completato il diagramma A.4 in verticale, ci sono 210 maglie sul giro. Mettere un filo di acciaio sottile lungo il bordo della tesa. Lavorare 1 maglia bassa in ogni maglia alta su tutto il giro e, ALLO STESSO TEMPO, lavorare intorno al filo di acciaio. In questo modo il bordo risulterà rigido. Regolare la lunghezza del filo in base alla misura del bordo. Avvolgere le estremità del filo tra loro e nasconderle nelle maglie. Tagliare e fermare il filo. |
||||||||||||||||||||||||||||
Spiegazioni del diagramma |
||||||||||||||||||||||||||||
|
||||||||||||||||||||||||||||
 |
||||||||||||||||||||||||||||
 |
||||||||||||||||||||||||||||
Avete terminato questo modello?Allora taggate le vostre foto con #dropspattern #alwaysbrighthat o inviatele alla #dropsfan gallery. Avete bisogno di aiuto con questo modello?Troverete 13 video tutorial, una sezione per i commenti/domande e molto altro guardando il modello su www.garnstudio.com © 1982-2026 DROPS Design A/S. Ci riserviamo tutti i diritti. Questo documento, compreso tutte le sue sotto-sezioni, è protetto dalle leggi sul copyright. Potete leggere quello che potete fare con i nostri modelli alla fine di ogni modello sul nostro sito. |
||||||||||||||||||||||||||||


Con oltre 40 anni di esperienza nel design di modelli di maglia e uncinetto, DROPS Design offre la più estesa collezione di modelli gratuiti su internet - tradotti in 17 lingue. Ad oggi vi possiamo fornire 325 cataloghi e 12298 modelli - 9569 dei quali sono tradotti in Italiano.
Ci stiamo impegnando molto per darvi il meglio che vi possiamo offrire in termini di maglia e uncinetto, ispirazioni e consigli così come filati di grande qualità ad un prezzo incredibile! Volete utilizzare i nostri modelli per qualcosa d'altro oltre al vostro uso personale? Potete leggere tutto ciò che è consentito nel testo sul Copyright in basso su tutte le pagine dei nostri modelli. Buon lavoro!
Lasciare un commento sul modello DROPS 199-14
Noi saremmo felici di ricevere i tuoi commenti e opinioni su questo modello!
Se vuoi fare una domanda, fai per favore attenzione a selezionare la categoria corretta nella casella qui sotto per velocizzare il processo di risposta. I campi richiesti sono indicati da *.