
Categorie popolari
State cercando un filato?


Commenti / Domande (102)
![]() Bricchi ha scritto:
Bricchi ha scritto:
Bonjour, Lorsqu'on arrive en haut du diagramme,doit-il rester les 39 mailles + les 2 de chaque côté? Dans mon cas,il m'en reste plus et la largeur en haut ne fait pas environ 20 cm mais 30 cm. D'autre part en ayant suivi toutes les diminutions ,les côtés "montent tout droit" et ne font pas la "courbe" qui est sous le bras? Merci par avance
17.07.2013 - 07:50DROPS Design ha risposto:
Bonjour Mme Brichi, quand on a terminé les diminutions de chaque côté, il ne reste que les mailles du diagramme. Avez-vous pensé à vérifier votre tension ? Ce top a été réalisé sur la base d'un échantillon de 20 brides x 10 rangs = 10 x 10 cm. Bon crochet !
17.07.2013 - 09:30
![]() Cloclo ha scritto:
Cloclo ha scritto:
Trés joli modèle , merci pour les explications
22.06.2013 - 17:05
![]() Cassy ha scritto:
Cassy ha scritto:
I've noticed that alot of people are having the same problem with this pattern that I have. I've read the replies and found how to properly work the pattern, but it's wasted alot of time. You may consider re-writing the first row as "1 double crochet (dc) in the 3rd ch from the hook, 1 dc in each of the next 2 sts, * skip 1 ch, 1 dc in each of the next 3 sts *, repeat from * - *=" to increase clarity.
18.02.2013 - 05:39
![]() Elisabeth ha scritto:
Elisabeth ha scritto:
Jeg har nå heklet denne toppen ferdig, men min topp er kortere enn lengden som sto i oppskriften. I str. S så skulle den være 31 cm, mens min kun er 26 cm. Jeg vurderer å hekle nedover fra bunnen av toppen (luftmaskeraden) og til ønsket lengde. Har noen erfaring med å improvisere på denne måten? Og vil det i så fall bli et bra resultat?
11.01.2013 - 03:46DROPS Design ha risposto:
Stemmer din haeklefasthed i höjden? Du skal have 11 raekker paa 10 cm. Hvis du har flere raekker bliver din top for kort. Du kan starte forfra eller pröve at haekle nedover fra bunnen med stangm, men du skal nok tage ind til din talje.
16.01.2013 - 18:24
![]() DROPS Design ha scritto:
DROPS Design ha scritto:
Cindy, this is how you work row 1: 1 dc in the 3rd ch from the hook, 1 dc in the next ch, 1 dc in the next ch, * skip 1 ch, 1 dc in the next ch, 1 dc in the next ch, 1 dc in the next ch*, repeat from * - * = 129-139-149-159 dc.
15.08.2011 - 09:13
![]() DROPS Design ha scritto:
DROPS Design ha scritto:
Cindy, this is how you work row 1: 1 dc in the 3rd ch from the hook, 1 dc in the next ch, 1 dc in the next ch, * skip 1 ch, 1 dc in the next ch, 1 dc in the next ch, 1 dc in the next ch*, repeat from * - * = 129-139-149-159 dc.
15.08.2011 - 09:08
![]() Cindy ha scritto:
Cindy ha scritto:
Hello. I'm trying to figure out how to start the pattern so that by end of row 1 I can have the correct number of dc. I've tried it 3 times and always end up with double the total it should be. What am I doing wrong. Please help and thank you.
07.08.2011 - 22:29Hobbes5 ha scritto:
Hi I'm trying to understand how to do the dec, when I reach the end of the row I do the dec again, my problem is, how do I do the dec to the next row? Do I, after the end dec, turn, ch eg. 6 then miss 4 and ss into 5 with a or dc into 5? I've got two chains running along alternate dc rows, is that correct? Thanks!
27.01.2011 - 03:02
![]() Victoria ha scritto:
Victoria ha scritto:
Hi. I think i misunderstood something, may be i had to inc 1dc on each row instead of 1 dc on each side of the row? Cause I crocheted the first row and the next 9 (for size S) but the work does not measure to 8cm, it's more like the half of it... what do i do? ignore and continue?
27.06.2009 - 23:34
![]() DROPS Design ha scritto:
DROPS Design ha scritto:
You more or less skip every 4th ch when working first row. That should match with 159 dc.
12.07.2008 - 06:45
|
|||||||||||||
Mediterranean Love Top#mediterraneanlovetop |
|||||||||||||
 |
 |
||||||||||||
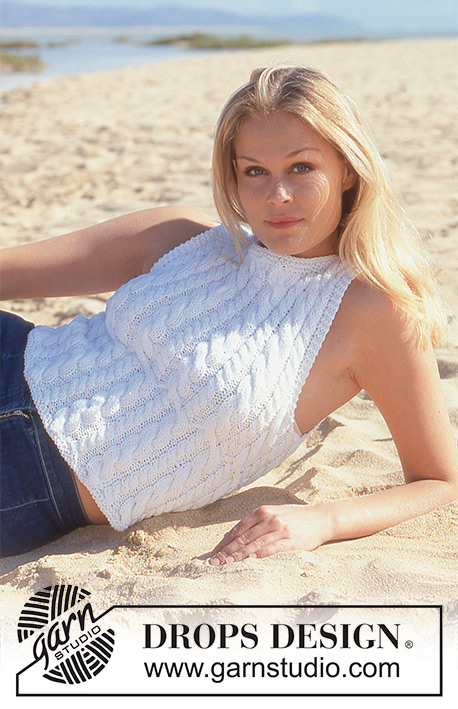
Top lavorato all'uncinetto a schiena nuda, in DROPS Safran Moulinè o Safran. Taglie: Dalla XS alla L.
DROPS 65-13 |
|||||||||||||
|
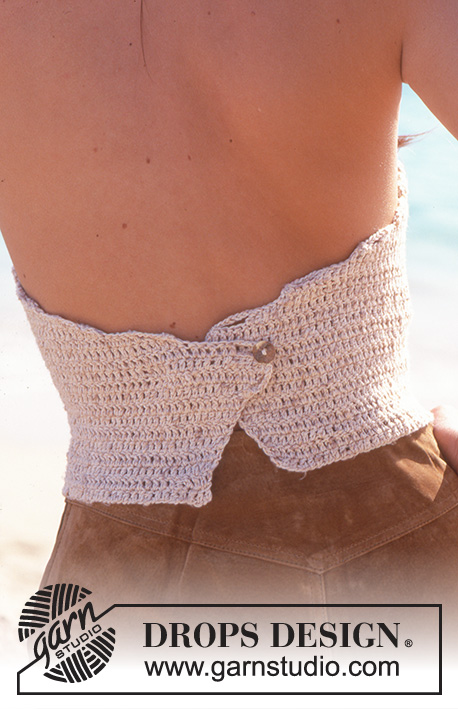
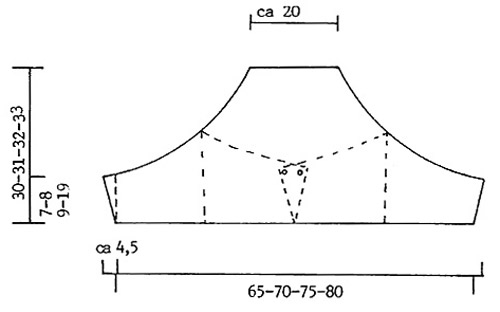
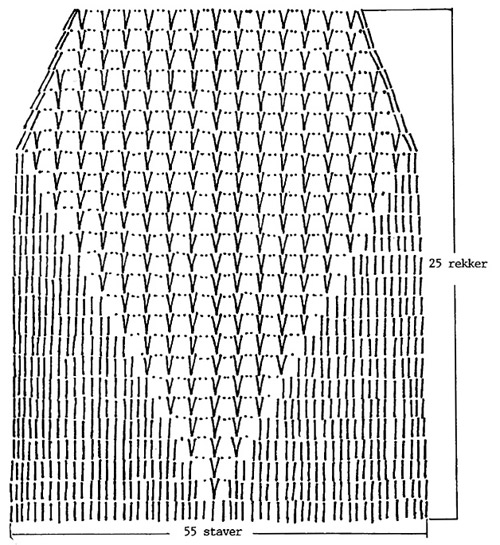
CAMPIONE: 20 maglie alte x 11 righe con l'uncinetto n° 3 mm = 10 x 10 cm. Ricordatevi che la misura dell'uncinetto è solo indicativa. MOTIVO: Vedere il diagramma. Il diagramma è lo stesso per tutte le taglie. SUGGERIMENTO PER IL LAVORO: Per diminuire 4 maglie alte: all'inizio della riga, 6 catenelle, saltare le prime 4 maglie alte sulla riga e iniziare a lavorare nella 5° maglie alte sulla riga, lavorare fino a quando rimangono 4 maglie alte, girare. Per diminuire 3 maglie alte: all'inizio della riga, 5 catenella, saltare le prime 3 maglie alte sulla riga e iniziare a lavorare nella 4° maglie alte sulla riga, lavorare fino a quando rimangono 3 maglie alte, girare. Per diminuire 2 maglie alte: all'inizio della riga, 4 catenelle, saltare le prime 2 maglie alte sulla riga e iniziare a lavorare nella 3° maglie alte sulla riga, lavorare fino a quando rimangono 2 maglie alte girare. ----------------------------------------------------------- DAVANTI e DIETRO: Avviare 170 - 183 - 196 - 210 catenelle con l'uncinetto n° 3 mm. Sulla riga successiva lavorare a maglie alte nella riga di catenelle come segue: 3 maglie alte (sostituire 1 maglia alta con 3 catenelle), * saltare 1 catenella, 3 maglie alte *, ripetere *-* (cioè lavorare 3 maglie alte su 4 catenelle) fino a quando rimangono 0-1-2-0 catenelle, lavorare 1 maglia alta in ogni cat.= 129-139-149-159 maglie alte. Fare attenzione alla tensione del lavoro - è importante non lavorare in modo troppo morbido su un capo aderente come questo. Poi lavorare a maglie alte su tutte le maglie e allo stesso tempo aumentare a ogni lato su ogni riga: 1 maglia alta a ogni lato 8-9-10-11 volte = 145-157-169-181 maglie alte. Il lavoro misura ora circa 7-8-9-10 cm. Poi diminuire a ogni lato su ogni riga - vedere il SUGGERIMENTO PER IL LAVORO - ALLO STESSO TEMPO, iniziare a lavorare il diagramma - assicurarsi di centrare correttamente il motivo - sulle 55 maglie alte centrali. Diminuire a ogni lato, come segue: 4 maglie alte 2-3-6-8 volte, 3 maglie alte 3-7-7-7 volte, 2 maglie alte 14-9-6-5 volte; proseguire poi lavorando il diagramma. Dopo aver completato il diagramma, il lavoro misura circa 30-31-32-34 cm. CONFEZIONE: Con l’uncinetto n° 3, lavorare 1 asola in cima a ogni, sul dietro, come segue: 1 maglia bassa, 2 catenelle, saltare ½ cm, 1 maglia bassa. Provarsi il capo per verificare la posizione corretta dei bottoni - attaccare 1 bottone in basso, sulla parte sinistra del dietro e 1 bottone in alto, sulla parte destra del dietro. Lavorare 3 cordini di catenelle lunghi circa. 100 cm ognuno. Intrecciarle, fare un nodo ad ogni estremità e far passare questo cordino attraverso l’ultima riga traforata in alto. |
|||||||||||||
Spiegazioni del diagramma |
|||||||||||||
|
|||||||||||||
 |
|||||||||||||
 |
|||||||||||||
Avete terminato questo modello?Allora taggate le vostre foto con #dropspattern #mediterraneanlovetop o inviatele alla #dropsfan gallery. Avete bisogno di aiuto con questo modello?Troverete 4 video tutorial, una sezione per i commenti/domande e molto altro guardando il modello su www.garnstudio.com © 1982-2026 DROPS Design A/S. Ci riserviamo tutti i diritti. Questo documento, compreso tutte le sue sotto-sezioni, è protetto dalle leggi sul copyright. Potete leggere quello che potete fare con i nostri modelli alla fine di ogni modello sul nostro sito. |
|||||||||||||


Con oltre 40 anni di esperienza nel design di modelli di maglia e uncinetto, DROPS Design offre la più estesa collezione di modelli gratuiti su internet - tradotti in 17 lingue. Ad oggi vi possiamo fornire 324 cataloghi e 12290 modelli - 9561 dei quali sono tradotti in Italiano.
Ci stiamo impegnando molto per darvi il meglio che vi possiamo offrire in termini di maglia e uncinetto, ispirazioni e consigli così come filati di grande qualità ad un prezzo incredibile! Volete utilizzare i nostri modelli per qualcosa d'altro oltre al vostro uso personale? Potete leggere tutto ciò che è consentito nel testo sul Copyright in basso su tutte le pagine dei nostri modelli. Buon lavoro!
Lasciare un commento sul modello DROPS 65-13
Noi saremmo felici di ricevere i tuoi commenti e opinioni su questo modello!
Se vuoi fare una domanda, fai per favore attenzione a selezionare la categoria corretta nella casella qui sotto per velocizzare il processo di risposta. I campi richiesti sono indicati da *.