
Categorie popolari
State cercando un filato?



























Commenti / Domande (106)
 Kathy ha scritto:
Hi, this is a beautiful pattern, I've been trying to do the math of the pattern in my head after reading through the comments below. From my understanding, to dec on both sides takes 2 rows (so for example: dec 4 dc, size S = 6 rows in total). But with that, there would be a total of 38 rows of dec yet the chart only shows 25 rows. What am doing wrong?
03.04.2015 - 04:32DROPS Design ha risposto:
Dear Kathy, you decrease at the beg and at the end of every row, ie to dec 4dc, work as stated under crocheting tip, (skip first 4 dc at beg of row ...) and at the end of same row, turn when 4 dc remain before the end of row = you have decreased 4 dc each side on the same row. Happy crocheting!
03.04.2015 - 09:22
 Maria ha scritto:
Thanks for you reply but I need further clarification. I'm crocheting size small, have completed the 145 dc's. According to the instructions I'm supposed to start decreasing on both sides on every row, meaning that I have to start decreasing 4 dc's at the beginning of the row by chaining 6 and starting working on the 5th chain, how do I decrease the 4 dc's at the end of the same row? If I do what you suggest in your answer I'll be only decreasing 4 dc's at only one end of the row.
24.03.2015 - 21:38DROPS Design ha risposto:
Dear Maria, (answer edited) to dec 4 dc work 1 row as stated: turn at the end of row, ch 6, skip 4 dc and work in 5th dc on row and work remaining sts on row until 4 sts remain (= you have decreased 4 dc each side), turn and work next decrease. Repeat how many times required in pattern (and continue same way (see crocheting tip) when dec 3 dc and 2 dc each side. Happy crocheting!
25.03.2015 - 09:01
Maria ha scritto:
Beautiful pattern but need help to continue working on it. Would you please clarify the decreasing (dec) instructions. The pattern calls for dec on both sides of every row, but the directions under Crocheting tip refer only to the end of the row. The same doesn't work for the beginning of the row. Thanking you in advance, María
23.03.2015 - 23:27DROPS Design ha risposto:
Dear Maria, (answer edited) when you have worked the row with dec at the end of the first row, turn work when the number of sts remain before end of row. Happy crocheting!
24.03.2015 - 09:31
Rebecca ha scritto:
Hi! Question- do you design all of the patterns on your website? I look forward to hearing from you :)
22.03.2015 - 07:41DROPS Design ha risposto:
Dear Rebecca, you are correct, we do. Happy crocheting!
23.03.2015 - 09:53
 Joelle ha scritto:
Bonjour, cela fait 3 fois que je fais et défais. Je ne comprends pas à quel moment précis on commence le diagramme, ce n'est pas clair pour moi. A combien de cm du bas du travail ? Juste après avoir fini les augmentations ? Je l'ai fait mais à ce moment-là on ne peut pas finir les dernières diminutions.... Je lis et je relis mais ne trouve pas la solution. Merci de me renseigner.
01.03.2015 - 23:14DROPS Design ha risposto:
Bonjour Joelle, on commence le diagramme à 7-8-9-10 cm (cf taille), c'est-à-dire quand les augmentations sont terminées et quand on commence les diminutions - centrez le diagramme sur les 55 m centrales. Bon crochet!
02.03.2015 - 10:52
Garridoannie ha scritto:
Bonjour, il me semble que les chiffres indiqués pour la chaînette (Taille S-184 ml) sont erronés. Je rejoins le commentaire de Coralie Lemaire. En suivant vos explications, on tombe sur 136 B. Cordialement
01.08.2014 - 00:54DROPS Design ha risposto:
Bonjour Mme Garridoannie, en taille S, vous crochetez 1 B dans la 3ème ml à partir du crochet, 1 B dans chacune des 2 ml suiv (= 3 B), puis *sautez 1 ml, 1B dans chacune des 3 ml suiv*= 139B. Bon crochet!
01.08.2014 - 09:32
Coralie Lemaire ha scritto:
Bonjour, Je ne parviens pas à obtenir les mêmes nombres que dans l'explication du modèle. En ayant le bon nombre de mailles en l'air au départ sur ma chainette, je n'obtiens pas le même nombre que vous de brides au premier rang. Êtes-vous sûr du nombre de mailles en l'air de la chainette ainsi que du nombre de brides du premier rang dans votre explication? Ou bien auriez-vous oublié les mailles en l'air pour tourner à la fin de la chainette de départ? Cordialement
21.04.2014 - 21:44DROPS Design ha risposto:
Bonjour Mme Lemaire, on monte davantage de ml pour éviter que le bord ne soit trop serré, et au 1er rang, on va sauter des ml comme indiqué pour avoir à la fin du 1er rang 129-139-149-159 B. Bon crochet!
22.04.2014 - 09:37
Janette ha scritto:
When does the chart begin? With the decreasing or after?
15.04.2014 - 14:18DROPS Design ha risposto:
Dear Janette, begin chart at the same time as dec begin, i.e. when piece measures 2.75" - 3-1/8" - 3.5" - 4". Happy crocheting!
15.04.2014 - 15:21
Migdalia ha scritto:
I just want to know is this is the patten for "small size"
26.02.2014 - 04:16DROPS Design ha risposto:
Dear Migdalia, this pattern is given in 4 sizes : Extra Small, Small, Medium and Large. Happy crocheting!
26.02.2014 - 09:35
Bricchi ha scritto:
Bonjour, suite à mon problème d'hier,j'ai représenté sur papier les 25 rangs du diagramme en notant les diminutions et j'arrive à seulement 7 diminutions de 2B au lieu de 14,je pense qu'il faut diminuer au début et à la fin de chaque rang pour arriver au bon nombre de mailles en haut des 25 rangs Qu'en pensez vous? Merci
18.07.2013 - 08:31DROPS Design ha risposto:
Bonjour Mme Bricchi, c'est tout à fait ça, on diminue au début et à la fin de chaque rang, tous les rangs. Bon crochet !
18.07.2013 - 08:49
|
|||||||||||||
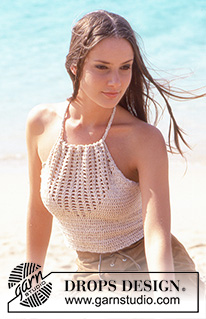
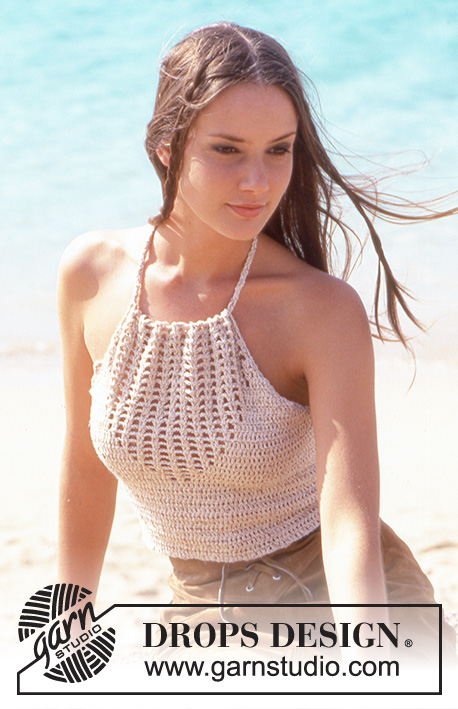
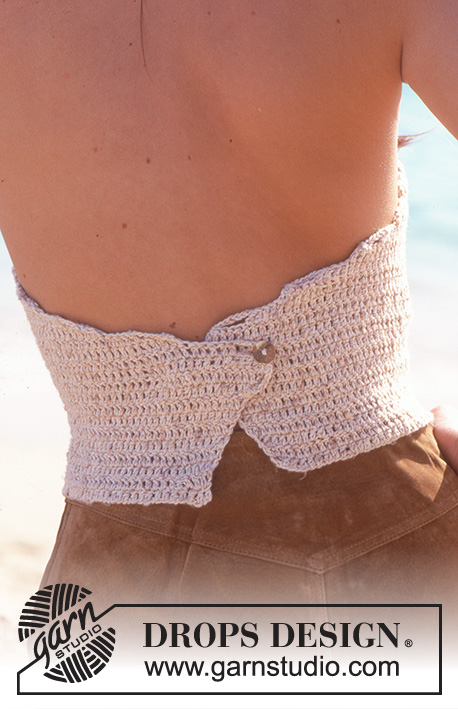
Mediterranean Love Top#mediterraneanlovetop |
|||||||||||||
 |
 |
||||||||||||
Top lavorato all'uncinetto a schiena nuda, in DROPS Safran Moulinè o Safran. Taglie: Dalla XS alla L.
DROPS 65-13 |
|||||||||||||
|
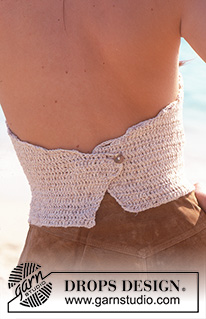
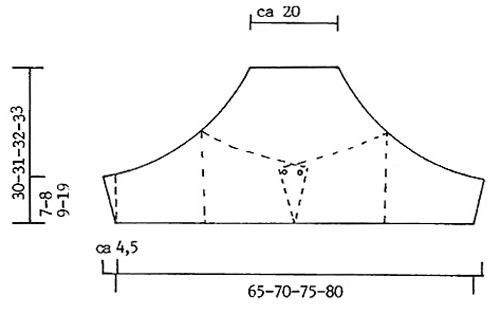
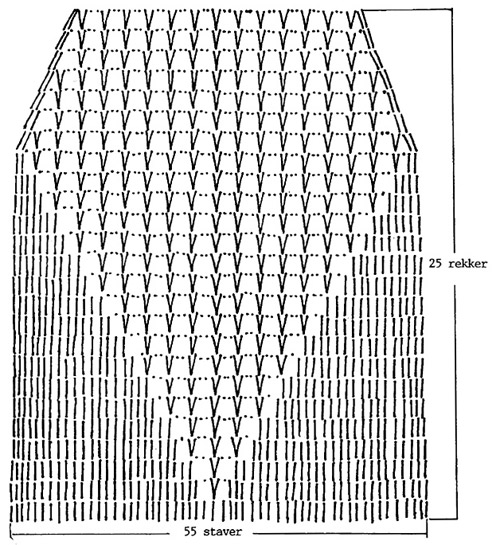
CAMPIONE: 20 maglie alte x 11 righe con l'uncinetto n° 3 mm = 10 x 10 cm. Ricordatevi che la misura dell'uncinetto è solo indicativa. MOTIVO: Vedere il diagramma. Il diagramma è lo stesso per tutte le taglie. SUGGERIMENTO PER IL LAVORO: Per diminuire 4 maglie alte: all'inizio della riga, 6 catenelle, saltare le prime 4 maglie alte sulla riga e iniziare a lavorare nella 5° maglie alte sulla riga, lavorare fino a quando rimangono 4 maglie alte, girare. Per diminuire 3 maglie alte: all'inizio della riga, 5 catenella, saltare le prime 3 maglie alte sulla riga e iniziare a lavorare nella 4° maglie alte sulla riga, lavorare fino a quando rimangono 3 maglie alte, girare. Per diminuire 2 maglie alte: all'inizio della riga, 4 catenelle, saltare le prime 2 maglie alte sulla riga e iniziare a lavorare nella 3° maglie alte sulla riga, lavorare fino a quando rimangono 2 maglie alte girare. ----------------------------------------------------------- DAVANTI e DIETRO: Avviare 173-186-199-213 catenelle con l'uncinetto n° 3 mm. Sulla riga successiva lavorare a maglie alte nella riga di catenelle come segue: lavorare 1 maglia alta nella 4° catenella dall'uncinetto (= 1 maglia alta sostituita da 3 catenelle), lavorare 1 maglia alta nella catenella successiva, * saltare 1 catenella, 1 maglia alta in ognuna delle 3 catenelle successive *, ripetere *-* (cioè lavorare 3 maglie alte su 4 catenelle) fino a quando rimangono 0-1-2-0 catenelle, 1 maglia alta in ognuna delle ultime 0-1-2-0 catenelle = 129-139-149-159 maglie alte. Fare attenzione alla tensione del lavoro - è importante non lavorare in modo troppo morbido su un capo aderente come questo. Poi lavorare a maglie alte su tutte le maglie e allo stesso tempo aumentare a ogni lato su ogni riga: 1 maglia alta a ogni lato 8-9-10-11 volte = 145-157-169-181 maglie alte. Il lavoro misura ora circa 7-8-9-10 cm. Poi diminuire a ogni lato su ogni riga - vedere il SUGGERIMENTO PER IL LAVORO - ALLO STESSO TEMPO, iniziare a lavorare il diagramma - assicurarsi di centrare correttamente il motivo - sulle 55 maglie alte centrali. Diminuire a ogni lato, come segue: 4 maglie alte 2-3-6-8 volte, 3 maglie alte 3-7-7-7 volte, 2 maglie alte 14-9-6-5 volte; proseguire poi lavorando il diagramma. Dopo aver completato il diagramma, il lavoro misura circa 30-31-32-34 cm. CONFEZIONE: Con l’uncinetto n° 3, lavorare 1 asola in cima a ogni, sul dietro, come segue: 1 maglia bassa, 2 catenelle, saltare ½ cm, 1 maglia bassa. Provarsi il capo per verificare la posizione corretta dei bottoni - attaccare 1 bottone in basso, sulla parte sinistra del dietro e 1 bottone in alto, sulla parte destra del dietro. Lavorare 3 cordini di catenelle lunghi circa. 100 cm ognuno. Intrecciarle, fare un nodo ad ogni estremità e far passare questo cordino attraverso l’ultima riga traforata in alto. |
|||||||||||||
Spiegazioni del diagramma |
|||||||||||||
|
|||||||||||||
 |
|||||||||||||
 |
|||||||||||||
Avete terminato questo modello?Allora taggate le vostre foto con #dropspattern #mediterraneanlovetop o inviatele alla #dropsfan gallery. Avete bisogno di aiuto con questo modello?Troverete 4 video tutorial, una sezione per i commenti/domande e molto altro guardando il modello su www.garnstudio.com © 1982-2026 DROPS Design A/S. Ci riserviamo tutti i diritti. Questo documento, compreso tutte le sue sotto-sezioni, è protetto dalle leggi sul copyright. Potete leggere quello che potete fare con i nostri modelli alla fine di ogni modello sul nostro sito. |
|||||||||||||






Con oltre 40 anni di esperienza nel design di modelli di maglia e uncinetto, DROPS Design offre la più estesa collezione di modelli gratuiti su internet - tradotti in 17 lingue. Ad oggi vi possiamo fornire 333 cataloghi e 12532 modelli - 9806 dei quali sono tradotti in Italiano.
Ci stiamo impegnando molto per darvi il meglio che vi possiamo offrire in termini di maglia e uncinetto, ispirazioni e consigli così come filati di grande qualità ad un prezzo incredibile! Volete utilizzare i nostri modelli per qualcosa d'altro oltre al vostro uso personale? Potete leggere tutto ciò che è consentito nel testo sul Copyright in basso su tutte le pagine dei nostri modelli. Buon lavoro!
Lasciare un commento sul modello DROPS 65-13
Noi saremmo felici di ricevere i tuoi commenti e opinioni su questo modello!
Se vuoi fare una domanda, fai per favore attenzione a selezionare la categoria corretta nella casella qui sotto per velocizzare il processo di risposta. I campi richiesti sono indicati da *.