
Categorie popolari
State cercando un filato?


Commenti / Domande (102)
Carol ha scritto:
Why do you not have a video for the complete pattern.so we can look at the video like on youtube. Thank you.
26.07.2015 - 10:48DROPS Design ha risposto:
Dear Carol. It's not possible for us to publish videos of a complete pattern, we only make on techniques, stitches and pattern diagrams. If you need help with a specific part of the pattern, we will take a look at it.
27.07.2015 - 15:34
![]() Studer Brigitta ha scritto:
Studer Brigitta ha scritto:
Hallo, das Abnehmen auf der linken Seite ist nicht beschrieben! Wie muss das gemacht werden mit den Luftmaschen? Diese Anleitung ist recht spärlich beschrieben, könnte eine Auffrischung brauchen.
21.07.2015 - 06:54DROPS Design ha risposto:
Die Abnahmen werden beidseitig gemacht, d.h. immer am Anfang jeder R. Die Anleitung wurde neu übersetzt und ist nun hoffentlich etwas deutlicher, ansonsten fragen Sie gerne noch einmal nach. Gutes Gelingen!
28.07.2015 - 16:56
![]() Summer ha scritto:
Summer ha scritto:
How would you instead of having a button connect it in the back?
04.07.2015 - 04:56DROPS Design ha risposto:
Dear Summer, you can make 2 twisted strings or a ch and sew them at each end of piece then cross them and tie them with a knot. A button may be a good idea to hold both pieces tog. Happy crocheting!
04.07.2015 - 09:27
![]() Tam ha scritto:
Tam ha scritto:
I don't understand the part that inc 1 dc on each side every row 8 times . That mean I'm do inc 8 times the hold row 1 from beginning 1 the end and another 6 during the row ????
24.06.2015 - 18:27DROPS Design ha risposto:
Dear Tam, you inc 1 st at the beg + 1 st at the end of row (= 2 sts inc per row) for 8 rows (1st size) = you have a total of 145 sts on row 9. Happy crocheting!
25.06.2015 - 10:24
![]() Stephanie ha scritto:
Stephanie ha scritto:
After reading pattern and looking at the diagram for drops 65-13 pattern I don't understand the instructions right above the chart
04.06.2015 - 16:46DROPS Design ha risposto:
Dear Stephanie, you will find above measurement chart all diagram text, 1 symbol represent 1 st / 1 group of st - read more about diagrams here. Happy crocheting!
05.06.2015 - 09:48
![]() Pam ha scritto:
Pam ha scritto:
I have just got rolling with no problem.Rows 2 through 9-10-11-12: 1 dc in each dc from the previous row--at the same time, inc 1 dc on each side every row 8-9-10-11 times. What does 8-9-10-11 times mean. It doesn't make sense to me. Does it mean to increase row 3 through row 12 ? Maybe if you clear up if I am understanding this part I will be able to get through the decreasing also.
09.04.2015 - 07:50DROPS Design ha risposto:
Dear Pam, this refers to the size, eg in 1st size, you work rows 2 through row 9, inc every row 8 times (in 2nd size through row 10, inc 9 times etc..). Happy crocheting!
09.04.2015 - 09:56
![]() Kathy ha scritto:
Kathy ha scritto:
Hi, this is a beautiful pattern, I've been trying to do the math of the pattern in my head after reading through the comments below. From my understanding, to dec on both sides takes 2 rows (so for example: dec 4 dc, size S = 6 rows in total). But with that, there would be a total of 38 rows of dec yet the chart only shows 25 rows. What am doing wrong?
03.04.2015 - 04:32DROPS Design ha risposto:
Dear Kathy, you decrease at the beg and at the end of every row, ie to dec 4dc, work as stated under crocheting tip, (skip first 4 dc at beg of row ...) and at the end of same row, turn when 4 dc remain before the end of row = you have decreased 4 dc each side on the same row. Happy crocheting!
03.04.2015 - 09:22
![]() Maria ha scritto:
Maria ha scritto:
Thanks for you reply but I need further clarification. I'm crocheting size small, have completed the 145 dc's. According to the instructions I'm supposed to start decreasing on both sides on every row, meaning that I have to start decreasing 4 dc's at the beginning of the row by chaining 6 and starting working on the 5th chain, how do I decrease the 4 dc's at the end of the same row? If I do what you suggest in your answer I'll be only decreasing 4 dc's at only one end of the row.
24.03.2015 - 21:38DROPS Design ha risposto:
Dear Maria, (answer edited) to dec 4 dc work 1 row as stated: turn at the end of row, ch 6, skip 4 dc and work in 5th dc on row and work remaining sts on row until 4 sts remain (= you have decreased 4 dc each side), turn and work next decrease. Repeat how many times required in pattern (and continue same way (see crocheting tip) when dec 3 dc and 2 dc each side. Happy crocheting!
25.03.2015 - 09:01
![]() Maria ha scritto:
Maria ha scritto:
Beautiful pattern but need help to continue working on it. Would you please clarify the decreasing (dec) instructions. The pattern calls for dec on both sides of every row, but the directions under Crocheting tip refer only to the end of the row. The same doesn't work for the beginning of the row. Thanking you in advance, María
23.03.2015 - 23:27DROPS Design ha risposto:
Dear Maria, (answer edited) when you have worked the row with dec at the end of the first row, turn work when the number of sts remain before end of row. Happy crocheting!
24.03.2015 - 09:31
![]() Rebecca ha scritto:
Rebecca ha scritto:
Hi! Question- do you design all of the patterns on your website? I look forward to hearing from you :)
22.03.2015 - 07:41DROPS Design ha risposto:
Dear Rebecca, you are correct, we do. Happy crocheting!
23.03.2015 - 09:53
|
|||||||||||||
Mediterranean Love Top#mediterraneanlovetop |
|||||||||||||
 |
 |
||||||||||||
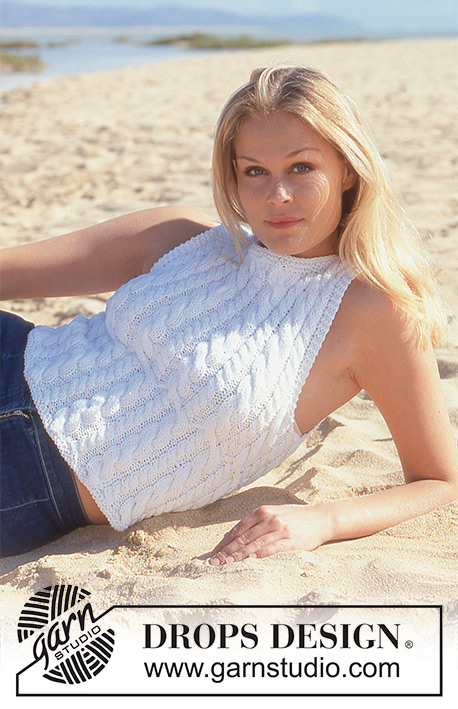
Top lavorato all'uncinetto a schiena nuda, in DROPS Safran Moulinè o Safran. Taglie: Dalla XS alla L.
DROPS 65-13 |
|||||||||||||
|
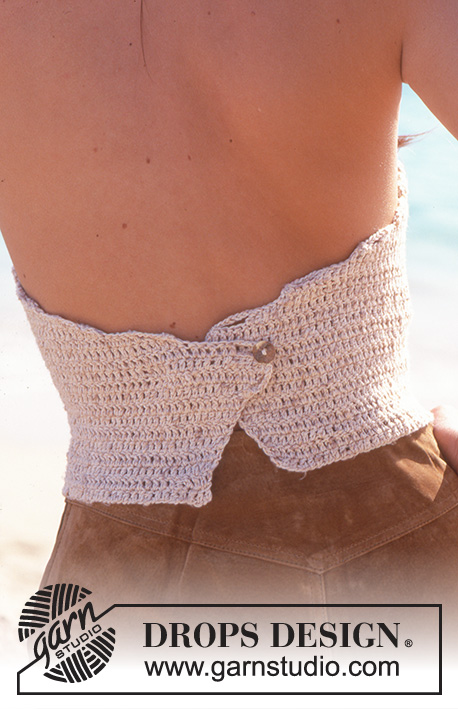
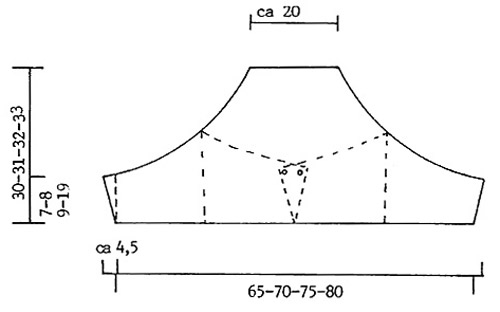
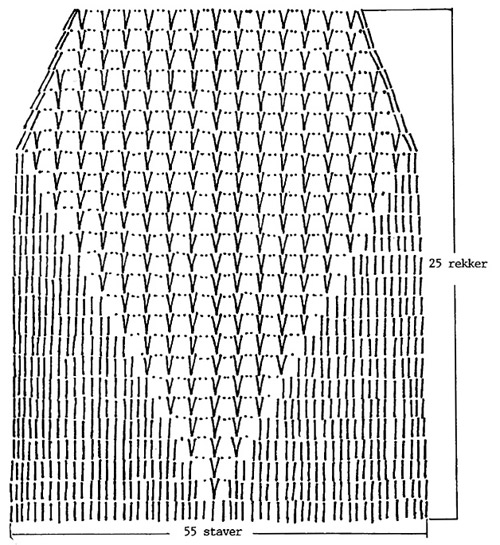
CAMPIONE: 20 maglie alte x 11 righe con l'uncinetto n° 3 mm = 10 x 10 cm. Ricordatevi che la misura dell'uncinetto è solo indicativa. MOTIVO: Vedere il diagramma. Il diagramma è lo stesso per tutte le taglie. SUGGERIMENTO PER IL LAVORO: Per diminuire 4 maglie alte: all'inizio della riga, 6 catenelle, saltare le prime 4 maglie alte sulla riga e iniziare a lavorare nella 5° maglie alte sulla riga, lavorare fino a quando rimangono 4 maglie alte, girare. Per diminuire 3 maglie alte: all'inizio della riga, 5 catenella, saltare le prime 3 maglie alte sulla riga e iniziare a lavorare nella 4° maglie alte sulla riga, lavorare fino a quando rimangono 3 maglie alte, girare. Per diminuire 2 maglie alte: all'inizio della riga, 4 catenelle, saltare le prime 2 maglie alte sulla riga e iniziare a lavorare nella 3° maglie alte sulla riga, lavorare fino a quando rimangono 2 maglie alte girare. ----------------------------------------------------------- DAVANTI e DIETRO: Avviare 170 - 183 - 196 - 210 catenelle con l'uncinetto n° 3 mm. Sulla riga successiva lavorare a maglie alte nella riga di catenelle come segue: 3 maglie alte (sostituire 1 maglia alta con 3 catenelle), * saltare 1 catenella, 3 maglie alte *, ripetere *-* (cioè lavorare 3 maglie alte su 4 catenelle) fino a quando rimangono 0-1-2-0 catenelle, lavorare 1 maglia alta in ogni cat.= 129-139-149-159 maglie alte. Fare attenzione alla tensione del lavoro - è importante non lavorare in modo troppo morbido su un capo aderente come questo. Poi lavorare a maglie alte su tutte le maglie e allo stesso tempo aumentare a ogni lato su ogni riga: 1 maglia alta a ogni lato 8-9-10-11 volte = 145-157-169-181 maglie alte. Il lavoro misura ora circa 7-8-9-10 cm. Poi diminuire a ogni lato su ogni riga - vedere il SUGGERIMENTO PER IL LAVORO - ALLO STESSO TEMPO, iniziare a lavorare il diagramma - assicurarsi di centrare correttamente il motivo - sulle 55 maglie alte centrali. Diminuire a ogni lato, come segue: 4 maglie alte 2-3-6-8 volte, 3 maglie alte 3-7-7-7 volte, 2 maglie alte 14-9-6-5 volte; proseguire poi lavorando il diagramma. Dopo aver completato il diagramma, il lavoro misura circa 30-31-32-34 cm. CONFEZIONE: Con l’uncinetto n° 3, lavorare 1 asola in cima a ogni, sul dietro, come segue: 1 maglia bassa, 2 catenelle, saltare ½ cm, 1 maglia bassa. Provarsi il capo per verificare la posizione corretta dei bottoni - attaccare 1 bottone in basso, sulla parte sinistra del dietro e 1 bottone in alto, sulla parte destra del dietro. Lavorare 3 cordini di catenelle lunghi circa. 100 cm ognuno. Intrecciarle, fare un nodo ad ogni estremità e far passare questo cordino attraverso l’ultima riga traforata in alto. |
|||||||||||||
Spiegazioni del diagramma |
|||||||||||||
|
|||||||||||||
 |
|||||||||||||
 |
|||||||||||||
Avete terminato questo modello?Allora taggate le vostre foto con #dropspattern #mediterraneanlovetop o inviatele alla #dropsfan gallery. Avete bisogno di aiuto con questo modello?Troverete 4 video tutorial, una sezione per i commenti/domande e molto altro guardando il modello su www.garnstudio.com © 1982-2026 DROPS Design A/S. Ci riserviamo tutti i diritti. Questo documento, compreso tutte le sue sotto-sezioni, è protetto dalle leggi sul copyright. Potete leggere quello che potete fare con i nostri modelli alla fine di ogni modello sul nostro sito. |
|||||||||||||


Con oltre 40 anni di esperienza nel design di modelli di maglia e uncinetto, DROPS Design offre la più estesa collezione di modelli gratuiti su internet - tradotti in 17 lingue. Ad oggi vi possiamo fornire 324 cataloghi e 12290 modelli - 9561 dei quali sono tradotti in Italiano.
Ci stiamo impegnando molto per darvi il meglio che vi possiamo offrire in termini di maglia e uncinetto, ispirazioni e consigli così come filati di grande qualità ad un prezzo incredibile! Volete utilizzare i nostri modelli per qualcosa d'altro oltre al vostro uso personale? Potete leggere tutto ciò che è consentito nel testo sul Copyright in basso su tutte le pagine dei nostri modelli. Buon lavoro!
Lasciare un commento sul modello DROPS 65-13
Noi saremmo felici di ricevere i tuoi commenti e opinioni su questo modello!
Se vuoi fare una domanda, fai per favore attenzione a selezionare la categoria corretta nella casella qui sotto per velocizzare il processo di risposta. I campi richiesti sono indicati da *.