
Categorie popolari
State cercando un filato?


Commenti / Domande (60)
![]() Janny ha scritto:
Janny ha scritto:
Ik begrijp niet hoe het moet met de mouwen. Ik heb tot 46 cm in het rond gehaakt en dan moet ik het werk keren. Hoe werkt dit? Moet ik dan 8 lossen, 1 vaste in het eerste boogje doen? En aan het eind van de toer, hoe gaat dat? Eindig ik met een vaste in het laatste boogje, keren, 8 lossen etc.? Er ontstaat dus een opening, dat is de bedoeling? Jammer dat jullie geen instructie/patroonuitleg hebben.
27.06.2021 - 00:00DROPS Design ha risposto:
Dag Janny,
Is inderdaad niet helder uitgelegd. Voordat je begint met heen en weer haken, zorg je dat je met een vaste eindigt midden onder de mouw. Dan keer je het werk en haak je halve vasten tot het midden van het eerste boogje. Dan maak je boogjes en je sluit de toer weer met een halve vaste in het midden onder de mouw. Keer het werk en haak weer halve vasten tot het midden van het eerste boogje. Haak boogjes en sluit de toer met een halve vaste waar het eerste boogje van de vorige toer begon (dus waar je tot het midden van het boogje halve vasten hebt gehaakt.) Zo gaa je verder heen en weer.
28.06.2021 - 12:40
![]() Jacqueline Vervelde ha scritto:
Jacqueline Vervelde ha scritto:
Hallo. Ik kom er niet uit met de mouwen. Je moet nu heen en weer haken ipv rond. Misschien kan er een video van gemaakt worden want heb al wel gezien dat er meerderen zijn die dit niet snappen. Van rond haken naar heen en weer met lossenbogen....ik wacht met spanning want wil het vest heel graag aan....
13.12.2020 - 22:28
![]() Jacqueline Vervelde ha scritto:
Jacqueline Vervelde ha scritto:
Hallo. Ik kom er niet uit met de mouwen. Je moet nu heen en weer haken ipv rond. Misschien kan er een video van gemaakt worden want heb al wel gezien dat er meerderen zijn die dit niet snappen. Van rond haken naar heen en weer met lossenbogen....ik wacht met spanning want wil het vest heel graag aan
13.12.2020 - 22:26DROPS Design ha risposto:
Dag Jacqueline,
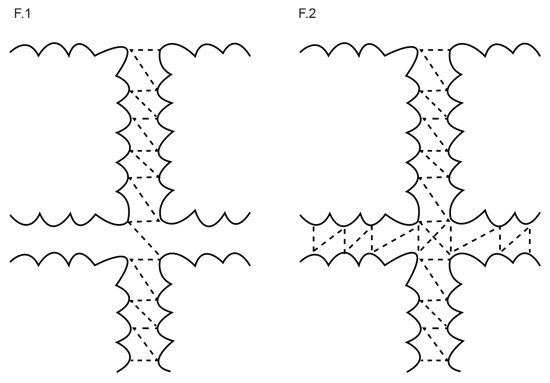
Ja, je haakt inderdaad de mouwen in de rondte. Eerst maak je 2 vierkanten, die aan elkaar gehaakt worden volgens figuur 1 en dan haak je de mouw verder in de rondte tot het armsgat. Daarna brei je de mouw weer heen en weer.
22.12.2020 - 11:54
![]() Jacqueline Vervelde ha scritto:
Jacqueline Vervelde ha scritto:
Hallo. Ik kom er niet uit met de mouwen. Je moet nu heen en weer haken ipv rond. Misschien kan er een video van gemaakt worden want heb al wel gezien dat er meerderen zijn die dit niet snappen. Van rond haken naar heen en weer met lossenbogen....ik wacht met spanning want wil het vest heel graag aan
13.12.2020 - 22:25
![]() HELENE ha scritto:
HELENE ha scritto:
Bonjour, je voudrais faire le modèle du gilet Drops 65/9. Mais je en comprends pas ni le explications qui parlent de "carré" alors que je vois des fleurs et je ne comprends pas les explications qui parlent d'assemblage de carré alors que je vois le gilet tricoté en bride et en fleurs. merci de m'eclaicir sur ce modèle. J'en profite pour vous vous dire que j'adore votre site. Bien cordialement
15.11.2020 - 19:29DROPS Design ha risposto:
Bonjour Hélène, ce modèle se compose de carrés crochetés entre eux à la fin comme le montre le schéma - cette vidéo montre comment crocheter les 4 premiers tours de ces carrés - crochetez le dernier comme indiqué dans les explications. Bon crochet!
16.11.2020 - 09:29
![]() Leslie ha scritto:
Leslie ha scritto:
Need help with joining squares in vertical columns. Starting at the centre of the 1st bow ch2 across seems fine but the video show ch 4 vertically then 1 sc in the 3 rd space. I repeated this but the chain 4 are all bunched. I am looking at diagram but it doesn’t show how many to skip. The diagram shows 6 bows along the sides with 6 connections in centre of each bow. My crocheted flower only 5 bows so do I skip enough to connect in the centre of each bows and disregard the video?
10.03.2020 - 23:10DROPS Design ha risposto:
Dear Leslie, the video is showing the technique, but the number of chains/ sc can vary depending on each pattern, ie you have here to crochet the squares together as shown in fig. 1 and Fig.2 = 3 /5 chains between the squares and along the 6 ch-spaces from first corner to last corner each square - you should have 6-ch-spaces along each side of each square at the end of round 5. Hope this helps. Happy crocheting!
11.03.2020 - 09:05
![]() Leslie ha scritto:
Leslie ha scritto:
Is there a right and wrong side to the squares? If so how do I tell which is which as I am about to weave i the tails of the squares.
02.03.2020 - 16:32DROPS Design ha risposto:
Dear Leslie, you are working squares in the round, so that the side where you are crocheting is the right side and the side behind will be the wrong side. Happy crocheting!
03.03.2020 - 09:27
![]() Evy Kristine ha scritto:
Evy Kristine ha scritto:
Jeg har begynt på en egendesignet jumper med ananasmønster, og leter etter en fin måte å feste ermene. Her hadde dere en oppskrift som gjaldt jakke eller genser. Jeg prøver meg på rund felling, men som nevnt, nedenfra og opp.
17.02.2020 - 21:18DROPS Design ha risposto:
Hej Evy, sådan her kan du søge på hæklet nedenfra og op dame - hekle - nedenfra og opp God fornøjelse!
18.02.2020 - 14:28
![]() Evy Kristine Fjerdingen ha scritto:
Evy Kristine Fjerdingen ha scritto:
Hei, jeg har begynt på en heklet topp med ananas-mønster, nedenfra og opp, og har kommet til under ermene. Jeg ser etter en lignende topp, med trekvart lange ermer. Det virker som om det er mest vanlig å hekle ovenfra og ned.
09.02.2020 - 03:27DROPS Design ha risposto:
Hei Evy Kristine. Er det en topp fra oss med Ananas mønster du leter etter? Litt usikker på hva du leter etter, ettersom du har lagt ditt spørsmål under en jakke. mvh DROPS design
10.02.2020 - 14:48
![]() Leslie ha scritto:
Leslie ha scritto:
Hi there, thanks for alerting me to that. Now that I am reading the U.S, terminology for round two uses dc stitches however, when viewing the video it shows round two using treble crochets? Is this the right video for drops 65-9?
04.02.2020 - 23:35DROPS Design ha risposto:
Dear Leslie, that's right on round 2 in this jacket you work double crochets, in the round 2 on the video (another similar pattern) you work trebles. The video is applying to another pattern but remember to follow the written instructions of the pattern you are working on. Happy crocheting!
05.02.2020 - 08:25
|
|||||||||||||
Garden Wedding Cardigan#gardenweddingcardigan |
|||||||||||||
|
|
|||||||||||||
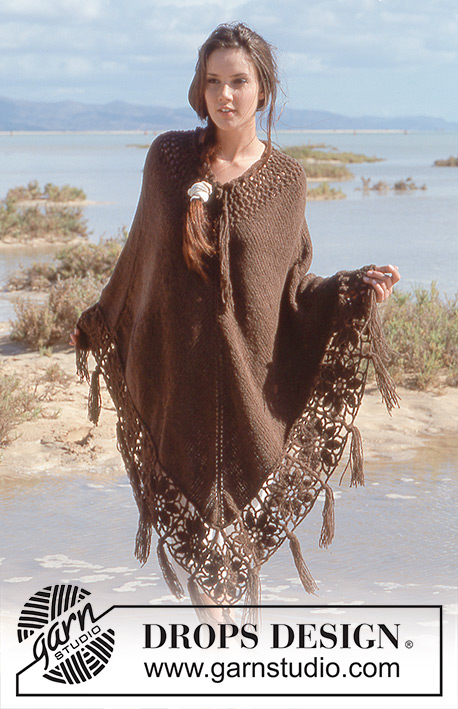
Cardigan lungo lavorato all’uncinetto a quadrati in DROPS Muskat
DROPS 65-9 |
|||||||||||||
|
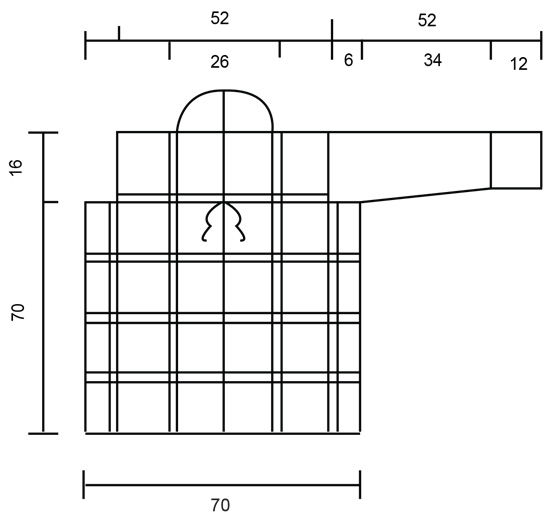
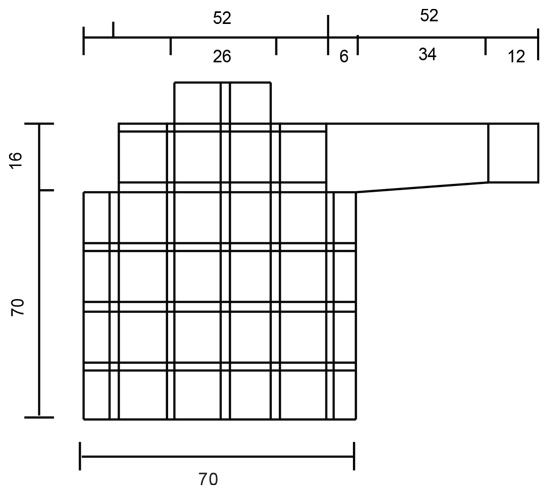
CAMPIONE: Un quadrato lavorato con l’uncinetto n° 4 mm misura circa 12 x 12 cm. Lavorare un campione, passare ad un uncinetto di misura più grande o più piccola se necessario. ------------------------------------------------------- TECNICHE IMPIEGATE: ------------------------------------------------------- QUADRATO: Avviare 8 catenelle e unirle ad anello con 1 maglia bassissima. RIGA 1: * 1 maglia alta (la 1° maglia alta è sostituita da 3 catenelle), 2 catenelle *, ripetere *-* 8 volte, finire con 1 maglia bassissima nella 1° maglia alta. RIGA 2: * 4 maglie alte (la 1° maglia alta è sostituita da 3 catenelle), attorno all’arco di catenelle, 2 catenelle *, ripetere *-* 8 volte, finire con 1 maglia bassissima nella 1° maglia alta. RIGA 3: * 4 maglie alte doppie lavorate insieme (la 1° maglia alta è sostituita da 4 catenelle) = aspettare con l’ultimo gettato e passaggio in ogni maglia alta doppia fino a quando sono state lavorate tutte le maglie alte doppie, fare un gettato e farlo passare attraverso tutti gli occhielli sull’uncinetto (lavorare 1 maglia alta doppia in ognuna delle maglie alte della riga precedente), 6 catenelle, 1 maglia alta attorno alle 2 catenelle della riga precedente, 6 catenelle * ripetere *-* 8 volte, finire con 1 maglia bassissima nel 1° gruppo di maglie alte doppie. RIGA 4: Lavorare a maglie bassissime fino al centro dell’arco di catenelle, 1 catenella, 1 maglia bassa attorno all’arco di catenelle, * 5 catenelle, 1 maglia bassa attorno all’arco di catenelle successivo, 5 catenelle, 1 maglia alta doppia attorno all’arco di catenelle successivo, 10 catenelle, 1 maglia alta attorno all’arco di catenelle successivo (= angolo), 5 catenelle, 1 maglia bassa attorno all’arco di catenelle successivo *, ripetere *-* per un totale di 3 volte, poi 5 catenelle, 1 maglia bassa attorno all’arco di catenelle successivo, 5 catenelle, 1 maglia alta attorno all’arco di catenelle successivo, 10 catenelle, 1 maglia alta attorno all’arco di catenelle successivo (= angolo), 5 catenelle, finire con 1 maglia bassissima nella 1° maglia bassa. RIGA 5: Lavorare a maglie bassissime fino al centro dell’arco di catenelle, 1 catenella, 1 maglia bassa attorno all’arco di catenelle, * 5 catenelle, 1 maglia bassa attorno all’arco di catenelle successivo, 5 catenelle, 1 maglia bassa attorno all’arco di catenelle successivo, 8 catenelle, 1 maglia bassa attorno allo stesso arco di catenelle circa 1 cm più in là (= angolo), 5 catenelle, 1 maglia bassa attorno all’arco di catenelle successivo, 5 catenelle, 1 maglia bassa attorno all’arco di catenelle successivo *, ripetere *-* per un totale di 3 volte, poi 5 catenelle, 1 maglia bassa attorno all’arco di catenelle successivo, 5 catenelle, 1 maglia bassa attorno all’arco di catenelle successivo, 8 catenelle, 1 maglia bassa attorno allo stesso arco di catenelle circa 1 cm più in là (= angolo), 5 catenelle, 1 maglia bassa attorno all’arco di catenelle successivo, 5 catenelle, finire con 1 maglia bassissima nella 1° maglia bassa. -------------------------------------------------------------- CORPO: Lavorare 50 quadrati. Ora unire i quadrati in verticale seguendo la Fig.1 Le lunghezze sono lavorate con il seguente numero di quadrati – visti dal centro davanti: Lunghezza 1: = 5 quadrati, lunghezza 2: = 5 quadrati, lunghezza 3: = 4 quadrati (= lato), lunghezza 4: = 5 quadrati, lunghezza 5: = 6 quadrati (centro dietro = tra le lunghezze 5 e 6), lunghezza 6: = 6 quadrati, lunghezza 7: = 5 quadrati, lunghezza 8: = 4 quadrati (= lato), lunghezza 9: = 5 quadrati (= lato), lunghezza 10: = 5 quadrati. Ora unire le lunghezze in orizzontale, Vedere la Fig.2. Lavorare le spalle e il collo nello stesso modo seguendo la Fig.2, poi lavorare i 2 quadrati del centro dietro con i primi 2 quadrati del centro davanti = colletto. MANICA: Lavorare 2 quadrati e unirli ad anello lavorando seguendo la Fig.1. Continuare le maniche come segue: RIGA 1: 1 maglia bassa nel 1° arco di catenelle * 5 catenelle, 1 maglia bassa nell’arco di catenelle successivo *, ripetere *-* attorno a tutta la manica = 13 archi di catenelle, affrancare l’ultimo arco con 1 maglia bassissima nella 1° maglia bassa. RIGA 2: Lavorare a maglie bassissime fino al centro del 1° arco di catenelle, lavorare 1 maglia bassa attorno all’arco, * 5 catenelle, 1 maglia bassa nell’arco di catenelle successivo *, ripetere *-*. Ripetere la riga 2 fino a quando la manica misura 20 cm. Ora aumentare ogni arco di catenelle da 5 a 6 catenelle. Continuare in questo modo fino a quando la manica misura 28 cm. Ora aumentare ogni arco di catenelle da 6 a 7 archi di catenelle. Quando la manica misura 38 cm aumentare ogni arco di catenelle da 7 a 8 catenelle. Quando il lavoro misura 46 cm continuare a lavorare in piano dal centro sotto la manica – fare in modo che il 1° quadrato sulla parte inferiore della manica sia al centro sopra del braccio quando si divide il lavoro. Finire quando la manica misura 52 cm. CONFEZIONE: Attaccare le maniche al corpo seguendo la Fig.1. Lavorare con l’uncinetto n° 4 mm e Muskat attorno alla parte inferiore del corpo: RIGA 1: * 1 maglia bassa, 1 catenella *, ripetere *-*. RIGA 2: * 1 maglia bassa attorno alla catenella della riga precedente, 1 catenella *, ripetere *-* Lungo 1 quadrato unito, lavorare circa 18 maglie basse. CONFEZIONE: Ripetere le 2 righe attorno alla scollatura e al centro davanti del cardigan. Lavorare dei cordini come segue: lavorare con l’uncinetto n° 4 mm e il filo doppio 2 cordini di catenelle lunghi circa 50 cm ognuno. Affrancarne 1 a ogni lato del centro davanti in cima al quarto quadrato dal basso. |
|||||||||||||
Spiegazioni del diagramma |
|||||||||||||
|
|||||||||||||
 |
|||||||||||||
 |
|||||||||||||
 |
|||||||||||||
Avete terminato questo modello?Allora taggate le vostre foto con #dropspattern #gardenweddingcardigan o inviatele alla #dropsfan gallery. Avete bisogno di aiuto con questo modello?Troverete 8 video tutorial, una sezione per i commenti/domande e molto altro guardando il modello su www.garnstudio.com © 1982-2026 DROPS Design A/S. Ci riserviamo tutti i diritti. Questo documento, compreso tutte le sue sotto-sezioni, è protetto dalle leggi sul copyright. Potete leggere quello che potete fare con i nostri modelli alla fine di ogni modello sul nostro sito. |
|||||||||||||


Con oltre 40 anni di esperienza nel design di modelli di maglia e uncinetto, DROPS Design offre la più estesa collezione di modelli gratuiti su internet - tradotti in 17 lingue. Ad oggi vi possiamo fornire 324 cataloghi e 12290 modelli - 9561 dei quali sono tradotti in Italiano.
Ci stiamo impegnando molto per darvi il meglio che vi possiamo offrire in termini di maglia e uncinetto, ispirazioni e consigli così come filati di grande qualità ad un prezzo incredibile! Volete utilizzare i nostri modelli per qualcosa d'altro oltre al vostro uso personale? Potete leggere tutto ciò che è consentito nel testo sul Copyright in basso su tutte le pagine dei nostri modelli. Buon lavoro!
Lasciare un commento sul modello DROPS 65-9
Noi saremmo felici di ricevere i tuoi commenti e opinioni su questo modello!
Se vuoi fare una domanda, fai per favore attenzione a selezionare la categoria corretta nella casella qui sotto per velocizzare il processo di risposta. I campi richiesti sono indicati da *.