
Categorie popolari
State cercando un filato?


Commenti / Domande (60)
![]() Anneke Van Smirren ha scritto:
Anneke Van Smirren ha scritto:
Ik kom niet helemaal uit her vastmaken van de kraag. Gaan de vierkanten van achter recht aan de voorpanden of schuin. Het kan allenei en ik weet niet wat het juiste is. Alvast bedankt voor de reactie.
14.10.2025 - 12:26DROPS Design ha risposto:
Dag Anneke,
Je haakt alle vierkanten met de zijkanten tegen elkaar, ook bij de kraag.
20.10.2025 - 21:38
![]() Lotje ha scritto:
Lotje ha scritto:
Hoe kan ik de mouw 'erin' zetten. Ik weet met welke steek, maar de mouw heeft minder steken dan het mouwsgat, dus ik kom niet uit
07.08.2025 - 09:39DROPS Design ha risposto:
Dag Lotje,
In dat geval kun je, verdeeld over de mouw, vaker in eenzelfde steek of lossenlus haken.
09.08.2025 - 18:13
![]() Stefanie ha scritto:
Stefanie ha scritto:
Hallo! Auf dem Foto der Jacke ist oben am Ärmel noch ein Viereck zu sehen und in der Anleitung, wie der Ärmel zu häkeln ist, ist nicht beschrieben, dass oben noch Vierecke reinzuhäkeln sind. Nur dass die Arbeit oben geteilt werden soll . Könnten Sie das bitte genauer beschreiben? Vielen Dank!
22.07.2025 - 14:54DROPS Design ha risposto:
Liebe Stefanie, es sind keine Vierecke bei den Ärmeln, die Vierecke de man im Foto sieht sind die von den Schultern/Kragen = die 2 Vierecke oben bei jedem Schulter beim Vordeteil. Viel Spaß beim Häkeln!
24.07.2025 - 16:24
![]() Sylvia ha scritto:
Sylvia ha scritto:
Von der Anleitung sieht es für mich so aus, als ob die gesamte Jacke aus zusammengehäkelten Vierecken (52) besteht. Aber auf dem Photo sieht es so aus, also ob viel weniger Vierecke da sind und viel mehr Luftmaschenbögen zwischen den Vierecken. Könnten Sie das bitte erklären? Danke.
03.04.2025 - 02:43DROPS Design ha risposto:
Liebe Sylvia, so stimmen alle Foto mit Anleitung zusammen - wenn die Quadraten zusammengehäkelt sind, sieht es dann aus, wie es dann "mehr" Luftmaschenbogen gebe. Viel Spaß beim Häkeln!
03.04.2025 - 09:58
![]() Sylvia ha scritto:
Sylvia ha scritto:
Von der Anleitung sieht es für mich so aus, als ob die gesamte Jacke aus zusammengehäkelten Vierecken (52) besteht. Aber auf dem Photo sieht es so aus, also ob viel weniger Vierecke da sind und viel mehr Luftmaschenbögen zwischen den Vierecken. Könnten Sie das bitte erklären? Danke.
03.04.2025 - 02:42
![]() Ann Daeninck ha scritto:
Ann Daeninck ha scritto:
Hoeveel garen heb ik nodig om enkel de vest te maken?
23.05.2024 - 22:53DROPS Design ha risposto:
Dag Ann,
Je hebt 800 gram nodig van DROPS Muskat, dus 16 bollen.
26.05.2024 - 15:33
![]() Pernilla ha scritto:
Pernilla ha scritto:
Hej Jag får inte till monteringen och på vilket sätt jag ska virka ihop de två bakre rutorna i mitten med de två främre rutorna för att få en krage.
08.04.2024 - 21:10DROPS Design ha risposto:
Hej Pernilla, har du set skitsen nederst i opskriften, her ser du hvordan ruderne skal lægges ud og sys sammen :)
09.04.2024 - 11:38
![]() Leslie ha scritto:
Leslie ha scritto:
So just to clarify. When I start back and forth on the sleeve- the chain 8 at the end of the row I turn and do a 1 sc in that chain stitch bow making that bow only 4 chain stitches? So at each end when you turn the chain stitch bows are long half the Length?
24.02.2022 - 22:45DROPS Design ha risposto:
Dear Leslie, turn with 8 chains and crochet 1 sc in the first ch-space = you have half a ch-space, continue with the 8-ch-spaces and to the last ch-space of the row = you will have 12 ch-spaces + the first one as half a ch-space; turn with 8 ch, crochet 1 sc in the first ch-space, and crochet as before = you will have 12 ch-spaces + the first one as half a ch-space. Continue like this. Happy crocheting!
25.02.2022 - 09:13
![]() Leslie ha scritto:
Leslie ha scritto:
Confused about sleeve instructions- I have worked in the round up to sleeve measuring 18-1/8 th The instructions now say “ When the work measures 46 cm [18-1/8"], divide the work so that 1 square at the bottom of the sleeve is at the center of the hand and crochet back and forth. Finish when the sleeve measures 52 cm [20.5"].“. Confused about divide the work? Would I not just continue until 20.5” then when I set the sleeve in make sure the squares are on top and bottom center?
21.02.2022 - 18:44DROPS Design ha risposto:
Dear Leslie, lay the sleeve flat placing one square on top of wrist edge, mark the opposite side, the rows should now start from here, that way, when the sleeve is crocheted to the armhole, you have a square on top of hand. And continue now from here back and forth (without decreasing, just working ch-spaces as before). Happy crocheting!
22.02.2022 - 09:26
![]() Leslie ha scritto:
Leslie ha scritto:
Confused about joining squares. Using fig 1 and legend ( using 5 chain stitches, 3 chain stitches and 1 double crochet). Are all the joins 5 chain stitches? Hard to see on diagram bold lines indicating 3 chain stitches, or a dot indicating 1 double crochet?
10.02.2022 - 22:18DROPS Design ha risposto:
Dear Leslie, this video shows how to crochet squares together (this applies to a blanket, but you will work the same way for the squares here). Happy crocheting!
11.02.2022 - 09:20
|
|||||||||||||
Garden Wedding Cardigan#gardenweddingcardigan |
|||||||||||||
|
|
|||||||||||||
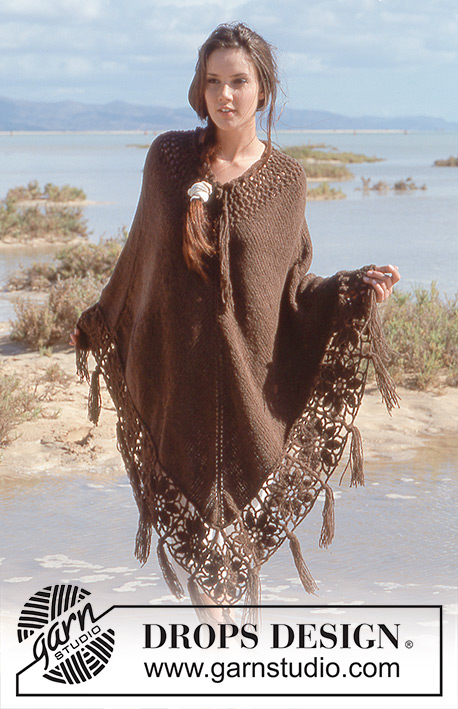
Cardigan lungo lavorato all’uncinetto a quadrati in DROPS Muskat
DROPS 65-9 |
|||||||||||||
|
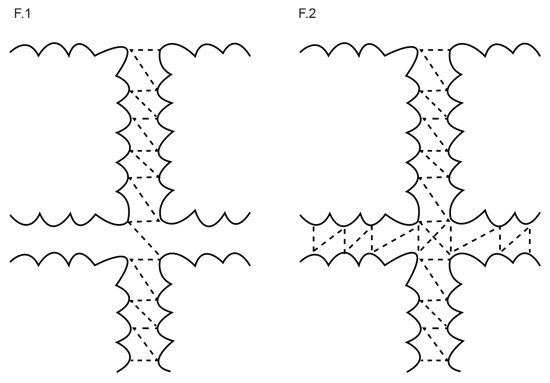
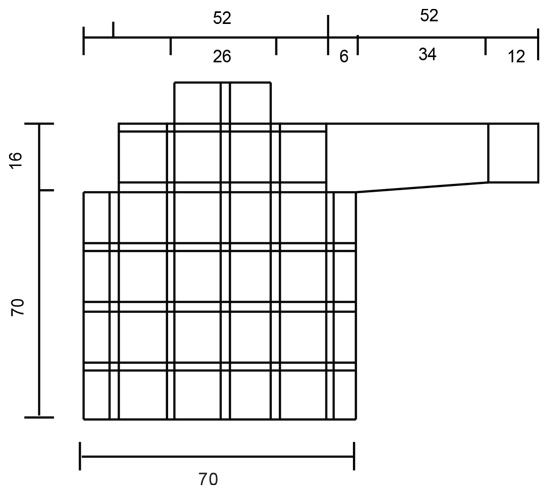
CAMPIONE: Un quadrato lavorato con l’uncinetto n° 4 mm misura circa 12 x 12 cm. Lavorare un campione, passare ad un uncinetto di misura più grande o più piccola se necessario. ------------------------------------------------------- TECNICHE IMPIEGATE: ------------------------------------------------------- QUADRATO: Avviare 8 catenelle e unirle ad anello con 1 maglia bassissima. RIGA 1: * 1 maglia alta (la 1° maglia alta è sostituita da 3 catenelle), 2 catenelle *, ripetere *-* 8 volte, finire con 1 maglia bassissima nella 1° maglia alta. RIGA 2: * 4 maglie alte (la 1° maglia alta è sostituita da 3 catenelle), attorno all’arco di catenelle, 2 catenelle *, ripetere *-* 8 volte, finire con 1 maglia bassissima nella 1° maglia alta. RIGA 3: * 4 maglie alte doppie lavorate insieme (la 1° maglia alta è sostituita da 4 catenelle) = aspettare con l’ultimo gettato e passaggio in ogni maglia alta doppia fino a quando sono state lavorate tutte le maglie alte doppie, fare un gettato e farlo passare attraverso tutti gli occhielli sull’uncinetto (lavorare 1 maglia alta doppia in ognuna delle maglie alte della riga precedente), 6 catenelle, 1 maglia alta attorno alle 2 catenelle della riga precedente, 6 catenelle * ripetere *-* 8 volte, finire con 1 maglia bassissima nel 1° gruppo di maglie alte doppie. RIGA 4: Lavorare a maglie bassissime fino al centro dell’arco di catenelle, 1 catenella, 1 maglia bassa attorno all’arco di catenelle, * 5 catenelle, 1 maglia bassa attorno all’arco di catenelle successivo, 5 catenelle, 1 maglia alta doppia attorno all’arco di catenelle successivo, 10 catenelle, 1 maglia alta attorno all’arco di catenelle successivo (= angolo), 5 catenelle, 1 maglia bassa attorno all’arco di catenelle successivo *, ripetere *-* per un totale di 3 volte, poi 5 catenelle, 1 maglia bassa attorno all’arco di catenelle successivo, 5 catenelle, 1 maglia alta attorno all’arco di catenelle successivo, 10 catenelle, 1 maglia alta attorno all’arco di catenelle successivo (= angolo), 5 catenelle, finire con 1 maglia bassissima nella 1° maglia bassa. RIGA 5: Lavorare a maglie bassissime fino al centro dell’arco di catenelle, 1 catenella, 1 maglia bassa attorno all’arco di catenelle, * 5 catenelle, 1 maglia bassa attorno all’arco di catenelle successivo, 5 catenelle, 1 maglia bassa attorno all’arco di catenelle successivo, 8 catenelle, 1 maglia bassa attorno allo stesso arco di catenelle circa 1 cm più in là (= angolo), 5 catenelle, 1 maglia bassa attorno all’arco di catenelle successivo, 5 catenelle, 1 maglia bassa attorno all’arco di catenelle successivo *, ripetere *-* per un totale di 3 volte, poi 5 catenelle, 1 maglia bassa attorno all’arco di catenelle successivo, 5 catenelle, 1 maglia bassa attorno all’arco di catenelle successivo, 8 catenelle, 1 maglia bassa attorno allo stesso arco di catenelle circa 1 cm più in là (= angolo), 5 catenelle, 1 maglia bassa attorno all’arco di catenelle successivo, 5 catenelle, finire con 1 maglia bassissima nella 1° maglia bassa. -------------------------------------------------------------- CORPO: Lavorare 50 quadrati. Ora unire i quadrati in verticale seguendo la Fig.1 Le lunghezze sono lavorate con il seguente numero di quadrati – visti dal centro davanti: Lunghezza 1: = 5 quadrati, lunghezza 2: = 5 quadrati, lunghezza 3: = 4 quadrati (= lato), lunghezza 4: = 5 quadrati, lunghezza 5: = 6 quadrati (centro dietro = tra le lunghezze 5 e 6), lunghezza 6: = 6 quadrati, lunghezza 7: = 5 quadrati, lunghezza 8: = 4 quadrati (= lato), lunghezza 9: = 5 quadrati (= lato), lunghezza 10: = 5 quadrati. Ora unire le lunghezze in orizzontale, Vedere la Fig.2. Lavorare le spalle e il collo nello stesso modo seguendo la Fig.2, poi lavorare i 2 quadrati del centro dietro con i primi 2 quadrati del centro davanti = colletto. MANICA: Lavorare 2 quadrati e unirli ad anello lavorando seguendo la Fig.1. Continuare le maniche come segue: RIGA 1: 1 maglia bassa nel 1° arco di catenelle * 5 catenelle, 1 maglia bassa nell’arco di catenelle successivo *, ripetere *-* attorno a tutta la manica = 13 archi di catenelle, affrancare l’ultimo arco con 1 maglia bassissima nella 1° maglia bassa. RIGA 2: Lavorare a maglie bassissime fino al centro del 1° arco di catenelle, lavorare 1 maglia bassa attorno all’arco, * 5 catenelle, 1 maglia bassa nell’arco di catenelle successivo *, ripetere *-*. Ripetere la riga 2 fino a quando la manica misura 20 cm. Ora aumentare ogni arco di catenelle da 5 a 6 catenelle. Continuare in questo modo fino a quando la manica misura 28 cm. Ora aumentare ogni arco di catenelle da 6 a 7 archi di catenelle. Quando la manica misura 38 cm aumentare ogni arco di catenelle da 7 a 8 catenelle. Quando il lavoro misura 46 cm continuare a lavorare in piano dal centro sotto la manica – fare in modo che il 1° quadrato sulla parte inferiore della manica sia al centro sopra del braccio quando si divide il lavoro. Finire quando la manica misura 52 cm. CONFEZIONE: Attaccare le maniche al corpo seguendo la Fig.1. Lavorare con l’uncinetto n° 4 mm e Muskat attorno alla parte inferiore del corpo: RIGA 1: * 1 maglia bassa, 1 catenella *, ripetere *-*. RIGA 2: * 1 maglia bassa attorno alla catenella della riga precedente, 1 catenella *, ripetere *-* Lungo 1 quadrato unito, lavorare circa 18 maglie basse. CONFEZIONE: Ripetere le 2 righe attorno alla scollatura e al centro davanti del cardigan. Lavorare dei cordini come segue: lavorare con l’uncinetto n° 4 mm e il filo doppio 2 cordini di catenelle lunghi circa 50 cm ognuno. Affrancarne 1 a ogni lato del centro davanti in cima al quarto quadrato dal basso. |
|||||||||||||
Spiegazioni del diagramma |
|||||||||||||
|
|||||||||||||
 |
|||||||||||||
 |
|||||||||||||
 |
|||||||||||||
Avete terminato questo modello?Allora taggate le vostre foto con #dropspattern #gardenweddingcardigan o inviatele alla #dropsfan gallery. Avete bisogno di aiuto con questo modello?Troverete 8 video tutorial, una sezione per i commenti/domande e molto altro guardando il modello su www.garnstudio.com © 1982-2026 DROPS Design A/S. Ci riserviamo tutti i diritti. Questo documento, compreso tutte le sue sotto-sezioni, è protetto dalle leggi sul copyright. Potete leggere quello che potete fare con i nostri modelli alla fine di ogni modello sul nostro sito. |
|||||||||||||


Con oltre 40 anni di esperienza nel design di modelli di maglia e uncinetto, DROPS Design offre la più estesa collezione di modelli gratuiti su internet - tradotti in 17 lingue. Ad oggi vi possiamo fornire 324 cataloghi e 12290 modelli - 9561 dei quali sono tradotti in Italiano.
Ci stiamo impegnando molto per darvi il meglio che vi possiamo offrire in termini di maglia e uncinetto, ispirazioni e consigli così come filati di grande qualità ad un prezzo incredibile! Volete utilizzare i nostri modelli per qualcosa d'altro oltre al vostro uso personale? Potete leggere tutto ciò che è consentito nel testo sul Copyright in basso su tutte le pagine dei nostri modelli. Buon lavoro!
Lasciare un commento sul modello DROPS 65-9
Noi saremmo felici di ricevere i tuoi commenti e opinioni su questo modello!
Se vuoi fare una domanda, fai per favore attenzione a selezionare la categoria corretta nella casella qui sotto per velocizzare il processo di risposta. I campi richiesti sono indicati da *.