
Categorie popolari
State cercando un filato?


Commenti / Domande (9)
![]() Akuliina ha scritto:
Akuliina ha scritto:
I thank you for your answer, but things still don't add up. My work now has 8 or 9 chain spaces per side, and if I work the "arrow" row here, A2 and A3 only take up three of them, leaving me way too far from the middle of the shawl where A4 should sit. So how do I fill the chain spaces in between? I'm assuming I'm supposed to repeat A3 more than once here, to fill up the space, but is it so?
09.05.2024 - 18:59DROPS Design ha risposto:
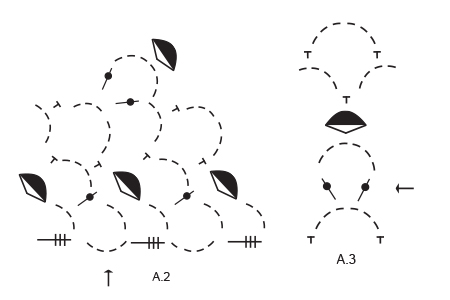
Dear Akuliina, starting with the row with an arrow repeat the diagrams just as before: start with A.2 at the beg of row, the repeat A.3 until you reach the middle stitch in shawl, then work the row with an arrow over this stitch (a total of 5 ch-spaces); then repeat A.3 to the end of the row ending with A.5 when 1 st-group + 1 ch-space remain. Happy crocheting!
10.05.2024 - 08:50
![]() Akuliina ha scritto:
Akuliina ha scritto:
I\'m asking the same as everyone else - how to continue after first completing A2-A5. I started following the chart exactly as before, but this way I wasn\'t anywhere near the middle of the shawl when it was time to start A4. Please explain in _detail_ where I should increase and how to keep the charts working. Do I need to repeat A3 more than once each side?
07.05.2024 - 13:27DROPS Design ha risposto:
Dear Akuliina, just repeat the diagrams as before, following the last 4 rows, ie work A.2, repeat A.3, work A.4 in the middle (just as before), work A.3 and finish with A.5, see from WS, work A.5, repeat A.3, work A.4, repeat A.3 and finish with A.2. When the 4 rows are done, repeat from first to 4 again and continue like this until finished measurements. Happy crocheting!
07.05.2024 - 15:47
![]() Emma Hessfelt ha scritto:
Emma Hessfelt ha scritto:
Let me try to rephrase my question: After I have completed all diagrams once, what is it that I am supposed to repeat? Am I supposed to repeat the complete diagrams again or is it just the LAST row from each diagram that I should repeat?
09.04.2023 - 06:53DROPS Design ha risposto:
Dear Emma, you should repeat ALL FOUR rows of the chart (excluding the very start), not just the last row. Happy crochetting!
09.04.2023 - 12:47
![]() Emma Hessfelt ha scritto:
Emma Hessfelt ha scritto:
Thank you for answering my question, but I still don't understand. Can you explain in detail exactly where in the diagrams A2, A4 and A5 I can find the increase and how the increase works?
09.04.2023 - 06:11DROPS Design ha risposto:
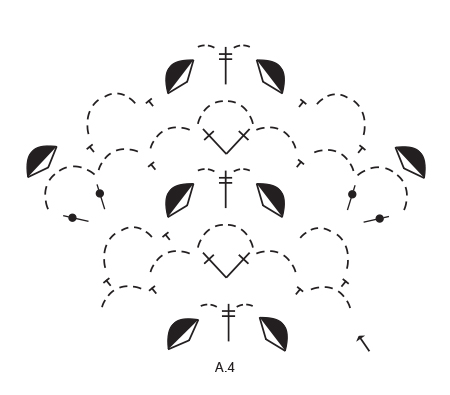
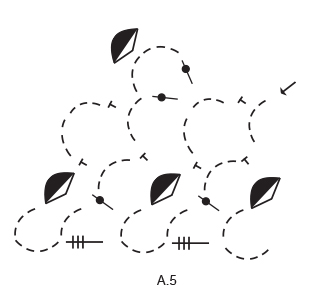
Dear Emma, the increases are done at the start of A.2, at the end of A.5 and near the central stitch in A.4. You have more increases in these charts because you will increase the amount of chain spaces in them. Happy crochetting!
09.04.2023 - 12:53
![]() Emma Hessfelt ha scritto:
Emma Hessfelt ha scritto:
Please help! I don't understand how to continue after completing A2-A5. Your instructions says to repeat the last 4 rows in each diagram (which means doing the same thing all over again). But this doesn't add up. Each diagram just has 4 rows! There needs to be an increase for each row if it's going to work. Can you please explain in another way?
08.04.2023 - 19:28DROPS Design ha risposto:
Dear Emma, yes, you need to work exactly as before. Remember that A.2, A.4 and A.5 include increases in their charts, so you will be increasing as you work, just as before. Happy crochetting!
08.04.2023 - 23:01
![]() Paz Juan Gutiérrez ha scritto:
Paz Juan Gutiérrez ha scritto:
"Después de completar los diagramas A.2 - A.5 en vertical, repetir la 4 últimas filas de cada diagrama con los aumentos a cada lado del centro del chal como antes." No entiendo cómo seguir. Porque si repito de nuevo los patrones A2 a A5 no sé dónde van los aumentos.
31.05.2019 - 18:00DROPS Design ha risposto:
Hola Paz. Los aumentos siguen en los mismos sitios ( a cada esquina y en el centro). Solo que no repetimos los diagramas enteros, sino que solo las 4 últimas filas de cada diagrama. El resto se trabaja como antes.
13.06.2019 - 23:21
![]() Liana ha scritto:
Liana ha scritto:
Buoongiorno, sto lavorando questo modello e mi sono bloccata in questo punto: "Dopo aver lavorato i diagrammi da A.2 a A.5 una volta in verticale, ripetere le ultime 4 righe di ogni diagramma per continuare ad aumentare da ciascun lato e al centro dello scialle come prima". che vuol dire? gli aumenti li devo continuare a fare sin dalla prima riga delle 4 da ripetere o no? non capisco bene come continuare gli aumenti.
09.04.2019 - 11:50DROPS Design ha risposto:
Buongiorno Liana, deve semplicemente continuare a lavorare sulle ultime 4 righe dei diagrammi, gli aumenti sono già inclusi in quelle righe. Buon lavoro!
09.04.2019 - 15:14
![]() Michelle ha scritto:
Michelle ha scritto:
Merci à Drops d'avoir l'audace d'introduire parmi ses modèles de très jolies mamies aux cheveux blancs !
18.02.2018 - 10:58
![]() Mary ha scritto:
Mary ha scritto:
Hooray for an elegant white haired model!
08.12.2016 - 18:20
|
|||||||||||||||||||||||||||||||
Christmas Charm |
|||||||||||||||||||||||||||||||
 |
 |
||||||||||||||||||||||||||||||
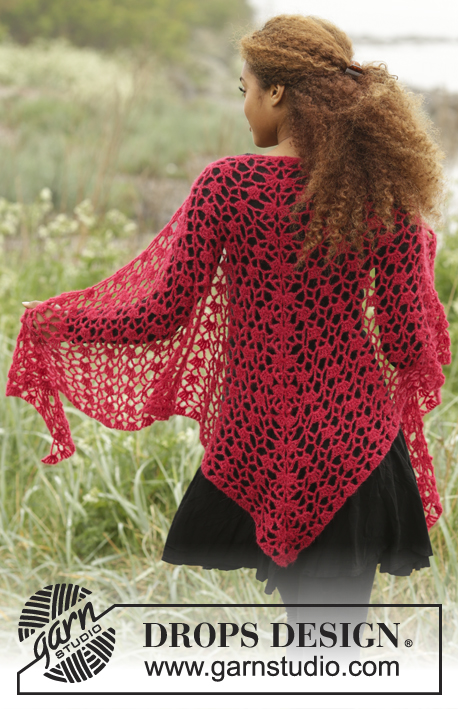
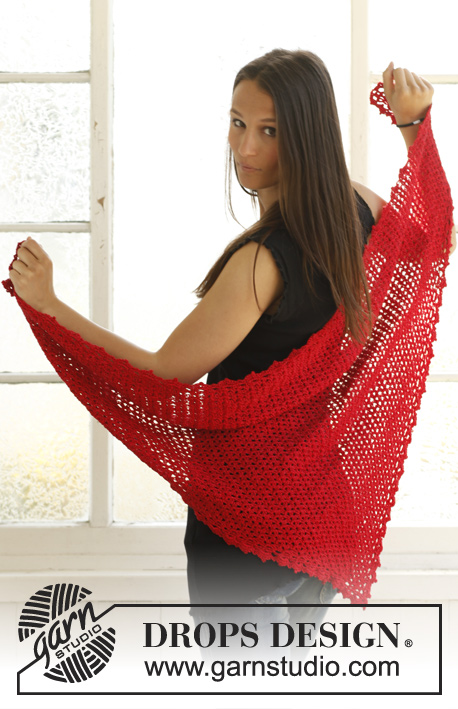
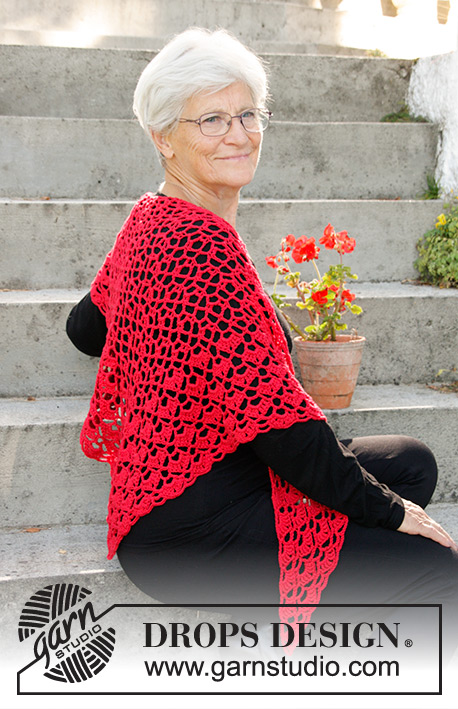
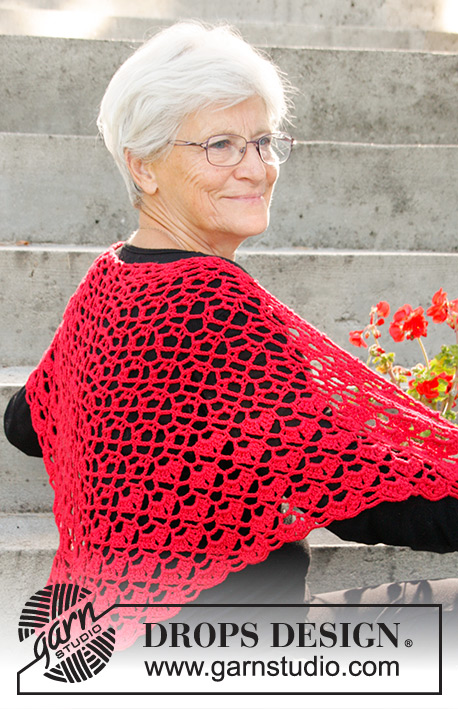
Scialle all’uncinetto per Natale, con motivo traforato e motivo a ventagli, in DROPS Cotton Merino.
DROPS Extra 0-1333 |
|||||||||||||||||||||||||||||||
|
MOTIVO: Vedere i diagrammi da A.1 a A.5. ---------------------------------------------------------- SCIALLE: Si lavora avanti e indietro dal centro, sul dietro del collo e dall’alto verso il basso. Iniziare con l’uncinetto n° 4,5 ed il filato Cotton Merino e lavorare il motivo seguendo il diagramma A.1. RICORDARSI DI MANTENERE LA CORRETTA TENSIONE DEL LAVORO! Dopo aver lavorato il diagramma A.1, proseguire seguendo i diagrammi a partire dalla riga con la freccia (= 2a riga) come segue: diagramma A.2 (= aumento al lato), diagramma A.3, diagramma A.4 (= aumento al centro), diagramma A.3, diagramma A.5 (= aumento al lato). Dopo aver lavorato i diagrammi da A.2 a A.5 una volta in verticale, ripetere le ultime 4 righe di ogni diagramma per continuare ad aumentare da ciascun lato e al centro dello scialle come prima. Quando il lavoro misura ca.40 cm lungo gli aumenti al centro dello scialle - finire con la riga 1 o la riga 3 - proseguire come prima ma sostituire il simbolo (1 m.a.d + 6 cat + 1 m.a.d) con (3 m.a.d + 2 cat + 3 m.a.d). Proseguire in questo modo finché lo scialle non misura 65 cm in tutto lungo il centro dello scialle - assicurarsi che l’ultima riga lavorata sia una riga 2 o una riga 4 dei diagrammi da A.2 a A.5. Tagliare il filo. Mettere lo scialle in acqua tiepida in modo che sia impregnato d’acqua. Molto delicatamente fare pressione sullo scialle in modo da far uscire la maggior parte dell’acqua – non torcere lo scialle; avvolgere poi lo scialle in un asciugamano e fare pressione delicatamente in modo da far uscire ulteriore acqua. Lo scialle deve rimanere solo umido. Stendere lo scialle su un tappeto o su un materasso – con molta cautela tirare lo scialle per portarlo alle misure corrette – vedere le indicazioni delle misure all’inizio delle spiegazioni. Lasciarlo asciugare. |
|||||||||||||||||||||||||||||||
Spiegazioni del diagramma |
|||||||||||||||||||||||||||||||
|
|||||||||||||||||||||||||||||||
 |
|||||||||||||||||||||||||||||||
 |
|||||||||||||||||||||||||||||||
 |
|||||||||||||||||||||||||||||||
 |
|||||||||||||||||||||||||||||||
Avete terminato questo modello?Allora taggate le vostre foto con #dropspattern o inviatele alla #dropsfan gallery. Avete bisogno di aiuto con questo modello?Troverete 8 video tutorial, una sezione per i commenti/domande e molto altro guardando il modello su www.garnstudio.com © 1982-2026 DROPS Design A/S. Ci riserviamo tutti i diritti. Questo documento, compreso tutte le sue sotto-sezioni, è protetto dalle leggi sul copyright. Potete leggere quello che potete fare con i nostri modelli alla fine di ogni modello sul nostro sito. |
|||||||||||||||||||||||||||||||


Con oltre 40 anni di esperienza nel design di modelli di maglia e uncinetto, DROPS Design offre la più estesa collezione di modelli gratuiti su internet - tradotti in 17 lingue. Ad oggi vi possiamo fornire 325 cataloghi e 12298 modelli - 9569 dei quali sono tradotti in Italiano.
Ci stiamo impegnando molto per darvi il meglio che vi possiamo offrire in termini di maglia e uncinetto, ispirazioni e consigli così come filati di grande qualità ad un prezzo incredibile! Volete utilizzare i nostri modelli per qualcosa d'altro oltre al vostro uso personale? Potete leggere tutto ciò che è consentito nel testo sul Copyright in basso su tutte le pagine dei nostri modelli. Buon lavoro!
Lasciare un commento sul modello DROPS Extra 0-1333
Noi saremmo felici di ricevere i tuoi commenti e opinioni su questo modello!
Se vuoi fare una domanda, fai per favore attenzione a selezionare la categoria corretta nella casella qui sotto per velocizzare il processo di risposta. I campi richiesti sono indicati da *.