
Categorie popolari
State cercando un filato?


Commenti / Domande (101)
![]() Meri Conant ha scritto:
Meri Conant ha scritto:
I love this bag but don't know how to crochet. Has anyone converted it to a knitting pattern? Thanks
13.12.2017 - 20:09DROPS Design ha risposto:
Dear Mrs Conant, why not have a try crocheting? This video will give you the basis and you'll find more videos related to this pattern under tab "Video". Happy crocheting!
14.12.2017 - 08:35
![]() DAUPRAT Mauricette ha scritto:
DAUPRAT Mauricette ha scritto:
Merci pour votre aide
27.11.2017 - 11:09
![]() DAUPRAT Mauricette ha scritto:
DAUPRAT Mauricette ha scritto:
Bonjour, pouvez vous me dire a quel rang se trouve la fleche actuellement je suis au rang 12 merci
24.11.2017 - 18:27DROPS Design ha risposto:
Bonjour Mme Dauprat, la flèche se trouve sur l'avant-dernier tour, c'est celui que l'on va crocheter (*1 B dans chacune des 3 premières B/ des 3 B suivantes, 1 ml, sauter 1 B*, répéter de *-*) - crochetez encore le dernier rang et le sac est terminé. Bon crochet!
27.11.2017 - 08:53
![]() DAUPRAT Mauricette ha scritto:
DAUPRAT Mauricette ha scritto:
Bonjour, pour une personne comme moi qui n'a jamais de sac mochila je trouve que les commentaires ne sont pas clairs a quel tour vous changer de couleur tour 1 en gris et apres vraiment pas facile pour une novice j ai achete la laine mais pense qu 'elle rester dans un tiroir dommage
17.11.2017 - 13:48DROPS Design ha risposto:
Bonjour Mme Dauprat, le sac se commence en gris foncé et on crochète ensuite le diagramme A.1 (en le répétant 12 fois en largeur au total). Les couleurs sont indiqués dans A.1: les 2 premiers tours se font en gris foncé, le tour 3 en beige clair, le tour 4 en alternant 1 m beige clair, 1 m gris foncé et ainsi de suite - suivez bien en même temps les indications écrites pour les augmentations de A.1. Bon crochet!
17.11.2017 - 15:10
![]() MENANTEAU NADINE ha scritto:
MENANTEAU NADINE ha scritto:
Je rajoute que j'ai realise ce modele en qualité Paris en naturel et bleu marine, un autre en blanc et framboise. J'ai modifié les finitions j'ai mis les noeuds des anses a l interieur ajouté un cordonnet dans les jours du haut du sac mis des perles en bois aux extremites de ce cordonnet pour un système de fermeture coulissante j'ai doublé le sac avec un tissu coton assorti à la couleur principale et fait des poches. Votre site donne vraiment envie de creer.
24.09.2017 - 19:37
![]() MENANTEAU NADINE ha scritto:
MENANTEAU NADINE ha scritto:
Bonjour Je voulais vous faire part du grand plaisir que j'ai eu pour la realisation de ce modèle. Vos explications sont très claires et vos infos crochet très utiles. Dommage que je ne puisse pas vous envoyer des photos de mes realisations un peu modifiees. Et maintenant je me lance dans les corbeilles. Merci encore de m'avoir donné envie de faire.
24.09.2017 - 19:30DROPS Design ha risposto:
Bonjour Mme Menanteau et merci pour votre message. Rejoignez le groupe DROPS Workshop ou taguez-nous sur les réseaux sociaux pour nous montrer votre ouvrage. Vous pouvez également envoyer des photos à votre magasin DROPS qui pourra également les publier pour vous sur ses réseaux sociaux. Bon crochet!
25.09.2017 - 10:58
![]() Soulié ha scritto:
Soulié ha scritto:
Bonjour, je viens de finir ce sac Santa Fé. J'en suis absolument ravie cependant alors que 200 g de chaque couleur sont prévues il ne m'a fallu que 3 pelotes de chacune. Il me reste 2 pelotes, les renvoyer me couterait aussi cher en frais de port que le remboursement. Je vous saurait gré de corriger les explications du modèle pour les futures amatrices. Cordialement
11.09.2017 - 15:28DROPS Design ha risposto:
Bonjour Mme Soulié et merci pour votre retour. La quantité de fil utilisé au crochet peut varier en fonction de la façon de crocheter de chacune, et pour l'instant, nous avons plutôt un retour global sur la nécessité des 4 pelotes de chaque couleur. Bon crochet!
11.09.2017 - 16:17
![]() Anita ha scritto:
Anita ha scritto:
Hej! Förstår inte hur jag ska läsa diagram A1? På bilden ser det ut som varannan stolpe är grå o den andra vit.. men så ser det inte ut på diagrammet.. Hur läser jag ut detta?
07.09.2017 - 11:50DROPS Design ha risposto:
Hei Anita. Du starter med grå og hekler 5 luftmasker som du setter sammen til en ring, så hekler du A.1 12 ganger om ringen, deretter hekler du 2 omganger (fortsatt grå, X i diagrammet), deretter 1 omgang hvit (hvit firkant i diagrammet) og så på 4.omgang hekler du med annenhver farge. God Fornøyelse!
07.09.2017 - 13:26
![]() Caterina ha scritto:
Caterina ha scritto:
Salve;il mio lavoro risulta inclinato a sinistra eppure sto seguendo correttamente lo schema. Sbaglio qualcosa?è giusto cambiare colore nell'ultimo passaggio della maglia di colore diverso?
24.08.2017 - 10:32DROPS Design ha risposto:
Buongiorno Caterina, il cambio colore è corretto, l'ultimo gettato deve essere fatto con il nuovo colore, come indicato nel paragrafo "colori jacquard". Il lavoro dovrebbe procedere in verticale. Buon lavoro!
24.08.2017 - 10:55
![]() Eva ha scritto:
Eva ha scritto:
Jag förstår inte näst sista varvet, varvet med pil. Jag uppfattar det som att man ska börja 3 stolpar och sedan en lm och hoppa över en maska och sedan börja om med 3 stolpar. När jag sedan läser beskrivningen om hur man gör med axelremmarna så verkar det vara ett större hål på 3 maskor där remmarna ska igenom. Jag förstår inte. Kan ni vara vänliga och förklara hur jag ska göra med detta varv?
30.07.2017 - 10:45DROPS Design ha risposto:
Hej, Jo du skall börja m 3 stolpar och sedan en lm och hoppa över som du skriver. Remmarna skall igenom lm-hålet på varje sida om de 3 stolparna. Lycka till!
17.08.2017 - 15:58
|
|||||||
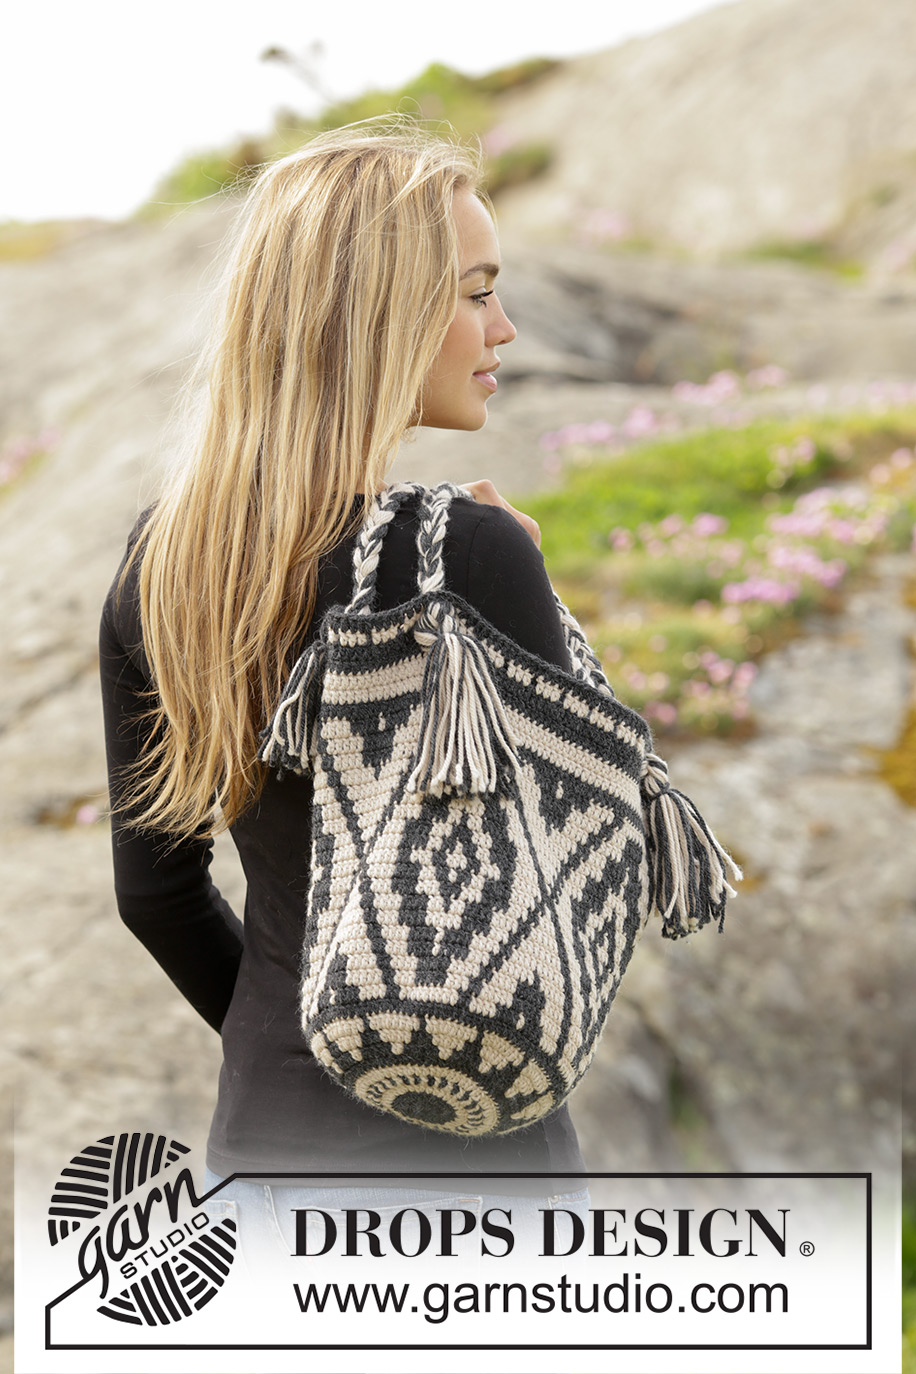
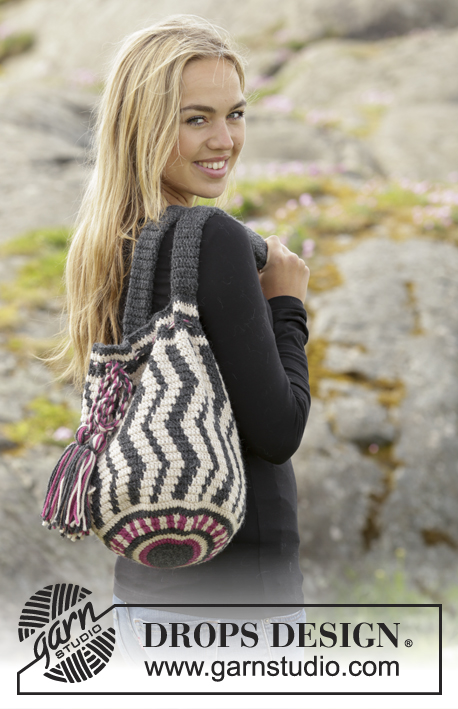
Santa Fe#santafebag |
|||||||
|
|
|||||||
Borsa DROPS all’uncinetto, con motivo jacquard, in "Nepal".
DROPS 173-1 |
|||||||
|
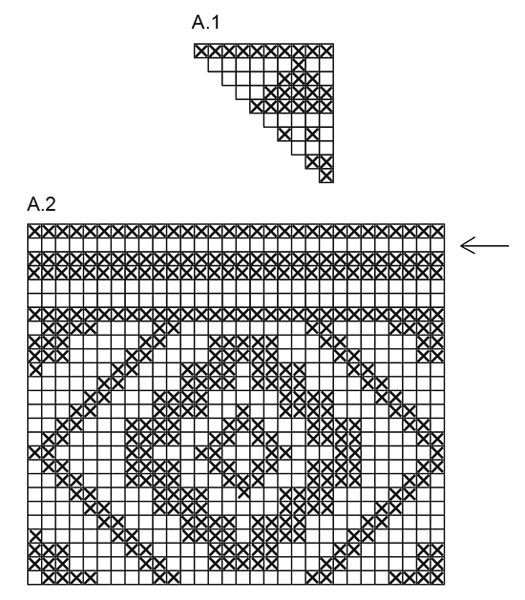
MOTIVO JACQUARD: Vedere i diagrammi A.1 e A.2. I diagrammi mostrano i colori del motivo. 1 quadrato = 1 m.a. COLORI JACQUARD (in tondo): Quando si cambia colore, lavorare come segue: Lavorare l’ultima m.a con il primo colore, ma non fare l’ultima gettata, fare l’ultima gettata con il colore successivo, lavorare poi la m.a successiva. Quando si lavora con 2 colori, mettere il filo del colore non utilizzato sulle m del giro precedente, lavorare intorno al filo in modo che venga nascosto e segua il giro. INFORMAZIONI PER IL LAVORO: Sostituire la prima m.a all’inizio di ogni giro con 3 cat; finire il giro con 1 m.bss nella 3a cat. --------------------------------------------------------- BORSA: Si lavora in tondo. Con l’uncinetto n° 3,5 ed il colore grigio scuro, avviare 5 cat e formare un anello con 1 m.bss nella prima cat. Proseguire in tondo e seguendo il diagramma A.1 (lavorare 12 ripetizioni del diagramma A.1 in larghezza) - VEDERE COLORI JACQUARD. GIRO 1: 12 m.a nell’anello di cat – vedere le INFORMAZIONI PER IL LAVORO. GIRO 2: 2 m.a in ogni m.a = 24 m.a. GIRO 3: * 1 m.a nella m.a successiva, 2 m.a nella m.a successiva *, ripetere da *-* su tutto il giro = 36 m.a. GIRO 4: * 1 m.a in ognuna delle prime 2 m.a, 2 m.a nella m.a successiva *, ripetere da *-* su tutto il giro = 48 m.a. RICORDARSI DI MANTENERE LA CORRETTA TENSIONE DEL LAVORO! GIRI 5-10: continuare con gli aumenti e con il motivo come prima, quindi ad ogni giro lavorare 1 m.a in più tra ogni aumento = 120 m.a. GIRO 11: Continuare in tondo ma senza aumentare e lavorare seguendo il diagramma A.2 (= 4 ripetizioni del diagramma in larghezza). Al giro indicato dalla freccia, lavorare come segue: * 1 m.a in ognuna delle prime 3 m.a /delle 3 m.a successive, 1 cat, saltare 1 m.a *, ripetere da *-*. Continuare con il diagramma A.2 fino alla fine del lavoro. Tagliare il filo. MANICI: Tagliare 18 capi di ogni colore lunghi 120 cm l’uno = 36 capi. Mettere i capi insieme e fare un nodo lento lasciando ca.12 cm dopo il nodo. Dividere i capi in 3 gruppi di 12 capi l’uno. Intrecciare i 3 gruppi per ca.68 cm. Dividere i capi in 2 gruppi. Infilare i 2 gruppi nel giro traforato a 3 m.a l’uno dall’altro. Legare i 2 gruppi con un nodo sul davanti della borsa. Disfare il nodo fatto all’inizio della treccia e fissare alla borsa in modo uguale, ma sul lato opposto. Preparare un’altra treccia in modo uguale – vedere la fotografia. |
|||||||
Spiegazioni del diagramma |
|||||||
|
|||||||
 |
|||||||
Avete terminato questo modello?Allora taggate le vostre foto con #dropspattern #santafebag o inviatele alla #dropsfan gallery. Avete bisogno di aiuto con questo modello?Troverete 7 video tutorial, una sezione per i commenti/domande e molto altro guardando il modello su www.garnstudio.com © 1982-2026 DROPS Design A/S. Ci riserviamo tutti i diritti. Questo documento, compreso tutte le sue sotto-sezioni, è protetto dalle leggi sul copyright. Potete leggere quello che potete fare con i nostri modelli alla fine di ogni modello sul nostro sito. |
|||||||


Con oltre 40 anni di esperienza nel design di modelli di maglia e uncinetto, DROPS Design offre la più estesa collezione di modelli gratuiti su internet - tradotti in 17 lingue. Ad oggi vi possiamo fornire 324 cataloghi e 12290 modelli - 9561 dei quali sono tradotti in Italiano.
Ci stiamo impegnando molto per darvi il meglio che vi possiamo offrire in termini di maglia e uncinetto, ispirazioni e consigli così come filati di grande qualità ad un prezzo incredibile! Volete utilizzare i nostri modelli per qualcosa d'altro oltre al vostro uso personale? Potete leggere tutto ciò che è consentito nel testo sul Copyright in basso su tutte le pagine dei nostri modelli. Buon lavoro!
Lasciare un commento sul modello DROPS 173-1
Noi saremmo felici di ricevere i tuoi commenti e opinioni su questo modello!
Se vuoi fare una domanda, fai per favore attenzione a selezionare la categoria corretta nella casella qui sotto per velocizzare il processo di risposta. I campi richiesti sono indicati da *.