
Categorie popolari
State cercando un filato?


Commenti / Domande (101)
![]() Mascha Grips ha scritto:
Mascha Grips ha scritto:
Hallo liebes Drops Team, bitte meine Anfrage löschen/ignorieren. Ich habe tatsächlich eine Masche übersehen und die Rapporte sind jetzt stimmig.
21.12.2025 - 21:20
![]() Mascha Grips ha scritto:
Mascha Grips ha scritto:
Hallo, ich hätte eine Frage bzgl. Diagramm A2, Runde 11. Durch die Zunahmen bis Runde 11 sind es 120 Maschen. Bei dem viermaligen Rapport ergeben sich aber insgesamt nur 116 Maschen, also habe ich 4 Maschen zuviel. Was übersehe ich hier?
21.12.2025 - 20:50DROPS Design ha risposto:
Liebe Mascha, der Rapport A.2 besteht aus 30 Maschen und geht daher genau in den 120 Maschen auf. Viel Spaß beim Häkeln!
24.02.2026 - 22:00
![]() Anna Davidson ha scritto:
Anna Davidson ha scritto:
I Just love this pattern. I have made several . Just wanted to say thank you for sharing it ☺️
16.12.2025 - 05:11
![]() Inge ha scritto:
Inge ha scritto:
Hallo, wunderschöne Tasche, aber die abgebildete Tasche ist niemals mit Nepal und Nadelstärke 3,5 gearbeitet worden. Meine ist ein Täschchen geworden, und ich ans schon mit Nagel Nr. 4,gehäkelt.
16.09.2025 - 13:55
![]() Rachel ha scritto:
Rachel ha scritto:
What color do I do the the ch3 at the beginning of the row? Is that my first stitch according to the chart or do I do the ch3 and then the next stitch is my first for that row? How does that work when switching colors from row to row….for example…row 4 or row 6. The row prior ends in a darker color so when I start the next row…what color is my ch 3?
25.08.2025 - 00:41DROPS Design ha risposto:
Dear Rachel, the ch3 at the beginning of the round count as the first dc. So you need to work them in the colour of the first square in the chart. You work in the round so you simply change colours in the last dc of the round as explained in the "COLOR PATTERN (worked in the round)" tip above, working the ch3 as the 1st dc, all in the same colour. If you need to change colours in the next stitch after the ch3, work the first 2 in their corresponding colour and work the 3rd chain stitch in the new colour. Happy crochetting!
27.08.2025 - 00:00
![]() Rachel Dew ha scritto:
Rachel Dew ha scritto:
I need clarification. At what row do I start the A.1 pattern? When do I transition to A.2? Where is the instructions for the bottom of the bag when it changes from the dark to light and then has the small dark marks/arrows? Is there a video that shows this or explains it better?
22.08.2025 - 06:47DROPS Design ha risposto:
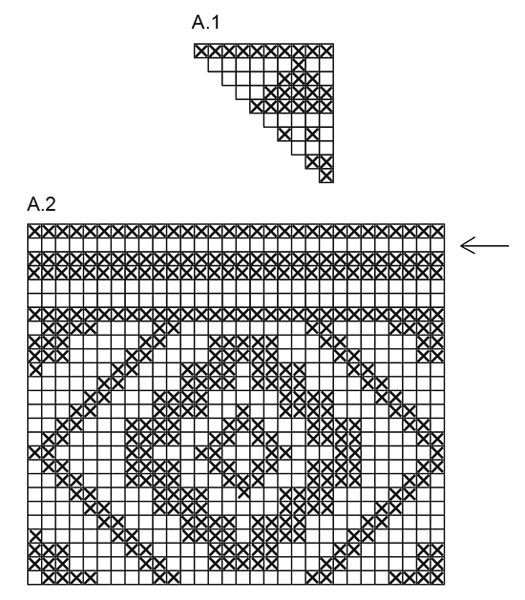
Dear Rachel, A.1 and A.2 are the colour patterns. For the first 10 rounds of the bag you work A.1 12 times on the round, working the stitches as in the written instructions while you check the colour changes in the chart. Then, after round 10, start round 11 with A.2, working only dc, without increases. Happy crochetting!
25.08.2025 - 01:53
![]() María Bañuelos ha scritto:
María Bañuelos ha scritto:
Muy bonita bolsa
04.05.2025 - 18:33
![]() Diane Bujold ha scritto:
Diane Bujold ha scritto:
Bonjour Pour le modèle ne-232 Après le tour 11 à la flèche dois-je augmenter les brides 1b dans chacune des 3 premières b/ des 3 b suivantes???? Merci de m’expliquer
12.04.2025 - 01:23DROPS Design ha risposto:
Bonjour Mme Bujold, lorsque vous avez terminé A.1, vous crocheter le diagramme A.2 en commençant à partir du bas. Lorsque vous arrivez au rang avec la flèche (avant-dernier rang de A.2), vous n'augmentez pas mais vous créez un rang ajouré pour y passer le lien: (1 bride dans chacune des 3 premières brides / des 3 brides suivantes; 1 maille en l'air, sautez 1 bride) répétez de (à) tout le tour, vous allez obtenir ainsi 30 "trous" (- 1 maille en l'air pour 1 bride sautée); au tour suivant, crochetez 1 bride dans chaque bride et 1 bride dans chaque maille en l'air. Bon crochet!
22.04.2025 - 08:15
![]() MariaLuisa ha scritto:
MariaLuisa ha scritto:
Riguardo i manici a treccia, OGNI treccia è composta da 27 capi (9 per ogni gruppo) oppure 54 capi (18 per ogni gruppo)?
22.02.2025 - 11:44DROPS Design ha risposto:
Buonasera Marialuisa i manici sono 2, ogni manico è costituito da una treccia formata da 36 capi, 12 per ogni "braccio" della treccia. Buon lavoro!
24.02.2025 - 00:20
![]() Julia Zimmermann ha scritto:
Julia Zimmermann ha scritto:
Ich verstehe leider überhaupt nicht was in Rd 5-10 gemeint ist mit „Zunahmen folgerichtig fortsetzen“. Könnten Sie mir bitte erklären wie ich in den Reihen 5-10 Maschen zunehmen muss? Viele Grüße und schon mal vielen Dank!
24.06.2024 - 22:31DROPS Design ha risposto:
Liebe Frau Zimmermann, die Zunahmen häkeln Sie wie zuvor, mit je 1 Stäbchen mehr zwischen jede Zunahme; so bei der 5. Runde häkeln Sie 2 Stb in jede 4. Masche, bei der 6. Runde in jeder 5. Masche, bei der 7. Runde in jeder 6. Masche usw, gleichzeitig häkeln Sie A.1 (die Zunahme ist jeweils die 2 letzten Maschen in A.1). Viel Spaß beim Häkeln!
25.06.2024 - 09:06
|
|||||||
Santa Fe#santafebag |
|||||||
|
|
|||||||
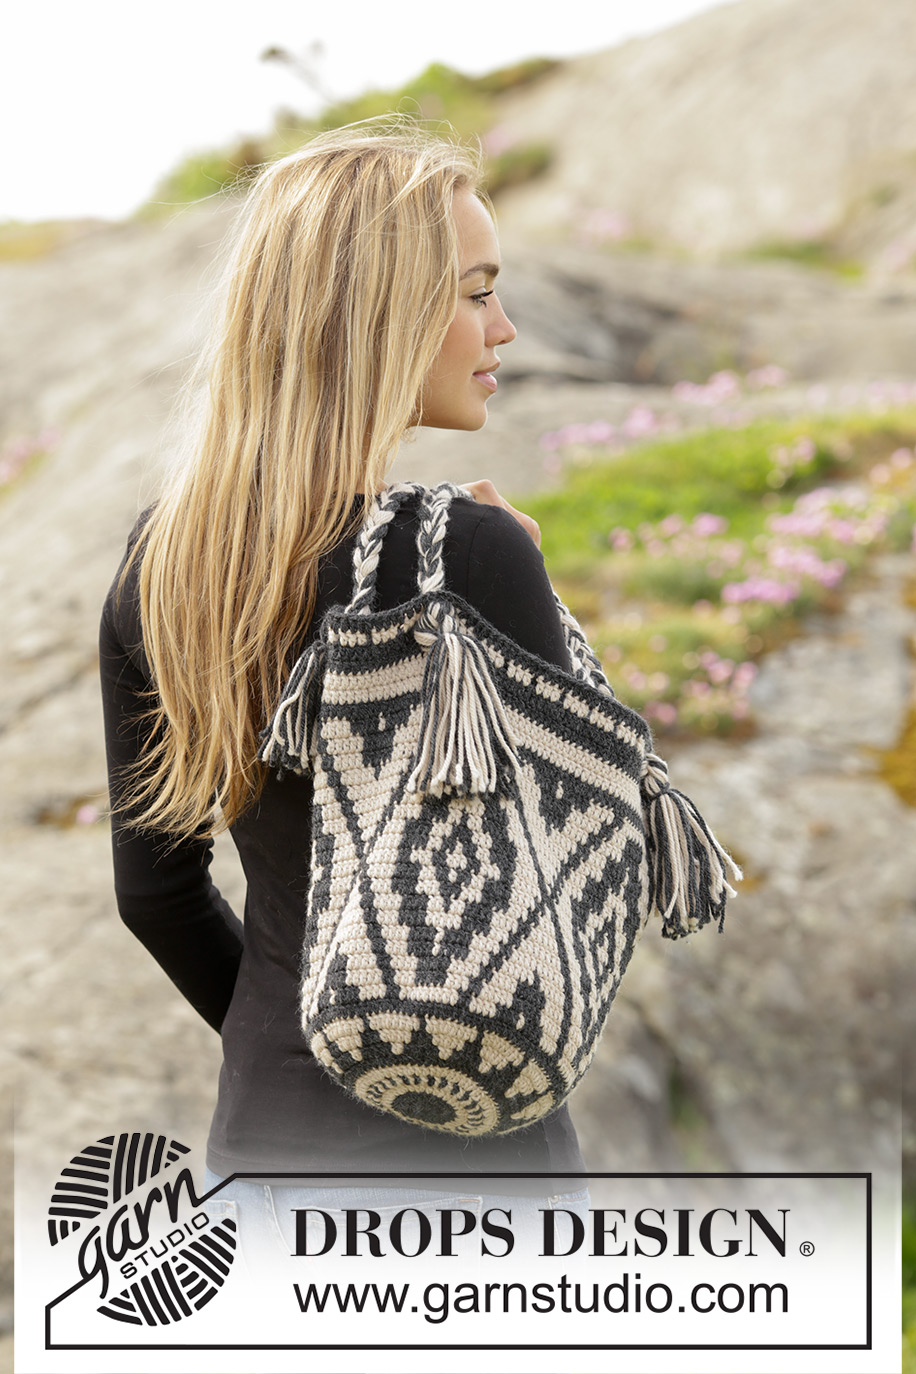
Borsa DROPS all’uncinetto, con motivo jacquard, in "Nepal".
DROPS 173-1 |
|||||||
|
MOTIVO JACQUARD: Vedere i diagrammi A.1 e A.2. I diagrammi mostrano i colori del motivo. 1 quadrato = 1 m.a. COLORI JACQUARD (in tondo): Quando si cambia colore, lavorare come segue: Lavorare l’ultima m.a con il primo colore, ma non fare l’ultima gettata, fare l’ultima gettata con il colore successivo, lavorare poi la m.a successiva. Quando si lavora con 2 colori, mettere il filo del colore non utilizzato sulle m del giro precedente, lavorare intorno al filo in modo che venga nascosto e segua il giro. INFORMAZIONI PER IL LAVORO: Sostituire la prima m.a all’inizio di ogni giro con 3 cat; finire il giro con 1 m.bss nella 3a cat. --------------------------------------------------------- BORSA: Si lavora in tondo. Con l’uncinetto n° 3,5 ed il colore grigio scuro, avviare 5 cat e formare un anello con 1 m.bss nella prima cat. Proseguire in tondo e seguendo il diagramma A.1 (lavorare 12 ripetizioni del diagramma A.1 in larghezza) - VEDERE COLORI JACQUARD. GIRO 1: 12 m.a nell’anello di cat – vedere le INFORMAZIONI PER IL LAVORO. GIRO 2: 2 m.a in ogni m.a = 24 m.a. GIRO 3: * 1 m.a nella m.a successiva, 2 m.a nella m.a successiva *, ripetere da *-* su tutto il giro = 36 m.a. GIRO 4: * 1 m.a in ognuna delle prime 2 m.a, 2 m.a nella m.a successiva *, ripetere da *-* su tutto il giro = 48 m.a. RICORDARSI DI MANTENERE LA CORRETTA TENSIONE DEL LAVORO! GIRI 5-10: continuare con gli aumenti e con il motivo come prima, quindi ad ogni giro lavorare 1 m.a in più tra ogni aumento = 120 m.a. GIRO 11: Continuare in tondo ma senza aumentare e lavorare seguendo il diagramma A.2 (= 4 ripetizioni del diagramma in larghezza). Al giro indicato dalla freccia, lavorare come segue: * 1 m.a in ognuna delle prime 3 m.a /delle 3 m.a successive, 1 cat, saltare 1 m.a *, ripetere da *-*. Continuare con il diagramma A.2 fino alla fine del lavoro. Tagliare il filo. MANICI: Tagliare 18 capi di ogni colore lunghi 120 cm l’uno = 36 capi. Mettere i capi insieme e fare un nodo lento lasciando ca.12 cm dopo il nodo. Dividere i capi in 3 gruppi di 12 capi l’uno. Intrecciare i 3 gruppi per ca.68 cm. Dividere i capi in 2 gruppi. Infilare i 2 gruppi nel giro traforato a 3 m.a l’uno dall’altro. Legare i 2 gruppi con un nodo sul davanti della borsa. Disfare il nodo fatto all’inizio della treccia e fissare alla borsa in modo uguale, ma sul lato opposto. Preparare un’altra treccia in modo uguale – vedere la fotografia. |
|||||||
Spiegazioni del diagramma |
|||||||
|
|||||||
 |
|||||||
Avete terminato questo modello?Allora taggate le vostre foto con #dropspattern #santafebag o inviatele alla #dropsfan gallery. Avete bisogno di aiuto con questo modello?Troverete 7 video tutorial, una sezione per i commenti/domande e molto altro guardando il modello su www.garnstudio.com © 1982-2026 DROPS Design A/S. Ci riserviamo tutti i diritti. Questo documento, compreso tutte le sue sotto-sezioni, è protetto dalle leggi sul copyright. Potete leggere quello che potete fare con i nostri modelli alla fine di ogni modello sul nostro sito. |
|||||||


Con oltre 40 anni di esperienza nel design di modelli di maglia e uncinetto, DROPS Design offre la più estesa collezione di modelli gratuiti su internet - tradotti in 17 lingue. Ad oggi vi possiamo fornire 324 cataloghi e 12290 modelli - 9561 dei quali sono tradotti in Italiano.
Ci stiamo impegnando molto per darvi il meglio che vi possiamo offrire in termini di maglia e uncinetto, ispirazioni e consigli così come filati di grande qualità ad un prezzo incredibile! Volete utilizzare i nostri modelli per qualcosa d'altro oltre al vostro uso personale? Potete leggere tutto ciò che è consentito nel testo sul Copyright in basso su tutte le pagine dei nostri modelli. Buon lavoro!
Lasciare un commento sul modello DROPS 173-1
Noi saremmo felici di ricevere i tuoi commenti e opinioni su questo modello!
Se vuoi fare una domanda, fai per favore attenzione a selezionare la categoria corretta nella casella qui sotto per velocizzare il processo di risposta. I campi richiesti sono indicati da *.