
Categorie popolari
State cercando un filato?


Commenti / Domande (100)
Zahra ha scritto:
Please i dont understand this part .. please explain it fore me (inc in addition 0-3-3-9-3-3 dc evenly on the entire row)
03.02.2017 - 13:43DROPS Design ha risposto:
Dear Zahra, each number refers to the size: in size S, inc no st, in size M and L, inc 3 dc, in size XL inc 9 dc and in 2 larger sizes inc 3 dc evenly. Happpy crocheting!
03.02.2017 - 13:47
![]() Susanne Bishop ha scritto:
Susanne Bishop ha scritto:
Hej, jeg forstår simpelthen ikke udtagningen. Jeg laver xxx og der står at der skal tages 3 st jævnt fordelt over hele pinden, det forstår jeg. Så står der hækl 40 st, sæt mærke, hækl 4 st og tag 4 st ud jævnt fordelt, sæt mærke. Men hvor skal de 4 tages ud? Skal der kun være 4 st mellem de 2 mærker, eller 8? Jeg er helt lost og håber på hurtigt svar, tak
17.11.2016 - 20:48DROPS Design ha risposto:
Hej Susanne. Du tager ud i de 4 st du lige har haeklet: hækl 4 st og tag 4 st ud jævnt fordelt = dvs, de 4 st bliver 8 st. De 3 st tager du jaevnt fordelt ud i st paa forstk/rygstk (jeg ville tage 1 paa hvort forstk og 1 paa rygst).
21.11.2016 - 15:15
![]() Kristina ha scritto:
Kristina ha scritto:
Hej! Jag ska virka storlek S. Det kan väl inte stämma att jag ska virka 163 luftmaskor och fortsätta på det sätt ni beskriver i rad 1. Det stämmer inte alls. Ska det inte vara 165 lm? Ska jag inte ha 7 stolpar på slutet av rad 1? I så fall blir det 140 stolpar och inte 139. På mönstret verkar det som att man ska avsluta med 6. Med vänlig hälsning Kristina
19.10.2016 - 13:51DROPS Design ha risposto:
Hej Kristina. Du starter med 163 l og haekler: Hekle 1 st i 4.lm fra nålen (= 2 st), 1 st i hver av de neste 5 lm, * hopp over 1 lm, 1 st i hver av de neste 6 lm *, gjenta fra *-* = 139 st. Dvs, 2 st (1e st = 3 lm) og 5 st og du har saa heklet over de förste 4+5 lm og har 154 lm tilbage: du hekler 6 st over 7 lm = 22 gentagelser = 22x6 st = 132 st + 5 + 2 = 139 st i alt.
20.10.2016 - 11:30
![]() Cisca Dekker ha scritto:
Cisca Dekker ha scritto:
Hoi ik ben maat xl aan het haken en ben met de 10de stoer bezig (hals) ik moet 9 stokjes extra verdelen over de hele toer . dan 38 stokjes maken 4 stokjes en dan 4 stokjes meerdere, marker plaatsen, haak 44, ,haak 4 stokjes en meerder 4 stokjes, plaats marker mouw. Het is de eerste keer dat ik weer haak en heb problemen met de verdeling van de stokjes. Hopelijk kunt u me op weg helpen.
19.10.2016 - 08:46DROPS Design ha risposto:
Hoi Cisca. Ik zou de stokjes gelijkmatig meerderen over de delen met stokjes. Je hebt 5 partijen met stk: 38/44/60/44/38. Dus ik zou bijvoorbeeld meerderen: 2/2/1/2/2, dan heb je 40/46/61/46/40 stk daarna. Je meerdert daarbij de 4 stk over de mouw / panden. Succes en fijne kerstdagen.
22.12.2016 - 14:44
![]() Cisca.dekker ha scritto:
Cisca.dekker ha scritto:
Ben met de 10 de toer bezig maar kom elke keer niet uit.Kan iemand uitleg geven ivm meerderen en hoe het moet . Had er de eerste keer mooi 4 stokjes en 4 x gemeerde om 1 lus maar daarna komt het niet meer uit wie kan mij helpen?
13.10.2016 - 18:10DROPS Design ha risposto:
Hoi Cisca. Kan je vertellen welke maat je maakt en waar in het patroon je precies bent, dan kan ik makkelijker meekijen. Bvd :)
18.10.2016 - 15:08Sara ha scritto:
I finished the first A5-A8 pattern on size S. The last row is an increase row right? How many rows of tr are there before i start the Pattern-1? Cause when i look at the picture, there are always 6 rows of tr between every A5-A8. So i think i did something wrong, cause i have 4 extra rows before starting the Pattern-1 (increase row (271), the i row tr (271), then increase row (289tr), then sleeves row (185)). Next row is the pattern 1, but WS. So i'm confused :(
03.10.2016 - 19:27DROPS Design ha risposto:
Dear Sara, correct last row in A.5-A.8 is an inc row - you can adjust the number of tr rows to get the stripes as you like to. Happy crocheting!
04.10.2016 - 08:53Sara ha scritto:
*My last message should say 55 chain spaces + 12tr and NOT 16tr
28.09.2016 - 13:49Sara ha scritto:
I still can't make it work. at the end of A1 i have 55 (5ch) chain spaces plus 16tr (left and right band). Counting all stitches, i have 232 in total. So to make the 235 i have to only make 3 increases, instead of the 7 from the pattern. Where did i go wrong? And even if i did good, instead of the 36tr at the end of the row, i have 40. This is so disappointing, i'm about to give up. Please one last help
28.09.2016 - 13:47DROPS Design ha risposto:
Dear Sara, if you worked the last row without inc you would have: A.1 (= 6tr) + 17 x A.2 (= (3 ch-spaces x 4 tr) x 17 repeats = 204 tr) + A.3 (3 ch-space x 4 tr = 12 tr) + A.4 (= 6 tr) = 228 tr. (= 3 ch-spaces in each of the 17 repeats in A.2 + 3 ch-spaces in A.3 = 54 ch-spaces). But on this row you will inc 7 sts (work 3 times: "work 4 tr and inc 2 tr evenly" + "work 4 tr and inc 1 tr evenly" = 228+7= 235 tr. Happy crocheting!
28.09.2016 - 14:31Sara ha scritto:
I still don't understand the first increase :( So far a have a right and a left band, with 55 chain spaces in between. According to the A1 pattern, i should crochet 4 tr in each chain space. When i add the increases (7 in total), do i add stitches so that there are more than 4tr on each chain space? Because is not like i'm working 2tr into 1 stitch, its a chain space. Please help :)
26.09.2016 - 19:55DROPS Design ha risposto:
Dear Sara, in size S you have ton inc 3 tr evenly on this row ie when working last row in A.1-A.4 so that you will have to crochet as in A.1 (4 tr in each ch-space) until you have to inc, (work 4 tr and inc 2 tr evenly), you will have then to crochet 5 tr instead of 4 so that you get the correct number of sts). Happy crocheting!
27.09.2016 - 09:08Sara ha scritto:
I'm doing size S. When doing the first increase, do i do it after the last row of A1-A4? or while i'm doing the tr around de chain spaces on the last row 0f A1-A4? And how do i increase 2 tr evenly? Is says "Work 36-36-38-38-40-40 tr, insert 1 marker in piece, work 4 tr and inc 2-4-4-4-4-4 tr evenly". Do i increase twice in those 4tr? Thanks
26.09.2016 - 15:35DROPS Design ha risposto:
Dear Sara, the inc are worked on last row in A.1, ie work tr as shown in A.1 and at the same time, inc as explained, ie when you have to work 4 tr and inc 2 tr, you have to inc 2 tr over these 4 tr evenly (ie inc in 1st and 3rd tr or in 2nd and 4th or in 1st and 4th). Happy crocheting!
26.09.2016 - 16:19
|
||||||||||||||||||||||||||||||||||
Sweet Mint Cardigan#sweetmintcardigan |
||||||||||||||||||||||||||||||||||
|
|
||||||||||||||||||||||||||||||||||
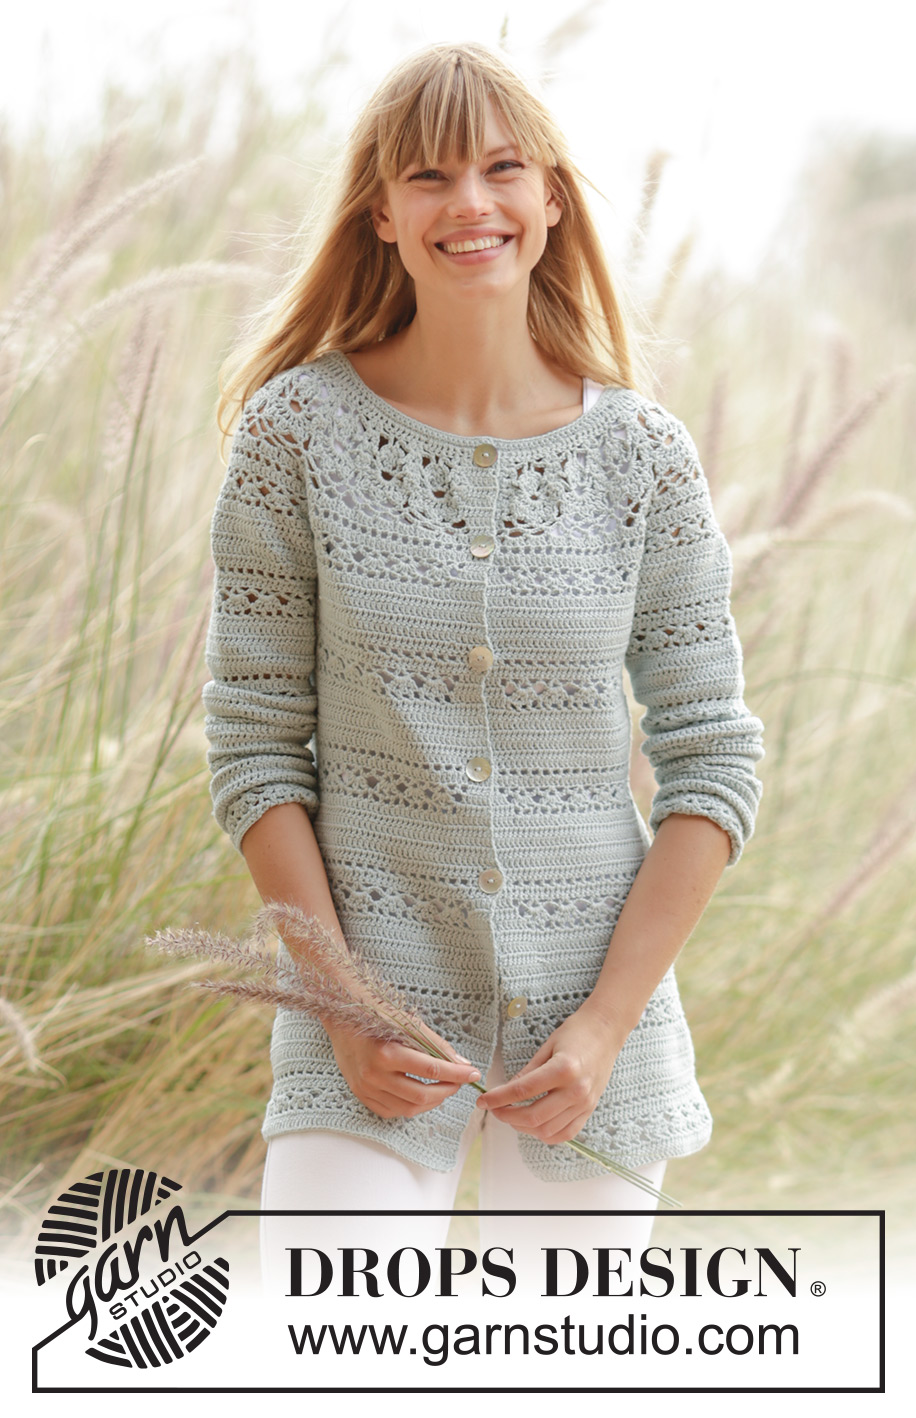
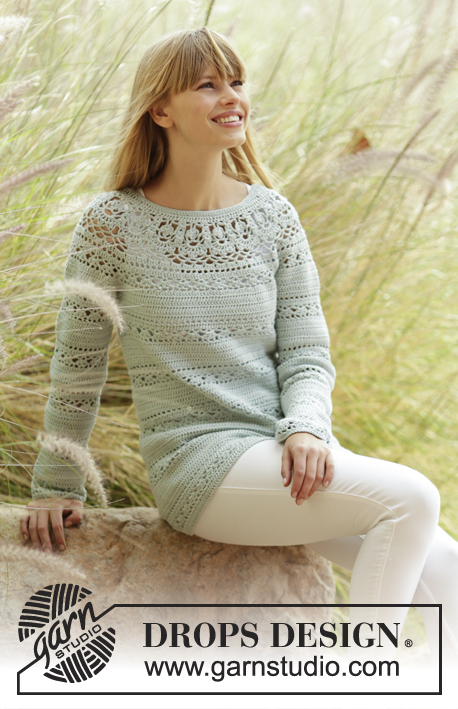
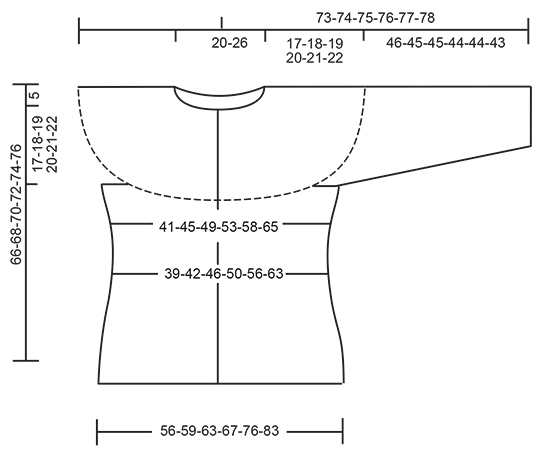
Cardigan DROPS lavorato all'uncinetto con motivo traforato e sprone rotondo in ”Safran”. Lavorato dall'alto in basso (top down). Taglie: S - XXXL.
DROPS 169-32 |
||||||||||||||||||||||||||||||||||
|
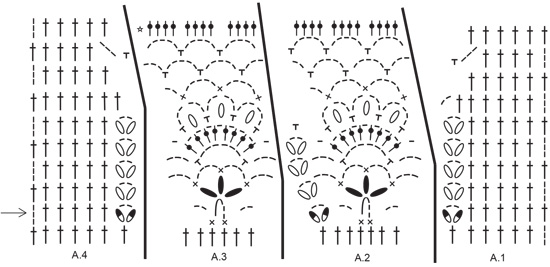
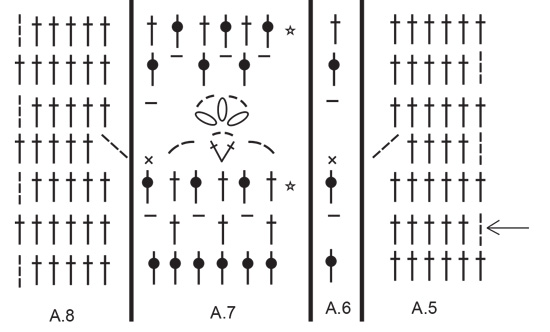
MOTIVO: Vedere i diagrammi A.1-A.8. INFORMAZIONI PER IL LAVORO: Su ogni riga a m.a sostituire la 1° m.a con 3 cat. Su ogni riga a m.b sostituire la 1° m.b con 1 cat. Sostituire la 1° m.a su ogni giro a m.a con 3 cat, finire il giro con 1 m.bss nella 3° cat all'inizio del giro. Sostituire la 1° m.b su ogni giro a m.b con 1 cat, finire il giro con 1 m.bss nella 3° cat all'inizio del giro. Iniziare ogni giro a m.b con 1 cat e finire il giro con 1 m.bss nella 1° cat all'inizio del giro. SUGGERIMENTO PER GLI AUMENTI-1: Aumentare 1 m.a lavorando 2 m.a nella stessa m. SUGGERIMENTO PER GLI AUMENTI-2: Lavorare fino a quando rimangono 2 m.a/cat prima del segnapunti, lavorare 2 m.a nella/attorno alla m.a/cat successiva (= 1 m.a aumentata), lavorare 1 m.a nella/attorno a ognuna delle 2 m.a/cat successive, il segnapunti è al centro di queste m.a/cat, lavorare 2 m.a nella/attorno alla m.a/cat successiva (= 1 m.a aumentata). Ripetere gli aumenti all'altezza di tutti i segnapunti. MOTIVO-1 (applicato al corpo): Lavorare 1 m.a in ogni m.a fino a quando sono state lavorate 6-8-10-10-10-10 righe in totale, * lavorare dal diritto del lavoro: lavorare A.5 sulle prime 6 m.a, A.6 sulla m.a successiva, ripetere A.7 fino a quando rimangono 6 m.a, A.8 sulle ultime 6 m.a. Quando A.5-A.8 sono stati lavorati 1 volta in verticale, lavorare 6-8-10-10-10-10 righe con 1 m.a in ogni m.a *, ripetere il motivo *-* fino alla fine del lavoro. MOTIVO-2 (applicato alle maniche): * lavorare A.7 su tutte le m.a. Quando A.7 è stato lavorato 1 volta in verticale, continuare come segue: lavorare 6-8-10-10-10-10 giri con 1 m.a in ogni m.a *, ripetere *-* fino alla fine del lavoro. SUGGERIMENTO PER LE DIMINUZIONI: Diminuire 1 m.a lavorando insieme le 2 m.a successive come segue: lavorare 1 m.a ma aspettare con l'ultimo passaggio (= 2 occhielli sull'uncinetto), poi lavorare la m.a successiva ma sull'ultimo passaggio, far passare il filo attraverso tutti e 3 gli occhielli sull'uncinetto. ASOLE: Fare le asole sul bordo destro. 1 asola = sostituire la 4° m.a dal bordo con 1 cat. Sulla riga successiva lavorare la m del bordo come prima (lavorare 1 m.a attorno alla cat). Lavorare per le asole quando il lavoro misura: TAGLIA S: 2, 11, 20, 29, 38 e 47 cm. TAGLIA M: 2, 11, 20, 29, 38 e 47 cm. TAGLIA L: 2, 10, 18, 26, 34, 42 e 50 cm TAGLIA: 2, 10, 18, 26, 34, 42 e 50 cm TAGLIA XXL: 2, 11, 20, 29, 38, 47 e 55 cm TAGLIA XXXL: 2, 11, 20, 29, 38, 47 e 55 cm ---------------------------------------------------------- SPRONE: Lavorato dall'alto in basso (top down). Avviare 163-163-172-172-180-180 cat con l'uncinetto n° 3,5 mm con Safran. Lavorare la riga successiva come segue: lavorare 1 m.a nella 4° cat dall’uncinetto (= 2 m.a) - LEGGERE IL SUGGERIMENTO PER IL LAVORO, 1 m.a in ognuna delle 5-5-0-0-1-1 cat successive, * saltare 1 cat, 1 m.a in ognuna delle 6 cat successive *, ripetere *-* per tutta la riga = 139-139-146-146-153-153 m.a. Poi lavorare la riga successiva dal rovescio del lavoro come segue: lavorare A.4 sulle prime 7 m.a (= bordo davanti destro), A.3 sulle 6 m.a successive, ripetere A.2 fino a quando rimangono 7 m.a (= 17-17-18-18-19-19 volte in totale in larghezza), finire con A.1 sulle ultime 7 m.a (= bordo davanti sinistro). Continuare in questo modo, cioè lavorare come segue dal diritto del lavoro: A.1, A.2 17-17-18-18-19-19 volte in totale, A.3 e A.4. FARE ATTENZIONE ALLA TENSIONE DEL LAVORO! Ricordarsi delle ASOLE – leggere la spiegazione sopra. Sull'ultima riga di A.1-A.4 (= dal rovescio del lavoro) inserire 8 segnapunti e lavorare gli aumenti come segue: continuare come mostrato nei diagrammi A.1-A.4. Lavorare ed aumentare come segue e ALLO STESSO TEMPO aumentare inoltre 0-3-3-9-3-3 m.a in modo uniforme su tutta la riga – LEGGERE IL SUGGERIMENTO PER GLI AUMENTI-1: lavorare 36-36-38-38-40-40 m.a, inserire 1 segnapunti nel lavoro, lavorare 4 m.a e aumentare 2-4-4-4-4-4 m.a in modo uniforme (= davanti destro), inserire 1 segnapunti, lavorare 42-42-44-44-46-46 m.a, inserire 1 segnapunti, lavorare 4 m.a e aumentare 2-4-4-4-4-4 m.a in modo uniforme, inserire 1 segnapunti (= manica), lavorare 56-56-60-60-64-64 m.a, inserire un segnapunti, lavorare 4 m.a e aumentare 2-4-4-4-4-4 m.a in modo uniforme, inserire 1 segnapunti (= dietro), lavorare 42-42-44-44-46-46 m.a, inserire 1 segnapunti, lavorare 4 m.a e aumentare 1-4-4-4-4-4 m.a in modo uniforme, inserire 1 segnapunti (= manica), lavorare 36-36-38-38-40-40 m.a (= davanti sinistro) = 235-247-259-265-271-271 m.a sulla riga. Spostare i segnapunti verso l’alto durante il lavoro. Il lavoro misura circa 9 cm. Lavorare 0-0-0-0-2-2 righe con 1 m.a in ogni m.a e aumentare 0-0-0-0-12-15 m.a in modo uniforme su ogni riga (= 0-0-0-0-24-30 m.a in totale) = 235-247-259-265-295-301 m.a. Lavorare A.5-A.7 come segue (la prima riga è dal diritto del lavoro): lavorare A.5 sulle prime 6 m.a (= bordo davanti sinistro), A.6 sulla m.a successiva, ripetere A.7 fino a quando rimangono 6 m.a (= 37-39-41-42-47-48 volte in totale in larghezza), finire con A.8 sulle ultime 6 m.a (= bordo davanti destro). Sulla 2° riga (cioè riga a m.a) aumentare all’altezza di tutti i segnapunti, LEGGERE IL SUGGERIMENTO PER GLI AUMENTI-2 e aumentare 2-8-8-8-8-8 m.a in modo uniforme sul giro (= 2 m.a all’altezza di ogni segnapunti e 2-8-8-8-8-8 m.a aumentate in modo uniforme = 18-24-24-24-24-24 m.a aumentate in totale sulla riga) = 253-271-283-289-319-325 m.a. Ora ripetere A.7 40-43-45-46-51-52 volte in larghezza. Ripetere gli aumenti (cioè 2 m.a aumentate all’altezza di tutti i segnapunti e 2-8-8-8-8-8 m.a aumentate in modo uniforme = 18-24-24-24-24-24 m.a aumentate in totale sulla riga) sull’ultimo giro in A.5-A.8 = 271-295-307-313-343-349 m.a. * Lavorare 1 riga con 1 m.a in ogni m.a. Lavorare 1 riga a m.a e aumentare 18-18-16-17-24-26 m.a in modo uniforme *, ripetere *-* 1-1-2-3-2-3 volte in totale = 289-313-339-364-391-427 m.a. Lavorare 0-1-1-0-1-0 righe con 1 m.a in ogni m.a. Il lavoro misura circa 17-18-19-20-21-22 cm. Sulla riga successiva (= dal diritto del lavoro) lavorare come segue: lavorare 1 m.a in ognuna delle prime 46-50-54-58-64-70 m.a (= davanti sinistro), lavorare 8 cat, saltare 60-64-69-73-75-79 m.a dalla riga precedente (= manica), 1 m.a in ognuna delle 77-85-93-102-113-129 m.a successive (= dietro), 8 cat, saltare 60-64-69-73-75-79 m.a dal giro precedente (= manica), 1 m.a in ognuna delle ultime 46-50-54-58-64-70 m.a (= davanti destro) = 185-201-217-234-257-285 m.a/cat sul giro. Inserire 1 segnapunti nel lavoro, ORA MISURARE IL LAVORO DA QUI. Lavorare 1 riga sul rovescio del lavoro con 1 m.a in ogni m.a/cat. Poi lavorare il MOTIVO-1 sul diritto del lavoro - vedere le spiegazioni sopra e diminuire 4-2-0-5-4-2 m.a in modo uniforme nel corso della prima riga di m.a – LEGGERE IL SUGGERIMENTO PER LE DIMINUZIONI = 181-199-217-229-253-283 m.a. Quando il lavoro misura 12 cm, aggiustarlo in modo che la riga successiva sia una riga a m.a, diminuire 6-12-12-6-6-6 m.a in modo uniforme = 175-187-205-223-247-277 m.a. Continuare con il motivo come prima. Quando il lavoro misura 19-20-21-22-23-24 cm, aggiustarlo in modo che la riga successiva sia una riga a m.a, aumentare 12 m.a in modo uniforme. Ripetere gli aumenti ogni 3 cm altre 5-5-5-5-6-6 volte = 247-259-277-295-331-361 m.a. Lavorare il motivo come prima fino a quando il lavoro misura 44-45-46-47-48-49 cm dal segnapunti. Chiudere e affrancare. MANICA: La manica è lavorata in tondo, dall’alto in basso. Iniziare lavorando al centro sotto la manica come segue: lavorare 1 m.b nella 5° cat delle 8 cat nello scalfo sul corpo, 3 cat (= 1 m.a), lavorare 1 m.a in ognuna delle 3 cat successive, lavorare 1 m.a in ogni m.a sulla manica, lavorare 1 m.a in ognuna delle 4 cat rimaste sotto la manica = 68-72-77-81-83-87 m.a. Inserire 1 segnapunti al centro sotto la manica. Inserire 1 segnapunti nel lavoro, ORA MISURARE IL LAVORO DA QUI. Lasciare i segnapunti nel lavoro spostarli durante il lavoro. TAGLIA S-M: Lavorare 1 m.a in ogni m.a e diminuire 2-0 m.a in modo uniforme = 66-72 m.a. TAGLIE L-XL-XXL-XXXL: Lavorare 1 m.a in ogni m.a e aumentare 1-3-1-3 m.a in modo uniforme = 78-84-84-90 m.a. TUTTE LE TAGLIE: LEGGERE TUTTA LA SEZIONE SEGUENTE PRIMA DI CONTINUARE! LAVORARE IL MOTIVO E DIMINUIRE ALLO STESSO TEMPO: MOTIVO: Lavorare 1 m.a in ogni m.a fino a quando sono stati lavorati 5-7-9-9-9-9 giri a m.a in totale. Lavorare il MOTIVO-2 – leggere la spiegazione sopra. DIMINUZIONI: Quando il lavoro misura 4 cm, aggiustarlo in modo che il giro successivo sia un giro a m.a, diminuire 6 m.a in modo uniforme, ripetere le diminuzioni ogni 15-10-8-8-8-6 cm altre 2-3-4-4-4-5 volte = 48-48-48-54-54-54 m.a. Chiudere e affrancare quando la manica misura 46-45-45-44-44-43 cm. Lavorare l’altra manica nello stesso modo. BORDO DEL COLLO: Lavorato avanti e indietro dal centro davanti. Iniziare dal diritto del lavoro: lavorare nella cat in cui è stata lavorata la m.a (cioè non lavorare sulla cat saltata = 139-139-146-146-153-153 m.a). Lavorare 1 m.b in ognuna delle prime 22-22-24-24-26-26 m.a, * 1 m.m.a in ognuna delle 3 cat successive, 1 m.a in ognuna delle 3 cat successive, 1 m.a.d in ognuna delle 19 cat successive, 1 m.a in ognuna delle 3 cat successive, 1 m.m.a in ognuna delle 3 cat successive *, 1 m.b in ognuna delle 33-33-36-36-39-39 cat successive, ripetere *-* 1 volta, 1 m.b in ognuna delle ultime 22-22-24-24-26-26 cat. Lavorare la riga successiva come segue: lavorare 1 m.b in ognuna delle prime 26-26-28-28-30-30 m, ** 1 m.m.a in ognuna delle 3 m successive, 1 m.a in ognuna delle 3 m successive, * lavorare insieme le 2 m.a.d successive *, ripetere *-* altre 5 volte, 1 m.a in ognuna delle 3 m successive, 1 m.m.a in ognuna delle 3 m successive **, 1 m.b in ognuna delle 39-39-42-42-45-45 m successive, ripetere **-** un’altra volta, finire con 1 m.b in ognuna delle ultime 26-26-28-28-30-30 m = 127-127-134-134-141-141 m. Lavorare 1 riga con 1 m.b in ogni m. Chiudere e affrancare. CONFEZIONE: Attaccare i bottoni sul bordo davanti sinistro. |
||||||||||||||||||||||||||||||||||
Spiegazioni del diagramma |
||||||||||||||||||||||||||||||||||
|
||||||||||||||||||||||||||||||||||
 |
||||||||||||||||||||||||||||||||||
 |
||||||||||||||||||||||||||||||||||
 |
||||||||||||||||||||||||||||||||||
Avete terminato questo modello?Allora taggate le vostre foto con #dropspattern #sweetmintcardigan o inviatele alla #dropsfan gallery. Avete bisogno di aiuto con questo modello?Troverete 15 video tutorial, una sezione per i commenti/domande e molto altro guardando il modello su www.garnstudio.com © 1982-2026 DROPS Design A/S. Ci riserviamo tutti i diritti. Questo documento, compreso tutte le sue sotto-sezioni, è protetto dalle leggi sul copyright. Potete leggere quello che potete fare con i nostri modelli alla fine di ogni modello sul nostro sito. |
||||||||||||||||||||||||||||||||||


Con oltre 40 anni di esperienza nel design di modelli di maglia e uncinetto, DROPS Design offre la più estesa collezione di modelli gratuiti su internet - tradotti in 17 lingue. Ad oggi vi possiamo fornire 324 cataloghi e 12290 modelli - 9561 dei quali sono tradotti in Italiano.
Ci stiamo impegnando molto per darvi il meglio che vi possiamo offrire in termini di maglia e uncinetto, ispirazioni e consigli così come filati di grande qualità ad un prezzo incredibile! Volete utilizzare i nostri modelli per qualcosa d'altro oltre al vostro uso personale? Potete leggere tutto ciò che è consentito nel testo sul Copyright in basso su tutte le pagine dei nostri modelli. Buon lavoro!
Lasciare un commento sul modello DROPS 169-32
Noi saremmo felici di ricevere i tuoi commenti e opinioni su questo modello!
Se vuoi fare una domanda, fai per favore attenzione a selezionare la categoria corretta nella casella qui sotto per velocizzare il processo di risposta. I campi richiesti sono indicati da *.