
Categorie popolari
State cercando un filato?


Commenti / Domande (68)
![]() Laura Holm ha scritto:
Laura Holm ha scritto:
Hej:-) Hvad menes der med: "A.2 (=2 fm) 6-7-7-8-8-9 gange i bredden"? (Linje 5 i opskriften)
17.04.2016 - 17:26DROPS Design ha risposto:
Hej Laura. Du haekler A.2 (som er 2 fm) 6-7-8 eller 9 gange i bredden afhaengigt af hvilken str du laver
18.04.2016 - 14:20Rainbow ha scritto:
Thanks for helping. Is there a video tht shows how to do the below? "sew small stitches through both layers to make a tunnel to thread the tie through." Regards Rainbow
06.03.2016 - 08:59DROPS Design ha risposto:
Dear Mrs Rainbow, there is no such video yet but your request has been added to our list - while it comes, I'll try to reword you how to process: fold 2 cm in each side towards WS (see also dotted line in chart) and sew small sts along this dotted line to keep the edge on place and you get a tunnel casing where you can then thread the string through - see chart at the very bottom, with top from WS and string through the tunnel casings on each side. Happy crocheting!
07.03.2016 - 10:08Rainbow ha scritto:
Then work 1 dc in every dc until piece measures 24-26-28-30-32-34 cm / 9½"-10 1/4"-11"-11 3/4"-12½"-13½" from cast-on edge mid front. Cast-on edge mid front means from beginning top?? Regards Rainbow
05.03.2016 - 06:50DROPS Design ha risposto:
Dear Mrs Rainbow, yes you measure from cast-on edge, ie from top edge of front piece, this is the total length of top (see also measurement chart - in cm). Happy crocheting!
05.03.2016 - 18:09Rainbow ha scritto:
Continue with 1 dc in every dc and continue to dec lace pattern mid front into a tip. don't get this, could you please explain?? Thanks, Rainbow
02.03.2016 - 12:45DROPS Design ha risposto:
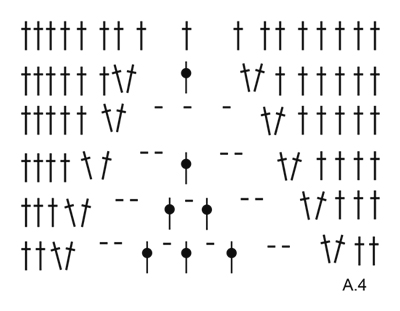
Dear Mrs Rainbow, you continue working A.1, A.2 and A.3 so that lace pattern dec as shown in A.1 and A.3. When there are only 4 ch-spaces remaining at the tip, work then diagram A.4. Happy crocheting!
02.03.2016 - 15:00Rainbow ha scritto:
Work 27-30-37-44-49-57 ch (includes 5 ch to turn with), turn and work as follows: Work 1 dc in 6th ch from hook, then work 1 dc in each of the next 1-4-6-3-3-6 ch, * skip ch 1, work 1 dc in each of the next 4 dc *, repeat from *-* 3-3-4-6-7-8 more times, continue pattern as before over the 71-77-77-81-85-85 dc, then work 27-30-37-44-49-57 ch (includes 5 ch to turn with). Means?? From right side once and left side once??
01.03.2016 - 09:50DROPS Design ha risposto:
Dear Rainbow, yes you crochet 27-30-37-44-49-57 ch on one side, turn and work as explained to the end of row, then at the end of this row, crochet 27-30-37-44-49-57 ch, turn and work next row. You have now inc on both sides of top. Happy crocheting!
01.03.2016 - 13:29
![]() Lindie ha scritto:
Lindie ha scritto:
Kære jer, Denne opskrift volder mig lidt udfordringer. Skal nu begynde forfra for 3. gang. Kan ikke forstå diagrammet. Der er 33 m når A.1-A.3 påbegyndes. Men der beskrives kun de 23 af maskerne. Hvordan hækler jeg de 10 i midten? På forhånd tak Mh Lindie
01.02.2016 - 11:21DROPS Design ha risposto:
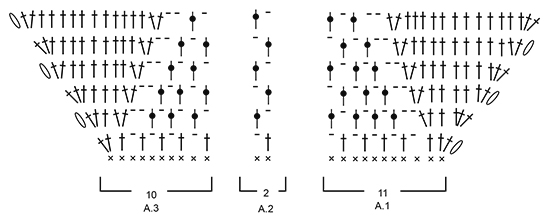
Hej Lindie. Du har 33 m og haekler: A.1 = 11 m, saa gentager du A.2 6 gange (= 12 m) og slutter af med A.3 = 10 m = 33 m haeklet
11.02.2016 - 15:25
![]() Malu De LEon ha scritto:
Malu De LEon ha scritto:
Could you please put the sizes measurements? Size S - M - L - XL and etc are for which size of bust?
26.01.2016 - 03:52DROPS Design ha risposto:
Dear Mrs De Leon, you will find at the bottom of the pattern a measurement chart with all measurements in cm - taken flat from side to side. Compare these to a similar garment you have and like the shape to find out the matching size. Happy crocheting!
26.01.2016 - 10:32
![]() Gisele ha scritto:
Gisele ha scritto:
I love this! So original
10.12.2015 - 11:22
|
|||||||||||||||||||
Mandarina#mandarinatop |
|||||||||||||||||||
 |
 |
||||||||||||||||||
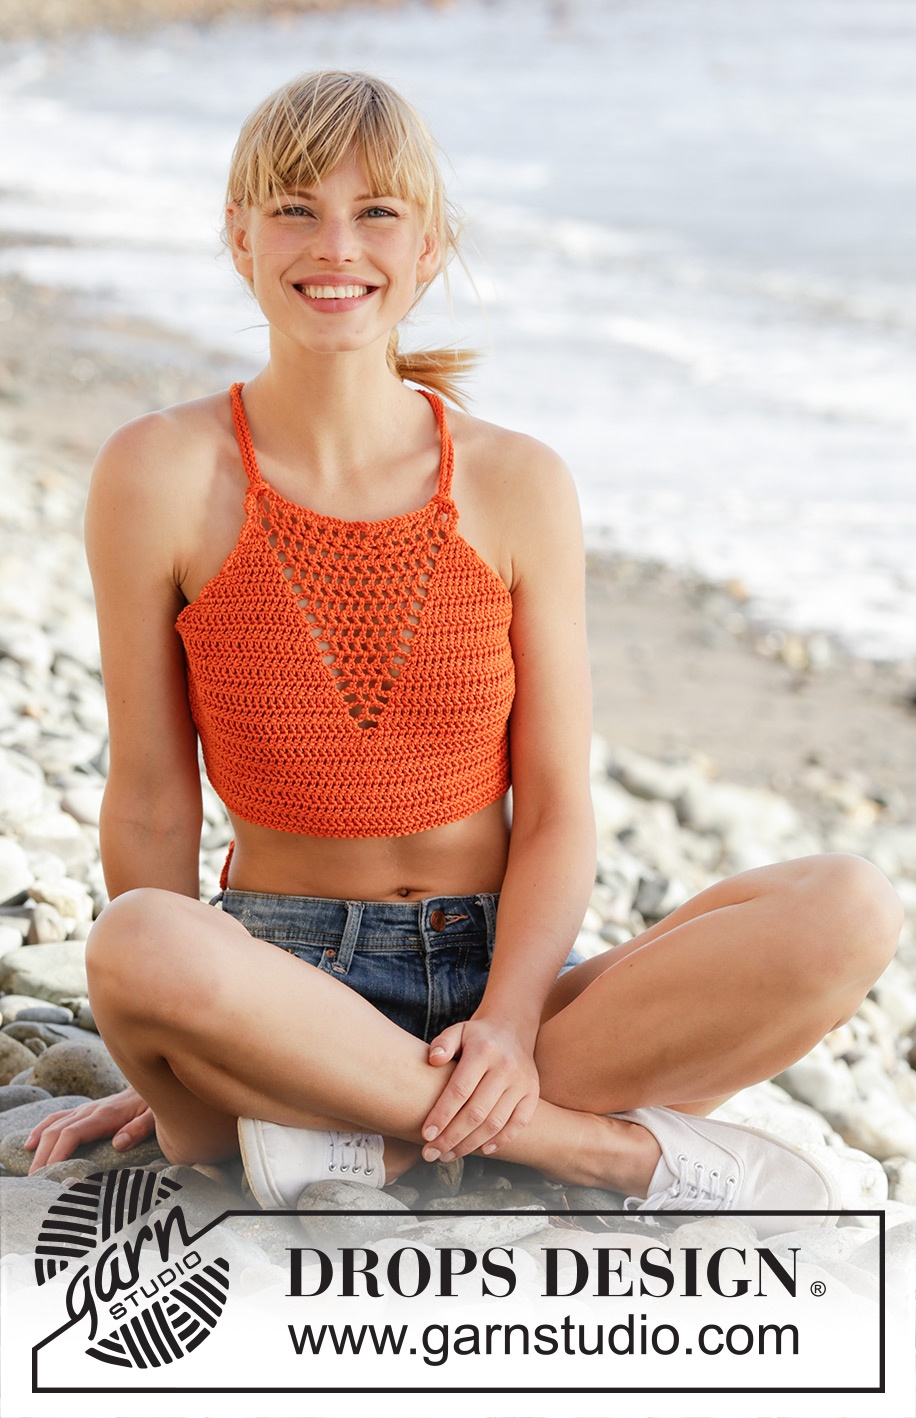
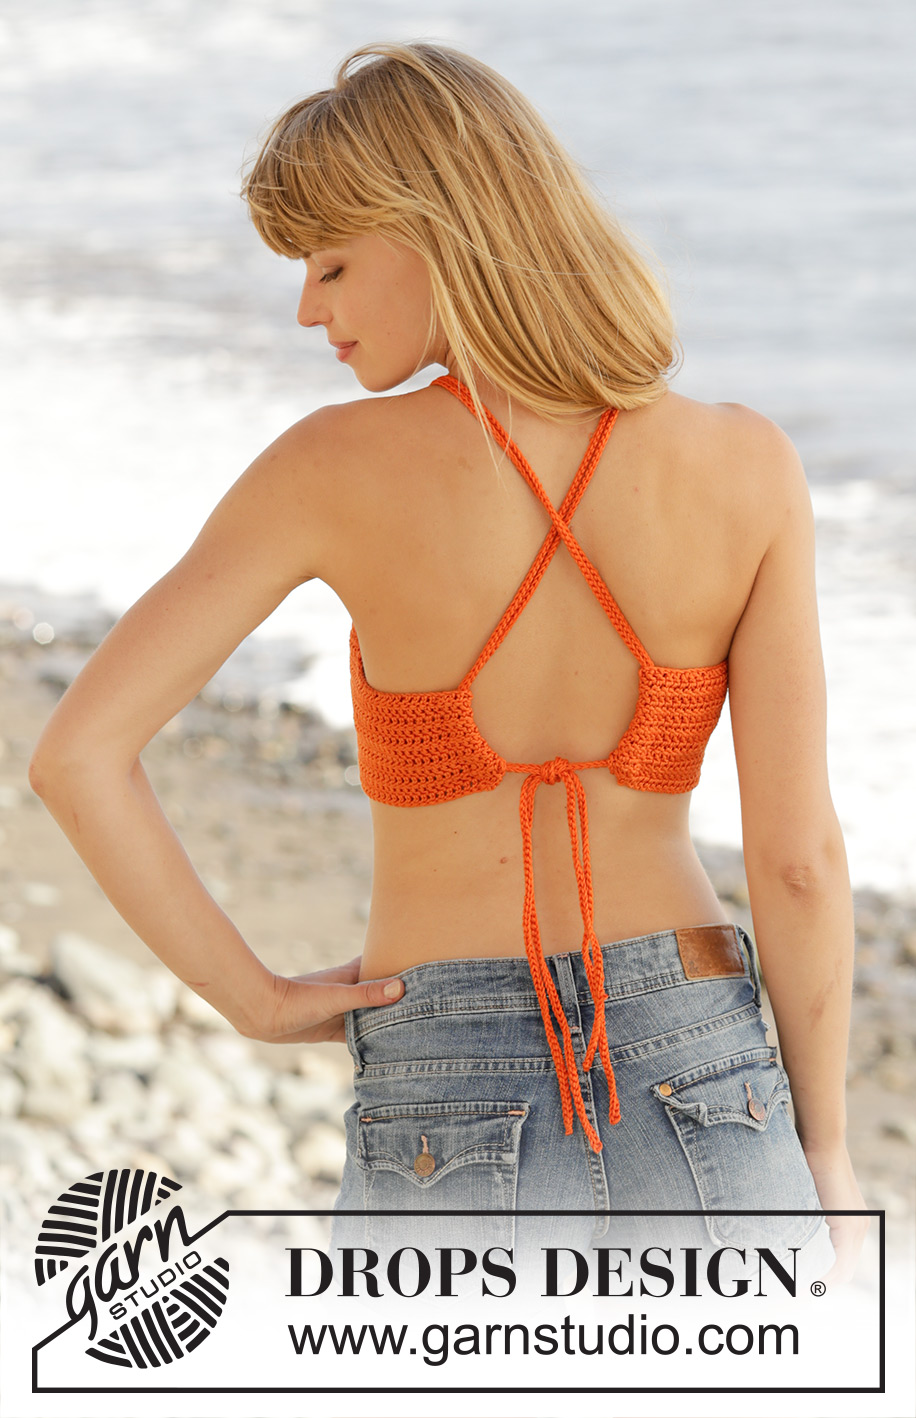
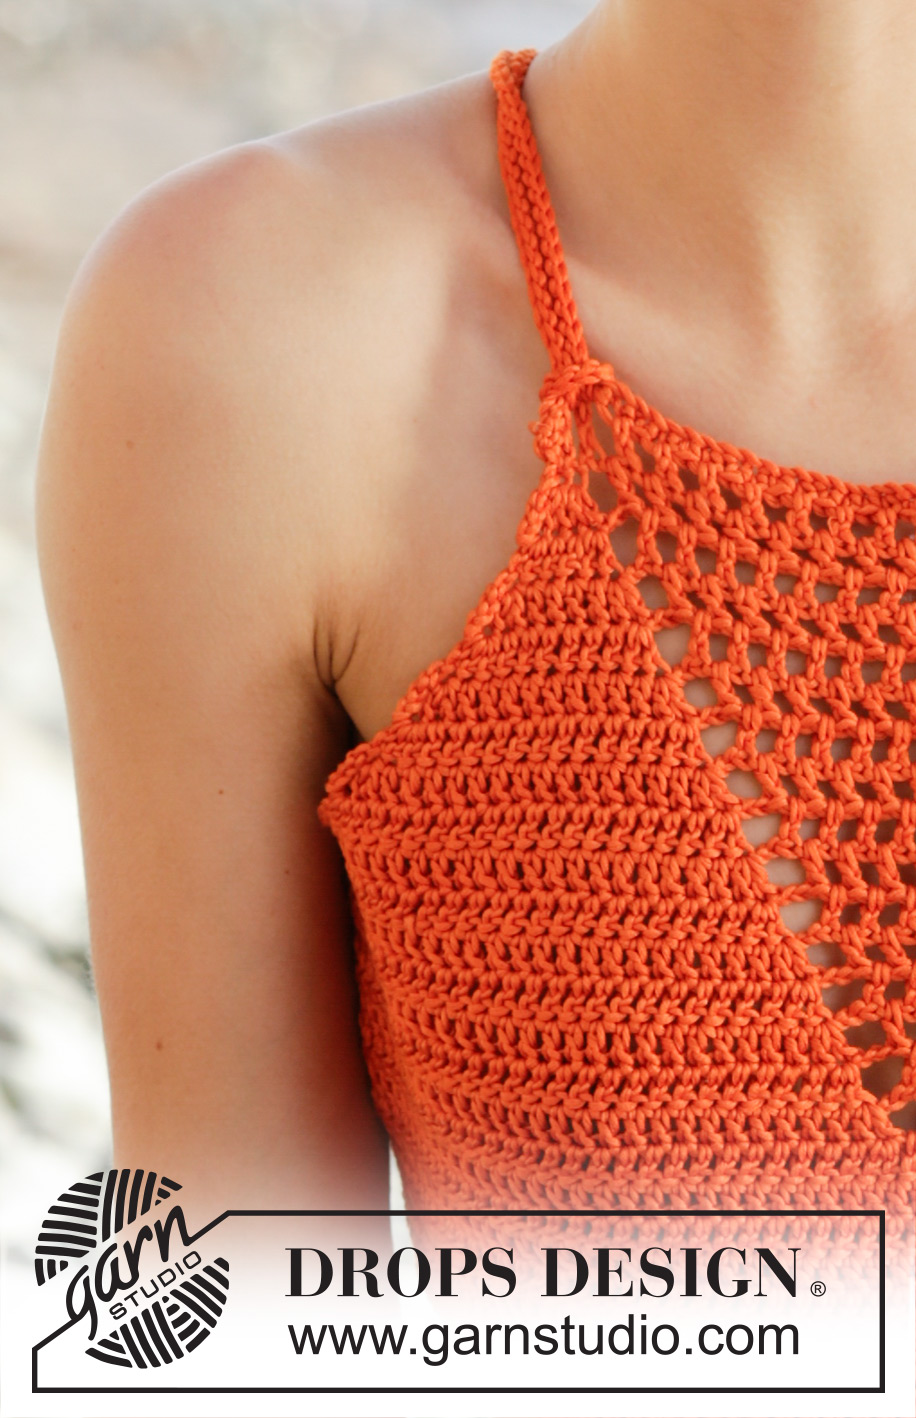
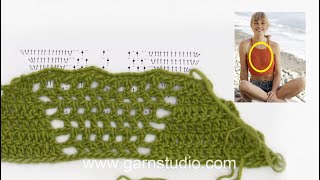
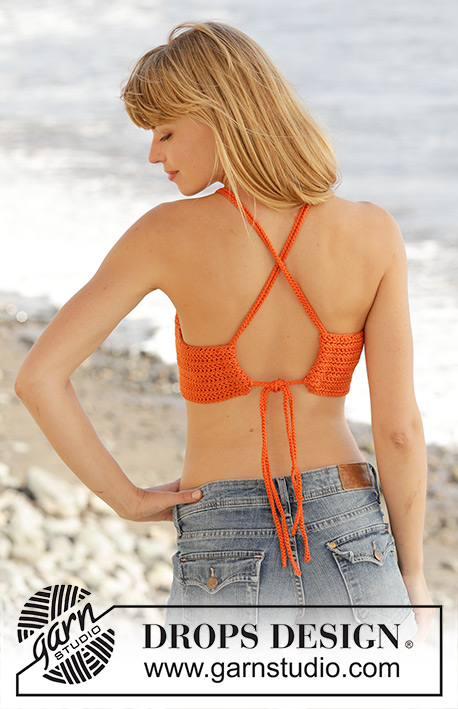
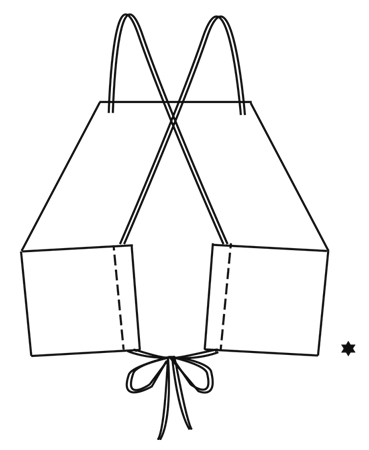
Top DROPS all’uncinetto, con maglie alte, motivo traforato e cordini sul dietro, lavorato dell’alto verso il basso (top down), in "Muskat". Taglie: Dalla S alla XXXL.
DROPS 170-16 |
|||||||||||||||||||
|
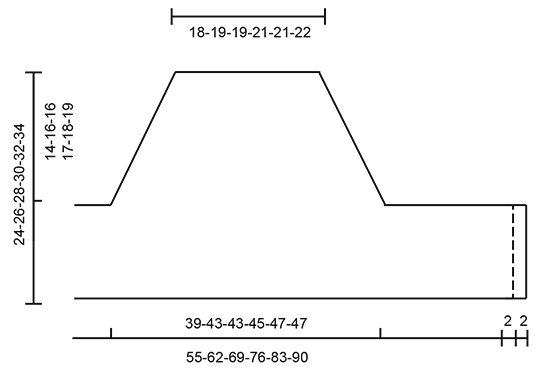
SUGGERIMENTO PER IL LAVORO: All’inizio di ogni riga di m.a lavorare 5 cat per girare il lavoro. Queste 5 cat non sostituiscono la prima m.a. MOTIVO: Vedere i diagrammi da A.1 a A.4. ---------------------------------------------------------- TOP: Si lavora avanti e indietro, dall’alto verso il basso. Con l’uncinetto n° 4 ed il filato Muskat, avviare 42-44-44-47-47-49 cat morbide (compresa 1 cat per girare il lavoro). Girare e lavorare come segue: 1 m.b nella 2a cat dall’uncinetto (= 1 m.b + 1 cat per girare il lavoro), 1 m.b in ognuna delle 2-4-4-2-2-4 cat successive, * saltare 1 cat, 1 m.b in ognuna delle 4 cat successive *, ripetere da *-* altre 6-6-6-7-7-7 volte, 1 m.b in ognuna delle rimanenti 2 cat = 33-35-35-37-37-39 m.b. Girare e lavorare come segue: Lavorare il diagramma A.1 sulle prime 11 m.b, ripetere il diagramma A.2 (= 2 m.b) 6-7-7-8-8-9 volte in larghezza, diagramma A.3 sulle restanti 10 m.b - VEDERE IL SUGGERIMENTO PER IL LAVORO ! RICORDARSI LA TENSIONE DEL LAVORO! Quando i diagrammi da A.1 a A.3 sono stati lavorati 1 volta in verticale, continuare con il motivo e aumentare in modo uguale finché non sono state lavorate in tutto 13-14-14-15-16-17 righe. Ci sono ora 71-77-77-81-85-85 m.a/cat. Gli aumenti da ciascun lato dei diagrammi A.1 e A.3 sono ora completati, ma il motivo traforato continua a diminuire in modo da formare una punta al centro sul davanti. Lavorare come segue: Lavorare 27-30-37-44-49-57 cat (comprese 5 cat per girare il lavoro), girare e lavorare come segue: 1 m.a nella 6a cat dall’uncinetto, 1 m.a in ognuna delle 1-4-6-3-3-6 cat successive, * saltare 1 cat, 1 m.a in ognuna delle 4 cat successive *, ripetere da *-* altre 3-3-4-6-7-8 volte, proseguire con il motivo come prima sulle 71-77-77-81-85-85 m.a successive, lavorare 27-30-37-44-49-57 cat (comprese 5 cat per girare il lavoro). Girare e lavorare come segue: 1 m.a nella 6a cat dall’uncinetto, lavorare poi 1 m.a in ognuna delle 1-4-6-3-3-6 cat successive, * saltare 1 cat, lavorare 1 m.a in ognuna delle 4 m.a successive *, ripetere da *-* altre 3-3-4-6-7-8 volte, proseguire con il motivo come prima sulle 71-77-77-81-85-85 m.a successive, lavorare poi 1 m.a in ognuna delle ultime m.a = 107-119-131-145-157-171 m.a/cat. Proseguire con 1 m.a in ogni m.a e continuare a diminuire il motivo traforato al centro sul davanti, per formare la punta. Quando rimangono 4 archi di cat, finire il motivo come indicato nel diagramma A.4. Lavorare poi 1 m.a in ogni m.a finché il lavoro non misura 24-26-28-30-32-34 cm dall’avvio delle m al centro sul davanti. Tagliare il filo. CONFEZIONE: Piegare i 2 cm da ciascun lato sul rovescio del lavoro e cucire con piccoli punti attraverso entrambi gli strati per formare un orlo per il passaggio dei cordini. CORDINI: Lavorare 1 cordino morbido come segue: con l’uncinetto n° 4 ed il filato Muskat lavorare una cat di base lunga ca. 140-150-160-170-180-190 cm, girare e lavorare 1 m.bss in ogni cat ma assicurarsi che le m.bss non siano più strette delle cat. Tagliare il filo. Lavorare un altro cordino in modo uguale. Iniziare sul diritto del lavoro e far passare una delle estremità di uno dei cordini nel motivo traforato nella parte in alto del top, intorno ad una m.a e attraverso il foro successivo (= le 2 estremità del cordino sono sul diritto). Regolare il cordino in modo che le 2 estremità siano lunghe uguali, fare poi passare le 2 estremità attraverso l’anello sul rovescio del lavoro e stringere. Ripetere sull’altro lato. Incrociare i cordini sul dietro e infilarli attraverso l’orlo sui lati – vedere il grafico. Fare un nodo. |
|||||||||||||||||||
Spiegazioni del diagramma |
|||||||||||||||||||
|
|||||||||||||||||||
 |
|||||||||||||||||||
 |
|||||||||||||||||||
 |
|||||||||||||||||||
 |
|||||||||||||||||||
Avete terminato questo modello?Allora taggate le vostre foto con #dropspattern #mandarinatop o inviatele alla #dropsfan gallery. Avete bisogno di aiuto con questo modello?Troverete 6 video tutorial, una sezione per i commenti/domande e molto altro guardando il modello su www.garnstudio.com © 1982-2026 DROPS Design A/S. Ci riserviamo tutti i diritti. Questo documento, compreso tutte le sue sotto-sezioni, è protetto dalle leggi sul copyright. Potete leggere quello che potete fare con i nostri modelli alla fine di ogni modello sul nostro sito. |
|||||||||||||||||||


Con oltre 40 anni di esperienza nel design di modelli di maglia e uncinetto, DROPS Design offre la più estesa collezione di modelli gratuiti su internet - tradotti in 17 lingue. Ad oggi vi possiamo fornire 324 cataloghi e 12290 modelli - 9561 dei quali sono tradotti in Italiano.
Ci stiamo impegnando molto per darvi il meglio che vi possiamo offrire in termini di maglia e uncinetto, ispirazioni e consigli così come filati di grande qualità ad un prezzo incredibile! Volete utilizzare i nostri modelli per qualcosa d'altro oltre al vostro uso personale? Potete leggere tutto ciò che è consentito nel testo sul Copyright in basso su tutte le pagine dei nostri modelli. Buon lavoro!
Lasciare un commento sul modello DROPS 170-16
Noi saremmo felici di ricevere i tuoi commenti e opinioni su questo modello!
Se vuoi fare una domanda, fai per favore attenzione a selezionare la categoria corretta nella casella qui sotto per velocizzare il processo di risposta. I campi richiesti sono indicati da *.