
Categorie popolari
State cercando un filato?


Commenti / Domande (68)
![]() Stacey Meyer ha scritto:
Stacey Meyer ha scritto:
Hello! This is a lovely detailed pattern and I so appreciate all the assistance you've provided. I'm sorry if I've overlooked it but I can't for the gauge guide for this pattern. I just want to be sure I'm not crocheting too loosely or too tight. Thank you!
15.08.2016 - 06:17DROPS Design ha risposto:
Dear Mrs Meyer, tension may differ with every crocheter, so remember to adjust the crochet hook size to that you get the stated gauge ie 18 dc x 9 rows = 4'' x 4'' (10 x 10 cm). Happy crocheting!
15.08.2016 - 11:21
![]() Sara Otero ha scritto:
Sara Otero ha scritto:
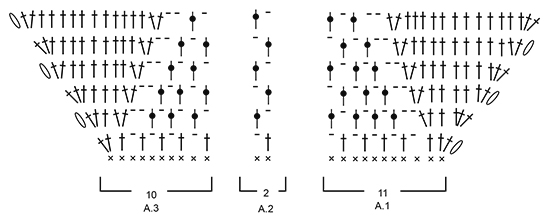
Buenas tardes, después de la primera ronda de puntos bajos, manda a trabajar los diagramas del 1 al 3 el 2 diagrama no lo entiendo pk solo pone dos puntos bajos, ¿entonces hay que disminuir? ¿Que significa 6 t veces? Muchas gracias
12.08.2016 - 16:08DROPS Design ha risposto:
Hola Sara, el diagrama A2 se trabaja sobre un total de 12 pts, es decir, A2 (=2p.b) se repite un total de 6 veces a lo largo de la fila para la talla S.
14.08.2016 - 12:02
![]() Karen A. Hillman ha scritto:
Karen A. Hillman ha scritto:
How do you even out the rows on the side panels, there's always one extra row on one side panel ???????
16.07.2016 - 20:27DROPS Design ha risposto:
Dear Mrs Hillmann, this will not be visible at the end - if you rather like to get both sides the same, cut the yarn and chain number of sts required for one side, work next row on the middle panel and chain number of sts required for the other side and continue as stated. Happy crocheting!
18.07.2016 - 09:15
![]() Sandy ha scritto:
Sandy ha scritto:
I am wondering about the purpose of the 5 chains at the beginning of each DC row. I can see they may be a decorative bit on the main part of the top, but why are they along the back strap since it will be folded over for the tube casing?
25.06.2016 - 01:04DROPS Design ha risposto:
Dear Sandy, you can choose to not crochet the 5 ch at the beg of dc rows when working the last rows for tube casing if your chains are long enough to not tighten piece on the sides. Happy crocheting!
27.06.2016 - 08:33
![]() Iris ha scritto:
Iris ha scritto:
Hey Drops, I would like to use your recycled cotton, either #6 of #5 to make this top. Is it a problem as they aren't in the yarn category B? Thanks in advance
30.04.2016 - 13:47DROPS Design ha risposto:
Dear Iris, DROPS loves you #6 belongs to group A and DROPS loves you #5 to group C so that they may be not the best alternative to a yarn group B - read more here, and contact your DROPS store for any further individual assistance choosing a yarn/a pattern. Happy crocheting!
02.05.2016 - 09:25Leona ha scritto:
Hi! I don't understand the last part on how to thread the ties through the top at all. Is there a video for this, or a clearer explanation? I have no idea which holes and dc:s and loops the text is talking about. Please help!
24.04.2016 - 21:44DROPS Design ha risposto:
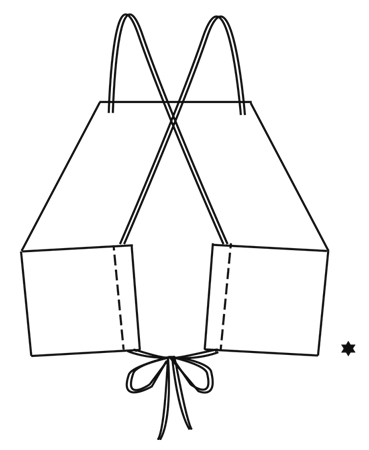
Dear Leona, you will find at the very bottom of the page when scrolling down a chart showing top from back side and how to thread the ties. Happy assembly!
25.04.2016 - 10:18
![]() KC ha scritto:
KC ha scritto:
Hello...I'm sorry, I'm not understanding where youre getting the measurements. or how you are measuring them. I just would like to know how to had the flaps that fold to the back side? am i supposed to add more chains or do i keep dc until it reaches a a certain length? Is there a way I could send a picture of my progress?
21.04.2016 - 20:08DROPS Design ha risposto:
Dear KC, you measure total width from the fundation chain towards last row worked. On each side of piece along fold from WS the outermost 3/4" on each side to make like a hem where you will thread tie through - see charts at the bottom of the page. For any further personnal assistance you are welcome to contact the store where you bought your yarn and then show your picture. Happy crocheting!
22.04.2016 - 08:43
![]() KC ha scritto:
KC ha scritto:
Hi! I actually don't understand what those numbers mean and where to measure then. I've completed a.1-a.4 by the diagram. I'm not sure how to read those numbers in crochet terms
21.04.2016 - 17:02DROPS Design ha risposto:
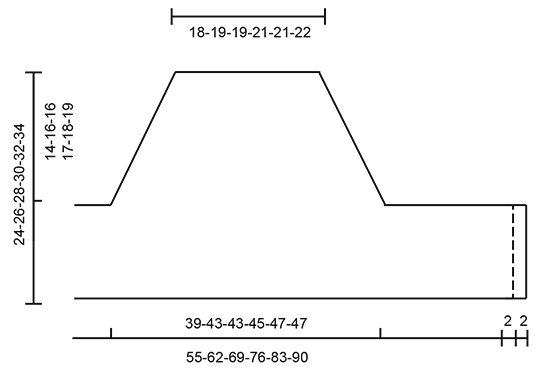
Dear KC, you will find a measurement chart at the bottom of the written patter below the diagrams - the finished measurements are the one from the very top of the piece (fundation chains) - measurements are in cm in chart and given in inches in written pattern. Happy crocheting!
21.04.2016 - 17:05
![]() KC ha scritto:
KC ha scritto:
After I've completed A.1 to A.4 What do i do next? How do i make the rest? all i have is the chest piece done..
21.04.2016 - 01:36DROPS Design ha risposto:
Dear Kc, After A.1-A.4 have been worked, work 1 dc in every dc until piece measures 24-26-28-30-32-34 cm / 9½"-10 1/4"-11"-11 3/4"-12½"-13½" from cast-on edge mid front. Fasten off. Happy crocheting!
21.04.2016 - 09:10
![]() Claudia Jakrlin ha scritto:
Claudia Jakrlin ha scritto:
Hallo Drops, warum muss ich eigentlich jede Reihe mit 5 Maschen beginnen? Das gibt derzeit ziemlich hässliche Bögen am Rand. Oder zeigt sich das später beim Tragen straff?
19.04.2016 - 15:03DROPS Design ha risposto:
Liebe Claudia, normalerweise wird eine Stb-Reihe mit 3 Luftmaschen gewendet, wenn allerdings die Kante schräg ist (z.B. zurch Zunahmen), braucht man mehr Lm um die Diagonale auszugleichen. Wenn Sie sehr lockere Lm häkeln, reichen vielleicht 4 - aber die Kante darf auf keinen Fall spannen.
20.04.2016 - 07:57
|
|||||||||||||||||||
Mandarina#mandarinatop |
|||||||||||||||||||
 |
 |
||||||||||||||||||
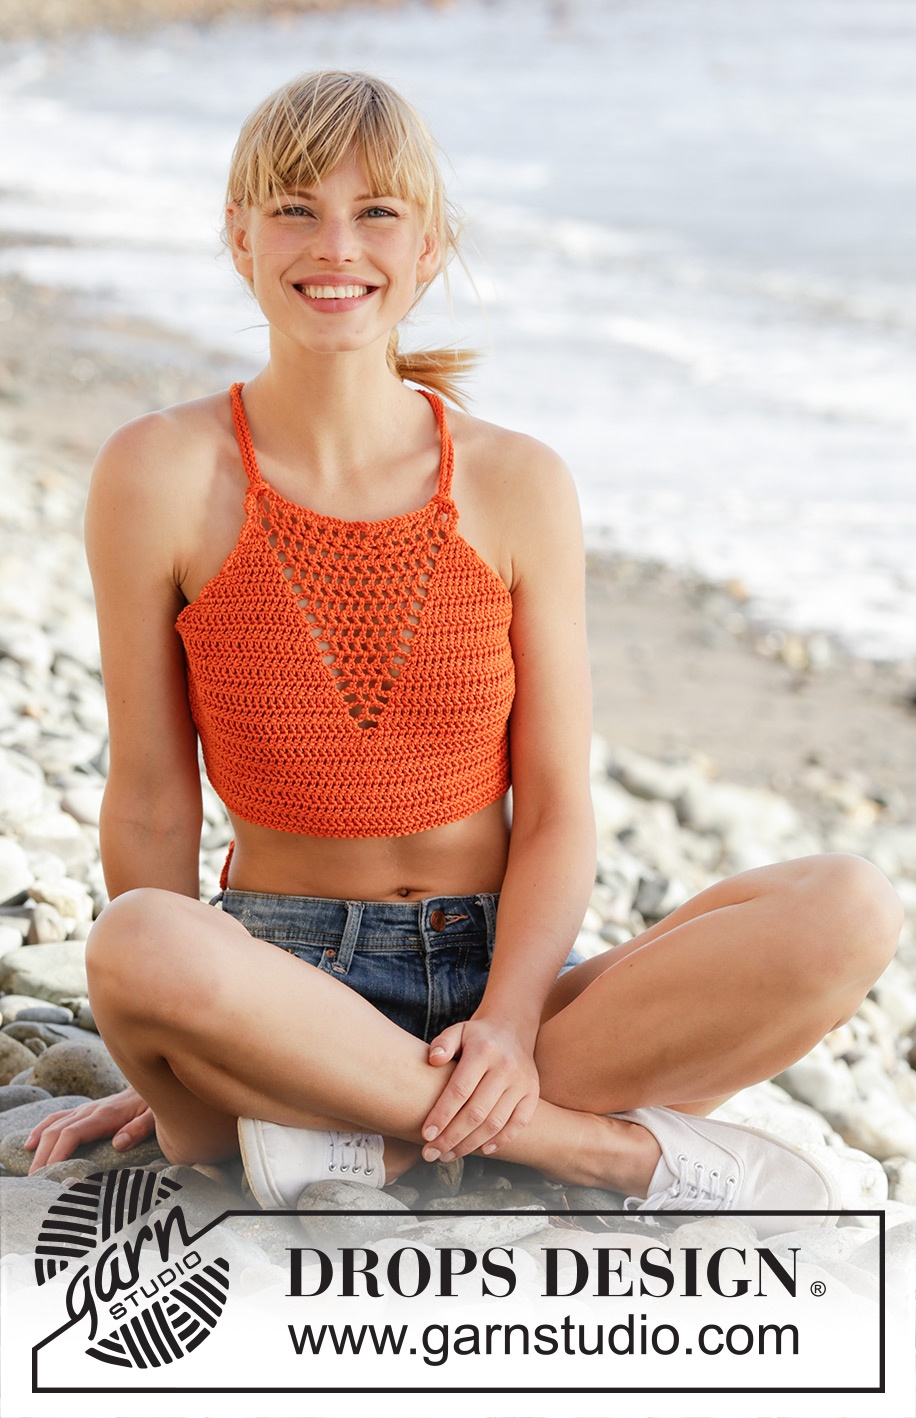
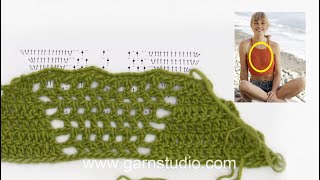
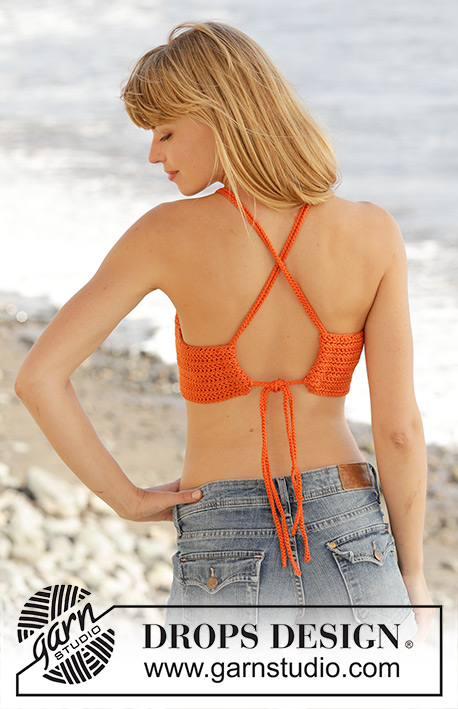
Top DROPS all’uncinetto, con maglie alte, motivo traforato e cordini sul dietro, lavorato dell’alto verso il basso (top down), in "Muskat". Taglie: Dalla S alla XXXL.
DROPS 170-16 |
|||||||||||||||||||
|
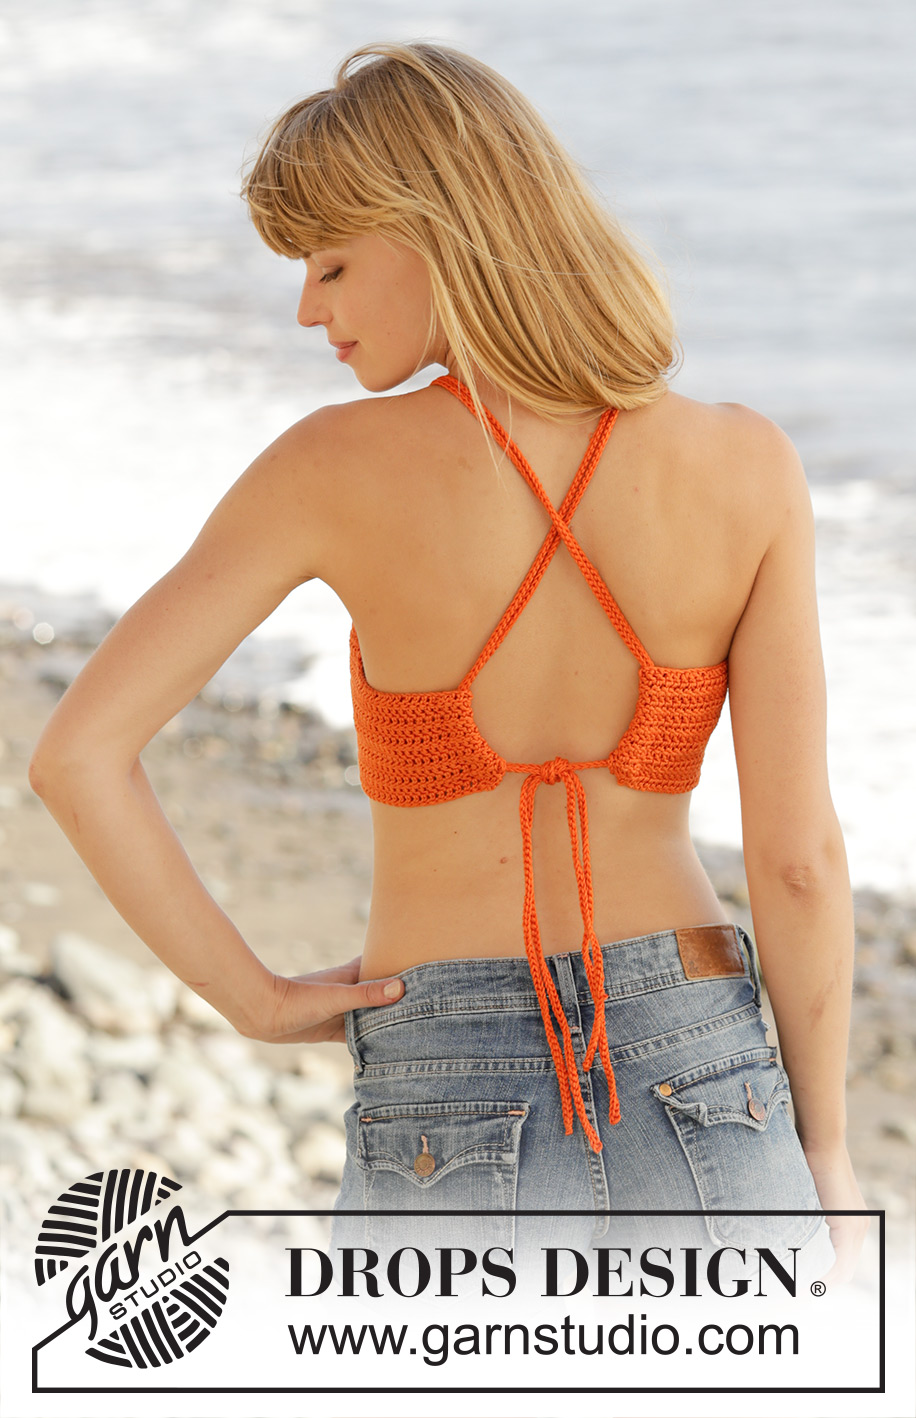
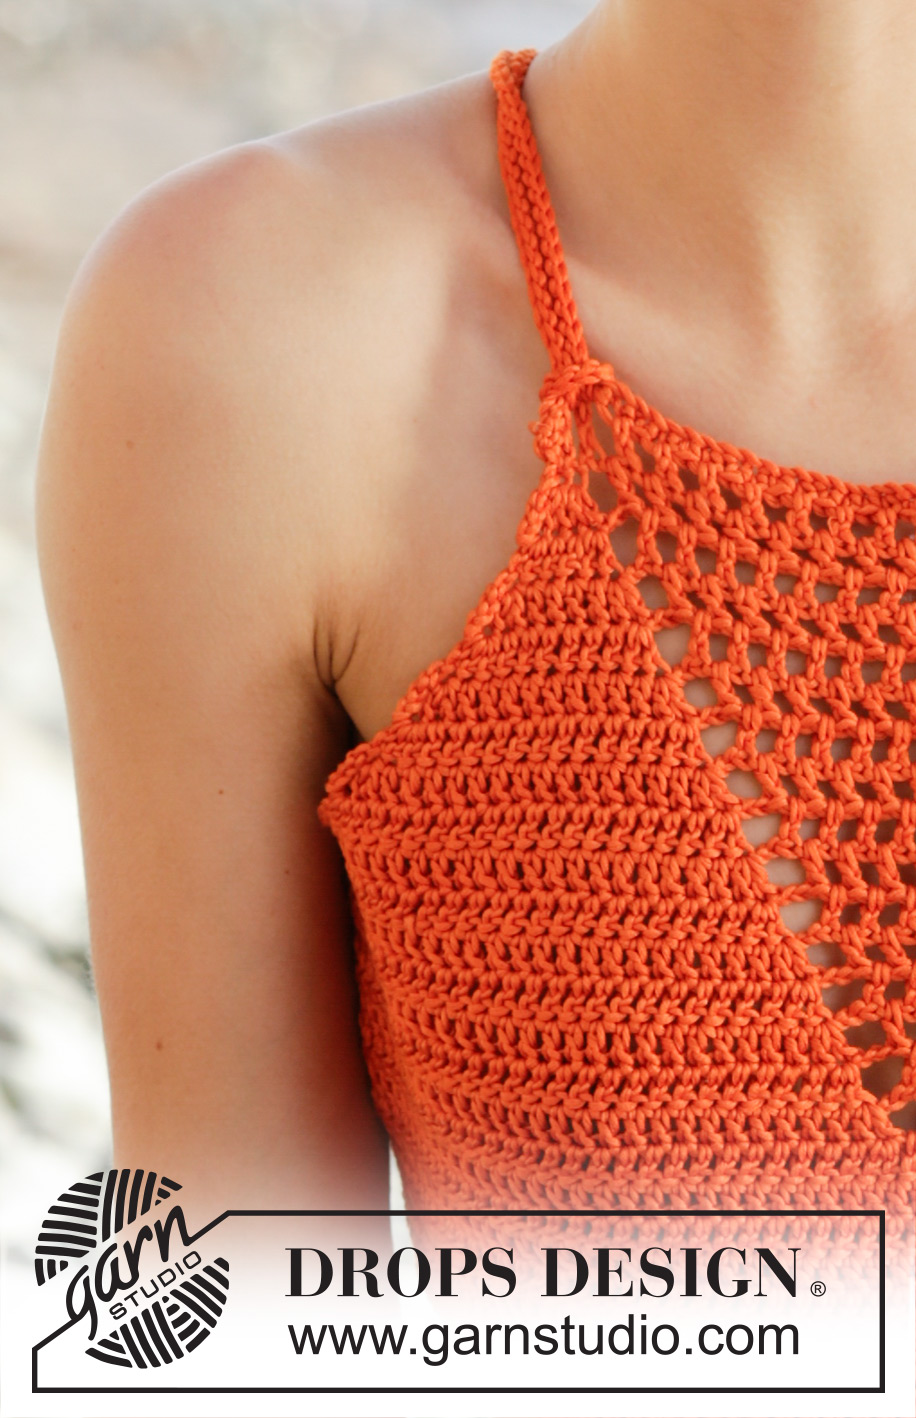
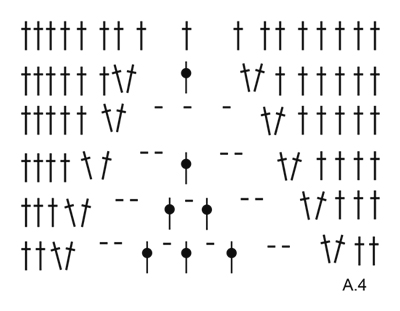
SUGGERIMENTO PER IL LAVORO: All’inizio di ogni riga di m.a lavorare 5 cat per girare il lavoro. Queste 5 cat non sostituiscono la prima m.a. MOTIVO: Vedere i diagrammi da A.1 a A.4. ---------------------------------------------------------- TOP: Si lavora avanti e indietro, dall’alto verso il basso. Con l’uncinetto n° 4 ed il filato Muskat, avviare 42-44-44-47-47-49 cat morbide (compresa 1 cat per girare il lavoro). Girare e lavorare come segue: 1 m.b nella 2a cat dall’uncinetto (= 1 m.b + 1 cat per girare il lavoro), 1 m.b in ognuna delle 2-4-4-2-2-4 cat successive, * saltare 1 cat, 1 m.b in ognuna delle 4 cat successive *, ripetere da *-* altre 6-6-6-7-7-7 volte, 1 m.b in ognuna delle rimanenti 2 cat = 33-35-35-37-37-39 m.b. Girare e lavorare come segue: Lavorare il diagramma A.1 sulle prime 11 m.b, ripetere il diagramma A.2 (= 2 m.b) 6-7-7-8-8-9 volte in larghezza, diagramma A.3 sulle restanti 10 m.b - VEDERE IL SUGGERIMENTO PER IL LAVORO ! RICORDARSI LA TENSIONE DEL LAVORO! Quando i diagrammi da A.1 a A.3 sono stati lavorati 1 volta in verticale, continuare con il motivo e aumentare in modo uguale finché non sono state lavorate in tutto 13-14-14-15-16-17 righe. Ci sono ora 71-77-77-81-85-85 m.a/cat. Gli aumenti da ciascun lato dei diagrammi A.1 e A.3 sono ora completati, ma il motivo traforato continua a diminuire in modo da formare una punta al centro sul davanti. Lavorare come segue: Lavorare 27-30-37-44-49-57 cat (comprese 5 cat per girare il lavoro), girare e lavorare come segue: 1 m.a nella 6a cat dall’uncinetto, 1 m.a in ognuna delle 1-4-6-3-3-6 cat successive, * saltare 1 cat, 1 m.a in ognuna delle 4 cat successive *, ripetere da *-* altre 3-3-4-6-7-8 volte, proseguire con il motivo come prima sulle 71-77-77-81-85-85 m.a successive, lavorare 27-30-37-44-49-57 cat (comprese 5 cat per girare il lavoro). Girare e lavorare come segue: 1 m.a nella 6a cat dall’uncinetto, lavorare poi 1 m.a in ognuna delle 1-4-6-3-3-6 cat successive, * saltare 1 cat, lavorare 1 m.a in ognuna delle 4 m.a successive *, ripetere da *-* altre 3-3-4-6-7-8 volte, proseguire con il motivo come prima sulle 71-77-77-81-85-85 m.a successive, lavorare poi 1 m.a in ognuna delle ultime m.a = 107-119-131-145-157-171 m.a/cat. Proseguire con 1 m.a in ogni m.a e continuare a diminuire il motivo traforato al centro sul davanti, per formare la punta. Quando rimangono 4 archi di cat, finire il motivo come indicato nel diagramma A.4. Lavorare poi 1 m.a in ogni m.a finché il lavoro non misura 24-26-28-30-32-34 cm dall’avvio delle m al centro sul davanti. Tagliare il filo. CONFEZIONE: Piegare i 2 cm da ciascun lato sul rovescio del lavoro e cucire con piccoli punti attraverso entrambi gli strati per formare un orlo per il passaggio dei cordini. CORDINI: Lavorare 1 cordino morbido come segue: con l’uncinetto n° 4 ed il filato Muskat lavorare una cat di base lunga ca. 140-150-160-170-180-190 cm, girare e lavorare 1 m.bss in ogni cat ma assicurarsi che le m.bss non siano più strette delle cat. Tagliare il filo. Lavorare un altro cordino in modo uguale. Iniziare sul diritto del lavoro e far passare una delle estremità di uno dei cordini nel motivo traforato nella parte in alto del top, intorno ad una m.a e attraverso il foro successivo (= le 2 estremità del cordino sono sul diritto). Regolare il cordino in modo che le 2 estremità siano lunghe uguali, fare poi passare le 2 estremità attraverso l’anello sul rovescio del lavoro e stringere. Ripetere sull’altro lato. Incrociare i cordini sul dietro e infilarli attraverso l’orlo sui lati – vedere il grafico. Fare un nodo. |
|||||||||||||||||||
Spiegazioni del diagramma |
|||||||||||||||||||
|
|||||||||||||||||||
 |
|||||||||||||||||||
 |
|||||||||||||||||||
 |
|||||||||||||||||||
 |
|||||||||||||||||||
Avete terminato questo modello?Allora taggate le vostre foto con #dropspattern #mandarinatop o inviatele alla #dropsfan gallery. Avete bisogno di aiuto con questo modello?Troverete 6 video tutorial, una sezione per i commenti/domande e molto altro guardando il modello su www.garnstudio.com © 1982-2026 DROPS Design A/S. Ci riserviamo tutti i diritti. Questo documento, compreso tutte le sue sotto-sezioni, è protetto dalle leggi sul copyright. Potete leggere quello che potete fare con i nostri modelli alla fine di ogni modello sul nostro sito. |
|||||||||||||||||||


Con oltre 40 anni di esperienza nel design di modelli di maglia e uncinetto, DROPS Design offre la più estesa collezione di modelli gratuiti su internet - tradotti in 17 lingue. Ad oggi vi possiamo fornire 324 cataloghi e 12290 modelli - 9561 dei quali sono tradotti in Italiano.
Ci stiamo impegnando molto per darvi il meglio che vi possiamo offrire in termini di maglia e uncinetto, ispirazioni e consigli così come filati di grande qualità ad un prezzo incredibile! Volete utilizzare i nostri modelli per qualcosa d'altro oltre al vostro uso personale? Potete leggere tutto ciò che è consentito nel testo sul Copyright in basso su tutte le pagine dei nostri modelli. Buon lavoro!
Lasciare un commento sul modello DROPS 170-16
Noi saremmo felici di ricevere i tuoi commenti e opinioni su questo modello!
Se vuoi fare una domanda, fai per favore attenzione a selezionare la categoria corretta nella casella qui sotto per velocizzare il processo di risposta. I campi richiesti sono indicati da *.