
Categorie popolari
State cercando un filato?


Commenti / Domande (10)
![]() Emma ha scritto:
Emma ha scritto:
Hej! Jag förstår inte början. Jag ska först göra en ring med 4 luftmaskor med dubbel tråd. Sen ska jag på något sätt virka fm så att 4 blir 6. Hur? Menar ni att man virkar 2 gånger fm i varannan? Eller menar ni att man ska sluta ha dubbel tråd efter att man slutit cirkeln och sen på något sätt virka 6 stycken fm? På videon ser det ut som att ni virkat botten men bara en tråd men det står aldrig att man ska ändra till enkel. Tacksam för svar.
02.10.2020 - 17:33DROPS Design ha risposto:
Hei Emma. Du skal hekle med 2 tråder (i videoen hekler vi med en tykkere tråd, derfor bare 1 tråd). Du starter med 4 luftmasker og setter disse sammen til en ring med en kjedemaske i første luftmaske. Så hekler du 6 fastmasker om denne ringen slik at du har en sirkel på 6 fastmasker ,deretter hekler du 2 fastmasker i hver av disse 6 fastmaskene = 12 fastmasker. Deretter øker du slik det står i oppskriften. God Fornøyelse!
05.10.2020 - 11:24
![]() Paola ha scritto:
Paola ha scritto:
Bellissimo questo cestino ma non sarebbe meglio lavorarlo tutto a spirale invece che chiudere tutti i giri? Il disegno si apprezza ugualmente....
19.12.2018 - 14:28DROPS Design ha risposto:
Buongiorno Paola. Può lavorare anche in spirale se preferisce. Buon lavoro!
20.12.2018 - 08:27Laura ha scritto:
I do agree with Sissy, one of my crochet students is working on this pattern and if the 3ch do not count as a dc, then the last one is an extra stitch.
22.04.2017 - 14:52
![]() Sissy ha scritto:
Sissy ha scritto:
The first round has the last stitch with an X in it. Your video shows the last stitch worked as the empty box color, the chart shows an X so technically you must stop before the end of the chart. That is fine when the first and last stitches are to be done in the same color. But for rows 4 & 6 the chain will not be the correct color. I have made the adjustments, but am writing to you for others who may not be able to make it work.
11.04.2017 - 22:21
![]() Sissy ha scritto:
Sissy ha scritto:
Yes, but then what happens when you come to the end of the chart on the last repeat? What is the last stitch?
10.04.2017 - 05:11DROPS Design ha risposto:
Dear Sissy, after the last repeat, you close the round with a slip stitch, which you crochet into the top of the 3 treble, the round was started with. I hope this helps. Happy chrocheting!
10.04.2017 - 23:08
![]() Sissy ha scritto:
Sissy ha scritto:
Hi, in the notes section of the pattern it says the ch 3 that replaces the first dc of every round does not count in the number of dc for the round. I believe as the pattern is written and as the video shows, it is counted.
01.04.2017 - 19:42DROPS Design ha risposto:
Dear Sissy, you can see in the first round in the video that the first 3 ch are worked extra to the first 2 sts worked in green (in the video / dark grey in the pattern). Happy crocheting!
03.04.2017 - 13:33Yasyas ha scritto:
Thank you so much for the pattern, I love the colours used for this basket.
13.10.2016 - 23:54
![]() Lauren McRoberts ha scritto:
Lauren McRoberts ha scritto:
Love this unique basket!
23.12.2015 - 17:53
![]() Sigi ha scritto:
Sigi ha scritto:
Würde ich gerne nach häkeln, ist auch ein schönes Geschenk.
18.12.2015 - 16:54
![]() Michelle Winther ha scritto:
Michelle Winther ha scritto:
Passar bra till inredningen.
13.12.2015 - 14:45
|
||||||||||
Quito#quitobasket |
||||||||||
|
|
||||||||||
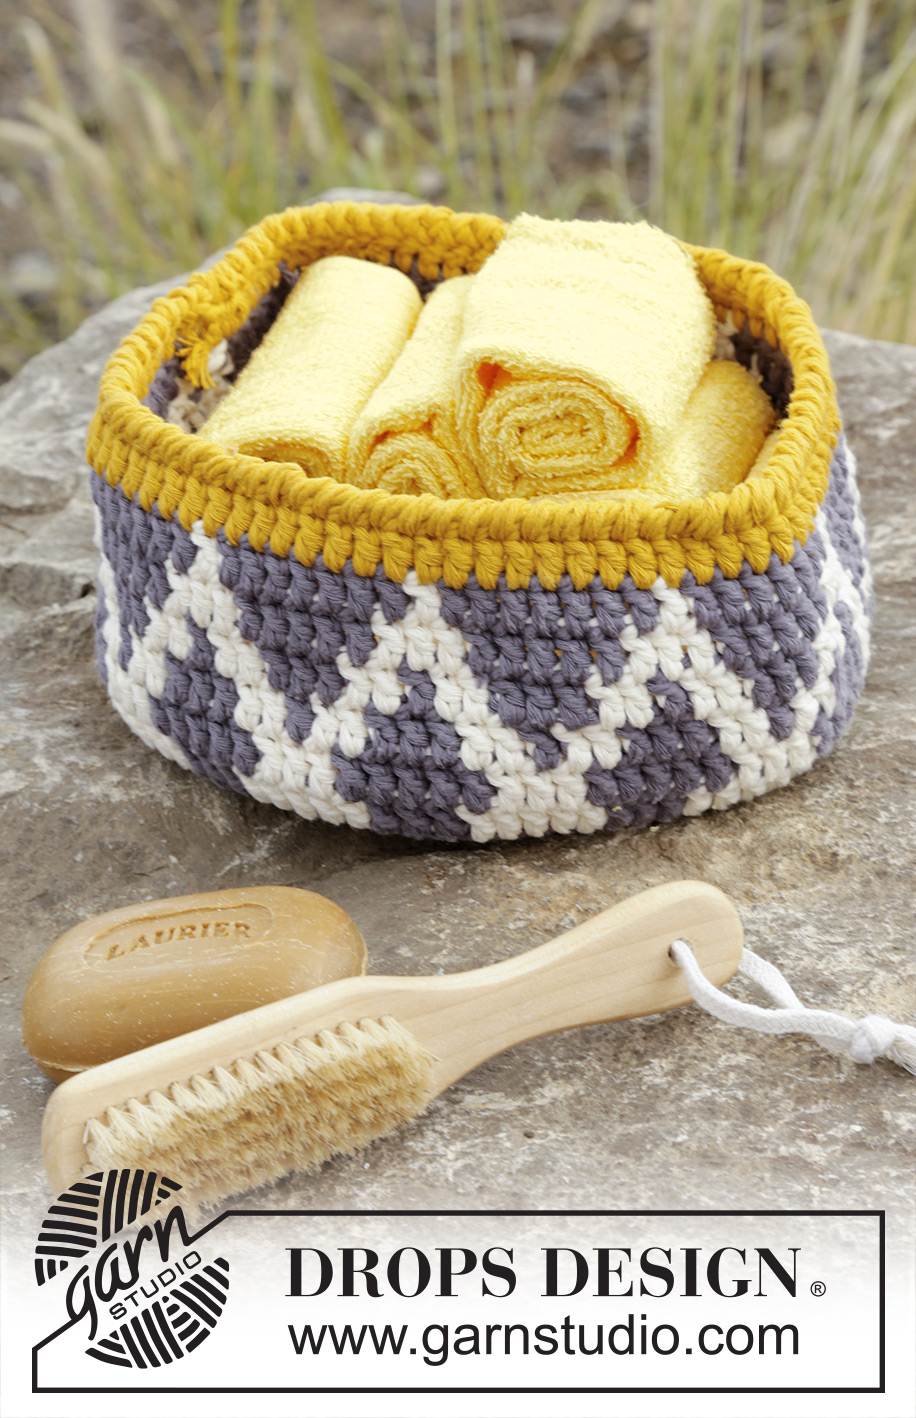
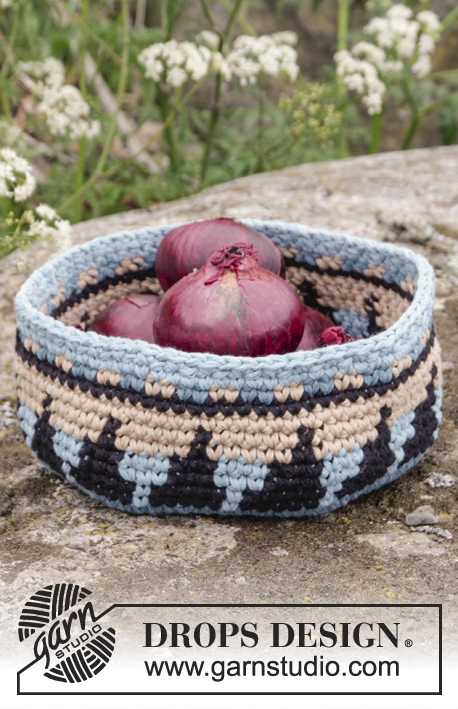
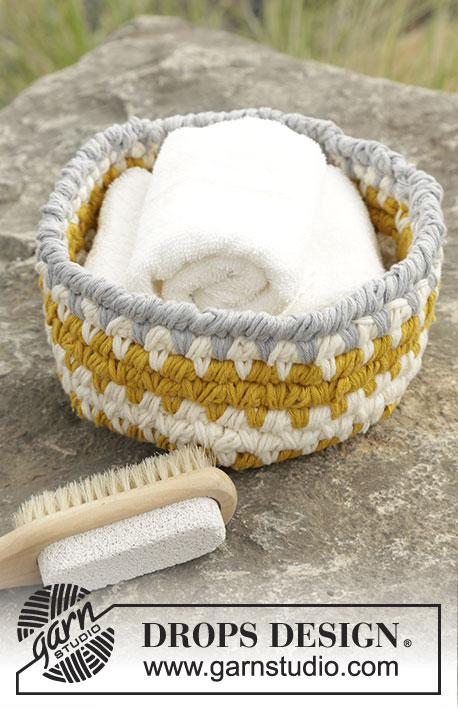
Cestino DROPS lavorato all’uncinetto con motivo a colori in 2 capi di "Paris".
DROPS 170-40 |
||||||||||
|
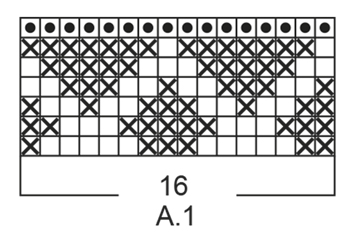
MODELLO: Vedere il diagramma A.1. Lavorare il diagramma a m.a, cioè 1 quadrato nel diagramma = 1 m.a con 2 capi. COLOUR PATTERN (lavorato in tondo): Quando si cambia colore lavorare come segue: lavorare l’ultima m.a con il 1° colore ma aspettare con l’ultimo passaggio, passare al colore successivo e lavorare l’ultimo passaggio, poi lavorare la m.a successiva. Quando si lavora con 2 colori mettere i capi con il colore non in uso sulle m del giro precedente, lavorare attorno ai capi in modo che siano nascosti e seguano il lavoro in tondo. INFORMAZIONI PER IL LAVORO: Iniziare ogni giro a m.b con 1 cat, finire con 1 m.bss nella 1° cat all’inizio del giro (questa cat non viene cantata nel n° delle m.b). Iniziare ogni giro a m.a con 3 cat, finire con 1 m.bss nella 3° cat dall’inizio del giro (queste cat non vengono contate nel n° di m.a). SUGGERIMENTO PER IL DOPPIO FILO: Usare sia l’estremità interna che quella esterna del gomitolo. Quando si cambia gomitolo, cercare di evitare di cambiare contemporaneamente entrambi i capi – per evitare di avere un filo spesso da affrancare. M.B ROVESCIA: Lavorare come per le m.b ma nel senso opposto, cioè lavorare a m.b da sinistra a destra. ---------------------------------------------------------- CESTINO: Avviare 4 cat con l’uncinetto n° 5,5 mm con 2 capi di grigio scuro e formare un anello con 1 m.bss nella 1° cat – LEGGERE IL SUGGERIMENTO PER IL DOPPIO FILO. GIRO 1: LEGGERE IL SUGGERIMENTO PER IL LAVORO! Lavorare 6 m.b nell’anello. GIRO 2: lavorare 2 m.b in ogni m.b = 12 m.b. GIRO 3: lavorare * 2 m.b nella 1° m.b/m.b successiva, 1 m.b nella m.b successiva *, ripetere *-* per tutto il giro = 18 m.b. FARE ATTENZIONE ALLA TENSIONE DEL LAVORO! GIRO 4: lavorare * 2 m.b nella 1° m.b/m.b successive, 1 m.b in ognuna delle 2 m.b successive *, ripetere *-* per tutto il giro = 24 m.b. GIRO 5: lavorare * 2 m.b nella 1° m.b/m.b successiva, 1 m.b in ognuna delle 3 m.b successive *, ripetere *-* per tutto il giro = 30 m.b. GIRO 6: lavorare * 2 m.b nella 1° m.b/m.b successiva, 1 m.b in ognuna delle 4 m.b successive *, ripetere *-* per tutto il giro = 36 m.b. Continuare a lavorare in questo modo fino a quando sono stati lavorati 12 giri = 72 m.b sull’ultimo giro. Lavorare il giro successivo come segue: lavorare * 2 m.b nella 1° m.b/m.b successiva, 1 m.b in ognuna delle 8 m.b successive *, ripetere *-* per tutto il giro = 80 m.b. Il lavoro misura circa 20 cm in diametro. ORA MISURARE IL LAVORO DA QUI! Lavorare il bordo. BORDO: Lavorato con il motivo con 2 colori contemporaneamente. Lavorare il bordo come segue: Ricordarsi delle INFORMAZIONI PER IL LAVORO! Lavorare A.1 (= 16 m.a) per tutto il giro – LEGGERE IL MOTIVO A COLORI. Quando A.1 è stato lavorato in verticale, lavorare 1 giro con 2 capi di giallo senape come segue: Lavorare 1 M.B A ROVESCIO in ogni m.a – leggere la spiegazione sopra. Chiudere e affrancare. |
||||||||||
Spiegazioni del diagramma |
||||||||||
|
||||||||||
 |
||||||||||
Avete terminato questo modello?Allora taggate le vostre foto con #dropspattern #quitobasket o inviatele alla #dropsfan gallery. Avete bisogno di aiuto con questo modello?Troverete 10 video tutorial, una sezione per i commenti/domande e molto altro guardando il modello su www.garnstudio.com © 1982-2026 DROPS Design A/S. Ci riserviamo tutti i diritti. Questo documento, compreso tutte le sue sotto-sezioni, è protetto dalle leggi sul copyright. Potete leggere quello che potete fare con i nostri modelli alla fine di ogni modello sul nostro sito. |
||||||||||


Con oltre 40 anni di esperienza nel design di modelli di maglia e uncinetto, DROPS Design offre la più estesa collezione di modelli gratuiti su internet - tradotti in 17 lingue. Ad oggi vi possiamo fornire 324 cataloghi e 12290 modelli - 9561 dei quali sono tradotti in Italiano.
Ci stiamo impegnando molto per darvi il meglio che vi possiamo offrire in termini di maglia e uncinetto, ispirazioni e consigli così come filati di grande qualità ad un prezzo incredibile! Volete utilizzare i nostri modelli per qualcosa d'altro oltre al vostro uso personale? Potete leggere tutto ciò che è consentito nel testo sul Copyright in basso su tutte le pagine dei nostri modelli. Buon lavoro!
Lasciare un commento sul modello DROPS 170-40
Noi saremmo felici di ricevere i tuoi commenti e opinioni su questo modello!
Se vuoi fare una domanda, fai per favore attenzione a selezionare la categoria corretta nella casella qui sotto per velocizzare il processo di risposta. I campi richiesti sono indicati da *.