
Categorie popolari
State cercando un filato?


Commenti / Domande (83)
![]() Pascale Andron ha scritto:
Pascale Andron ha scritto:
Bonjour, Je bloque au dernier rang pour faire le dernier pétale,je ne comprend pas Merci pour votre réponse
17.08.2024 - 22:02DROPS Design ha risposto:
Bonjour Mme Andron, au 6ème rang du diagramme crochetez ainsi: 1 ml pour tourner, *1 ms entre les 2 brides du 5ème rang, dans l'arceau de 5 ml entre les 2 triple-brides du 5ème rang crochetez: 3 triple-B, 5 ml, 1 ms dans l'arceau, (5 ml, 1 triple B, 5 ml, 1 ms dans l'arceau) x 3, 5 ml, 2 triple B dans l'arceau*, répétez de *à*. Bon crochet!
19.08.2024 - 08:11
![]() AK ha scritto:
AK ha scritto:
I'm finishing this pattern (well, some semblance of this pattern) out of spite. This is the worst pattern I've ever tried to follow.
04.08.2024 - 03:21
![]() Montserrat Mairata ha scritto:
Montserrat Mairata ha scritto:
Trabajar las sig 5 filas como sigue: 3 p. a. en el primer p. b.*1 p.cad, saltar 3 p. b.,3 p. a. en el sig p. b.*repetir de * *a lo largo de la fila,(36 vcs) vcs que significa? Y como seguir la 2da vuelta pues solo hay grupos de 3 p. a. separados por 1cad. Muchas gracias!!
23.07.2024 - 01:15DROPS Design ha risposto:
Hola Montserrat, en la 1ª fila trabajas como se explica, repitiendo la sección entre * * 36 veces en total en la fila. En las siguientes filas trabajarás 3 p.a en el pt (que en este caso sería ahora p.a y no p.b).
28.07.2024 - 16:48
![]() Luisa ha scritto:
Luisa ha scritto:
Buon giorno, all’inzio della coppa la prima riga devo saltare catenelle e fare una m. a. nella terza. devo fare lo stesso all’inizio di ogni giro? quindi x tutti e sei i giri? ora sto iniziando nella seconda catenella ma la coppa non rimane simmetrica, ovvero le catenelle libere non sono allineati. grazie, Luisa
09.07.2024 - 14:04DROPS Design ha risposto:
Buonasera Luisa, in questi gg il modello è stato aggiornato: provi a vedere se queste spiegazioni sono più chiare. Buon lavoro!
20.07.2024 - 22:10
![]() Johanna Latvala ha scritto:
Johanna Latvala ha scritto:
Millä puuvillalangalla Drops Denimin voi korvata?langalla
02.07.2024 - 17:39DROPS Design ha risposto:
Hei, voit korvata langan DROPS Cotton Light -langalla.
03.07.2024 - 17:07
![]() Anita ha scritto:
Anita ha scritto:
This is a very frustrating pattern, I don't really like to crochet clothing, because I don't like to keep a gauge, but my daughter wants some of these for her birthday, where it says, place the 2 bra cups together, I crocheted the 37 stitches, then attached it to the bottom of one of the cups and slip stitched across the bottom, chain 1 and attach the second cup with a slip stitch in the corner bottom of the cup and slip stitch across and then chain the 37 again.
30.06.2024 - 02:11
![]() Odile Cazade ha scritto:
Odile Cazade ha scritto:
Bonjour Je bloque au 6e rang pour faire l'arceau entre les 2 triples brides du 5e rang. Merci pour votre réponse
19.06.2024 - 19:40DROPS Design ha risposto:
Bonjour Mme Cazade, cet arceau se fait au 5ème rang: vous crochetez 1 triple-bride dans la maille serrée, puis 4 mailles en l'air et 1 maille coulée dans la triple bride, puis 1 autre triple bride dans la même maille serrée que la 1ère; ainsi, au 6ème rang, vous pouvez crocheter les pétales de la fleur dans cet arceau. Bon crochet!
20.06.2024 - 08:10
![]() Peyroutou ha scritto:
Peyroutou ha scritto:
Bonjour.jebloque pour bonnets:a la fin:faire les 2 rangs suivants:2ml+2b etccomment faire le 2 eime rang?
19.06.2024 - 08:51DROPS Design ha risposto:
Bonjour Mme Peyroutou, vous crochetez 1 bride dans chaque bride, et, autour de la maille en l'air du rang précédent (= 2 b, 1 ml, 2 b), vous crochetez de nouveau 2 b, 1 ml, 2 b. À chaque rang, vous avez ainsi 2 brides en plus de chaque côté de la maille en l'air. Bon crochet!
19.06.2024 - 12:11
![]() Ineke ha scritto:
Ineke ha scritto:
Worden de bloemen apart van elkaar gehaakt, of worden ze toer voor toer gehaakt. Ik kan er in het patroon niet achterkomen. Alvast bedankt.
29.05.2024 - 19:07DROPS Design ha risposto:
Dag Ineke,
De bloemen worden toer voor toer gehaakt en niet apart . Dus je herhaalt het telpatroon in de breedte totdat je in de rondte hebt gehaakt, dan ga je verder met de volgende toer, enzovoort.
30.05.2024 - 18:37
![]() Theresa ha scritto:
Theresa ha scritto:
This pattern is beyond infuriating and has to be one of the worst patterns I’ve tried to make as your directions rarely make sense. That being said, I cannot for the life of me figure out row 4. Nothing I’ve tried lines up and I’m left with several chain spaces and single crochets stitches after I completed all 11 lower edged blossoms. Your diagram doesn’t make sense and I even read your specific directions on how to “read a diagram”.
25.04.2024 - 19:00DROPS Design ha risposto:
Dear Theresa, work 4th row as follows (US-English terminology): 1 ch to turn with, *1 sc around next chain space, ch 3, skip 1 ch-space, 2 tr+3 ch+1 sc+3 ch+2 tr around next ch-space, 3 ch, skip next ch-space*, repeat from *-* all the row and end with 1 sc in last ch-space. Happy crocheting!
26.04.2024 - 07:48
|
||||||||||||||||||||||
Summer Festival |
||||||||||||||||||||||
 |
 |
|||||||||||||||||||||
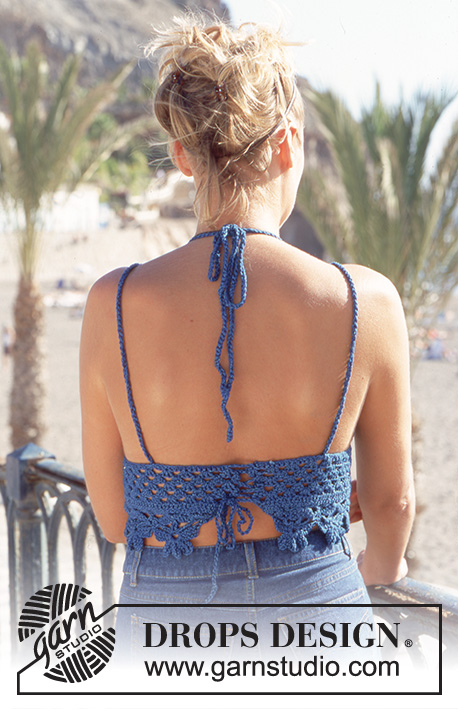
Top e bordo della gonna lavorati all’uncinetto in DROPS DEN-M-NIT o Cotton Light.
DROPS 69-3 |
||||||||||||||||||||||
|
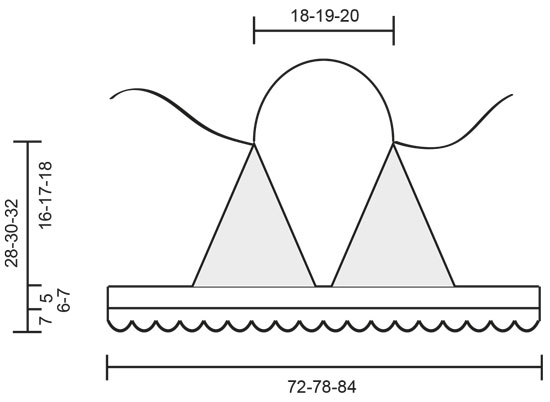
CAMPIONE: 18 m.a. x 10 righe con l’uncinetto n° 3,5 mm = 10 x 10 cm. 1 ripetizione del diagramma 1 (1 fiore) misura 6,5 cm in larghezza. Ricordarsi che la misura dell’uncinetto è solo indicativa. COPPA: Avviare una riga di 9-11-13 catenelle con il blu con l’uncinetto n° 3,5 mm. Poi lavorare a maglie alte lungo un lato della riga di catenelle (sostituire la 1° maglia alta con 2 catenelle). Nella catenella in alto lavorare 2 maglie alte, 1 catenella, 2 maglie alte, poi continuare a maglie alte lungo l’altro lato della riga di catenelle. Girare il lavoro, lavorare a maglie alte in piano a ogni lato della riga centrale – nella catenella in alto lavorare 2 maglie alte, 1 catenella e 2 maglie alte su ogni riga. Fare attenzione alla tensione del lavoro! Lavorare 6-7-8 righe in piano. Lavorare la riga successiva come segue: 2 catenelle + 2 maglie alte nella 1° maglia alta della riga precedente, * 1 catenella, saltare 2 maglie alte, 3 maglie alte nella maglia alta successiva *, ripetere da * - * fino in alto, nella catenella in cima lavorare come segue: 3 maglie alte, 1 catenella, 2 maglie alte. Continuare *-* lungo l’altro lato. Lavorare un’altra riga in questo modo. Lavorare un’altra coppa. TOP: Mettere le 2 metà delle coppe insieme. Avviare 1 riga con 37-39-41 catenelle lasse, poi lavorare 35-39-43 maglie bassissime lungo ona coppa, 1 catenella tra le coppe e 35-39-43 maglie bassissime lungo l’altra coppa, finire con 37-39-41 catenelle. Lavorare 1 riga con 1 maglia bassa in ogni catenella = 145-157-169 maglie basse. Lavorare la riga successiva come segue: 3 maglie alte nella 1° maglia bassa, * 1 catenella, saltare 3 maglie basse, 3 maglie alte nella maglia bassa successiva *. Ripetere *-* per tutta la riga (= 36-39-42 volte). Lavorare 5-6-7 righe successive con questo motivo. Poi seguire il diagramma 1 – iniziare dalla 2° riga = 145-157-169 maglie basse. Ci saranno 11-12-13 fiori sul bordo inferiore di 13 maglie ognuno = 143-156-169 maglie, cioè sulla riga successiva per la taglia S: 2 maglie e per la taglia M: 1 maglia (non diminuire per la taglia L) – diminuire saltando 1 maglia. Nota: per le taglie S e L ci sarà 1 fiore al centro davanti. Per la taglia M ci dev’essere uno spazio tra 2 fiori al centro davanti. CONFEZIONE: Cucire insieme le 2 metà della coppa al centro davanti per circa 5 cm. Lavorare con l'uncinetto n° 3,5 mm con 2 capi di Den-M-nit o Cotton Light: Fare 3 cordini di catenelle di circa 100 cm di lunghezza. Utilizzare 2 dei cordini come spalline. Attaccare 1 cordino al centro di ogni lato del dietro, poi far passare il cordino attraverso il buco in alto sul reggiseno sul davanti. Allacciare i cordini sul dietro del collo. Usare l’ultimo cordino per allacciare top al centro dietro. Iniziare facendo passare i cordini in alto in modo alternato verso destra e sinistra incrociandoli sul dietro. ________________________________________ BORDO ALL’UNCINETTO SULLA GONNA: La riga inferiore del top, (cioè la riga con i fiori) può essere lavorato fino alla lunghezza desiderata e cucito attorno al bordo inferiore della gonna o ad una gamba dei pantaloni. Materiali: vedere il top. 50 g: circa 12 fiori BORDO ALL'UNCINETTO: Misurare il bordo inferiore della gonna e calcolare di quanti fiori avrete bisogno - 1 fiore misura circa 6,5 cm in larghezza. Avviare 13 catenelle per fiore sulla 1° riga. Poi lavorare secondo il diagramma 1. |
||||||||||||||||||||||
Spiegazioni del diagramma |
||||||||||||||||||||||
|
||||||||||||||||||||||
 |
||||||||||||||||||||||
 |
||||||||||||||||||||||
Avete terminato questo modello?Allora taggate le vostre foto con #dropspattern o inviatele alla #dropsfan gallery. Avete bisogno di aiuto con questo modello?Troverete 7 video tutorial, una sezione per i commenti/domande e molto altro guardando il modello su www.garnstudio.com © 1982-2026 DROPS Design A/S. Ci riserviamo tutti i diritti. Questo documento, compreso tutte le sue sotto-sezioni, è protetto dalle leggi sul copyright. Potete leggere quello che potete fare con i nostri modelli alla fine di ogni modello sul nostro sito. |
||||||||||||||||||||||


Con oltre 40 anni di esperienza nel design di modelli di maglia e uncinetto, DROPS Design offre la più estesa collezione di modelli gratuiti su internet - tradotti in 17 lingue. Ad oggi vi possiamo fornire 324 cataloghi e 12290 modelli - 9561 dei quali sono tradotti in Italiano.
Ci stiamo impegnando molto per darvi il meglio che vi possiamo offrire in termini di maglia e uncinetto, ispirazioni e consigli così come filati di grande qualità ad un prezzo incredibile! Volete utilizzare i nostri modelli per qualcosa d'altro oltre al vostro uso personale? Potete leggere tutto ciò che è consentito nel testo sul Copyright in basso su tutte le pagine dei nostri modelli. Buon lavoro!
Lasciare un commento sul modello DROPS 69-3
Noi saremmo felici di ricevere i tuoi commenti e opinioni su questo modello!
Se vuoi fare una domanda, fai per favore attenzione a selezionare la categoria corretta nella casella qui sotto per velocizzare il processo di risposta. I campi richiesti sono indicati da *.