
Categorie popolari
State cercando un filato?


Commenti / Domande (40)
![]() Stacey ha scritto:
Stacey ha scritto:
Sorry me again I’m still confused When it says alternate increase right and left side of the markers dose that mean ? Increase on the right side of each 8 markers each row and then on the left side on the next row and then back to right side again next row ? Because if you increase both right and left side of the 8 markers that’s 16 stitch’s increase each row not 8 and that’s where I’m getting confused because I don’t understand the wording ?
12.09.2019 - 09:17DROPS Design ha risposto:
Dear Stacey, as shown in the video linked below, when you have to increase alternately on the right side and left side of each marker, work fist increase row increasing on the right side of each marker, then work the next increase row increasing on the left side of each marker and continue like this = you increase 8 stitches on each increase row. Happy crocheting!
12.09.2019 - 09:24
![]() Stacey ha scritto:
Stacey ha scritto:
Im confused by the pattern Where is says increase left and right of the markers seen on RS side Dose this mean only increase either side of the 8 marks every other row ? So one row increase and then the other just crochet into each stitch and the first row where it says just on the right does it mean increase only on the right on the first row and then just crochet the next row and then increase both sides on the next and then crochet every stitch no increase?
11.09.2019 - 22:00DROPS Design ha risposto:
Dear Stacey, this video shows how to increase alternately on the right and left side of markers ; there are 8 markers and you increase 8 stitches per increase row. Happy crocheting!
12.09.2019 - 08:52
![]() Heather ha scritto:
Heather ha scritto:
I've done a test piece for increasing right and left of the markers. However one side the dcs increase and the other side stays at 4dc before the first 2dc increase. Ive followed the video, surely the number of dcs should increase on both sides/ends? Evenly When working the pattern are you doing 2 rows of right side marker increase before alternating right/left?
14.03.2019 - 20:34DROPS Design ha risposto:
Dear Heather, you should increase alternately on right and left side of the markers - seen from RS, ie seen from RS the increase will be worked atlernately before and after the markers so that the number of sts increases on each side of markers. Happy crocheting!
15.03.2019 - 08:34
![]() Mirte ha scritto:
Mirte ha scritto:
Hallo, bedankt voor het antwoord op mijn vorige vraag! Ik vind nog iets niet duidelijk. In de tekst over de pas staat : “Meerder hierna afwisselend links en rechts van elke markeerder (gezien aan de goede kant). “. Klopt het dat de vermeerderingen vanuit de buitenkant van het vest telkens aan de zelfde kant van de markeerder komen omdat het werk elke toer gedraaid wordt? Zo ziet het eruit in de video, maar de toevoeging in de tekst tussen () schept verwarring. Mvg
25.11.2018 - 13:17DROPS Design ha risposto:
Dag Mirte
Je meerdert de ene keer aan de linker kant en de andere keer aan de rechter kant van de markeerders, gezien vanaf de goede kant. Dus als het werk klaar is, zie je op de goede kant dat er de ene toer aan de ene kant en de andere toer aan de andere kant gemeerderd is. Als je op de verkeerde kant aan het haken bent moet je hier dus rekening mee houden (want rechts op de goede kant is op de verkeerde kant links en vice verca). Hoop dat het zo duidelijk is :)
28.11.2018 - 12:54
![]() Mirte ha scritto:
Mirte ha scritto:
Zijn de rijen stokjes identiek of er in de rondte wordt gehaakt (mouwen) of heen en weer (pas). Op de mouwen heb je dan alleen de “voorkant”, terwijl je op de pas voor- en achterkant afwisselt. Hoe kun je ervoor zorgen dat er geen verschil is? Groeten, Mirte
20.11.2018 - 15:58DROPS Design ha risposto:
Dag Mirte
Om de mouwen en de panden er gelijk uit te laten zien, kan je de mouwen ook heen en weer haken vanaf de scheiding door steeds het werk te keren nadat je een halve vaste in de derde losse het begin van de toer hebt gehaakt.
21.11.2018 - 10:46
![]() Charley ha scritto:
Charley ha scritto:
Hi, I am working the body and can\'t seem to make it add up. In row 1 of the body I start with 116 stitches for the medium but I\'m not left with 4 stitches at the end to make it even. I see on the diagram it shows the pattern uses 9 stitches but 2tog+sk2+sc+sk2+sc+sk2 is 10 stitches. I can\'t work out where I\'m going wrong, if anyone can offer any insight that would be great! Thank you
13.06.2018 - 22:28Charley ha risposto:
After posting my question I have now seen my error. I was crocheting 2dc tog from previous row but have read properly now and it's 2dc tog in the same stitch. Thank you for the pattern x
13.06.2018 - 22:35
![]() Nancy Janssens ha scritto:
Nancy Janssens ha scritto:
Ik haak maat XXL. Een vraagje bij de pas: Ik vermeerder afwisselend links en rechts van de markeerders en om de toer 2 keer. Doe ik deze 2 keer ook thv de markeerders en zoja de welke en in welke toer? Vb toer 2 en 4? Of meer verspreid in de pas?
10.10.2017 - 19:55DROPS Design ha risposto:
Hallo Nancy, Het is de bedoeling dat je het meerderen steeds afwisselend rechts en links van de markeerders doet. Als je om de twee naalden meerdert, meerder je de ene keer bijvoorbeeld links van de markeerders en 2 naalden later rechts van de markeerders. Je wisselt dus steeds af: als je de vorige keer links van de markeerders hebt gemeerderd, doe je het de volgende keer rechts van de markeerders en zo ga je steeds heen en weer.
04.11.2017 - 14:26
![]() Petra Vincken ha scritto:
Petra Vincken ha scritto:
Hoi, ik moet nu de eerste regel van het lijf haken , mijn vraag is nu,,er staat , ga nu verder met 1 stk in elke stk/L op de toer , wil dat zeggen dat iK op die2 maal 8L die ik heb moeten haken in de vorige toer ook stokjes op moet haken? alvast bedankt ,Petra
26.05.2017 - 10:18DROPS Design ha risposto:
Hallo Petra, Ja, dat klopt helemaal. Op iedere losse haak je een stokje en op ieder stokje haak je een stokje.
26.05.2017 - 16:13
![]() Stanneke ha scritto:
Stanneke ha scritto:
Hallo, ik begrijp bij de mouw niet zo goed wat wordt bedoeld met: naai de opening onder de mouw dicht (bij de afwerking) Moet je deze steken niet meenemen met het in het rond haken van de mouw? Dank alvast!
21.01.2017 - 15:43DROPS Design ha risposto:
Hoi Stanneke. Je hebt gelijk. Je hoeft geen naad te sluiten. Wij zullen het weghalen.
26.01.2017 - 12:00
![]() Melli ha scritto:
Melli ha scritto:
Hallo, Nachdem ich 9 Reihen mit je 1 Stb. Zunahmen gehäkelt habe, steht in jeder 2. Reihe -3- (für Größe M) x arb. Wie soll ich dies verstehen? Nach den 9 Reihen habe ich nämlich 147 Stb. (14cm ). Mir fehlen also 33 Stb. bis 180/ und 9cm bis 23. Vielen Dank im Voraus LG Melli
15.10.2016 - 17:02DROPS Design ha risposto:
Liebe Melli, in der Größe M haben Sie 76 Stb, dann sollen Sie 1 M. an jeder Markierung (= 8 Zunahmen) in jede R. ins. 10 x zunehmen: 70 + (8 Zunahmen x 10 = 80) = 156 - dann nehmen Sie 1 M. an jeder Markierung in jede 2. R. ins 3 x = 156+ (8 Zunahmen x 3) = 180 M.
17.10.2016 - 09:09
|
|||||||||||||||||||||||||
Lakeside Cardigan#lakesidecardigan |
|||||||||||||||||||||||||
|
|
|||||||||||||||||||||||||
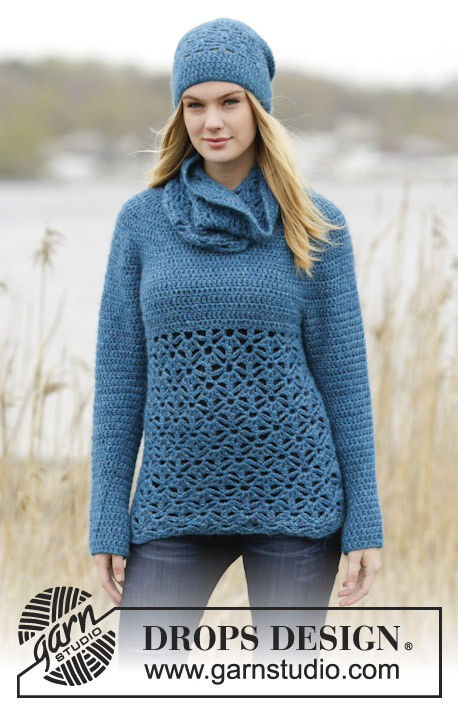
Cardigan DROPS lavorato all’uncinetto con sprone rotondo, maglie alte e motivo traforato, lavorato dall'alto in basso (top down) in "Air".
DROPS 164-33 |
|||||||||||||||||||||||||
|
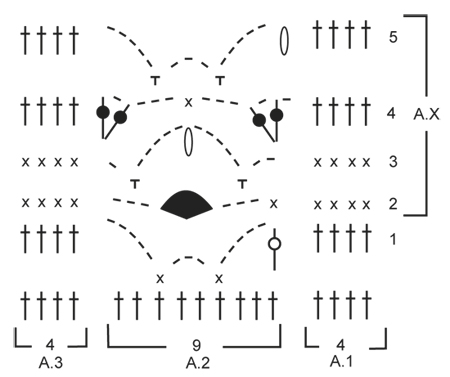
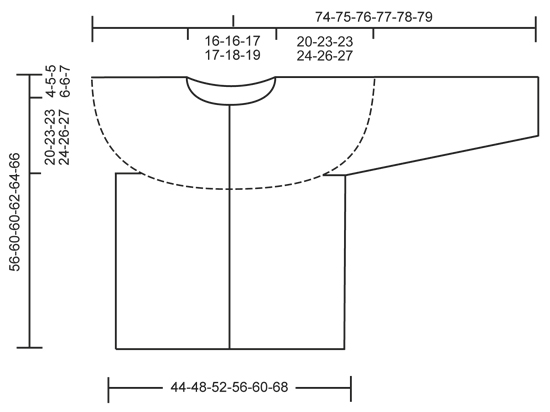
INFORMAZIONI PER IL LAVORO: All’inizio di ogni riga a m.b lavorare 1 cat con cui girare. La cat non sostituisce la 1° m.b. Sostituire la 1° m.a all'inizio di ogni giro a m.a con 3 cat. Manica: quando si lavora in tondo, finire ogni giro con 1 m.bss nella 3° cat dall'inizio del giro. MOTIVO: Vedere i diagrammi A.1 e A.3. LAVORARE 2 M.A INSIEME (nella m.a): Lavorare 1 m.a nella m.a successiva ma aspettare con l'ultimo passaggio, lavorare un'altra m.a nella stessa m.a, ma sull'ultimo passaggio, far passare il filo attraverso tutte le m sull'uncinetto. LAVORARE 2 M.A INSIEME (attorno alla cat): lavorare 1 m.a attorno alla cat centrale del gruppo di m.a ma aspettare con l'ultimo passaggio, lavorare un'altra m.a attorno alla stessa cat, ma sull'ultimo passaggio, far passare il filo attraverso tutte le m sull'uncinetto. GRUPPO DI M.A: Lavorare un gruppo di m.a attorno all'arco di cat come segue: lavorare * 1 m.a, 1 cat *, ripetere *-* altre 2 volte attorno allo stesso arco di cat, 1 m.a attorno allo stesso arco di cat. SUGGERIMENTO PER GLI AUMENTI: Aumentare 1 m.a lavorando 2 m.a in 1 m.b/m.a. SUGGERIMENTO PER LE DIMINUZIONI: Diminuire 1 m.a all'inizio e alla fine del giro come segue: lavorare 1 m.a (= 3 cat all’inizio della riga), * lavorare 1 m,a ma aspettare con l'ultimo passaggio (= 2 m sull'uncinetto), poi lavorare la m.a successiva ma sull'ultimo passaggio, far passare il filo attraverso tutte le m sull'uncinetto *, ripetere *-* quando rimangono 3 m.a sul giro = 1 m diminuita a ogni lato del segnapunti. ---------------------------------------------------------- CARDIGAN: Lavorato dall'alto in basso (top down). Lavorato avanti e indietro dal centro davanti. SPRONE: Avviare 75-78-84-89-93-98 cat (compresa la cat con cui girare) con l'uncinetto n° 6 mm con Air. Lavorare la riga successiva come segue - LEGGERE LE INFORMAZIONI PER IL LAVORO: RIGA 1: lavorare 1 m.b nella 2° cat dall’uncinetto, lavorare 1 m.b in ognuna delle 1-4-2-7-3-8 cat successive, * saltare 1 cat, lavorare 1 m.b in ognuna delle 7 cat successive *, ripetere *-* altre 8-8-9-9-10-10 volte = 65-68-73-78-81-86 m.b. RIGA 2: lavorare 1 m.a in ognuna delle prime 4 m.b (= bordo), continuare con 1 m.a in ogni m.b fino a quando rimangono 4 m.b sulla riga, ALLO STESSO TEMPO aumentare 6-8-8-9-12-23 m.a in modo uniforme - LEGGERE IL SUGGERIMENTO PER GLI AUMENTI, 1 m.a in ognuna delle 4 m.b rimaste = 71-76-81-88-93-109 m.a. Ora inserire 8 segnapunti nel lavoro per gli aumenti del raglan senza lavorare le m. Inserire 4 segnapunti da ogni lato del lavoro come segue: Inserire un segnapunti dopo 13-13-14-14-16-19 m.a, inserire il segnapunti successivo dopo 2 m.a, poi inserire il segnapunti successivo dopo 9-11-12-14-14-17 m.a, e finire con l'ultimo segnapunti dopo 2 m.a. Ora ci sono 19-20-21-24-25-29 m.a tra i due segnapunti centrali verso il centro dietro sul cardigan. Ora continuare con 1 m.a in ogni m.a, ALLO STESSO TEMPO aumentare 1 m.a sul lato destro degli 8 segnapunti. Poi aumentare in modo alternato sul lato destro e sinistro di tutti i segnapunti (visto dal diritto del lavoro). Ripetere gli aumenti a ogni riga altre 9-9-11-12-13-16 volte, e poi a righe alterne 2-3-2-2-2-0 volte = 167-180-193-208-221-245 m.a sulla riga. Il lavoro misura circa 20-23-23-24-26-27 cm. FARE ATTENZIONE ALLA TENSIONE DEL LAVORO! Sulla riga successiva lavorare come segue: lavorare 25-27-29-31-34-38 m.a (= davanti), 8 cat (sotto manica), saltare 38-40-42-45-47-50 m.a dalla riga precedente (= manica), 41-46-51-56-59-69 m.a (= dietro), 8 cat (sotto manica), saltare 38-40-42-45-47-50 m.a dalla riga precedente (= manica) e 25-27-29-31-34-38 m.a (= davanti). Inserire un segnapunti, ora misurare il lavoro da qui! CORPO: Ora ci sono 107-116-125-134-143-161 m per il corpo. Ora misurare il lavoro da qui. Ora continuare con 1 m.a in ogni m.a/cat sulla riga, girare e lavorare la riga successiva con il MOTIVO – leggere la spiegazione sopra, come segue: RIGA 1: lavorare 1 m.a in ognuna delle prima 4 m.a (= A.1), poi lavorare A.2 come segue: * lavorare 2 M.A INSIEME (nella m.a) –leggere la spiegazione sopra, 5 cat, saltare 2 m.a, 1 m.b nella m.a successiva, 3 cat, saltare 2 m.a, 1 m.b nella m.a successiva, 5 cat, saltare 2 m.a *, ripetere *-* altre 10-11-12-13-14-16 volte, lavorare 1 m.a in oognuna delle m.a rimaste (= A.3). RIGA 2: lavorare 1 m.b in ognuna delle prime 4 m.a, * lavorare 3 cat, saltare 1 arco di cat, lavorare 1 GRUPPO DI M.A – leggere la spiegazione sopra, attorno al successivo arco di cat, 3 cat, saltare 1 arco di cat, 1 m.b nelle 2 m.a lavorate insieme *, ripetere *-* altre 10-11-12-13-14-16 volte, lavorare 1 m.b in ognuna delle ultime 4 m.a. RIGA 3: lavorare 1 m.b in ognuna delle prime 4 m.a, * 2 cat, 1 m.b attorno all’arco di cat successivo, 5 cat, lavorare 2 M.A INSIEME (attorno alla cat) – leggere la spiegazione sopra, 5 cat, 1 m.b attorno all’arco di cat successivo dopo il gruppo di m.a, 1 cat *, ripetere *-* altre 10-11-12-13-14-16 volte, lavorare 1 m.b in ognuna delle ultime 4 m.a. RIGA 4: lavorare 1 m.a in ognuna delle prime 4 m.b, (1 m.a, 1 cat, 1 m.a) attorno al 1° arco di cat, 3 cat, saltare 1 arco di cat, 1 m.b nelle 2 m.a lavorate insieme, 3 cat, saltare un arco di cat, * (1 m.a, 1 cat, 1 m.a, 1 cat, 1 m.a, 1 cat, 1 m.a) attorno all’arco di cat successivo, 3 cat, saltare 1 arco di cat, 1 m.b nelle 2 m.a lavorate insieme, 3 cat, saltare 1 arco di cat *, ripetere *-* altre 9-10-11-12-13-15 volte, (1 m.a, 1 cat, 1 m.a, 1 cat) attorno all’ultimo arco di cat, 1 m.a in ognuna delle ultime 4 m.b. RIGA 5: lavorare 1 m.b in ognuna delle prime 4 m.a, * lavorare 2 M.A INSIEME (attorno alla cat), 5 cat, 1 m.b attorno all’arco di cat dopo il gruppo di m.a, 3 cat, 1 m.b attorno all’arco di cat successivo, 5 cat *, ripetere *-* altre 10-11-12-13-14-16 volte, lavorare 1 m.b in ognuna delle ultime 4 m.a. Continuare in questo modo e ripetere A.X (= 2°-5° riga) avanti e indietro fino a quando il lavoro misura circa 32 cm in tutte le taglie – aggiustare per finire dopo la 2° o 4° riga in A.1-A.3. Il lavoro misura 56-60-60-62-64-66 cm in totale. MANICA: La manica è lavorata in tondo, dall’alto in basso (top down). Inserire un segnapunti al centro delle 8 cat lavorate sotto la manica. Ora misurare il lavoro da qui. Lasciare che il segnapunti segua il lavoro fino alla fine del lavoro. Affrancare il filo con 1 m.bss nella 5° cat delle 8 cat lavorate sullo scalfo sul corpo. Lavorare 3 cat (= 1 m.a), continuare con 1 m.a in ognuna delle 3 cat successive, 1 m.a in ognuna delle m.a per la manica e poi 1 m.a nelle 4 cat rimaste sotto la manica = 46-48-50-53-55-58 m.a – ricordarsi delle INFORMAZIONI PER IL LAVORO! Continuare con 1 m.a in ogni m.a e ALLO STESSO TEMPO quando il lavoro misura circa 4 cm iniziare a diminuire – LEGGERE IL SUGGERIMENTO PER LE DIMINUZIONI. Ripetere le stesse diminuzioni ogni 3-2-2-2-2-1 giri altre 8-9-10-10-11-12 volte = 28-28-28-31-31-32 m.a rimaste. Affrancare quando il lavoro misura 46-44-44-43-42-40 cm. Lavorare l’altra manica nello stesso modo. CONFEZIONE: Affrancare i bottoni sul davanti sinistro, il bottone in alto a circa 1 cm dal bordo del collo, affrancare i bottoni rimasti a distanza di 8-8-9-9-9-10 cm. Allacciarli tra 2 m.a sul davanti. |
|||||||||||||||||||||||||
Spiegazioni del diagramma |
|||||||||||||||||||||||||
|
|||||||||||||||||||||||||
 |
|||||||||||||||||||||||||
 |
|||||||||||||||||||||||||
Avete terminato questo modello?Allora taggate le vostre foto con #dropspattern #lakesidecardigan o inviatele alla #dropsfan gallery. Avete bisogno di aiuto con questo modello?Troverete 17 video tutorial, una sezione per i commenti/domande e molto altro guardando il modello su www.garnstudio.com © 1982-2026 DROPS Design A/S. Ci riserviamo tutti i diritti. Questo documento, compreso tutte le sue sotto-sezioni, è protetto dalle leggi sul copyright. Potete leggere quello che potete fare con i nostri modelli alla fine di ogni modello sul nostro sito. |
|||||||||||||||||||||||||


Con oltre 40 anni di esperienza nel design di modelli di maglia e uncinetto, DROPS Design offre la più estesa collezione di modelli gratuiti su internet - tradotti in 17 lingue. Ad oggi vi possiamo fornire 324 cataloghi e 12290 modelli - 9561 dei quali sono tradotti in Italiano.
Ci stiamo impegnando molto per darvi il meglio che vi possiamo offrire in termini di maglia e uncinetto, ispirazioni e consigli così come filati di grande qualità ad un prezzo incredibile! Volete utilizzare i nostri modelli per qualcosa d'altro oltre al vostro uso personale? Potete leggere tutto ciò che è consentito nel testo sul Copyright in basso su tutte le pagine dei nostri modelli. Buon lavoro!
Lasciare un commento sul modello DROPS 164-33
Noi saremmo felici di ricevere i tuoi commenti e opinioni su questo modello!
Se vuoi fare una domanda, fai per favore attenzione a selezionare la categoria corretta nella casella qui sotto per velocizzare il processo di risposta. I campi richiesti sono indicati da *.