
Categorie popolari
State cercando un filato?


Commenti / Domande (100)
![]() Mariam Khan ha scritto:
Mariam Khan ha scritto:
Hei. I A3 så er det grupper med 4 staver oppover i midten. Jeg syns diagrammet viser veldig dårlig hvordan det skal bli gjort. Skal stavene bli heklet i maskene fra forrige rundes staver eller skal de hekles i en gruppe i luftmaske buen?
29.09.2016 - 17:30DROPS Design ha risposto:
Hej Mariam. De förste 4 staver + 2 lm + 4 staver (rk 3) haekles om lm fra forrige omg. Naeste gruppe staver (rk 4) haekles om de 2 lm fra forrige omg. I rk 5 ligesaa. I rk 6 haekles först de 4 staver överst i de 3 lm, saa 4 lm og 1 fm nederst i de 3 lm, 3 lm, 1 fm nederst om de naeste 3 lm, 4 lm og 4 staver överst i de 3 lm. Osv.
04.10.2016 - 16:41
![]() Mariam Khan ha scritto:
Mariam Khan ha scritto:
I diagrammet er det et symbol som forklares slik: Hekle 1 st i neste st - men vent med siste gjennomtrekning (= 2 m på nåla), hekle 1 st i hver av de neste 2 st på samme måte, dra tråden gjennom alle 4 m på nåla. Jeg vet ikke om dere har skrevet feil eller om jeg misforstår. Hvis man skal vente med siste gjennomtrekning på totalt 3 staver, vil det på slutten av stav nr 3 være seks masker på nåla som skal dras gjennom. Er det slik det skal gjøres?
13.09.2016 - 19:01DROPS Design ha risposto:
Hej Mariam. Det er korrekt hvad der staar. Du skal slaa om og trekke igennem 1 gang hver gang, saa har du 4 m paa naalen naar du har heklet de 3 st. Dvs: du hekler 1 st, men vent med å trekke igjennom den siste løkken av st (det er nå 2 løkker på nålen), hekl st nr 2, men vent med å trekke igjennom den siste løkken av st = 3 m paa naalen, hekl st nr 3, efter förste gennemtraek har du ialt 4 m paa pinden
14.09.2016 - 11:43Maria ha scritto:
Very nice and easy to make 🙂
30.08.2016 - 16:29
![]() Mette Munch-Boutrup ha scritto:
Mette Munch-Boutrup ha scritto:
Jeg har hæklet denne flotte nederdel i Safran og er meget glad for den. Nu vil jeg gerne hækle den med garn der giver en lettere nederdel, evt. med en silkeagtigt overflade. Kan I hjælpe mig med hvilket drops garn jeg kan bruge (evt. kombinationer) uden at jeg skal ændrer på opskriften? Mvh Mette
22.06.2016 - 09:03DROPS Design ha risposto:
Hej Mette. Her er garnalternativerne til Safran, du kan eventuelt lave den i BabyAlpaca Silk. Eller tag en snak med din garnbutik, maaske har de ogsaa et alternativ.
23.06.2016 - 12:35
![]() Sacha Roest ha scritto:
Sacha Roest ha scritto:
Can you please explain the last row on the bottom of the skirt? I cant seem to make it look good. When it says skip 3dc; the ch4 stretches out to much and doesnt look right. And the ch4 insert in next ch sp looks a bit awkward aswell. As if they are too close together in certain places.
24.04.2016 - 18:43Sacha Roest ha risposto:
I just asked you a question but I have figured it out. Thanks anyway!
24.04.2016 - 19:09
![]() Kelly ha scritto:
Kelly ha scritto:
I was wondering if you could explain in the A1 pattern and the others, if we are supposed to work stitch/chain for stitch/chain how is it that in the first part of the A1/AX rows the number of stitches go up or down from round to round, how do we maintain the stitch count to be the same (in my case 252 stitches for each round, before we reach the next increase)? I'm confused on this part to be able to match the pattern? Please explain. Thanks Kelly
08.04.2016 - 04:45DROPS Design ha risposto:
Dear Kelly, A.1 is worked over 12 sts and will be repeated 12 times in total in width, there is no inc in A.1, insert a marker between each repeat so that you can check each row in diagram. After you have worked A.1 (and A.X a total of 2 times), work 12 rounds with dc while inc 36 dc evenly, then work A.2 on next round. Read more about diagrams here and how to inc evenly here. Happy crocheting!
08.04.2016 - 09:05
![]() Kelly ha scritto:
Kelly ha scritto:
I was wondering for the graph, if each stitch was individual to each chain. Most diagrams have chain's underneath the symbol to indicate where the stitch is going. Also when it says to work from 1st round in A1 (=12 dc) 21 times in width, and when AX has been worked verticall what does that mean? At this point are you supposed to actually crochet 12dc and turn 21 times? Thanks, Kelly
05.04.2016 - 00:27DROPS Design ha risposto:
Dear Kelly, the diagram A.1 will be worked a total of 21 times in width on the round (work first round 1 over all sts, then round 2 over all sts etc..) - inserting a marker between each repeat may help - Make 1 ch for each "-" in diagram, so that on row 3 in A.1, you will work 5 ch, 1 sc, 5 ch between the dc - A.X = row 3 to 6 in A.1. When working A.1, work to row 6 = including A.X then work again the row 3 to 6 (= A.X) then continue A.1 with next row (= row 7 in A.1, coming after A.X). Happy crocheting!
05.04.2016 - 09:31
![]() Rendi ha scritto:
Rendi ha scritto:
Hello, are the instructions available in English, please? I have not yet learned to use charts. Thank you :-)
31.01.2016 - 17:34DROPS Design ha risposto:
Dear Rendi, there are only diagrams to this pattern - each symbol represent 1 st/group of st as stated under diagram text, start reading from the right and read every round from the right towards the left. You are welcome to contact your DROPS store for any further individual assistance. Happy crocheting!
01.02.2016 - 11:19
![]() Sacha Roest ha scritto:
Sacha Roest ha scritto:
Please look at the terms in the diagram, maybe its a mistake... The little X says "sc in/around st", the little T: "sc in ch-space". My question is how to sc in ch-space. The term: "dc around ch-space" I get... So is this just wrong? Should the little T be called "sc around ch-space"? Or is it the same as the little X?
05.09.2015 - 20:16DROPS Design ha risposto:
Dear Mrs Roest, you crochet around the ch-space inserting crochet hook in the ch-space, but when you have to crochet in the st (eg in the sc below), you will insert crochet hook under both threads of st (sc in this example) from previous round. Happy crocheting!
07.09.2015 - 10:42
![]() Sacha Roest ha scritto:
Sacha Roest ha scritto:
In the diagram explanation one symbol is the "dc around ch-space" another "sc in ch-space". Is there is a difference inbetween "in" and "around"? As far as I know they are the same and the only difference is the dc and sc.. Please let me know if this is true. (I made the mistake by posting this question for uk aswell..)
03.09.2015 - 12:13DROPS Design ha risposto:
See answer below.
03.09.2015 - 15:35
|
|||||||||||||||||||||||||||||||||||||
Summer Escape#summerescapeskirt |
|||||||||||||||||||||||||||||||||||||
 |
 |
||||||||||||||||||||||||||||||||||||
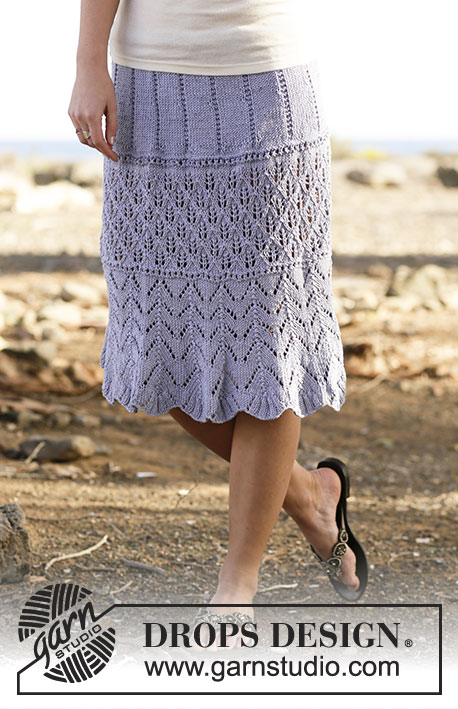
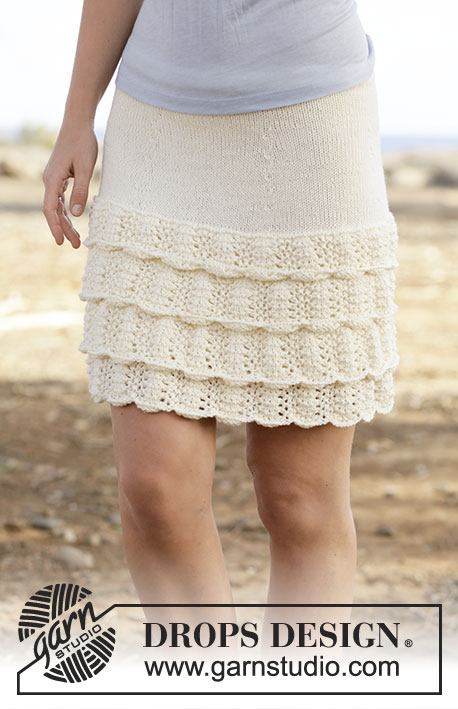
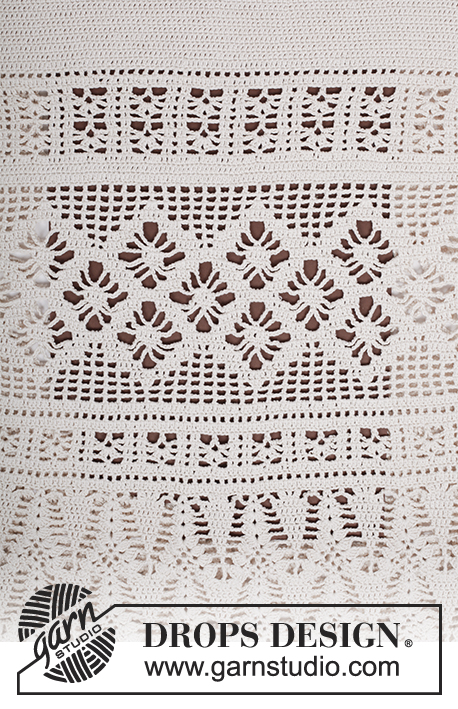
Gonna DROPS all’uncinetto, con maglie alte e motivo traforato, lavorata top down, in "Safran". Taglie: Dalla S alla XXXL.
DROPS 162-18 |
|||||||||||||||||||||||||||||||||||||
|
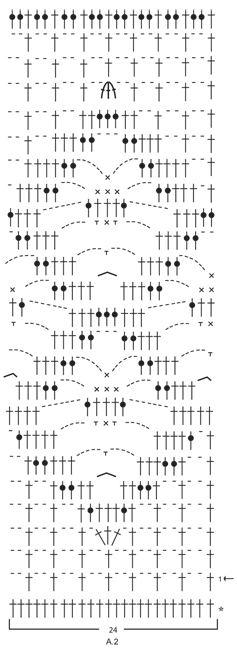
INFORMAZIONI PER IL LAVORO: Sostituire la prima m.a all’inizio di ogni giro/riga con 3 cat. Finire la riga con 1 m.a nella 3a cat della riga precedente (quando si lavora avanti e indietro). Finire il giro con 1 m.bss nella 3a cat dall’inizio del giro (quando si lavora in tondo). NON sostituire la prima m.b all’inizio di ogni giro, ma lavorare 1 cat prima della m.b all’inizio del giro. Finire con 1 m.bss nella 1a cat del giro. SUGGERIMENTO PER GLI AUMENTI: Per aumentare 1 m.a, lavorare 2 m.a nella stessa m.a. SUGGERIMENTO PER LE DIMINUZIONI: Lavorare 1 m.a, ma non fare l’ultima gettata (= 2 m sull’uncinetto), lavorare la m.a. successiva e all’ultima gettata, passare il filo attraverso tutte e 3 le m sull’uncinetto = è stata diminuita 1 m. MOTIVO: Vedere i diagrammi da A.1 a A.3. ---------------------------------------------------------- GONNA: Si lavora avanti e indietro, dall’alto verso il basso (top down) finché non è completata l’apertura sul lato; poi si lavora in tondo. Con l’uncinetto n° 3,5 ed il filato Safran, avviare 186-209-232-258-279-305 cat (comprese 3 cat per girare il lavoro). Lavorare la prima riga, come segue: 1 m.a nella 4a cat dall’uncinetto, 1 m.a in ognuna delle 4 cat successive, * saltare 1 cat, 1 m.a in ognuna delle 6 cat successive *, ripetere da *-* finché non rimangono 3-5-7-5-5-3 cat, saltare 1 cat e finire con 1 m.a in ognuna delle ultime 2-4-6-4-4-2 m.a = 158-178-198-220-238-260 m.a. Proseguire avanti e indietro con 1 m.a in ogni m.a - VEDERE LE INFORMAZIONI PER IL LAVORO. RICORDARSI LA TENSIONE DEL LAVORO! Dopo aver lavorato 5 righe in verticale, inserire 6 segni nel lavoro come segue: primo segno dopo 14-14-16-20-21-22 m.a, inserire gli altri segni in modo che ci siano 26-30-33-36-39-43 m.a tra un segno e l’altro; ci devono essere 14-14-17-20-22-23 m.a dopo l’ultimo segno, alla fine del riga. Nel corso della riga successiva, aumentare 1 m.a prima di ogni segno – VEDERE IL SUGGERIMENTO PER GLI AUMENTI! Ripetere questi aumenti ogni 2 righe altre 6-6-7-8-9-10 volte - ATTENZIONE: aumentare alternativamente prima e dopo il segno (quindi una volta aumentare sempre prima del segno, la volta successiva aumentare sempre dopo il segno) = 200-220-246-274-298-326 m.a. ALLO STESSO TEMPO, dopo aver lavorato in tutto 12 righe in verticale, chiudere l’apertura al lato e proseguire in tondo; il giro inizia sul lato – VEDERE LE INFORMAZIONI PER IL LAVORO ! Quando il lavoro misura 24-24-25-25-25-26 cm, nel corso del giro successivo, aumentare 28-32-30-26-38-22 m a intervalli regolari = 228-252-276-300-336-348 m. Lavorare ora il motivo come segue: Lavorare 19-21-23-25-28-29 volte in larghezza il diagramma A.1 (= 12 m.a) iniziando dal primo giro del diagramma. Dopo aver lavorato il diagramma A.X 1 volta in verticale, ripetere il diagramma A.X ancora 1 volta prima di proseguire con il giro successivo del diagramma. Lavorare ora 1-2-2-1-2-3 giri con 1 m.a in ogni m.a e, ALLO STESSO TEMPO, durante l’ultimo giro, aumentare 36-36-36-36-24-36 m a intervalli regolari = 264-288-312-336-360-384 m.a. Lavorare ora il diagramma A.2 dal primo giro (= 11-12-13-14-15-16 ripetizioni in larghezza); ALLO STESSO TEMPO, durante l’ultimo giro, aumentare 12 m.a a intervalli regolari per tutte le taglie = 276-300-324-348-372-396 m.a. Lavorare ora il diagramma A.1 (= 23-25-27-29-31-33 ripetizioni in larghezza) 1 volta in verticale; ALLO STESSO TEMPO, durante l’ultimo giro, aumentare 12-20-12-20-12-20 m.a a intervalli regolari = 288-320-336-368-384-416 m.a. Lavorare ora il diagramma A.3 (= 18-20-21-23-24-26 ripetizioni in larghezza). Dopo aver lavorato il diagramma A.3 una volta in verticale, ripetere il diagramma A.Z altre 1-1-1-2-2-2 volte in verticale. Lavorare ora come segue: 1 cat (= 1 m.b), ** lavorare * 4 cat, 1 m.b nell’arco di cat successivo *, ripetere da *-* altre 2 volte, 4 cat, saltare 3 m.a, 1 m.b nella m.a successiva **, ripetere da **-** su tutto il giro, e finire con 1 m.bss nella prima cat del giro. OCCHIELLI PER I BOTTONI: Lungo l’apertura sul davanti, lavorare gli occhielli per i bottoni come segue (iniziare dal basso): 2 m.b nella prima m.a, 3 cat, saltare 1 m.a, * lavorare 2 m.b in ognuna delle 2 m.a successive, 3 cat, saltare 1 m.a *, ripetere da *-* 3 volte in tutto e finire con 2 m.b nell’ultima m.a in alto, girare e lavorare come segue: 1 m.b in ogni m.b e 3 m.b in ogni arco di cat. BORDO PER I BOTTONI: Lungo l’altro lato dell’apertura, lavorare 5 righe di m.b avanti e indietro (nella prima riga lavorare 2 m.b in ogni m.a = 24 m.b), tagliare il filo. Attaccare i bottoni sul bordo per i bottoni. BORDO: Lavorare un bordo all’altezza della vita, come segue, sul diritto del lavoro: Unire il filo con 1 m.bss sul bordo per i bottoni, 1 cat, * 1 cat, saltare 1 cat, 1 m.b nella cat successiva *, ripetere da *-* su tutto il bordo. Tagliare il filo. |
|||||||||||||||||||||||||||||||||||||
Spiegazioni del diagramma |
|||||||||||||||||||||||||||||||||||||
|
|||||||||||||||||||||||||||||||||||||
 |
|||||||||||||||||||||||||||||||||||||
 |
|||||||||||||||||||||||||||||||||||||
 |
|||||||||||||||||||||||||||||||||||||
Avete terminato questo modello?Allora taggate le vostre foto con #dropspattern #summerescapeskirt o inviatele alla #dropsfan gallery. Avete bisogno di aiuto con questo modello?Troverete 12 video tutorial, una sezione per i commenti/domande e molto altro guardando il modello su www.garnstudio.com © 1982-2026 DROPS Design A/S. Ci riserviamo tutti i diritti. Questo documento, compreso tutte le sue sotto-sezioni, è protetto dalle leggi sul copyright. Potete leggere quello che potete fare con i nostri modelli alla fine di ogni modello sul nostro sito. |
|||||||||||||||||||||||||||||||||||||


Con oltre 40 anni di esperienza nel design di modelli di maglia e uncinetto, DROPS Design offre la più estesa collezione di modelli gratuiti su internet - tradotti in 17 lingue. Ad oggi vi possiamo fornire 324 cataloghi e 12290 modelli - 9561 dei quali sono tradotti in Italiano.
Ci stiamo impegnando molto per darvi il meglio che vi possiamo offrire in termini di maglia e uncinetto, ispirazioni e consigli così come filati di grande qualità ad un prezzo incredibile! Volete utilizzare i nostri modelli per qualcosa d'altro oltre al vostro uso personale? Potete leggere tutto ciò che è consentito nel testo sul Copyright in basso su tutte le pagine dei nostri modelli. Buon lavoro!
Lasciare un commento sul modello DROPS 162-18
Noi saremmo felici di ricevere i tuoi commenti e opinioni su questo modello!
Se vuoi fare una domanda, fai per favore attenzione a selezionare la categoria corretta nella casella qui sotto per velocizzare il processo di risposta. I campi richiesti sono indicati da *.