
Categorie popolari
State cercando un filato?


Commenti / Domande (100)
![]() Anette Glasell ha scritto:
Anette Glasell ha scritto:
Hej. Hur börjar jag varv 9 i diagram A2 då varvet ska börja med 4 luftmaskor som ska hänga ihop med de 4 luftmaskor som avslutar varvet? Jag har ju avslutat varv 8 med en smygmaska i lm-stolpen?
12.04.2026 - 19:01
![]() Anny Baade Nielsen ha scritto:
Anny Baade Nielsen ha scritto:
Hvordan får jeg startet med at hækle rundt ? forstår ikke lige hvad i mener mvh Anny
08.04.2026 - 09:49DROPS Design ha risposto:
Hei Anny. Når det er heklet totalt 12 rader i høyden slutter splitten i siden og arbeidet skal nå hekles rundt. Ikke snu arbeidet , men start med 1 kjedemaske i 3. luftmaske i 1. maske på begynnelsen av forrige rad. Start med å hekle 3 luftmasker, forstsett med 1 stav i hver stav omgangen rundt og avslutt omgangen med 1 kjedemaske i 3.luftmaske på begynnelsen av omgangen. mvh DROPS Design
13.04.2026 - 12:06
![]() Birgit ha scritto:
Birgit ha scritto:
Hej Jeg er ved at hækle A1 i diagrammet og er i tvivl om hvad "st i/om m" vil sige? Skal jeg hækle i eller om masken? På forhånd tak. Mvh Birgit
16.02.2026 - 13:07DROPS Design ha risposto:
Hei Birgit. Om du ser på 1. rad i A.1 (med pil) hekles stavene i en stav fra forrige omgang, men om du ser på 5.rad hekles de 2 første stavene i en stav fra forrige omgang, mens de 4 neste stavene hekles om luftmaskebue fra forrige rad. mvh DROPS Design
23.02.2026 - 11:16
![]() Jessica ha scritto:
Jessica ha scritto:
Hoeveel bollen garen heb ik nodig voor dit patroon
12.02.2026 - 12:24DROPS Design ha risposto:
Dag Jessica,
Bovenaan bij de materialenlijst staat per maat aangegeven hoeveel gram je nodig hebt. (Het eerste getal geldt voor maat S, het tweede getal voor maat M, enzovoort). 1 bol weegt meestal 50 gram, maar let erop dat dit per garensoort verschillend kan zijn. Dus als er bijvoorbeeld 400 gram staat dan zou je 8 bollen nodig hebben als 1 bol 50 gram weegt.
12.02.2026 - 19:22
![]() Birgit ha scritto:
Birgit ha scritto:
Hej Jeg er nået til diagram A1 og er i tvivl om de to "st i/om m" og "fm i/om m". Skal jeg så hækle i eller om masken? Mvh. Birgit
03.02.2026 - 09:17DROPS Design ha risposto:
Hei Birgit. Husk HÆKLEINFO, står øvert i oppskriften (Første st i beg af rækken/omg erstattes med 3 lm. Afslut rækken med 1 st i 3.lm fra forrige række (når arb hækles frem og tilbage) og afslut omg med 1 km i 3.lm i beg af omg (når arb hækles rundt). Første fm i beg af omg erstattes IKKE, men der hækles 1 lm før fm i beg af omg. Afslut med 1 km i første lm på omg. Mvh DROPS Design
09.02.2026 - 08:02
![]() Bettina ha scritto:
Bettina ha scritto:
Hallo ich häkle diesen rock aber mach ihn gleich in runden also lasse die knopfleiste weg weil ich einen gummi in einem tunnel ziehe muß ich trotzdem die ersten runden so häkeln wie beschrieben oder ist das nur wegen den knöpfen so?
13.01.2026 - 14:12DROPS Design ha risposto:
Liebe Bettina, Sie können so anfangen wie beschrieben, aber direkt in Runden. Ansonsten ändert sich nichts. Viel Spaß beim Häkeln!
06.02.2026 - 13:45
![]() Zsofia ha scritto:
Zsofia ha scritto:
In A.1, specifically A.X middle row, are you sure that the double crochet (US term) should go IN the stitches? If yes, the two sc of previous row? On the pictures it seems that the dc go AROUND the middle chain space.
04.12.2024 - 18:43DROPS Design ha risposto:
Dear Zsofia, the double crochet symbol in the third row is used for working both in or around the stitches, as indicated in the chart key above. In this specific case, the dc are worked around the central chain space. Happy crochetting!
08.12.2024 - 17:58
![]() Diya ha scritto:
Diya ha scritto:
In the A3 diagram on row 3,4,5,6 the middle, do I have to DC only in the chain space or also on the previous row DCs and the chain space?
28.08.2024 - 12:09DROPS Design ha risposto:
Dear Diya, the dc (US-English) on rows 3,4,5 and 6 are worked in the chain spaces below. Happy crocheting!
29.08.2024 - 09:31
![]() Linda Sjelvgren ha scritto:
Linda Sjelvgren ha scritto:
Förstår ej hur jag ska gå från fram och tillbaka till att virka runt, trots beskrivningen. Innebär detta att man byter varv på arbetet när man för ihop ändarna?
07.08.2024 - 20:14DROPS Design ha risposto:
Hej Linda, Uanset om du virkar fram och tillbaka, börjar du varvet med 3 lm för att komma upp på nästa varv. Se VIRKINFO øverst under Instruktioner :)
14.08.2024 - 14:58
![]() Basil ha scritto:
Basil ha scritto:
I am confused on how to go from working back and forth at the beginning of the pattern to working in the round. Do I join to the first double crochet to create a circle? And do I sew the two sides together? Thanks
19.05.2024 - 05:39DROPS Design ha risposto:
Dear Basil, first you work back and forth to create a vent; this will be used for the buttonband and buttonhole band. Then you join to continue in the round. The joining method is explained in CROCHET INFO: 1 slip stitch in the 3rd chain from the beginning of the round and then simply work over the previous stitches. Happy crochetting!
20.05.2024 - 00:19
|
|||||||||||||||||||||||||||||||||||||
Summer Escape#summerescapeskirt |
|||||||||||||||||||||||||||||||||||||
 |
 |
||||||||||||||||||||||||||||||||||||
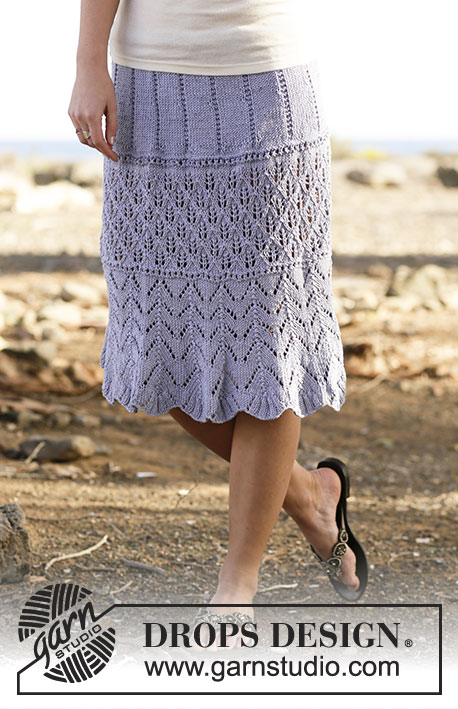
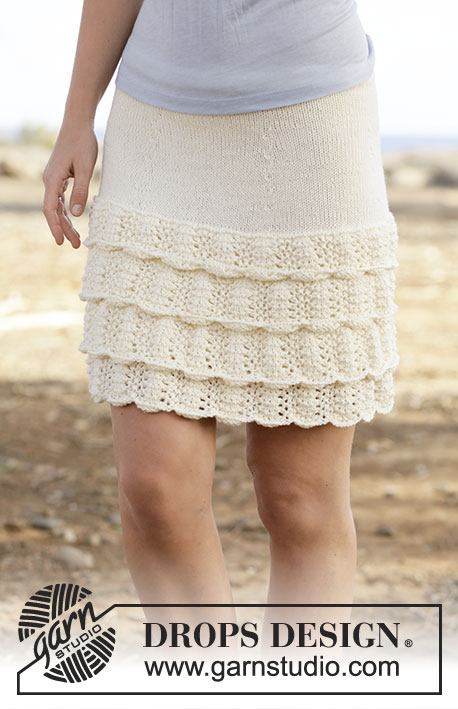
Gonna DROPS all’uncinetto, con maglie alte e motivo traforato, lavorata top down, in "Safran". Taglie: Dalla S alla XXXL.
DROPS 162-18 |
|||||||||||||||||||||||||||||||||||||
|
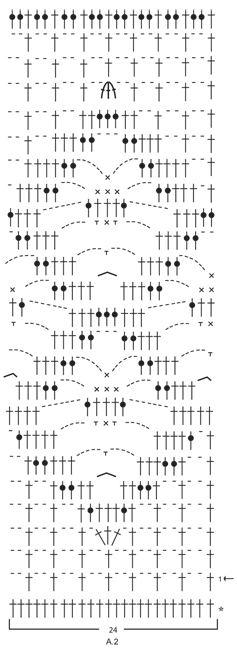
INFORMAZIONI PER IL LAVORO: Sostituire la prima m.a all’inizio di ogni giro/riga con 3 cat. Finire la riga con 1 m.a nella 3a cat della riga precedente (quando si lavora avanti e indietro). Finire il giro con 1 m.bss nella 3a cat dall’inizio del giro (quando si lavora in tondo). NON sostituire la prima m.b all’inizio di ogni giro, ma lavorare 1 cat prima della m.b all’inizio del giro. Finire con 1 m.bss nella 1a cat del giro. SUGGERIMENTO PER GLI AUMENTI: Per aumentare 1 m.a, lavorare 2 m.a nella stessa m.a. SUGGERIMENTO PER LE DIMINUZIONI: Lavorare 1 m.a, ma non fare l’ultima gettata (= 2 m sull’uncinetto), lavorare la m.a. successiva e all’ultima gettata, passare il filo attraverso tutte e 3 le m sull’uncinetto = è stata diminuita 1 m. MOTIVO: Vedere i diagrammi da A.1 a A.3. ---------------------------------------------------------- GONNA: Si lavora avanti e indietro, dall’alto verso il basso (top down) finché non è completata l’apertura sul lato; poi si lavora in tondo. Con l’uncinetto n° 3,5 ed il filato Safran, avviare 186-209-232-258-279-305 cat (comprese 3 cat per girare il lavoro). Lavorare la prima riga, come segue: 1 m.a nella 4a cat dall’uncinetto, 1 m.a in ognuna delle 4 cat successive, * saltare 1 cat, 1 m.a in ognuna delle 6 cat successive *, ripetere da *-* finché non rimangono 3-5-7-5-5-3 cat, saltare 1 cat e finire con 1 m.a in ognuna delle ultime 2-4-6-4-4-2 m.a = 158-178-198-220-238-260 m.a. Proseguire avanti e indietro con 1 m.a in ogni m.a - VEDERE LE INFORMAZIONI PER IL LAVORO. RICORDARSI LA TENSIONE DEL LAVORO! Dopo aver lavorato 5 righe in verticale, inserire 6 segni nel lavoro come segue: primo segno dopo 14-14-16-20-21-22 m.a, inserire gli altri segni in modo che ci siano 26-30-33-36-39-43 m.a tra un segno e l’altro; ci devono essere 14-14-17-20-22-23 m.a dopo l’ultimo segno, alla fine del riga. Nel corso della riga successiva, aumentare 1 m.a prima di ogni segno – VEDERE IL SUGGERIMENTO PER GLI AUMENTI! Ripetere questi aumenti ogni 2 righe altre 6-6-7-8-9-10 volte - ATTENZIONE: aumentare alternativamente prima e dopo il segno (quindi una volta aumentare sempre prima del segno, la volta successiva aumentare sempre dopo il segno) = 200-220-246-274-298-326 m.a. ALLO STESSO TEMPO, dopo aver lavorato in tutto 12 righe in verticale, chiudere l’apertura al lato e proseguire in tondo; il giro inizia sul lato – VEDERE LE INFORMAZIONI PER IL LAVORO ! Quando il lavoro misura 24-24-25-25-25-26 cm, nel corso del giro successivo, aumentare 28-32-30-26-38-22 m a intervalli regolari = 228-252-276-300-336-348 m. Lavorare ora il motivo come segue: Lavorare 19-21-23-25-28-29 volte in larghezza il diagramma A.1 (= 12 m.a) iniziando dal primo giro del diagramma. Dopo aver lavorato il diagramma A.X 1 volta in verticale, ripetere il diagramma A.X ancora 1 volta prima di proseguire con il giro successivo del diagramma. Lavorare ora 1-2-2-1-2-3 giri con 1 m.a in ogni m.a e, ALLO STESSO TEMPO, durante l’ultimo giro, aumentare 36-36-36-36-24-36 m a intervalli regolari = 264-288-312-336-360-384 m.a. Lavorare ora il diagramma A.2 dal primo giro (= 11-12-13-14-15-16 ripetizioni in larghezza); ALLO STESSO TEMPO, durante l’ultimo giro, aumentare 12 m.a a intervalli regolari per tutte le taglie = 276-300-324-348-372-396 m.a. Lavorare ora il diagramma A.1 (= 23-25-27-29-31-33 ripetizioni in larghezza) 1 volta in verticale; ALLO STESSO TEMPO, durante l’ultimo giro, aumentare 12-20-12-20-12-20 m.a a intervalli regolari = 288-320-336-368-384-416 m.a. Lavorare ora il diagramma A.3 (= 18-20-21-23-24-26 ripetizioni in larghezza). Dopo aver lavorato il diagramma A.3 una volta in verticale, ripetere il diagramma A.Z altre 1-1-1-2-2-2 volte in verticale. Lavorare ora come segue: 1 cat (= 1 m.b), ** lavorare * 4 cat, 1 m.b nell’arco di cat successivo *, ripetere da *-* altre 2 volte, 4 cat, saltare 3 m.a, 1 m.b nella m.a successiva **, ripetere da **-** su tutto il giro, e finire con 1 m.bss nella prima cat del giro. OCCHIELLI PER I BOTTONI: Lungo l’apertura sul davanti, lavorare gli occhielli per i bottoni come segue (iniziare dal basso): 2 m.b nella prima m.a, 3 cat, saltare 1 m.a, * lavorare 2 m.b in ognuna delle 2 m.a successive, 3 cat, saltare 1 m.a *, ripetere da *-* 3 volte in tutto e finire con 2 m.b nell’ultima m.a in alto, girare e lavorare come segue: 1 m.b in ogni m.b e 3 m.b in ogni arco di cat. BORDO PER I BOTTONI: Lungo l’altro lato dell’apertura, lavorare 5 righe di m.b avanti e indietro (nella prima riga lavorare 2 m.b in ogni m.a = 24 m.b), tagliare il filo. Attaccare i bottoni sul bordo per i bottoni. BORDO: Lavorare un bordo all’altezza della vita, come segue, sul diritto del lavoro: Unire il filo con 1 m.bss sul bordo per i bottoni, 1 cat, * 1 cat, saltare 1 cat, 1 m.b nella cat successiva *, ripetere da *-* su tutto il bordo. Tagliare il filo. |
|||||||||||||||||||||||||||||||||||||
Spiegazioni del diagramma |
|||||||||||||||||||||||||||||||||||||
|
|||||||||||||||||||||||||||||||||||||
 |
|||||||||||||||||||||||||||||||||||||
 |
|||||||||||||||||||||||||||||||||||||
 |
|||||||||||||||||||||||||||||||||||||
Avete terminato questo modello?Allora taggate le vostre foto con #dropspattern #summerescapeskirt o inviatele alla #dropsfan gallery. Avete bisogno di aiuto con questo modello?Troverete 12 video tutorial, una sezione per i commenti/domande e molto altro guardando il modello su www.garnstudio.com © 1982-2026 DROPS Design A/S. Ci riserviamo tutti i diritti. Questo documento, compreso tutte le sue sotto-sezioni, è protetto dalle leggi sul copyright. Potete leggere quello che potete fare con i nostri modelli alla fine di ogni modello sul nostro sito. |
|||||||||||||||||||||||||||||||||||||


Con oltre 40 anni di esperienza nel design di modelli di maglia e uncinetto, DROPS Design offre la più estesa collezione di modelli gratuiti su internet - tradotti in 17 lingue. Ad oggi vi possiamo fornire 324 cataloghi e 12290 modelli - 9561 dei quali sono tradotti in Italiano.
Ci stiamo impegnando molto per darvi il meglio che vi possiamo offrire in termini di maglia e uncinetto, ispirazioni e consigli così come filati di grande qualità ad un prezzo incredibile! Volete utilizzare i nostri modelli per qualcosa d'altro oltre al vostro uso personale? Potete leggere tutto ciò che è consentito nel testo sul Copyright in basso su tutte le pagine dei nostri modelli. Buon lavoro!
Lasciare un commento sul modello DROPS 162-18
Noi saremmo felici di ricevere i tuoi commenti e opinioni su questo modello!
Se vuoi fare una domanda, fai per favore attenzione a selezionare la categoria corretta nella casella qui sotto per velocizzare il processo di risposta. I campi richiesti sono indicati da *.