
Categorie popolari
State cercando un filato?


Commenti / Domande (52)
![]() Scholiams ha scritto:
Scholiams ha scritto:
Would this be achievable to me , I am an absolute beginner at knitting?
14.06.2015 - 14:37DROPS Design ha risposto:
Dear Mrs Scholiams, you will find under the tab "videos" some related videos to the techniques used in that pattern. Should you need any further assistance remember you can get help from your DROPS store or ask your question here. Happy knitting!
15.06.2015 - 10:32
![]() Andrea ha scritto:
Andrea ha scritto:
Hi there, Thank you for replay this, but I still don't know what to do... In order to start right front piece do I have to cut the yarn? Because the yarn is on the another edge right?
12.05.2015 - 22:08DROPS Design ha risposto:
Dear Andrea, that's correct, when you have worked left front piece, cut the yarn and put sts onto a st holder. Slip sts from right front piece onto needle and join yarn to work right front piece, cut the yarn and put sts onto a st holder. Repeat for back piece. Then work all sts together joining yarn again. Happy knitting!
13.05.2015 - 10:33Andrea ha scritto:
I just finished working on the left front piece. It says to move that piece to a stich holder and work on theright front piece. I don't really understand how because the left front piece has the yarns do I cast of and work on the right front piece or?
12.05.2015 - 00:37DROPS Design ha risposto:
Dear Andrea, after you have worked the sts on left front piece, put the sts on a st holder and work the front piece as left piece and put sts on another st holder. Work then back sts from back piece the same height as both front pieces and then move all sts back onto needle and work all pieces together. Happy knitting!
12.05.2015 - 09:35
![]() Helen ha scritto:
Helen ha scritto:
Do you have a size guide anywhere on the web site?
27.04.2015 - 10:52DROPS Design ha risposto:
Dear Helen, you will find at the bottom of the pattern a measurement chart with all measures for each size in cm taken flat from side to side. Compare these to a similar garment you have and like the shape to find out the matching size. Happy knitting!
27.04.2015 - 11:51Andrea Alejandra Silveira De Anton ha scritto:
Hola escribo desde uruguay, si no tengo agujas circulares como puedo adaptarlo a 2 agujas? Muchas grcs
18.04.2015 - 20:03DROPS Design ha risposto:
Hola Andrea, la única razón para usar ag circular con este patrón es que en ag rectas es muy incomodo trabajar porque son muchos pts para distribuir y es dificil que quepan. Por lo demás se trabajaría igual.
20.04.2015 - 10:37Martha May ha scritto:
I have question on 158-28 In armhole area. I have 84 stitches on needles and 144 stitches on holder. Then I knitted 7 garter stitches and 54 stockinette Then 7 garter stitches for armhole. But all of this does not add up to 84 stitches. What did I do wrong?
14.04.2015 - 15:27DROPS Design ha risposto:
Dear Mrs May, when you work on the 84 sts for left front piece (the 144 sts for right front piece and back piece are onto a st holder), you continue on these 84 sts with 3 sts in garter st towards armhole (= towards sts on st holder) and 2 garter sts towards mid front (as before). The 7 sts worked in garter sts under each armhole are worked before dividing work. Happy knitting!
14.04.2015 - 16:17
![]() Mamiou ha scritto:
Mamiou ha scritto:
Ich finde die Jacke seeehr schön! Ich bin mir aber mit der Größe nicht sicher ... normalerweise trage ich Gr.42 - wäre das L oder XL ? Danke schonmal für die Hilfe !
14.02.2015 - 22:37DROPS Design ha risposto:
Am besten schauen Sie sich die Maße ganz unten in der Maßskizze an und entscheiden damit, welche Größe Ihnen am besten passt. Viel Spaß beim Stricken!
15.02.2015 - 19:14Donna W. Hall ha scritto:
Question in JACKET section: The last sentence says....."On next row from RS bind off the middle of the 7 sts in garter st for armhole and work each part separately to make an opening for the armhole." I am not sure WHICH sts to bind off because I have worked 2 sections of 7 sts in garter. I am very unsure about the instructions to "bind off the MIDDLE of the 7 sts". Please help! I love the jacket and can't wait to finish it. Thank you so much! Donna
05.02.2015 - 22:06DROPS Design ha risposto:
Dear Mrs Hall, you will bind off the middle st in each of the 7 sts garter sts (under armhole), you will then have 3 separate parts: right front piece, (1 st bound off), back piece, (1 st bound off), left front piece (seen from RS). Continue each part separately. Happy knitting!
06.02.2015 - 11:22
![]() Maya ha scritto:
Maya ha scritto:
Bonjour à tous, après avoit tricoté bonnets; écharpes et snood, je souhaite enfin me lancer sur de plus gros ouvrages. Les instructions ne sont pas très claires pour moi à ce niveau là (excusez, je débute :)) : "tricoter 2 côtes au POINT MOUSSE. Continuer avec l'aiguille circulaire 5 et tricoter en jersey avec 2 m lis au point mousse de chaque côté jusqu'à la fin. Est-ce que cela signifie que sur mon rang je vais avoir : 2 lis - 2 cotes mousses - le reste en jersey ?
18.01.2015 - 16:56DROPS Design ha risposto:
Bonjour Maya, 1 côte mousse = 2 rangs endroit - vous tricotez 4 rangs endroit sur toutes les mailles puis continuez ainsi: 2 m point mousse, jersey sur les mailles suivantes et vous terminez par 2 m point mousse. Ces 2 m de chaque côté se tricotent au point mousse tout le temps jusqu'à la fin. Bon tricot!
19.01.2015 - 11:52Priti Parihar ha scritto:
Hi, I live in India and am not able to get this wool. Can you please tell me the gauge for this article so that I can substitute some other wool for this project. I have been looking for this style and would love to make it. Thanks I hope you will reply
10.01.2015 - 12:08
|
|
Ballade#balladecardigan |
|
 |
 |
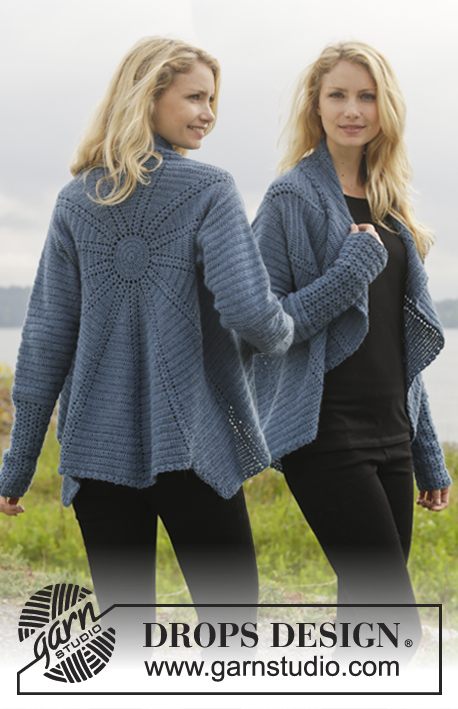
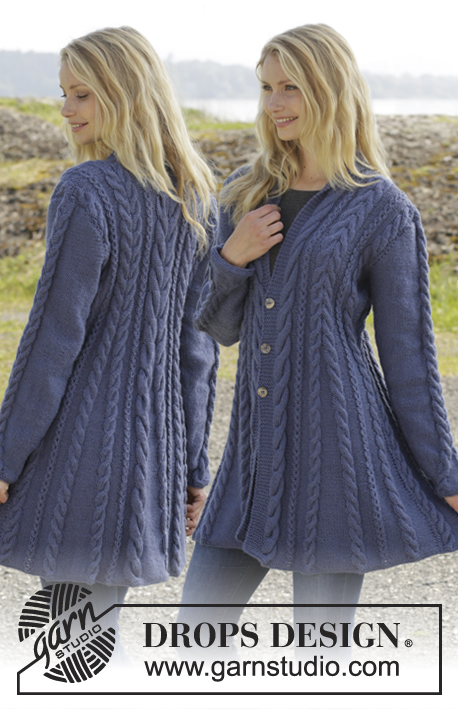
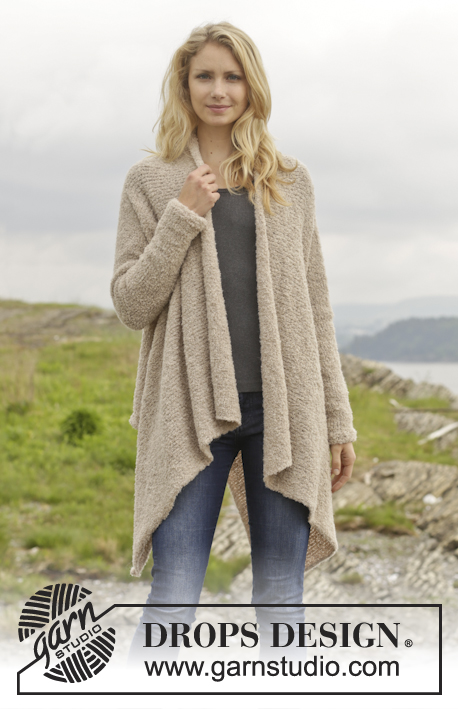
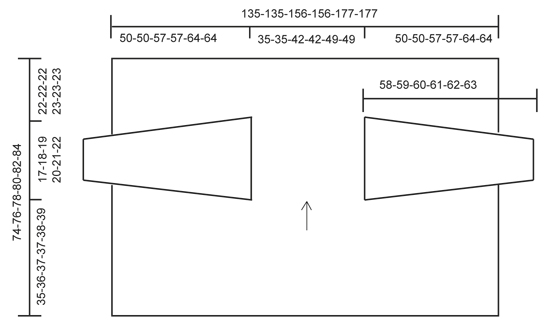
Giacca DROPS lavorata ai ferri in "Alpaca Bouclé". Taglie: S - XXXL.
DROPS 158-28 |
|
|
M LEGACCIO (avanti e indietro sui f): Lavorare tutti i f a dir. 1 “costa” a m legaccio = 2 f dir. ---------------------------------------------------------- GIACCA: Lavorata avanti e indietro sui f circolari per avere spazio per tutte le m. Avviare 230-230-266-266-302-302 m con i f circolari n° 4 mm con Alpaca Bouclé. Lavorare 2 “coste” a M LEGACCIO – leggere la spiegazione sopra. Passare ai f circolari n° 5 mm e lavorare a m rasata con 2 m di vivagno a m legaccio a ogni lato fino alla fine del lavoro. FARE ATTENZIONE ALLA TENSIONE DEL LAVORO! Lavorare fino a quando il lavoro misura 34-35-36-36-37-38 cm. Sul f successivo dal diritto del lavoro, lavorare come prima sulle prime 81-81-93-93-105-105 m, 7 m a m legaccio, 54-54-66-66-78-78 m a m rasata, 7 m a m legaccio e lavorare come prima sulle ultime 81-81-93-93-105-105 m. Sul rovescio del lavoro lavorare come prima con 7 m a m legaccio come dal diritto del lavoro. Sul f successivo dal diritto del lavoro intrecciare la m centrale delle 7 m a m legaccio per lo scalfo e lavorare ogni parte in modo separato per fare un’apertura per lo scalfo. DAVANTI SINISTRO: Tenere le prime 84-84-96-96-108-108 m sul f e trasferire le 144-144-168-168-192-192 m rimaste su un fermamaglie. Lavorare a m rasata con 3 m a m legaccio verso lo scalfo e 2 m di vivagno a m legaccio verso il centro davanti. Lavorare fino a quando il lavoro misura 51-53-55-56-58-60 cm. Trasferire le m su un fermamaglie e lavorare il davanti destro. DAVANTI DESTRO: Riportare le 84-84-96-96-108-108 m più esterne sui f di lavoro, lavorare come per il davanti sinistro. Assicurarsi di lavorare il davanti destro della stessa lunghezza del davanti sinistro. Trasferire le m su un fermamaglie e lavorare il dietro. DIETRO: Riportare le 60-60-72-72-84-84 m centrali sui f di lavoro. Lavorare a m rasata con 3 m a m legaccio a ogni lato. Lavorare fino a quando il lavoro misura 51-53-55-56-58-60 cm. Assicurarsi di lavorare il dietro della stessa lunghezza del davanti destro e sinistro. Trasferire tutte e 3 le parti sui f di lavoro e lavorare come segue: m rasata con 2 m di vivagno a m legaccio sulle prime 81-81-93-93-105-105 m, 3 m a m legaccio, avviare 1 nuova m, 3 m a m legaccio, m rasata su 54-54-66-66-78-78 m, 3 m a m legaccio, avviare 1 nuova m, 3 m a m legaccio, m rasata e 2 m di vivagno a m legaccio sulle ultime 81-81-93-93-105-105 m. Lavorare a m legaccio e m rasata nello stesso modo dal rovescio del lavoro. Poi lavorare a m rasata con 2 m di vivagno a m legaccio fino a quando il lavoro misura 73-75-77-79-81-84 cm. Passare ai f circolari n° 4 mm e lavorare 2 “coste”. Intrecciare senza stringere dal rovescio del lavoro. MANICA: Lavorata avanti e indietro sui f circolari.Avviare 32-35-37-38-39-41 m con i f circolari n° 4 mm con Alpaca Bouclé. Lavorare 4 “coste”. Passare ai f circolari n° 5 mm e lavorare a m rasata con 1 m di vivagno a m legaccio a ogni lato fino alla fine del lavoro. Quando il lavoro misura 9 cm, aumentare 1 m all’interno della m di vivagno a ogni lato del lavoro. Ripetere gli aumenti ogni 3-3-3-2½-2½-2½ cm altre 13-13-14-15-16-17 volte = 60-63-67-70-73-77 m sul f. Lavorare a m rasata fino a quando il lavoro misura 52-53-54-55-56-57 cm. Intrecciare 1 m di vivagno a ogni lato del lavoro all’inizio dei 2 f successivi = 58-61-65-68-71-75 m rimaste sul f. Poi intrecciare per l’arrotondamento della manica a ogni lato del lavoro all’inizio di ogni f come segue: intrecciare 4 m 5 volte in totale = 18-21-25-28-31-35 m rimaste sul f. Intrecciare le m rimaste. Il lavoro misura circa 58-59-60-61-62-63 cm. CONFEZIONE: Attaccare le maniche. Cucire i margini sotto le braccia all’interno della m di vivagno. |
|
 |
|
Avete terminato questo modello?Allora taggate le vostre foto con #dropspattern #balladecardigan o inviatele alla #dropsfan gallery. Avete bisogno di aiuto con questo modello?Troverete 16 video tutorial, una sezione per i commenti/domande e molto altro guardando il modello su www.garnstudio.com © 1982-2026 DROPS Design A/S. Ci riserviamo tutti i diritti. Questo documento, compreso tutte le sue sotto-sezioni, è protetto dalle leggi sul copyright. Potete leggere quello che potete fare con i nostri modelli alla fine di ogni modello sul nostro sito. |
|


Con oltre 40 anni di esperienza nel design di modelli di maglia e uncinetto, DROPS Design offre la più estesa collezione di modelli gratuiti su internet - tradotti in 17 lingue. Ad oggi vi possiamo fornire 324 cataloghi e 12290 modelli - 9561 dei quali sono tradotti in Italiano.
Ci stiamo impegnando molto per darvi il meglio che vi possiamo offrire in termini di maglia e uncinetto, ispirazioni e consigli così come filati di grande qualità ad un prezzo incredibile! Volete utilizzare i nostri modelli per qualcosa d'altro oltre al vostro uso personale? Potete leggere tutto ciò che è consentito nel testo sul Copyright in basso su tutte le pagine dei nostri modelli. Buon lavoro!
Lasciare un commento sul modello DROPS 158-28
Noi saremmo felici di ricevere i tuoi commenti e opinioni su questo modello!
Se vuoi fare una domanda, fai per favore attenzione a selezionare la categoria corretta nella casella qui sotto per velocizzare il processo di risposta. I campi richiesti sono indicati da *.