
Categorie popolari
State cercando un filato?


Commenti / Domande (195)
![]() Kari Kunkes ha scritto:
Kari Kunkes ha scritto:
Just a observation for those who crochet using American terms. The slip stitch in this pattern is actually a single crochet.
01.10.2019 - 14:49
![]() ASMA ha scritto:
ASMA ha scritto:
Je n'ai pas compris comment tricoter les manches est ce que je tricote sur les 31 ml puis sur le dos et je termine sur les 29ml je n'ai pas compris 2 fois A1 ou 2 fois A1 2
21.09.2019 - 20:30DROPS Design ha risposto:
Bonjour Asma, vous commencez par la 1ère manche sur les 31 ml (= 1 bride dans la 4ème ml à partir du crochet car les 3 premières ml = 1ère bride, et 1 bride dans les 4 ml suivantes = 6 brides), puis A.1, 2 x A.2, crochetez ensuite les mailles du dos: 1 ou 2 fois A.2 (cf taille), A.3, 4-11 brides, A.1, A.2, A.3, 4-11 brides, A.1, 1 ou 2 fois A.1, 1 x A.2 au-dessus des dernières m du dos et 1 x A.2 au-dessus des 8 premières ml des 29 ml, 1 x A.3 et vous terminez par la 2ème manche (et 1 bride dans chacune des 6 dernières des 29 ml). Bon crochet!
23.09.2019 - 09:11
![]() Miep Van Grieken ha scritto:
Miep Van Grieken ha scritto:
Bij de maten XXL en XXXL is het aantal opgezette lossen niet goed opgegeven. Bij beide maten moeten er met 12 lossen meer begonnen worden. Jammer dat dit niet goed uitgerekend is.
15.09.2019 - 00:13
![]() Miep Van Grieken ha scritto:
Miep Van Grieken ha scritto:
Bij de maten XXL en XXXL is het aantal opgezette lossen niet goed opgegeven. Bij beide maten moeten er met 12 lossen meer begonnen worden. Jammer dat dit niet goed uitgerekend is.
14.09.2019 - 23:55
![]() Virginie ha scritto:
Virginie ha scritto:
Bonjour, J'ai fini le dos et le devant côté droit de la veste en taille L. Je ne comprends pas comment crocheter le col châle. Le col se travaille-t-il uniquement sur le côté droit ou se continue t-il sur le dos et sur le côté gauche? A quel endroit se commence t-il? Et doit-on faire la même chose côté gauche? Merci pour votre réponse
08.08.2019 - 09:21DROPS Design ha risposto:
Bonjour Virginie, pour faire le col châle du devant droit, commencez sur l'endroit de l'ouvrage en crochetant les 27-27-29-30-32-32 premières brides comme indiqué, puis continuez en rangs raccourcis (les mailles des différentes hauteur vont former d'elles-mêmes l'arrondi du col châle) pendant 10 cm (côté épaule) soit jusqu'à la moitié de l'encolure dos environ. Vous ferez ensuite le col châle du devant gauche de la même façon (en crochetant les dernières mailles sur l'endroit cette fois - et le rang des ms se fera sur l'endroit au lieu de sur l'envers). Assemblez ensuite le dernier rang des 2 cols puis le côté du col le long de l'encolure dos. Bon crochet!
08.08.2019 - 10:09
![]() Barbara Nuttmann ha scritto:
Barbara Nuttmann ha scritto:
My question was ask above but not answered! I’m doing szL.. I got first row with 9dc..then first row A.z, when I get to 9dc the only way to make it balance is ch3 sk 1 stitch, 7dc, ch3, sk one stitch, slip stitch??? Then..what do I do when I get to this solid area on rows a.z 2,3,4???
15.07.2019 - 21:23DROPS Design ha risposto:
Dear Mrs Nuttmann, in size L you will have on row 1 in A.z: 3 ch, 7 dc, 3 ch (see NOTE in pattern) as you worked, then on next rows in A.z you will have again 9 dc - the 3 ch from row 1 replace the first and the last of the 9 dc. Happy crocheting!
16.07.2019 - 09:18
![]() Raffaella ha scritto:
Raffaella ha scritto:
Grazie
11.07.2019 - 13:58
![]() Raffaella ha scritto:
Raffaella ha scritto:
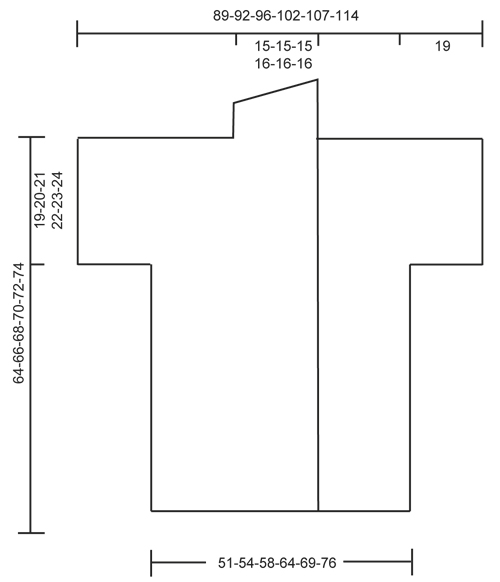
The numbers that are at the base and sideways are the numbers of chains according to the size?
11.07.2019 - 13:49DROPS Design ha risposto:
Dear Raffaella, each number refers to the size in the order of the size, ie for example you cast on 83 chains in size S -87 chains in size M, 93 chains in size L, 101 chains in size XL, 111 chains in size XXL and 121 chains in size XXXL. Happy crocheting!
11.07.2019 - 13:52
![]() Denise ha scritto:
Denise ha scritto:
Could I use Red Heart With Love 4 ply worsted weight to make this project? If so, would there need to be any adjustments to the pattern?
05.07.2019 - 17:55DROPS Design ha risposto:
Dear Denise, the DROPS patterns are written and made available free to support the DROPS yarns. I hope you will understand that we cannot help you with substitutions of yarns made by other companies. However, you should always make a swatch, check gauge and make necessary changes accordingly. Happy Crafting!
07.07.2019 - 17:18
![]() Dotty Maddock ha scritto:
Dotty Maddock ha scritto:
This sweater came out, in the end, beautifully. However, the instructions are misleading and incomplete. For example, the only way I knew about attaching the shawl collar was through reading questions and answers here. There are missing instructions to turn and chain (at the end of rows), and it is just very confusing. Not for inexperienced crocheters, and frustrating for even experienced ones. You've been warned.
09.04.2019 - 00:40DROPS Design ha risposto:
Dear Mrs Maddock, thanks for your comment, we are sorry to hear that, your comment has been forwarded to our design team. Happy crocheting!
09.04.2019 - 10:59
|
||||||||||||||||||||||
Shining Star#shiningstarcardigan |
||||||||||||||||||||||
 |
 |
|||||||||||||||||||||
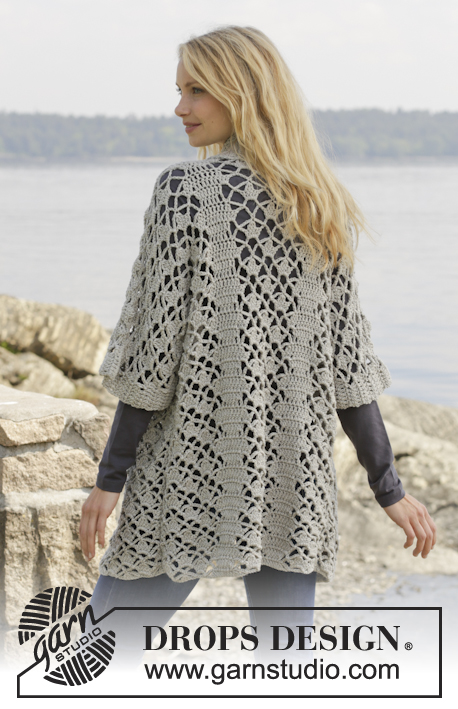
Giacca DROPS all’uncinetto, con motivo traforato e collo a scialle, in "Merino Extra Fine". Taglie: Dalla S alla XXXL.
DROPS 157-18 |
||||||||||||||||||||||
|
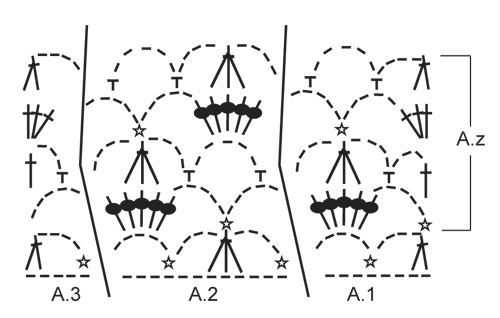
SUGGERIMENTO PER IL LAVORO: Sostituire la prima m.a all’inizio di ogni riga di m.a con 3 cat. MOTIVO: Vedere i diagrammi da A.1 a A.3 ---------------------------------------------------------- DIETRO: Si lavora avanti e indietro. Con l’uncinetto n° 5 ed il filato Merino Extra Fine, avviare 83-87-93-101-111-121 cat. Proseguire come segue, sul diritto del lavoro: Lavorare il diagramma A.1 – vedere le spiegazioni sopra, sulle prima 8 cat, ATTENZIONE: sostituire la prima m.a con 3 cat – vedere il SUGGERIMENTO PER IL LAVORO sopra, diagramma A.2 sulle 12-12-12-12-24-24 cat successive, diagramma A.3 sulle 5 cat successive, 1 m.a in ognuna delle 4-6-9-13-6-11 cat successive, diagramma A.1, diagramma A.2, diagramma A.3, 1 m.a in ognuna delle 4-6-9-13-6-11 cat successive, diagramma A.1, diagramma A.2 sulle 12-12-12-12-24-24 cat successive e diagramma A.3. Ripetere poi il diagramma A.z in verticale fino alla fine del lavoro. ATTENZIONE: Nel corso della prima riga del diagramma A.z (= sul rovescio del lavoro) lavorare come segue: diagramma A.3, ripetere il diagramma A.2 1-1-1-1-2-2 volte in larghezza, diagramma A.1, 3 cat (sostituiscono 1 m.a), 1 m.a in ognuna delle 2-4-7-11-4-9 m.a successive, 3 cat (sostituiscono 1 m.a), 1 m.b nella m successiva, diagramma A.3, diagramma A.2, diagramma A.1, 3 cat (sostituiscono 1 m.a), 1 m.a in ognuna delle 2-4-7-11-4-9 m.a successive, 3 cat (sostituiscono 1 m.a), 1 m.b nella m successiva, diagramma A.3, ripetere il diagramma A.2 1-1-1-1-2-2 volte in larghezza e diagramma A.1. RICORDARSI LA TENSIONE DEL LAVORO! Quando il lavoro misura ca.45-46-47-48-49-50 cm, assicurarsi di finire con una riga 2 del diagramma A.z - tagliare il filo. Proseguire con le maniche come segue: Avviare 29 cat morbide, e iniziando sul rovescio del lavoro, proseguire seguendo i diagrammi A.3, A.2 e A.1 e lavorando m.a sul dietro come prima; finire avviando 31 cat morbide, girare il lavoro. Lavorare ora,sul diritto del lavoro, la prima riga dei diagrammi A.1-A.3 sulle cat, ALLO STESSO TEMPO, proseguire seguendo il motivo sulle m del dietro come prima (quindi lavorare la riga 4 del diagramma A.z su queste m) come segue: Lavorare 1 m.a in ognuna delle prime 6 cat, diagramma A.1 sulle 8 cat successive, ripetere il diagramma A.2 2 volte in larghezza (quindi lavorare l’ultima ripetizione del diagramma A.2 sulle ultime 5 cat e finire sopra le m del diagramma A.1), ripetere il diagramma A.2 1-1-1-1-2-2 volta in larghezza come prima, diagramma A.3, 1 m.a in ognuna delle 4-6-9-13-6-11 m.a successive, diagrammi A.1, A.2, A.3, 1 m.a in ognuna delle 4-6-9-13-6-11 m.a successive, diagramma A.1, ripetere il diagramma A.2 1-1-1-1-2-2 volte in larghezza, lavorare il diagramma A.2 2 volte in larghezza (quindi lavorare la prima ripetizione del diagramma A.2 sulle m del diagramma A.3 e sulle 6 cat successive), diagramma A.3 sulle 5 cat successive e 1 m.a in ognuna delle ultime 6 cat. Proseguire in questo modo finché il lavoro non misura ca.62-64-66-68-70-72 cm – assicurarsi di finire dopo una riga sul rovescio del lavoro. Finire ora ogni spalla /manica separatamente come segue: SPALLA/MANICA DESTRA: Lavorare 6 m.a, diagramma A.1 1 volta, ripetere il diagramma A.2 3-3-3-3-4-4 volte, diagramma A.3, 1 m.a in ognuna delle 4-6-9-13-6-11 m.a successive. Girare e lavorare il motivo come prima. Proseguire in questo modo finché il lavoro non misura 64-66-68-70-72-74 cm in tutto; assicurarsi di aver completato una intera ripetizione del diagramma A.z. Tagliare il filo. SPALLA/MANICA SINISTRA: Lavorare la spalla/manica sinistra in modo uguale alla spalla/manica destra ma a specchio, lavorando il diagramma A.1 al posto del diagramma A.3 all’inizio della riga. DAVANTI DESTRO: Si lavora avanti e indietro. Con l’uncinetto n° 5 ed il filato Merino Extra Fine, avviare 63-65-70-74-81-86 cat (comprese 3 cat per girare il lavoro). Lavorare 1 m.a nella 4a cat dall’uncinetto, 1 m.a in ognuna delle 5-5-7-7-9-9 cat successive (= bordo davanti), diagramma A.1 sulle 8 cat successive, diagramma A.2 sulle 12 cat successive, diagramma A.3 sulle 5 cat successive, 1 m.a in ognuna delle 4-6-9-13-6-11 cat successive, diagramma A.1 sulle 8 cat successive, diagramma A.2 sulle 12-12-12-12-24-24 cat successive, diagramma A.3 sulle ultime 5 cat. Ripetere poi il diagramma A.z in verticale fino alla fine del lavoro. ATTENZIONE: Nel corso della prima riga del diagramma A.z (= sul rovescio del lavoro) lavorare come segue: diagramma A.3, ripetere il diagramma A.2 1-1-1-1-2-2 volte in larghezza, diagramma A.1, 3 cat (sostituiscono 1 m.a), 1 m.a in ognuna delle 2-4-7-11-4-9 m.a successive, 3 cat (sostituiscono 1 m.a), diagrammi A.3, A.2, A.1, 3 cat (sostituiscono 1 m.a), 1 m.b nella m successiva, 1 m.a in ognuna delle 5-5-7-7-9-9 m.a successive. Quando il lavoro misura ca.45-46-47-48-49-50 cm, assicurarsi di finire con una riga 2 del diagramma A.z, tagliare il filo. Avviare ora 29 cat morbide per la manica e proseguire come indicato per il dietro. Quando il lavoro misura 64-66-68-70-72-74 cm, assicurarsi di aver completato una intera ripetizione del diagramma A.z (quindi l’ultima riga è lavorata sul diritto del lavoro) - tagliare il filo. Proseguire con il collo a scialle. COLLO A SCIALLE: Lavorare il collo a scialle avanti e indietro, iniziando sul diritto del lavoro, come segue: Lavorare 1 m.a in ognuna delle prime 6-6-8-8-10-10 m.a, 1 m.a nella prima m.a del diagramma A.1, * 3 m.a nell’arco di cat successivo *, ripetere da *-* altre 2 volte, 1 m.a nella m.a successiva, * 3 m.a nell’arco di cat successivo *, ripetere da *-* altre 2 volte, 1 m.a nell’ultima m.a del diagramma A.3, 0-0-0-1-1-1 m.a nella m.a successiva = 27-27-29-30-32-32 m.a. Proseguire ora a righe accorciate sulle m del bordo davanti come segue: RIGA 1 (= rovescio del lavoro): 5 m.b, 5 m.m.a, 17-17-19-20-22-22 m.a RIGA 2 (= diritto del lavoro): Lavorare 1 m.a in ognuna delle 27-27-29-30-32-32 m. Ripetere queste 2 righe finché il lavoro non misura ca.10 cm sul lato più stretto – assicurarsi di finire con una riga 2 (diritto del lavoro). Tagliare il filo. DAVANTI SINISTRO: Lavorare come il davanti destro ma a specchio. Lavorare seguendo il diagramma A.3 al posto del diagramma A.1 all’inizio della riga. Quando il lavoro misura 45-46-47-48-49-50 cm, assicurarsi di finire con una riga 2 del diagramma A.z, lavorare come prima sul davanti sul rovescio del lavoro; avviare poi 31 cat morbide per la manica. Quando il lavoro misura 64-66-68-70-72-74 cm, assicurarsi di aver completato una intera ripetizione del diagramma A.z (quindi l’ultima riga è stata lavorata sul diritto del lavoro), lavorare il collo a scialle. ATTENZIONE: Non è necessario tagliare il filo. CONFEZIONE: Mettere i davanti sopra il dietro e unire le spalle come segue: 1 m.b puntando l’uncinetto attraverso entrambi gli strati, * 3 cat, 1 m.b nell’arco di cat successivo *, ripetere da *-* lungo tutta la spalla/maniche, finire con 1 m.b. Unire i lati come segue: 1 m.b, * 3 cat, 1 m.b nell’arco di cat della riga successiva *, ripetere da *-* lungo tutto il lato e finire con 1 m.b. Unire il sotto delle maniche come segue: * 1 m.b nell’arco di cat successivo, 3 cat *, ripetere da *-* e finire con 1 m.b. |
||||||||||||||||||||||
Spiegazioni del diagramma |
||||||||||||||||||||||
|
||||||||||||||||||||||
 |
||||||||||||||||||||||
 |
||||||||||||||||||||||
Avete terminato questo modello?Allora taggate le vostre foto con #dropspattern #shiningstarcardigan o inviatele alla #dropsfan gallery. Avete bisogno di aiuto con questo modello?Troverete 8 video tutorial, una sezione per i commenti/domande e molto altro guardando il modello su www.garnstudio.com © 1982-2026 DROPS Design A/S. Ci riserviamo tutti i diritti. Questo documento, compreso tutte le sue sotto-sezioni, è protetto dalle leggi sul copyright. Potete leggere quello che potete fare con i nostri modelli alla fine di ogni modello sul nostro sito. |
||||||||||||||||||||||


Con oltre 40 anni di esperienza nel design di modelli di maglia e uncinetto, DROPS Design offre la più estesa collezione di modelli gratuiti su internet - tradotti in 17 lingue. Ad oggi vi possiamo fornire 325 cataloghi e 12298 modelli - 9569 dei quali sono tradotti in Italiano.
Ci stiamo impegnando molto per darvi il meglio che vi possiamo offrire in termini di maglia e uncinetto, ispirazioni e consigli così come filati di grande qualità ad un prezzo incredibile! Volete utilizzare i nostri modelli per qualcosa d'altro oltre al vostro uso personale? Potete leggere tutto ciò che è consentito nel testo sul Copyright in basso su tutte le pagine dei nostri modelli. Buon lavoro!
Lasciare un commento sul modello DROPS 157-18
Noi saremmo felici di ricevere i tuoi commenti e opinioni su questo modello!
Se vuoi fare una domanda, fai per favore attenzione a selezionare la categoria corretta nella casella qui sotto per velocizzare il processo di risposta. I campi richiesti sono indicati da *.