
Categorie popolari
State cercando un filato?


Commenti / Domande (36)
![]() Lynn Hanrahan ha scritto:
Lynn Hanrahan ha scritto:
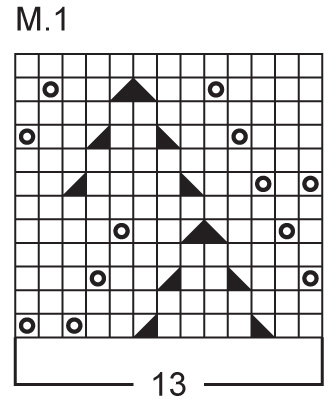
Dear Judy, Lynn Hanrahan here again . I just started the sleeve and got the rib pattern completed. I am now at the part of the pattern where i changed to larger needles. So now im susposed to continue as follows: 2 sts stockette st, p1 over 52 sts, stockinette st. When the piece measures 12cm inc 1 at each side a total of 18 times alternately every 4th and 5th row = 92 sts.
10.12.2022 - 16:28DROPS Design ha risposto:
Dear Lynn, work 2 sts in stockinette stitch, repeat the pattern M.1 over 52 stitches and work the last 2 sts in stockinette stitch. Continue this way. When the piece measures 12 cm, start increasing 1 stitch at each side 18 times every 4th and 5th row alternately. That is, increase 1 st at the beginning and at the end of the row and repeat this increase every 4th and 5th row alternately. You need to work these increases 18 times (so you will have increased 36 sts after finishing all increases). 56 initial sts + 2 sts* 18 times = 92 sts. Happy knitting!
11.12.2022 - 21:16
![]() Lynn Hanrahan ha scritto:
Lynn Hanrahan ha scritto:
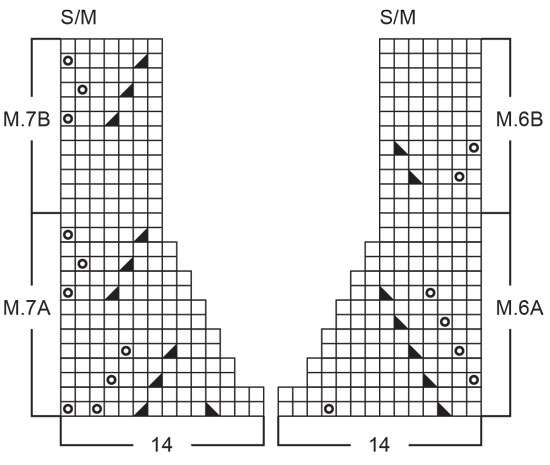
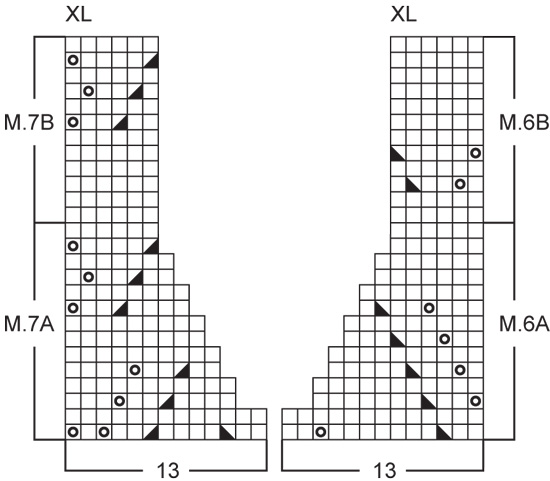
I am at the part of "when the piece measures approx 43 cm etc." How do i complete this part ? I am doing size XL
05.12.2022 - 14:56DROPS Design ha risposto:
Dear Mrs Hanrahan, make sure you have finished a whole M.1 in height (work more or less cm if needed), then work: 1 st in stocking st, 26 sts in M.1, M.6A (13 sts in XL), bind off 13 sts for the neck, M.7A (13 sts in XL), work 26 sts of M.1 and 1 st in stocking stitch. Work now each shoulder separately, slip the stitches before the cast of sts (seen from RS) on a thread/st holder and work the first shoulder casting off for neck as shown in the diagram M.7/M.6. Happy knitting!
06.12.2022 - 10:35
![]() Lynn Hanrahan ha scritto:
Lynn Hanrahan ha scritto:
Can you explain to me what you do after the first row.The pattern is wisteria weaving
30.10.2022 - 20:50DROPS Design ha risposto:
Hi Lynn, You work 6 rows of rib (K2, P4), with 1 edge stitch in garter stitch (knitted from both the right and wrong sides). After these 6 rows you change to needle size 4.5 mm and work M.1. Happy knitting!
31.10.2022 - 06:48
![]() Annette Kierkegaard Priess ha scritto:
Annette Kierkegaard Priess ha scritto:
Jeg er ved at strikke første ærme i str l/xl, og er nu færdig med at lukke af til ærmekuppel 4 x 1, 2 x 5 og 1x1, så står der at jeg videre skal lukke 2 masker af til arb måler 55 cm, er det stadig hver anden pind flere gange? Hvor mange masker ender man med, når ærmet er helt færdigt?
09.05.2022 - 15:33DROPS Design ha risposto:
Hej Annette, ja det er på hver 2.pind til du når de 55 cm. Det gør du for at ærmekuplen skal blive afrundet. Antal masker du har tilbage er afhængig af hvor mange cm du har tilbage :)
11.05.2022 - 07:50
![]() Giorgia ha scritto:
Giorgia ha scritto:
Un'ulteriore domanda da principiante: per il modellamento del collo(taglia S/M) devo intrecciare le maglie? Sempre sul ferro rovescio per M6A, e invece per M7A sempre ad inizio ferro, quindi sul diritto del lavoro?
18.02.2022 - 09:50DROPS Design ha risposto:
Buonasera Giorgia, deve seguire i motivo M6A e M7A per modellare il collo. Buon lavoro!
22.02.2022 - 22:43
![]() Angela ha scritto:
Angela ha scritto:
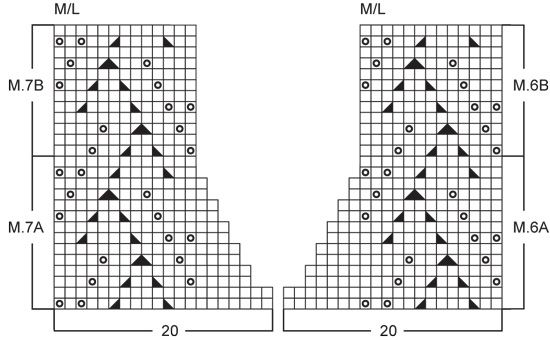
If I increase 2 stitches evenly across the first row of the pattern, then surely the subsequent pattern rows will not sit correctly above this evenly increased first row? I’m knitting the M/L size and the pattern will repeat 8 times with 2 stitches left over. Are these extra 2 stitches not meant to be edge stitches? Or should I knit an increase row and start the pattern rows after this, then I can naturally knit the extra stitches one at each end without compromising the pattern repeats?
17.02.2022 - 15:17DROPS Design ha risposto:
Dear Angela, in the 2nd size you will work M.1 as follows: 1 edge stitch, repeat a total of 8 times the 13 stitches in the diagram M.1 and end with 1 edge stitch 1+ 8x13 + 1 =106 sts. Happy knitting!
17.02.2022 - 16:16
![]() Giorgia ha scritto:
Giorgia ha scritto:
Arrivata a 34 cm e finito interamente il Motivo1, lavoro 14 m. a m. rasata ad ogni lato del lavoro. Il successivo ferro lo lavoro tutto a rovescio. È dal 3° ferro che iniziò ad intrecciare ad ogni lato per lo scalfo? Grazie per la risposta
17.02.2022 - 12:30DROPS Design ha risposto:
Buonasera Giorgia, può procedere in questo modo. Buon lavoro!
22.02.2022 - 22:46
![]() Giorgia ha scritto:
Giorgia ha scritto:
C'è un errore nella spiegazione delle maniche: avviare 56 m. (di cui 1 m. di vivagno a legaccio ad ogni lato). Dopo aver lavorato 10 cm a coste scrivete di passare ai ferri + grandi e lavorare come segue: "2 m. a m. rasata, il motivo 1 sulle 52 m. successive , 2 m. a m. rasata" ..per un totale quindi di 56 m. Ora le 2 maglie di vivagno da lavorare a legaccio che fine hanno fatto?
14.11.2021 - 15:35DROPS Design ha risposto:
Buonasera Giorgia, abbiamo inoltrato la sua richiesta al settore design. Se ci saranno delle correzioni le potrà trovare direttamente online. Buon lavoro!
28.12.2021 - 16:57
![]() Bine ha scritto:
Bine ha scritto:
Wie wird das Dreieck im Diagramm gestrickt?
08.07.2021 - 12:57DROPS Design ha risposto:
Liebe Bine, das Dreieck = das 4. Symbol (= 1 M re abheben, 1 re, die abgehobene M über die gestrickte ziehen) + das 3. Symbol (= 2 re zusammen), dh es sind 2 Abnahmen nebeneindander. Viel Spaß beim stricken!
08.07.2021 - 13:42
![]() Alessia ha scritto:
Alessia ha scritto:
Buonasera, sto lavorando una taglia S/M. Potreste aiutarmi a capire meglio questo passaggio? "intrecciare per l’arrotondamento della manica a ogni lato a f. alterni: 4 m. 1 volta, 2 m. 4 volte, 1 m. 2 volte, poi intrecciare 2 m. a ogni lato... e poi intrecciare 4 m. 1 volta." "A ogni lato a ferri alterni" significa che devo diminuire all'inizio di ogni ferro, cioè lato dx sempre a dritto e lato sx sempre a rovescio, fino alla fine delle diminuzioni? Grazie
16.02.2021 - 18:56DROPS Design ha risposto:
Buonasera Alessia, si, esatto, è corretta la sua interpretazione. Buon lavoro!
16.02.2021 - 22:33
|
|||||||||||||
Wisteria Weaving |
|||||||||||||
|
|
|||||||||||||
Maglione DROPS in "Muskat" Taglie: S/M - M/L - XL
DROPS 73-5 |
|||||||||||||
|
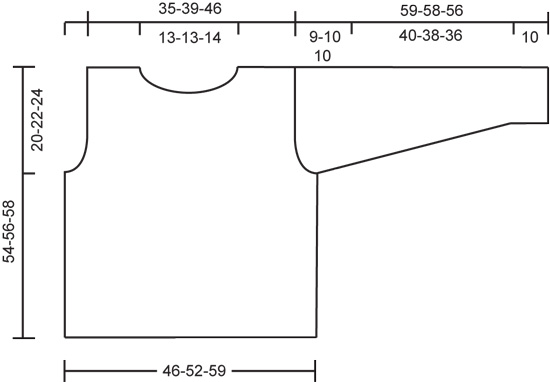
Campione: 20 m. x 26 f. = 10 x 10 cm con i f. più grandi (4,5) con il motivo. 1 ripetizione del motivo 1 = 7 cm in larghezza Coste: * 2 m. dir., 4 m. rov. *, ripetere * - *. M. legaccio, lavorando avanti e indietro sui f.: lavorare tutti i f. a dir. Motivo: vedere gli schemi. Il motivo è visto dal diritto del lavoro. Nota: i motivi 6 e 7 (modellamento del collo) sono diversi per ogni taglia – usare lo schema appropriato per la vostra taglia. ------------------------------------------------------------------ Davanti: avviare 92-104-116 m. con i f. più piccoli. Lavorare 6 f. a coste, ma tenere 1 m. di vivagno a ogni lato lavorata a m. legaccio per tutto il lavoro. Passare ai f. più grandi e al motivo 1, distribuendo 1-2-3 aumenti in modo uniforme sul primo f. = 93-106-119 m. (le m. di vivagno a ogni lato non dovrebbero essere lavorate con il motivo 1). Quando il lavoro misura circa 34 cm – aggiustarlo per finire dopo un’intera ripetizione del motivo 1 – lavorare il f. successivo come segue (f. dal diritto del lavoro): 14 m. a m. rasata, motivo 1 su 65-78-91 m., 14 m. a m. rasata. Continuare il motivo 1 con m. rasata a ogni lato e intrecciare per lo scalfo a ogni lato a f. alterni: 4 m. 1 volta, 2 m. 2 volte e 1 m. 3-5-5 volte = 71-80-93 m. Continuare il motivo 1 con 3-1-1 m. a m. rasata a ogni lato. Quando il lavoro misura circa 43 cm (aggiustarlo per finire dopo un’intera ripetizione del motivo 1) lavorare il f. successivo come segue: 3-1-1 m. a m. rasata, 13-13-26 m. con il motivo 1, motivo 6A (usare lo schema per la vostra taglia) per 14-20-13 m., intrecciare 11-12-13 m. per il collo, motivo 7A (usare lo schema per la vostra taglia) per 14-20-13 m., 13-13-26 m. del motivo 1 e 3-1-1 m. a m. rasata. Modellare il collo seguendo i motivi 6A e 7A. Alla fine del modellamento del collo rimangono 23-27-33 m. su ogni spalla. Continuare con i motivi 6B e 7B su 7-13-6 m. fino alla fine del lavoro, lavorare le m. rimaste come prima. Intrecciare quando il lavoro misura 54-56-58 cm. Dietro: Avviare e lavorare come per il davanti. Intrecciare per lo scalfo come sul davanti e continuare fino a quando il lavoro misura 52-54-56 cm. Ora intrecciare le 23-24-25 m. centrali per il collo. Sul f. successivo, diminuire 1 m. a ogni bordo del collo = 23-27-33 m. rimaste su ogni spalla. Intrecciare quando il lavoro misura 54-56-58 cm. Maniche: Avviare 56-56-56 m. con i f. più piccoli e lavorare a coste per 10 cm, tenendo 1 m. di vivagno a ogni lato a m. legaccio. Passare ai f. più grandi e continuare come segue: 2 m. a m. rasata, motivo 1 su 52 m., 2 m. a m. rasata. Quando il lavoro misura 12 cm aumentare 1 m. a ogni lato per un totale di 10-14-18 volte: Taglia S/M: ogni 10 f. Taglia M/L: in modo alternato ogni 6 e 7 f. Taglia XL: in modo alternato ogni 4 e 5 f. = 76-84-92 m. – lavorare le m. aumentate a m. rasata. Quando la manica misura 50-48-46 cm intrecciare per l’arrotondamento della manica a ogni lato a f. alterni (non fare nessun gettato nel motivo anche se le m. vengono lavorate insieme): 4 m. 1 volta, 2 m. 4-5-5 volte, 1 m. 2-2-1 volte, poi intrecciare 2 m. a ogni lato fino a quando il lavoro misura 58-57-55 cm e poi intrecciare 4 m. 1 volta. Intrecciare, la manica misura circa 59-58-56 cm. Confezione: cucire la spalla destra. Bordo del collo: riprendere circa 80-90 m. attorno al collo con i f. più piccoli. Lavorare 4 f. a m. legaccio, intrecciare. Cucire la spalla sinistra e su lungo il bordo del collo. Attaccare le maniche e cucire le maniche e i margini dei lati usando le m. di vivagno come margine di cucitura. Cintura: avviare 7 m. con i f. a doppia punta. Lavorare 1 f. a dir., * spostare le m. sul lato destro del f. senza girare il lavoro, tirare il filo forte sul dietro e lavorare 1 f. dallo stesso lato del f. precedente *. Ripetere * - *. Per un risultato migliore, tirare forte il filo sui f. precedentemente lavorati durante il lavoro. Intrecciare quando la cintura misura circa 120-150 cm. |
|||||||||||||
Spiegazioni del diagramma |
|||||||||||||
|
|||||||||||||
 |
|||||||||||||
 |
|||||||||||||
 |
|||||||||||||
 |
|||||||||||||
 |
|||||||||||||
Avete terminato questo modello?Allora taggate le vostre foto con #dropspattern o inviatele alla #dropsfan gallery. Avete bisogno di aiuto con questo modello?Troverete 19 video tutorial, una sezione per i commenti/domande e molto altro guardando il modello su www.garnstudio.com © 1982-2026 DROPS Design A/S. Ci riserviamo tutti i diritti. Questo documento, compreso tutte le sue sotto-sezioni, è protetto dalle leggi sul copyright. Potete leggere quello che potete fare con i nostri modelli alla fine di ogni modello sul nostro sito. |
|||||||||||||


Con oltre 40 anni di esperienza nel design di modelli di maglia e uncinetto, DROPS Design offre la più estesa collezione di modelli gratuiti su internet - tradotti in 17 lingue. Ad oggi vi possiamo fornire 324 cataloghi e 12290 modelli - 9561 dei quali sono tradotti in Italiano.
Ci stiamo impegnando molto per darvi il meglio che vi possiamo offrire in termini di maglia e uncinetto, ispirazioni e consigli così come filati di grande qualità ad un prezzo incredibile! Volete utilizzare i nostri modelli per qualcosa d'altro oltre al vostro uso personale? Potete leggere tutto ciò che è consentito nel testo sul Copyright in basso su tutte le pagine dei nostri modelli. Buon lavoro!
Lasciare un commento sul modello DROPS 73-5
Noi saremmo felici di ricevere i tuoi commenti e opinioni su questo modello!
Se vuoi fare una domanda, fai per favore attenzione a selezionare la categoria corretta nella casella qui sotto per velocizzare il processo di risposta. I campi richiesti sono indicati da *.