
Categorie popolari
State cercando un filato?


Commenti / Domande (123)
![]() Hettyh ha scritto:
Hettyh ha scritto:
Wordt de hals niet af gewerkt?
13.07.2014 - 09:14
![]() Mette Krogh-Larnkjær ha scritto:
Mette Krogh-Larnkjær ha scritto:
Hej igen. Tak for svaret, når jeg hækler som beskrevet både i svaret og i opskriften, så får jeg alt for mange masker, for så øges der med 2 masker i hver side hver gang. Jeg har lige pillet et helt ærme op, for jeg opdagede det først ved den sidste udtagning. Jeg må jo forsøge mig frem, men forstår stadig ikke helt hvordan man laver udtagning med en maske for opskriften siger jo egentlig 2 hvis man følger udtagningstippet.
20.06.2014 - 13:07DROPS Design ha risposto:
Det skal stemme med opskriften. Men skriv gerne en kommentar om hvordan du løste det, så kan vi eft skrive det tydeligere i opskriften.
05.09.2014 - 12:21
![]() Mette Krogh-Larnkjær ha scritto:
Mette Krogh-Larnkjær ha scritto:
Har en udfordring med udtagning. Hvordan går man det nemmest når man skal øge med 1 m i et mønster med 2 m hvoraf den ene er luftmaske?
18.06.2014 - 07:13DROPS Design ha risposto:
Hej Mette. Du skal tage ud ved at haekle 1 st + 1 lm i den den yderste st i hver side. Dvs, hvis du fölger diagrammet saa haekler du bare 1 lm + 1 st i den yderste m ekstra. Du skal ikke haekle 1 st + 1 lm (altsaa i den raekkefölge, for saa kan jeg forestille mig det bliver kompliceret). God fornöjelse.
19.06.2014 - 13:30
![]() Jackie ha scritto:
Jackie ha scritto:
Hi there! Thanks again for the clarification. I think I understand, but I just want to list out what I think the pattern is for the beginning of the back piece - hopefully you can clarify! After finishing A.1A, and continuing to read the pattern to complete A.1B, do I repeat only the stiches specified between the brackets (noting section B), and then go back to the bottom once I reach the top of the bracket that is labeled section A1? Thanks for all of your help!
31.05.2014 - 16:42DROPS Design ha risposto:
Dear Jackie, after A.1A (=ch3, 1 dc), repeat M.1B = *ch1, skip 1ch, 1 dc in next ch, ch1, skip 1ch, 1 dc in next ch, ch1, skip 1ch, 1 dc in next ch* until 2 sts remain on row, and finish with A.1C(=1ch, skip 1 ch, 1dc in next ch). then turn and start 2nd row starting from the left towards the right. Happy crocheting!
16.06.2014 - 10:05
![]() Jackie ha scritto:
Jackie ha scritto:
Hi there! I absolutely love this pattern but I am having trouble understanding how to read the diagram - do I read horizontally or vertically? I feel as though it may zig-zag, but this is the first time I have seen a pattern like this before. Your help is much appreciated! Thank you so much :)
28.05.2014 - 00:06DROPS Design ha risposto:
Dear Jackie, start reading diagram from the bottom corner on the right side towards the right (RS rows), on WS rows, read from the left towards the right - the 3 ch at beg of rows = 1st dc (= A.1A from RS, A.1C from WS), repeat A.1B on the middle sts. Happy crocheting!
28.05.2014 - 09:08
![]() Chiara ha scritto:
Chiara ha scritto:
Buongiorno vorrei capire se sto sbagliando qualcosa nella realizzazione di questo capo. Sto facendo il dietro. Nel passaggio dallo schema A1 allo schema A2 il lavoro passa kentamente ma inesorabilmente dopo 13 righe da 60 cm a 72 cm in larghezza, nonostante abbia mantenuto lo stesso numero di maglie come nella spiegazione. Ho provato anche a rifare lo schema A2 con un uncinetto più piccolo, il 3,5, ma nulla è cambiato. Che cosa sto sbagliando? Potete aiutarmi? Grazie
22.05.2014 - 08:15DROPS Design ha risposto:
Buongiorno Chiara. Per risolvere il suo problema può riprendere, a intervalli regolari, un numero inferiore di m nel passaggio tra lo schema A.1 e lo schema A.2. Buon lavoro!
22.05.2014 - 13:06
![]() Susanne ha scritto:
Susanne ha scritto:
LES ØKETIPS. Gjenta økningen på hver 7.-5.-4½.-3½.-3½.-3.cm 5-7-8-9-9-10 ganger til (totalt 6-8-9-10-10-11 økninger) = 57-61-65-69-71-75 st/lm Jeg har økt 4 ganger på hver side og har 61 masker der nå. Men skal jeg telle med lm også? Er det riktig å kun øke 4 ganger på hver side? eller er det å øke 8 ganger på hver side?? trenger svar så raskt som mulig : ) takk på forhånd
06.05.2014 - 11:01DROPS Design ha risposto:
Du har 45 m öger 8 gange i hver side = 16 m 45 + 16 = 61 m God fornöjelse!
07.05.2014 - 09:13
![]() Jane ha scritto:
Jane ha scritto:
My comfortable measurements underarm to underarm is 64cm making it 128cm in total. The 126cm is closest, but I would have to downsize making it slightly tighter. Would perhaps going for the next size up (138cm) be more of a sensible decision? Any advise would be happily received as I have no clue which way to go. Thank you in advance.
07.10.2013 - 23:32DROPS Design ha risposto:
Dear Jane, check if these 2 cm tighter can fit or not, so that you can rather decide to make smaller size or larger size. Do not hesitate to get help from your local store, they also can help you. Happy crocheting!
08.10.2013 - 09:50
![]() Jane ha scritto:
Jane ha scritto:
Would it be fair to say that a US size XXL is equivilent to a UK size 18?
06.10.2013 - 23:22DROPS Design ha risposto:
Dear Jane, you will see at the bottom of the pattern a measurement chart. Compare the measurements (in cm) to one of your similar garment to find the correct size. The measurements are taken flat, from side to side. Happy crocheting!
07.10.2013 - 09:51
![]() A.v.Rooij ha scritto:
A.v.Rooij ha scritto:
Heb dit patroon uitgeprobeerd en dan kom het volgende tegen, als je het onderste gedeelte klaar hebt krijg je bij het tweede gedeelte veel meer volume,hoe los je dit op(door steken te minderen?
24.05.2013 - 06:35DROPS Design ha risposto:
Het gedeelte A.1 zou dezelfde breedte krijgen als A.2. Er blijft hetzelfde aantal steken op de toer en zorg ervoor dat u bij het beginnen van A.2 ook 1 stk haakt in elke l l van A.1 (zie teltekening).
29.05.2013 - 16:18
|
|||||||
Donna#donnasweater |
|||||||
 |
 |
||||||
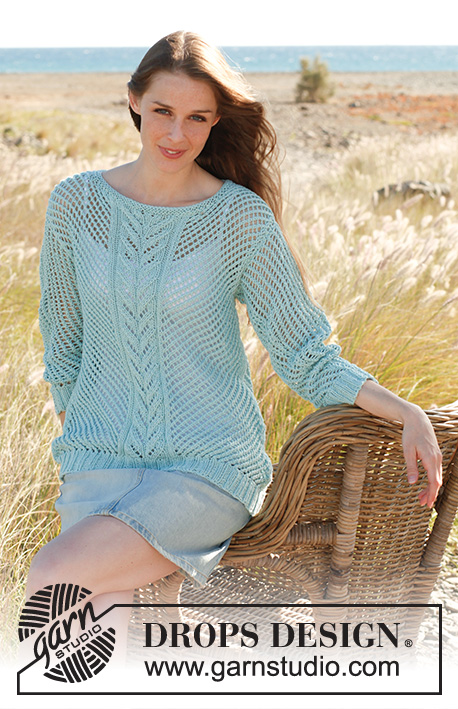
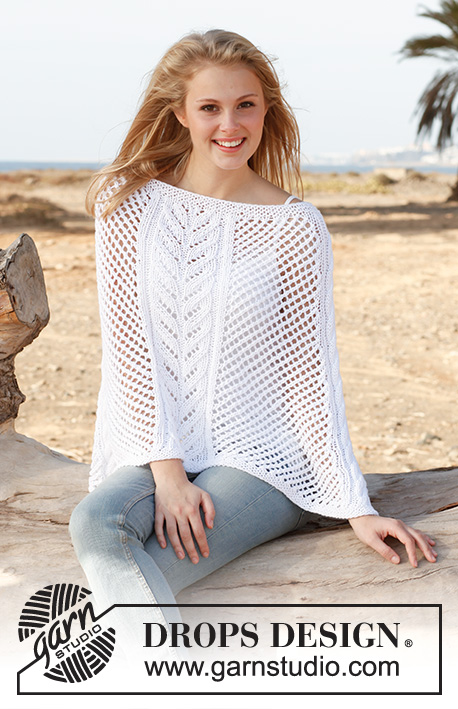
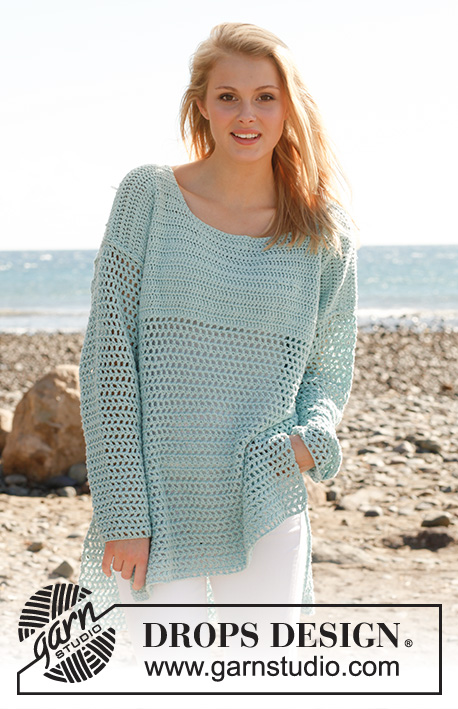
Maglia DROPS all’uncinetto, in "Cotton Light". Taglie: Dalla S alla XXXL.
DROPS 145-19 |
|||||||
|
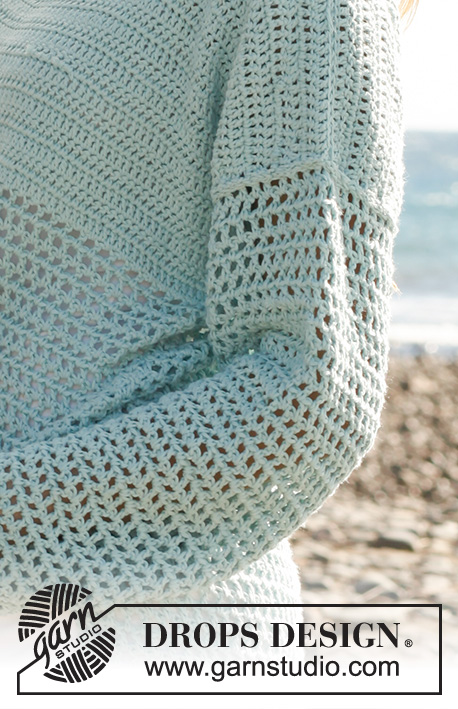
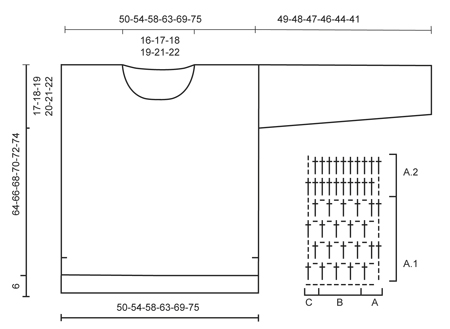
MOTIVO: Vedere i diagrammi A.1 e A.2 SUGGERIMENTO PER LE DIMINUZIONI: Girare il lavoro quando rimane 1 m.a = è stata diminuita 1 m.a. SUGGERIMENTO PER GLI AUMENTI: Aumentare lavorando 1 m.a + 1 cat aggiuntiva nella prima / ultima m.a da ciascun lato. Lavorare le m aumentate seguendo progressivamente il diagramma A.1. ---------------------------------------------------------- DIETRO: Si lavora avanti e indietro. Il dietro è 6 cm più lungo del davanti. Con l’uncinetto n° 4 ed il filato Cotton Light, avviare, senza stringere troppo il filo, 88-94-102-110-120-130 cat (è importante che le cat siano lente per evitare un bordo di avvio troppo stretto). Girare e lavorare 1 m.a nella 6a cat dall’uncinetto (è stato lavorato il diagramma A.1 A – vedere il diagramma sotto). Lavorare seguendo il diagramma A.1 B sulle 80-86-94-102-112-122 cat successive, e finire con il diagramma A.1 C sulle ultime 2 cat. Proseguire ora lavorando il diagramma A.1. Quando il lavoro misura 47-48-49-50-51-52 cm, lavorare come segue: diagramma A.2 A, ripetere il diagramma A.2 B finché non rimangono 2 m.a /cat, lavorare il diagramma A.2 C = 85-91-99-107-117-127 m.a. Proseguire seguendo il diagramma A.2 fino alla fine del lavoro. Quando il lavoro misura 53-54-55-56-57-58 cm, inserire 1 segno da ciascun lato (i segni indicano l’inizio degli scalfi). Quando il lavoro misura 68-70-72-74-76-78 cm, non lavorare più le 27-29-31-33-35-37 m.a centrali = per ogni spalla rimangono 29-31-34-37-41-45 m.a. Finire ora ogni spalla separatamente. Proseguire seguendo il diagramma A.2. Quando il lavoro misura 70-72-74-76-78-80 cm, tagliare e fermare il filo. DAVANTI: Avviare le m e lavorare come indicato per il dietro, finché il lavoro non misura 41-42-43-44-45-46 cm - ATTENZIONE: Il dietro deve risultare 6 cm più lungo del davanti – questo spiega le misure diverse. Proseguire ora come segue: diagramma A.2 A, ripetere il diagramma A.2 B finché non rimangono 2 m.a /cat, lavorare il diagramma A.2 C = 85-91-99-107-117-127 m.a. Proseguire seguendo il diagramma A.2 fino alla fine del lavoro. Quando il lavoro misura 47-48-49-50-51-52 cm, inserire 1 segno da ciascun lato (i segni indicano l’inizio degli scalfi). Quando il lavoro misura 56-58-60-62-64-66 cm, non lavorare più le 23-25-27-29-31-33 m.a centrali. Finire ora ogni spalla separatamente; ALLO STESSO TEMPO, diminuire, dalla parte del collo, 1 m.a ad ogni riga, 2 volte in tutto – vedere il SUGGERIMENTO PER LE DIMINUZIONI = per ogni spalla rimangono 29-31-34-37-41-45 m.a. Proseguire seguendo il diagramma A.2. Quando il lavoro misura 64-66-68-70-72-74 cm, tagliare e fermare il filo. MANICHE: Lavorare le maniche avanti e indietro. Con l’uncinetto n° 4 ed il filato Cotton Light avviare, senza stringere troppo il filo, 48-48-50-52-54-56 cat (è importante che le cat siano lente per evitare un bordo di avvio troppo stretto). Girare e lavorare 1 m.a nella 6a cat dall’uncinetto (è stato lavorato il diagramma A.1 A). Lavorare seguendo il diagramma A.1 B sulle 40-40-42-44-46-48 cat successive, e finire con il diagramma A.1 C sulle ultime 2 cat = 45-45-47-49-51-53 m.a/ cat. Proseguire ora seguendo il diagramma A.1. Quando il lavoro misura 8 cm, aumentare 1 m da ciascun lato - vedere il SUGGERIMENTO PER GLI AUMENTI! Ripetere questi aumenti ogni 7-5-4½-3½-3½-3 cm altre 5-7-8-9-9-10 volte (6-8-9-10-10-11 aumenti in tutto) = 57-61-65-69-71-75 m.a/cat. Quando il lavoro misura 49-48-47-46-44-41 cm (misure più corte per le taglie più grandi perché le spalle sono più larghe), tagliare e fermare il filo. CONFEZIONE: Cucire le spalle. Cucire le maniche – iniziare dalla spalla e scendere fino al segno sul davanti e sul dietro. Cucire i lati delle maniche e i lati della maglia; fermarsi quando rimangono 26 cm sul dietro e 20 cm sul davanti = spacchi laterali. |
|||||||
Spiegazioni del diagramma |
|||||||
|
|||||||
 |
|||||||
Avete terminato questo modello?Allora taggate le vostre foto con #dropspattern #donnasweater o inviatele alla #dropsfan gallery. Avete bisogno di aiuto con questo modello?Troverete 5 video tutorial, una sezione per i commenti/domande e molto altro guardando il modello su www.garnstudio.com © 1982-2026 DROPS Design A/S. Ci riserviamo tutti i diritti. Questo documento, compreso tutte le sue sotto-sezioni, è protetto dalle leggi sul copyright. Potete leggere quello che potete fare con i nostri modelli alla fine di ogni modello sul nostro sito. |
|||||||


Con oltre 40 anni di esperienza nel design di modelli di maglia e uncinetto, DROPS Design offre la più estesa collezione di modelli gratuiti su internet - tradotti in 17 lingue. Ad oggi vi possiamo fornire 324 cataloghi e 12290 modelli - 9561 dei quali sono tradotti in Italiano.
Ci stiamo impegnando molto per darvi il meglio che vi possiamo offrire in termini di maglia e uncinetto, ispirazioni e consigli così come filati di grande qualità ad un prezzo incredibile! Volete utilizzare i nostri modelli per qualcosa d'altro oltre al vostro uso personale? Potete leggere tutto ciò che è consentito nel testo sul Copyright in basso su tutte le pagine dei nostri modelli. Buon lavoro!
Lasciare un commento sul modello DROPS 145-19
Noi saremmo felici di ricevere i tuoi commenti e opinioni su questo modello!
Se vuoi fare una domanda, fai per favore attenzione a selezionare la categoria corretta nella casella qui sotto per velocizzare il processo di risposta. I campi richiesti sono indicati da *.