
Categorie popolari
State cercando un filato?


Commenti / Domande (123)
Lisa ha scritto:
Hi, I am working on the sleeve for size S, and after the third increase I already have the total 57 tr/ch stitches , because increasing by 1tr+1ch at each end of the row means there is an increase of 4 stitches for the row, but the pattern only counts 2 to calculate the total. Is that correct, and if so should I end up with a total of 69 stitches? Or am I doing something wrong? thanks
30.04.2017 - 16:33DROPS Design ha risposto:
Dear Lisa, number of sts after increase will be check, thank you. Happy crocheting!
02.05.2017 - 10:35
![]() Sylvia ha scritto:
Sylvia ha scritto:
What does, A.1B stands for. First time doing symbols. Thanks
02.04.2017 - 07:12DROPS Design ha risposto:
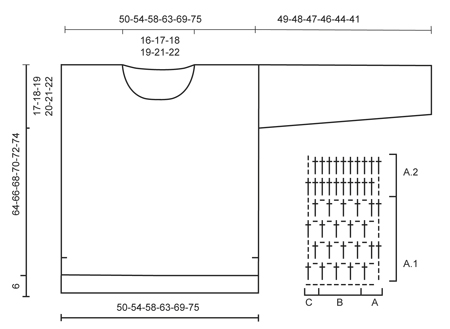
Dear Sylvia, diagram A.1 is divided into 3 parts: A.1A = beg of row from RS (= row1: 3 ch, 1 ch, skip 1 st, 1 dc in next st) and end of row from WS, then A.1B to repeat until last 3 sts on row 1 (= *1 ch, skip 1 st, 1 dc in next ch*, repeat from *-* a total of 3 times for 1 repeat of A.1B, repeat these until 2 sts remain on row, and A.1C = end of row from RS, beg of row from WS (row 1 = 1 ch, 1 dc in last st). Your DROPS store will provide you any further invidivual assistance required for reading charts. Happy crocheting!
03.04.2017 - 10:39
![]() Tommie ha scritto:
Tommie ha scritto:
Can you send me the pattern for this. I would be happy to pay for a pdf or written out.
03.11.2016 - 02:33DROPS Design ha risposto:
Dear Tommie, you will find the pattern for free scrolling down the page. Happy crocheting!
03.11.2016 - 09:45Eva ha scritto:
Hello!!!Can you tell me the size of the jumper on picture?Thank you.
10.08.2016 - 00:13DROPS Design ha risposto:
Dear Eva, our models are usually wearing size M - read more about sizing here. Happy crocheting!
10.08.2016 - 08:45
![]() Wendy ha scritto:
Wendy ha scritto:
I am on the back section starting A2 which seems to be a row of treble's. I've done that and I have 5 extra trebles which I don't know how to get rid of but also, because it has gone from a mesh pattern to all treble's, it is very curly. Am I reading the pattern correctly, is it a row of all treble's?
04.08.2016 - 23:51DROPS Design ha risposto:
Dear Wendy, A.2 is all trebles - remember to check and keep gauge (17 tr = 10 cm) when working A.1, and do not work too tight the rows with ch and tr. Happy crocheting!
05.08.2016 - 09:45
![]() Wendy ha scritto:
Wendy ha scritto:
I really want to make this and looking at it, it appears easy, however, I don't understand the pattern at all. On the back piece, after the foundation row, I've done a treble in the 6th chain from the hook as instructed. It tells me that is A.1A, but the diagram shows it as two chains and a treble. Is it possible to get the written pattern instructions as opposed to looking at the diagram? If not, can you tell me what to do after the first treble in row 2.
31.07.2016 - 01:57DROPS Design ha risposto:
Dear Wendy, when you work first row you skip first 5 ch (working in the 6th ch from hook), these first 5 ch are : 1st tr (= 3 ch), 1 ch before next tr + 1 ch skipped before crocheting next tr). At the beg of row 2 work A.1C: 3ch, 1 tr around next ch, then repeat A.1B and finish with A.1C. Happy crocheting!
01.08.2016 - 09:35
![]() Sarah ha scritto:
Sarah ha scritto:
I need further clarification on the sleeve increases, inadvertently I am acquiring an extra two stitches when increasing the sleeves leading to too many stitches. I have looked at the pattern to see how I can prevent the extra stitches from occurring but having great difficulty in figuring out how, can you advise further? The first increase stitch is placed at A.1 A and at the end however the extra stitches are occurring in every third row following this, hope this makes sense, Thanks Sarah
11.03.2016 - 23:30DROPS Design ha risposto:
Dear Sarah, you inc for sleeve 1 st in each side, ie you will have a total of 2 tr more on every inc row - increase should be done by working 1 tr + 1 ch more in outermost tr in each side. On next row, work in A.1 as before, you will have same as before, but just 2 more tr per inc row. Happy crocheting!
12.03.2016 - 18:03Trishy ha scritto:
I'm new to the Crotchet world. And was wondering, if I try to make a large size in this jumper, how do I know how many stitches do I need for the back, & front etc?
31.10.2015 - 04:23DROPS Design ha risposto:
Dear Trishy, you will find at the bottom of the pattern a measurement chart, compare the measurements (in cm) to a similar garment you have and like the shape and find out the matching size - you can then follow this size in the pattern. Read more about sizing here. Happy crocheting!
31.10.2015 - 18:09
![]() Federica Piucci ha scritto:
Federica Piucci ha scritto:
Buon pomeriggio, io intendo confezionare questa maglia in con due colori diversi, uno per la parte superiore e uno per quella inferiore. Indicativamente quanti grammi potrebbero servire per le due parti prese separatamente?
12.10.2015 - 15:06DROPS Design ha risposto:
Buongiorno Federica. Non riusciamo ad essere precisi sul quantitativo di filato necessario per lavorare con due colori. Lavorare un piccolo campione con i due diversi motivi potrebbe dare una prima indicazione. Il suo rivenditore di fiducia è a sua disposizione per consigliarla. Se possibile e non troppo oneroso, si informi anche sulla possibilità di restituire eventuali gomitoli di filato integri e non utilizzati. Buon lavoro!
16.10.2015 - 23:39Dalia ha scritto:
When piece measures 53-54-55-56-57-58 cm / 21''-21¼''-21 5/8''-22''-22½''-22¾'', insert 1 marker in each side (marks where armhole beg). where exactly do I insert my markers?
14.07.2015 - 10:29DROPS Design ha risposto:
Dear Dalia, see answer below. Happy crocheting!
27.07.2015 - 11:29
|
|||||||
Donna#donnasweater |
|||||||
 |
 |
||||||
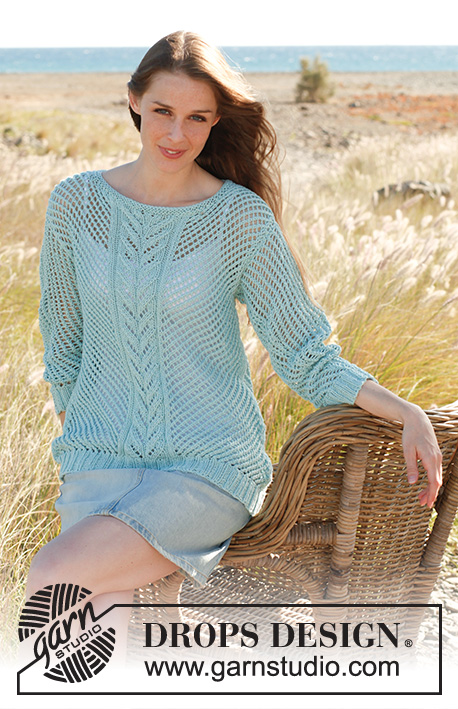
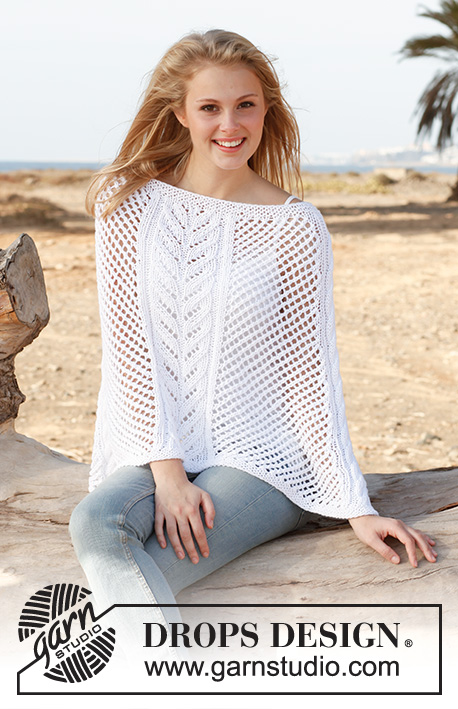
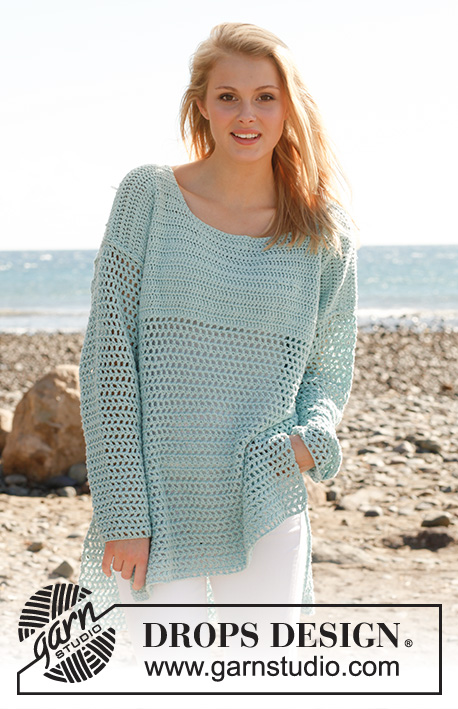
Maglia DROPS all’uncinetto, in "Cotton Light". Taglie: Dalla S alla XXXL.
DROPS 145-19 |
|||||||
|
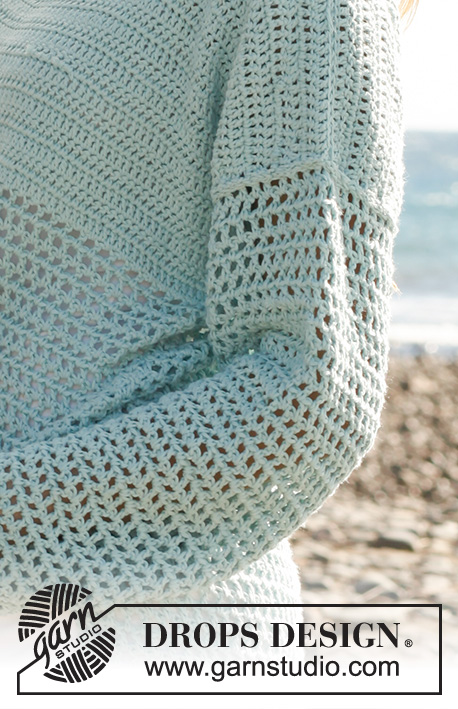
MOTIVO: Vedere i diagrammi A.1 e A.2 SUGGERIMENTO PER LE DIMINUZIONI: Girare il lavoro quando rimane 1 m.a = è stata diminuita 1 m.a. SUGGERIMENTO PER GLI AUMENTI: Aumentare lavorando 1 m.a + 1 cat aggiuntiva nella prima / ultima m.a da ciascun lato. Lavorare le m aumentate seguendo progressivamente il diagramma A.1. ---------------------------------------------------------- DIETRO: Si lavora avanti e indietro. Il dietro è 6 cm più lungo del davanti. Con l’uncinetto n° 4 ed il filato Cotton Light, avviare, senza stringere troppo il filo, 88-94-102-110-120-130 cat (è importante che le cat siano lente per evitare un bordo di avvio troppo stretto). Girare e lavorare 1 m.a nella 6a cat dall’uncinetto (è stato lavorato il diagramma A.1 A – vedere il diagramma sotto). Lavorare seguendo il diagramma A.1 B sulle 80-86-94-102-112-122 cat successive, e finire con il diagramma A.1 C sulle ultime 2 cat. Proseguire ora lavorando il diagramma A.1. Quando il lavoro misura 47-48-49-50-51-52 cm, lavorare come segue: diagramma A.2 A, ripetere il diagramma A.2 B finché non rimangono 2 m.a /cat, lavorare il diagramma A.2 C = 85-91-99-107-117-127 m.a. Proseguire seguendo il diagramma A.2 fino alla fine del lavoro. Quando il lavoro misura 53-54-55-56-57-58 cm, inserire 1 segno da ciascun lato (i segni indicano l’inizio degli scalfi). Quando il lavoro misura 68-70-72-74-76-78 cm, non lavorare più le 27-29-31-33-35-37 m.a centrali = per ogni spalla rimangono 29-31-34-37-41-45 m.a. Finire ora ogni spalla separatamente. Proseguire seguendo il diagramma A.2. Quando il lavoro misura 70-72-74-76-78-80 cm, tagliare e fermare il filo. DAVANTI: Avviare le m e lavorare come indicato per il dietro, finché il lavoro non misura 41-42-43-44-45-46 cm - ATTENZIONE: Il dietro deve risultare 6 cm più lungo del davanti – questo spiega le misure diverse. Proseguire ora come segue: diagramma A.2 A, ripetere il diagramma A.2 B finché non rimangono 2 m.a /cat, lavorare il diagramma A.2 C = 85-91-99-107-117-127 m.a. Proseguire seguendo il diagramma A.2 fino alla fine del lavoro. Quando il lavoro misura 47-48-49-50-51-52 cm, inserire 1 segno da ciascun lato (i segni indicano l’inizio degli scalfi). Quando il lavoro misura 56-58-60-62-64-66 cm, non lavorare più le 23-25-27-29-31-33 m.a centrali. Finire ora ogni spalla separatamente; ALLO STESSO TEMPO, diminuire, dalla parte del collo, 1 m.a ad ogni riga, 2 volte in tutto – vedere il SUGGERIMENTO PER LE DIMINUZIONI = per ogni spalla rimangono 29-31-34-37-41-45 m.a. Proseguire seguendo il diagramma A.2. Quando il lavoro misura 64-66-68-70-72-74 cm, tagliare e fermare il filo. MANICHE: Lavorare le maniche avanti e indietro. Con l’uncinetto n° 4 ed il filato Cotton Light avviare, senza stringere troppo il filo, 48-48-50-52-54-56 cat (è importante che le cat siano lente per evitare un bordo di avvio troppo stretto). Girare e lavorare 1 m.a nella 6a cat dall’uncinetto (è stato lavorato il diagramma A.1 A). Lavorare seguendo il diagramma A.1 B sulle 40-40-42-44-46-48 cat successive, e finire con il diagramma A.1 C sulle ultime 2 cat = 45-45-47-49-51-53 m.a/ cat. Proseguire ora seguendo il diagramma A.1. Quando il lavoro misura 8 cm, aumentare 1 m da ciascun lato - vedere il SUGGERIMENTO PER GLI AUMENTI! Ripetere questi aumenti ogni 7-5-4½-3½-3½-3 cm altre 5-7-8-9-9-10 volte (6-8-9-10-10-11 aumenti in tutto) = 57-61-65-69-71-75 m.a/cat. Quando il lavoro misura 49-48-47-46-44-41 cm (misure più corte per le taglie più grandi perché le spalle sono più larghe), tagliare e fermare il filo. CONFEZIONE: Cucire le spalle. Cucire le maniche – iniziare dalla spalla e scendere fino al segno sul davanti e sul dietro. Cucire i lati delle maniche e i lati della maglia; fermarsi quando rimangono 26 cm sul dietro e 20 cm sul davanti = spacchi laterali. |
|||||||
Spiegazioni del diagramma |
|||||||
|
|||||||
 |
|||||||
Avete terminato questo modello?Allora taggate le vostre foto con #dropspattern #donnasweater o inviatele alla #dropsfan gallery. Avete bisogno di aiuto con questo modello?Troverete 5 video tutorial, una sezione per i commenti/domande e molto altro guardando il modello su www.garnstudio.com © 1982-2026 DROPS Design A/S. Ci riserviamo tutti i diritti. Questo documento, compreso tutte le sue sotto-sezioni, è protetto dalle leggi sul copyright. Potete leggere quello che potete fare con i nostri modelli alla fine di ogni modello sul nostro sito. |
|||||||


Con oltre 40 anni di esperienza nel design di modelli di maglia e uncinetto, DROPS Design offre la più estesa collezione di modelli gratuiti su internet - tradotti in 17 lingue. Ad oggi vi possiamo fornire 324 cataloghi e 12290 modelli - 9561 dei quali sono tradotti in Italiano.
Ci stiamo impegnando molto per darvi il meglio che vi possiamo offrire in termini di maglia e uncinetto, ispirazioni e consigli così come filati di grande qualità ad un prezzo incredibile! Volete utilizzare i nostri modelli per qualcosa d'altro oltre al vostro uso personale? Potete leggere tutto ciò che è consentito nel testo sul Copyright in basso su tutte le pagine dei nostri modelli. Buon lavoro!
Lasciare un commento sul modello DROPS 145-19
Noi saremmo felici di ricevere i tuoi commenti e opinioni su questo modello!
Se vuoi fare una domanda, fai per favore attenzione a selezionare la categoria corretta nella casella qui sotto per velocizzare il processo di risposta. I campi richiesti sono indicati da *.