
Categorie popolari
State cercando un filato?


Commenti / Domande (68)
![]() Melanie ha scritto:
Melanie ha scritto:
Can these squares be crocheted together instead of sewn please?
02.03.2020 - 09:04DROPS Design ha risposto:
Dear Melanie, sure you can crochet them together instead of sewing them together if you rather. Happy crocheting!
02.03.2020 - 11:21
![]() Leisa Roberts ha scritto:
Leisa Roberts ha scritto:
Hi how can I download and print this off please
03.07.2019 - 01:17DROPS Design ha risposto:
Dear Ms. Roberts, you can print the patttern by clicking on the icon "print: pattern" at any time. Choosing a virtual printer will allow you to save it as a .PDF file. Happy crocheting!
03.07.2019 - 06:52
![]() Lindyloowho ha scritto:
Lindyloowho ha scritto:
Good morning. Love this blanket. Please can I check for the striped square, should the work be turned at the end of every row or just row 2? Thank you.
21.04.2019 - 10:06DROPS Design ha risposto:
Dear Lindyloowho, you turn the work at the end of every row in the striped square. Only the finishing border is worked in round around whole square. Happy crocheting!
21.04.2019 - 13:35
![]() Liliana Gomez Lopez ha scritto:
Liliana Gomez Lopez ha scritto:
HI. I LOVE THIS PATTERN AND I AM GOING TO DO IT. IN MY COUNTRY WE USUALLY DO DIAGRAMAS TO CROCHET.IT IS EASIER TO FOLLOW AND IT MAY BE USED FOR ALL OVER THE WORLD WITHOUT THE NEED TO KNOW AND UNDERSTAND THE LANGUAGE. THANK YOU.
22.02.2019 - 18:04
![]() Carolyn Lueders ha scritto:
Carolyn Lueders ha scritto:
On pinterest you show two pictures of the blanket worked up in different colors. Could you tell me the colors of the second one. It has a softer shade of pink
22.11.2018 - 18:41DROPS Design ha risposto:
Dear Mrs Lueders, please contact the owner of the picture in Pinterest to get more info s ince the photo is not ours we cannot help there sorry. Your DROPS Store can also help you to find the best colours matching your wishes - even per mail or telephone. Happy crocheting!
23.11.2018 - 11:30
![]() Donna Arundale ha scritto:
Donna Arundale ha scritto:
I would like too see a video of this that shows the whole process of making the orange blossom Blanket I cannot read patterns and have trouble with reading so having a full version visual tutorail video from beginning too the end is how I learn too do things. I note there are some video links but they dont gel too me watching them so I was wondering if you have a tutorail of this blanket step by step at all.
06.11.2018 - 02:20
![]() Christy Wilson-Murray ha scritto:
Christy Wilson-Murray ha scritto:
I love the orange blossom throw pattern but was hoping you could tell me the colors that were used in the pink version rather than the orange. Thanks
29.10.2018 - 18:10DROPS Design ha risposto:
Dear Christy, not sure what you mean by "the pink version" as the colors for eaxh row of each squareis given in the pattern, the orange/red/pink, and the more pinkish colors as well. Happy Crafting!
30.10.2018 - 03:33Cheryl Taylor ha scritto:
I Am trying to find the link to download the free pattern called, \"Easy Crochet 3D Flower\". I keep getting to a site to download Embird. The Flower Picture is on the page with the website listed but there are no directions or any link. Can you please send me a link. TY
10.10.2018 - 15:20DROPS Design ha risposto:
Dear Mrs Taylor, do you mean this pattern? This one is only available in our video sections, you'll find the written pattern below the video. Happy crocheting!
10.10.2018 - 16:20Penni ha scritto:
This is the first time in going to try something like this ! It's beautiful I hope it turns out as beautiful as it looks!
05.10.2018 - 22:13Neethu Varghese ha scritto:
Love all your patterns, great work, I love all the crochet pattern you have on your website and its great that you are giving all these designs for free, great work, i am trying to do the orange blossom and i have question on step 9, you said, repeat from (-) a total of 3 times, but whats (-) i cant quite make from the step although i understood, i have to repeat from *-*, can you please help, i saw the video but its only till 7, can you please do a video for the whole flower
14.07.2017 - 05:14DROPS Design ha risposto:
Dear Mrs Varghese, you have to repeat (4 ch, 1 tr(UK-English)/1 dc (US-English) in next ch-loop), repeat from (-) a total of 3 times, ie you will have 4 ch, 1 tr/1 dc, 4 ch, 1 tr/1 dc, 4 ch, 1 tr/1 dc. Then repeat from the first * to the last *. Happy crocheting!
14.07.2017 - 10:09
|
|
Orange Blossom#orangeblossomblanket |
|
 |
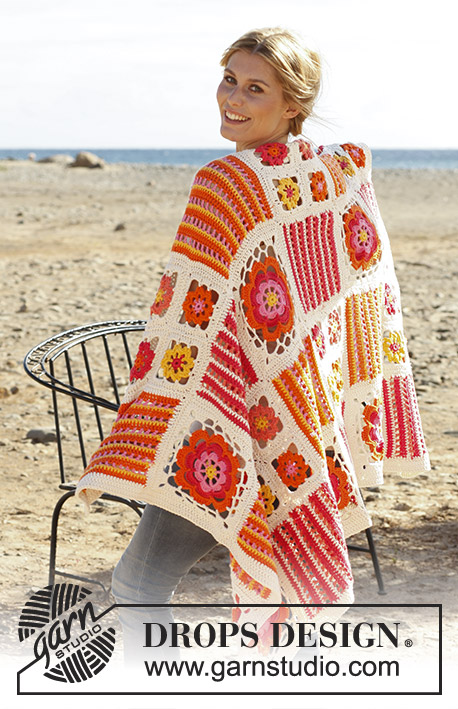 |
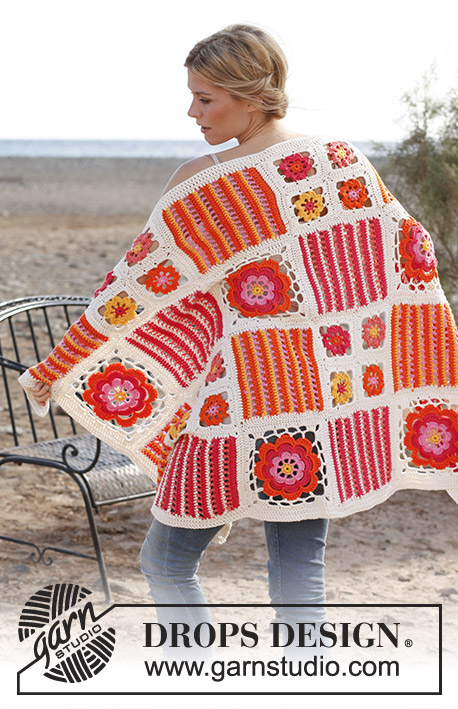
Coperta DROPS con quadrati diversi all’uncinetto, in "Paris".
DROPS 139-39 |
|
|
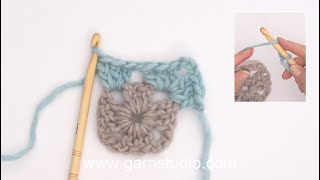
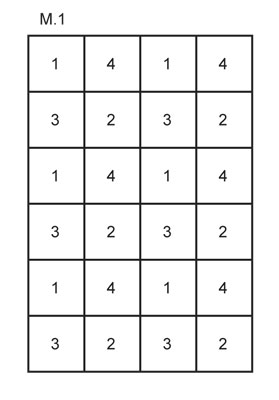
SUGGERIMENTO UNCINETTO: Sostituire la 1° m.a di ogni giro / riga con 3 cat. -------------------------------------------------------- COPERTA: La coperta consiste in 4 tipi di quadrati diversi. Lavorare 6 quadrati di ogni tipo = in totale 24 quadrati. VEDERE SUGGERIMENTO UNCINETTO! QUADRATO-1 (= 1 fiore grande): Avviare una catena di 4 cat con l’uncinetto 5 e il giallo forte e formare un anello con 1 m.bss nella 1° cat. 1° GIRO: 1 cat, 8 m.b nell’anello, terminare con 1 m.bss nella 1° m.b, tagliare il filo. 2° GIRO (in rosa medio). 6 cat (= 1 m.a + 3 cat), * 1 m.a nella m.b seguente, 3 cat *, ripetere da *-* in totale 7 volte e terminare con 1 m.bss nella 3° cat d’inizio giro = 8 m.a con 3 cat tra ognuna di esse. 3° GIRO: 1 cat, lavorare così in ogni arco di cat: 1 m.b, 1 m.m.a, 3 m.a, 1 m.m.a e 1 m.b, terminare il giro con 1 m.bss nella cat d’inizio giro = 8 petali, tagliare il filo. 4° GIRO (in corallo): 7 cat, * 1 m.b tra i 2 petali seguenti, 6 cat *, ripetere da *-* in totale 7 volte, terminare il giro con 1 m.bss nella 1° cat d’inizio giro = 8 archi. 5° GIRO: 1 cat, lavorare così in ogni arco di cat: 1 m.b, 1 m.m.a, 5 m.a, 1 m.m.a e 1 m.b, terminare il giro con 1 m.bss nella cat d’inizio giro = 8 petali, tagliare il filo. 6° GIRO (in arancione): 10 cat, * 1 m.b tra i 2 petali seguenti, 9 cat *, ripetere da *-* in totale 7 volte, terminare il giro con 1 m.bss nella 1° cat d’inizio giro = 8 archi. 7° GIRO: 1 cat, lavorare così in ogni arco di cat: 1 m.b, 1 m.m.a, 1 m.a, 5 m.a.d, 1 m.a, 1 m.m.a e 1 m.b, terminare il giro con 1 m.bss nella 1° cat d’inizio giro = 8 petali. Tagliare il filo e tirarlo attraverso la m sull’uncinetto. 8° GIRO (in panna): Iniziare con 1 m.b nella 1° m.a.d del 1° petalo, 3 cat (= 1 m.a), * 8 cat (= angolo), saltare 3 m.a.d, 1 m.a nell’ultima m.a.d dello stesso petalo, 5 cat, 1 m.b nella 1° m.a.d del petalo seguente, 5 cat, saltare 3 m.a.d, 1 m.b nell’ultima m.a.d dello stesso petalo, 5 cat, 1 m.a nella 1° m.a.d del petalo seguente *, ripetere da *-* in totale 4 volte, ma terminare con 1 m.bss nella 3° cat d’inizio giro (anziché 1 m.a nella 1° m.a.d del petalo seguente. 9° GIRO: 1 m.bss nell’arco di 8 cat, * 4 m.a + 4 cat + 4 m.a nell’arco dell’angolo, (4 cat, 1 m.a nell’arco seguente), ripetere da (-) in totale 3 volte, 4 cat *, ripetere da *-* in totale 4 volte, terminare con 1 m.bss nella 1° m.a d’inizio giro. 10° GIRO: * 1 m.a in ognuna delle prime 4 m.a, lavorare nell’arco dell’angolo: 3 m.a + 2 cat + 3 m.a, 1 m.a in ognuna delle 4 m.a seguenti, 4 m.a in ognuno dei 4 archi seguenti, 1 m.a inn ognuna delle 4 m.a seguenti *, ripetere da *-* in totale 4 volte, terminare il giro con 1 m.bss nella 1° m.a d’inizio giro. Ci sono ora 30 m.a lungo ogni lato e 2 cat in ogni angolo. Tagliare il filo. Il quadrato misura ca 22 x 22 cm. QUADRATO-2 (= 4 piccoli fiori): Ci sono 4 combinazioni di colori per i piccoli quadrati. Quadrato-A: Colore-1 = corallo, Colore-2 = giallo forte. Quadrato-B: Colore-1 = arancione, Colore-2 = corallo. Quadrato-C: Colore-1 = rosa medio, Colore-2 = arancione. Quadrato-D: Colore-1 = giallo forte, Colore-2 = albicocca. Terminare tutti i quadrati con il panna. Lavorare 6 quadrati di ogni combinazione di colori. Avviare 4 cat con l’uncinetto 5 ed il colore-1 e formare un anello con 1 m.bss nella 1° cat. 1° GIRO: 1 cat, 8 m.b nell’anello, terminare con 1 m.bss nella 1° m.b, tagliare il filo. 2° GIRO (in Colore-2): 5 cat (= 1 m.b + 4 cat), * 1 m.b nella m.b seguente, 4 cat *, ripetere da *-* in totale 7 volte e terminare con 1 m.bss nella 1° cat d’inizio giro = 8 m.b con 4 cat tra ognuna di esse. 3° GIRO: 1 cat, lavorare così in ogni arco: 1 m.b, 1 m.m.a, 2 m.a, 1 m.m.a e 1 m.b, terminare il giro con 1 m.bss nella cat d’inizio giro = 8 petali. Tagliare il filo. 4° GIRO (in panna): 1 m.b in alto del 1° petalo, * 8 cat, 1 m.b in alto del petalo seguente, 3 cat, 1 m.b in alto del petalo seguente *, ripetere da *-* tutto il giro, ma terminare il giro con 1 m.bss nella m.b d’inizio giro. 5° GIRO: * Lavorare nell’arco dell’angolo: 5 m.a + 2 cat + 5 m.a, 4 m.a nell’arco seguente *, ripetere da *-* in totale 4 volte, terminare con 1 m.bss nella 1° m.a d’inizio giro, tagliare il filo. 1 quadrato = ca 11 x 11 cm. Lavorare 1 quadrato in ogni combinazione di colori. Cucirli insieme formando un quadrato (= quadrato grande) – cucire bordo contro bordo con il panna e 1 punto in ogni m. Il quadrato misura ca 22 x 22 cm. Quadrato-3 (= righe): Avviare 31 cat LENTE con corallo, girare il lavoro. 1° RIGA: Lavorare 1 m.a nella 4° cat, poi 1 m.a in tutte le cat seguenti = 29 m.a (1° m.a = 3 cat). 2° RIGA (in albicocca): NOTA: Non tagliare il filo ad ogni cambio colore, ma farli seguire lungo il bordo. Lavorare 4 cat (= 1 m.a + 1 cat), saltare 1 m.a, 1 m.a nella m.a seguente, * 1 cat, saltare 1 m.a, 1 m.a nella m.a seguente *, ripetere da *-* tutta la riga = 14 archi di cat, girare il lavoro. 3° RIGA (in panna): 1 cat, poi 1 m.b in ogni m.a ed 1 m.b in ogni cat = 29 m.b. 4° RIGA (in corallo): 1 m.a in ogni m.b. Ripetere le righe 2° alla 4° RIGA, finché il lavoro non misuri ca 20 cm – terminare dopo la 4° riga. Continuare poi con 1 giro di panna e m.a intorno a tutto il quadrato - aggiustare perché ci siano 30 m.a lungo tutti i lati, lavorare anche 2 cat in tutti gli angoli, tagliare il filo. Il quadrato misura ca 22 x 22 cm. Quadrato-4: Lavorare come il quadrato 3, ma avviare con l’arancione, lavorare poi 1° e la 4° riga con l’arancione, la 2° riga con il rosa medio e la 3° riga con il giallo forte. CONFEZIONE: Posizionare tutti i quadrati uno contro l’altro come indicato nella figura – M.1. Cucirli bordo contro bordo con il color panna ed 1 punto in ogni m. BORDO DI RIFINITURA: Lavorare 2 giri di m.a con il panna intorno a tutta la coperta, nelle cat in tutti gli angoli lavorare: 2 m.a + 2 cat + 2 m.a a ognuno dei 2 giri. Tagliare e fissare i fili. |
|
 |
|
Avete terminato questo modello?Allora taggate le vostre foto con #dropspattern #orangeblossomblanket o inviatele alla #dropsfan gallery. Avete bisogno di aiuto con questo modello?Troverete 9 video tutorial, una sezione per i commenti/domande e molto altro guardando il modello su www.garnstudio.com © 1982-2026 DROPS Design A/S. Ci riserviamo tutti i diritti. Questo documento, compreso tutte le sue sotto-sezioni, è protetto dalle leggi sul copyright. Potete leggere quello che potete fare con i nostri modelli alla fine di ogni modello sul nostro sito. |
|


Con oltre 40 anni di esperienza nel design di modelli di maglia e uncinetto, DROPS Design offre la più estesa collezione di modelli gratuiti su internet - tradotti in 17 lingue. Ad oggi vi possiamo fornire 325 cataloghi e 12298 modelli - 9569 dei quali sono tradotti in Italiano.
Ci stiamo impegnando molto per darvi il meglio che vi possiamo offrire in termini di maglia e uncinetto, ispirazioni e consigli così come filati di grande qualità ad un prezzo incredibile! Volete utilizzare i nostri modelli per qualcosa d'altro oltre al vostro uso personale? Potete leggere tutto ciò che è consentito nel testo sul Copyright in basso su tutte le pagine dei nostri modelli. Buon lavoro!
Lasciare un commento sul modello DROPS 139-39
Noi saremmo felici di ricevere i tuoi commenti e opinioni su questo modello!
Se vuoi fare una domanda, fai per favore attenzione a selezionare la categoria corretta nella casella qui sotto per velocizzare il processo di risposta. I campi richiesti sono indicati da *.