
Categorie popolari
State cercando un filato?


Commenti / Domande (108)
![]() Marie ha scritto:
Marie ha scritto:
Bonjour, Pour une taille L, faut-il assembler 4 carrés 8 fois puis assembler les 8x4 carrés entre eux ? Bien à vous
27.01.2018 - 00:15DROPS Design ha risposto:
Bonjour Marie, tout à fait, on assemble les carrés par bandes, quand vous avez 8 bandes de 4 carrés, crochetez la 1ère bande à la 2ème puis la 3ème à la 2ème et enfin la 4ème à la 3ème. Bon assemblage!
29.01.2018 - 08:46
![]() Dorgi ha scritto:
Dorgi ha scritto:
Als ich dieses Model gesehen habe, dachte ich: das muss ich haben. Dank der Maschenprobe klappt es auch mit anderer Wolle. Der Poncho ist genau so raus gekommen wie auf dem Bild. Nur habe ich die Fransen weggelassen. Ich liebe dieses Teil.
03.11.2017 - 16:33
![]() Lois Simon ha scritto:
Lois Simon ha scritto:
THANK YOU! THANK YOU! THANK YOU! I shouldn't have been so upset, because i knew there was an answer, i just couldn't figure it out and began to voice my frustration. Again I apologize. Sincerely, Lois Simon
20.10.2017 - 23:44Lois Simon ha scritto:
I apologize for my abruptness... Im just so upset about this. Thanking you for any help that you can give. Your video on how to put it together doesn't tell you how to make it go diagonally. Again i apologize. I'm just upset about this.
19.10.2017 - 23:04Lois Simon ha scritto:
Question 1: what is place 2 and 2 squares? Question 2: what do you mean by sew squares tog alongside and then across.. -- How? When... at what point? Question 3. for xtra large.... confusing how do u put it together. instructions are not clear
19.10.2017 - 22:59DROPS Design ha risposto:
Dear Mrs Simon, you will crochet squares 2 by 2 as shown in video (remember to follow pattern, video only shows technique). You firs sew the square together alongside = in a long row then accross = crochet the rows together. Happy crocheting!
20.10.2017 - 09:14LOIS SIMON ha scritto:
And now i just got that my comment is to long... Oh My God.... wow. And i have been crocheting for decades... I'm sorry that i started this pattern.
19.10.2017 - 22:54
![]() Heiltje ha scritto:
Heiltje ha scritto:
Goedenavond, ik heb een vraag over dit patroon. Ik heb nu drie vierkantjes gehaakt maar de bloemblaadjes zijn niet mooi plat, maar krullen iets op. Nu vroeg ik me af, moet ik de vierkantjes als ze klaar zijn opspannen
20.02.2017 - 19:28DROPS Design ha risposto:
Hoi Heiltje. Zijn de afmetingen voor de vierkant correct (dwz, ca. 8.5 x 8.5 cm), dan komt het goed. En opspannen is altijd handig. Dan wordt het vierkantje mooi glad en persoonlijk vind ik het ook makkelijker om te monteren.
21.02.2017 - 16:01
![]() Lynn ha scritto:
Lynn ha scritto:
Why does it say sew squares tog and then crochet them tog, a bit confused. thanks
20.01.2017 - 17:28DROPS Design ha risposto:
Dear Lynn, squares will be crocheted tog as explained later in the pattern. Happy crocheting!
23.01.2017 - 09:02
![]() Lene ha scritto:
Lene ha scritto:
I've made this in size small/medium. It's gorgeous, but I didn't have enough yarn. I ended up using 272 grams in total despite making the tassels slightly smaller than the pattern calls for
28.06.2016 - 10:42
![]() Louise ha scritto:
Louise ha scritto:
Hej, jag undrar om det är riktigt att den tolfte luftmaskbågen ska fästas i den första fasta maskan i varv 1, när jag virkar så korsas början av den första luftmaskbågen och det ser aningen klumpigt ut. Borde den tolfte luftmaskbågen istället fästas i den tolfte fasta maskan i varv ett?
22.04.2016 - 18:01DROPS Design ha risposto:
Hej Louise, titta gärna på videon som beskriver hur du gör. Lycka till!
01.02.2017 - 08:31
|
|
Lily of the Valley#lilyofthevalleyponcho |
|
 |
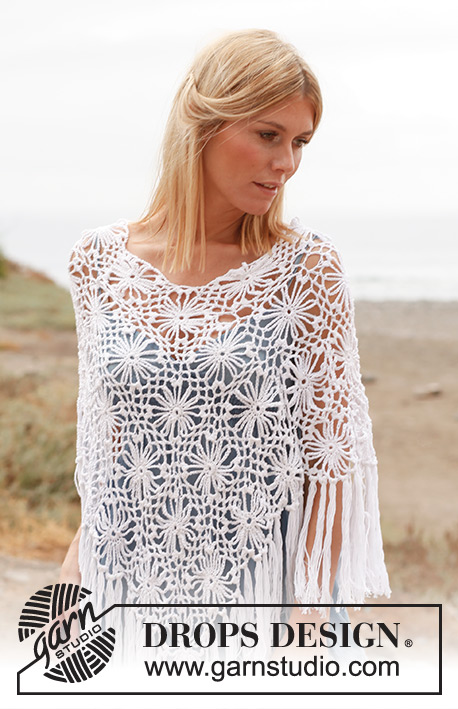 |
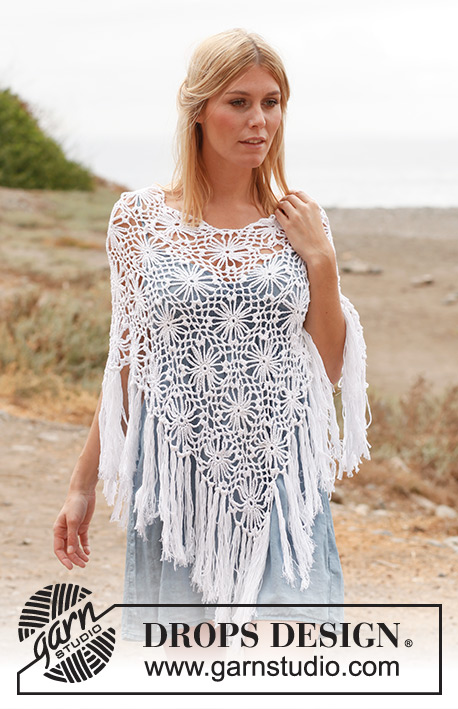
Poncho DROPS all’uncinetto con quadrati, in "Safran". Dalla S alla XXXL.
DROPS 137-16 |
|
|
---------------------------------------------------------- INIZIO BOLLA: Lavorare 3 cat, lavorare 1 m.a - ma non estrarre l’ultimo gettato (= 2 m sull’uncinetto), lavorare 1 altra m.a nella stessa maniera nella stessa m, estrarre il filo attraverso tutte le 3 m sull’uncinetto = 1° bolla sul giro. BOLLA: Lavorare 1 m.a - ma non estrarre l’ultimo gettato (= 2 m sull’uncinetto), lavorare altre 2 m.a nella stessa maniera nella stessa m, estrarre il filo attraverso tutte le 4 m sull’uncinetto. ---------------------------------------------------------- PONCHO: Il poncho si lavora in 2 parti che vengono cuciti a lavoro terminato. QUADRATO: Lavorare 5 cat con l’uncinetto 4 ed il filato Safran e formare un anello con 1 m.bss. 1° GIRO: 1 cat, 12 m.b nell’anello. 2° GIRO: * 15 cat, 1 m.bss nella m.b seguente *, ripetere da *-* tutto il giro, terminare con 10 cat e 1 m.a.d nella 1° m.b del 1° GIRO, girare = 12 archi di cat. 3° GIRO: M.bss fino alla metà del 1° arco di cat, lavorare nello stesso arco: [1 INIZIO BOLLA - Vedere le spiegazioni sopra, 4 cat, 1 BOLLA - Vedere le spiegazioni sopra] = 1° angolo, * lavorare [4 cat, 1 m.b nell’arco seguente] 2 volte, 4 cat, lavorare nell’arco di cat seguente: [1 bolla, 4 cat, 1 bolla] = angolo *. Ripetere da *-* tutto il giro. Quando si ripete da *-* l’ultima volta, NON lavorare [1 bolla, 4 cat, 1 bolla], MA terminare con 1 m.bss nella 1° bolla. Tagliare e fissare il filo. 1° PARTE: Lavorare in totale 28-32-40 quadrati. Cucire prima i quadrati per la lunghezza e poi per la larghezza. Posizionare i quadrati con 4-4-5 quadrati in larghezza e 7-8-8 quadrati in altezza. Mettere 1 quadrato sopra l’altro e lavorarli insieme così: Lavorare 1 m.b nell’arco di cat nell’angolo del 1° quadrato, 2 cat, 1 m.b nell’arco di cat nell’angolo del 2° quadrato, * 2 cat, 1 m.b nell’arco seguente del 1° quadrato, 2 cat, 1 m.b nell’arco seguente del 2° quadrato *, ripetere da *-*, terminare con 2 cat, 1 m.b nell’arco nell’angolo del 1° quadrato, 2 cat, 1 m.b nell’arco nell’angolo del 2° quadrato. NOTA: Fare attenzione che i passaggi tra un quadrato e l’altro siano belli quando vengono lavorati insieme per lunghezza. Il lavoro misura ca 36-36-45 cm in larghezza, e 63-72-72 cm in altezza. 2° PARTE: Lavorare la 2° parte identica alla 1° PARTE. CONFEZIONE: Lavorare le parti insieme così: Posizionare il lato corto della 1° parte contro il lato lungo della 2° parte (36-36-45 cm a partire dal basso. Lavorare le 2 parti insieme nella stessa maniera di prima (1 m.b nell’angolo, 2 cat e 1 m.b nell’arco seguente ecc.). Poi lavorare insieme il lato corto della 2° parte alla 1° parte nella stessa maniera, ma contro il lato lungo della 1° parte. FRANGE: 1 frangia = 6 fili di ca 40 cm. Piegare i fili in 2, infilare il cappio ottenuto in 1 arco di cat, e tirare le estremità attraverso il cappio (in modo da avere 12 fili in ogni frangia). Inserire frange sui lati diagonali del poncho così: Inserire 1 frangia nei 3 archi di cat tra gli angoli di ogni quadrato, e 1 frangia nell’arco si cat tra i quadrati. |
|
 |
|
Avete terminato questo modello?Allora taggate le vostre foto con #dropspattern #lilyofthevalleyponcho o inviatele alla #dropsfan gallery. Avete bisogno di aiuto con questo modello?Troverete 7 video tutorial, una sezione per i commenti/domande e molto altro guardando il modello su www.garnstudio.com © 1982-2026 DROPS Design A/S. Ci riserviamo tutti i diritti. Questo documento, compreso tutte le sue sotto-sezioni, è protetto dalle leggi sul copyright. Potete leggere quello che potete fare con i nostri modelli alla fine di ogni modello sul nostro sito. |
|


Con oltre 40 anni di esperienza nel design di modelli di maglia e uncinetto, DROPS Design offre la più estesa collezione di modelli gratuiti su internet - tradotti in 17 lingue. Ad oggi vi possiamo fornire 324 cataloghi e 12290 modelli - 9561 dei quali sono tradotti in Italiano.
Ci stiamo impegnando molto per darvi il meglio che vi possiamo offrire in termini di maglia e uncinetto, ispirazioni e consigli così come filati di grande qualità ad un prezzo incredibile! Volete utilizzare i nostri modelli per qualcosa d'altro oltre al vostro uso personale? Potete leggere tutto ciò che è consentito nel testo sul Copyright in basso su tutte le pagine dei nostri modelli. Buon lavoro!
Lasciare un commento sul modello DROPS 137-16
Noi saremmo felici di ricevere i tuoi commenti e opinioni su questo modello!
Se vuoi fare una domanda, fai per favore attenzione a selezionare la categoria corretta nella casella qui sotto per velocizzare il processo di risposta. I campi richiesti sono indicati da *.