
Categorie popolari
State cercando un filato?


Commenti / Domande (108)
![]() Deborah HEALEY ha scritto:
Deborah HEALEY ha scritto:
The diagram shows the measurement of the width of the panels, I'm just wondering what the length measurement would be, thank you.
29.03.2022 - 04:05DROPS Design ha risposto:
Hi Deborah, The length is given by the vertical line to the left of the sketch. Happy crafting!
29.03.2022 - 07:29
![]() Natalia ha scritto:
Natalia ha scritto:
Witam. Czy mogę prosić o wyjaśnienie skrótu oz ?
13.03.2022 - 21:47DROPS Design ha risposto:
Witaj Natalio, 'oz' znaczy oczko zamykające. Jak je wykonać znajdziesz TUTAJ. Pozdrawiamy!
14.03.2022 - 08:19
![]() Sabrina Lamaire ha scritto:
Sabrina Lamaire ha scritto:
Geachte ik heb nu 2 keer 28 vierkantjes gemaakt Hoeveel zijn er nu in de breedte en in de lengte aub Is dat 4 breed en 7 lang Mvg
25.06.2021 - 04:30DROPS Design ha risposto:
Dag Sabrina,
Ja dat klopt! Per deel heb je 28 vierkanten nodig; 4 in de breedte en 7 in de hoogte.
28.06.2021 - 12:51
![]() Wiesława ha scritto:
Wiesława ha scritto:
Skorzystałam z tego wzoru i poncho wyszlo pięknie:) Dziękuję:)
05.07.2020 - 11:52
![]() Christina Challies ha scritto:
Christina Challies ha scritto:
Dismiss previous query, parts one and two are the same, diagram is of sewn up poncho.
26.11.2019 - 05:48
![]() Christina Challies ha scritto:
Christina Challies ha scritto:
Pattern says to work part two the same as part one yet the L shaped diagram shows one rectangular square much smaller than the other so cannot be the same amount of squares. How many squares for part two?
26.11.2019 - 04:44DROPS Design ha risposto:
Dear Mrs Challies, both rectangles should have the same number of squares, then you will crochet both rectangles together - see that video for a knitted poncho, where the assembly will be the same here - chart shows poncho when worn, ie a part of both rectangle is "hidden" = on the back side. Happy crocheting!
27.11.2019 - 08:45
![]() Jost Regina ha scritto:
Jost Regina ha scritto:
Habe passendes Video (Zusammenhäkeln) gefunden. Bei diesem Modell aber immer 2 LM?
27.04.2019 - 09:32DROPS Design ha risposto:
Liebe Frau Jost, ja genau, bei diesem Modell wird es immer 2 Lm zwischen den Vierecken gehäkelt. Viel Spaß beim häkeln!
29.04.2019 - 08:29
![]() Regina Jost ha scritto:
Regina Jost ha scritto:
Nach Zusammenhäkel von 2 Vierecken vertikal jeweils wieder 2 LM zum Übergang bis zum nächsten Dreieck? bis gewünschte Höhe erreicht ist (4-5). Oder nach dem Zusammenhäkeln von 2 Vierecken Immer Faden abschneiden? Danke
27.04.2019 - 09:15DROPS Design ha risposto:
Liebe Frau Jost, alle Quadraten werden in Reihe bzw Streifen zusammengehäkelt, dh 4-5 Quadraten in der Breite und 7-8 Quadraten in der Höhe. Wenn Sie die 2. ersten Vierecke zusammengehäkelt haben, wiederholen Sie mit den 2 nächsten Vierecke, ohne den Faden abzuschneiden. Viel Spaß beim häkeln!
29.04.2019 - 08:29
![]() Pouic Pick ha scritto:
Pouic Pick ha scritto:
Bonjour Je suis perdue j’ai mes 16 bandes de 4 carrés pour une taille L mais je ne comprend pas comment les assembler puis je avoir de làide svp?
25.05.2018 - 21:57DROPS Design ha risposto:
Bonjour Pouic Pick, Cette vidéo montre comment assembler les carrés (en les crochetant en bandes, d'abord , dans un sens puis dans l'autre ) , puis quand vous avez vos 2 rectangles, assemblez-les en les crochetant de la même façon mais cette fois comme dans cette vidéo. Bon crochet!
28.05.2018 - 08:28
![]() Petra ha scritto:
Petra ha scritto:
Ik heb deze poncho gehaakt met garen dorps safean en is zeer mooi geworden. Nu na het wassen op de hand zijn alle draadjes van de franjes gespleten. Dit ziet er heel rommelig uit. Hebben jullie en idee wat ik hier mee kan doen. Knoopje onderin elk draadje staat niet mooi, en ik wil ze niet afknippen. De poncho is zo niet te dragen en dat is toch wel heel jammer.
14.02.2018 - 11:11DROPS Design ha risposto:
Hallo Petra, Dat is erg jammer om te horen. Het beste is om even contact op te nemen met het verkooppunt waar je het garen hebt gekocht, als er klachten of problemen zijn met het garen.
12.03.2018 - 10:56
|
|
Lily of the Valley#lilyofthevalleyponcho |
|
 |
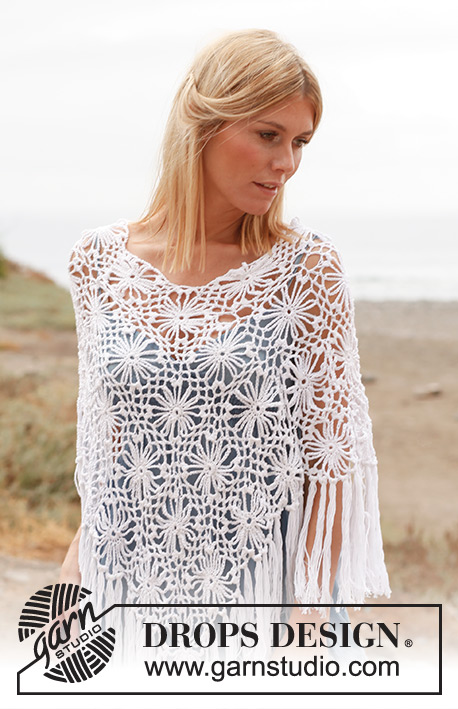 |
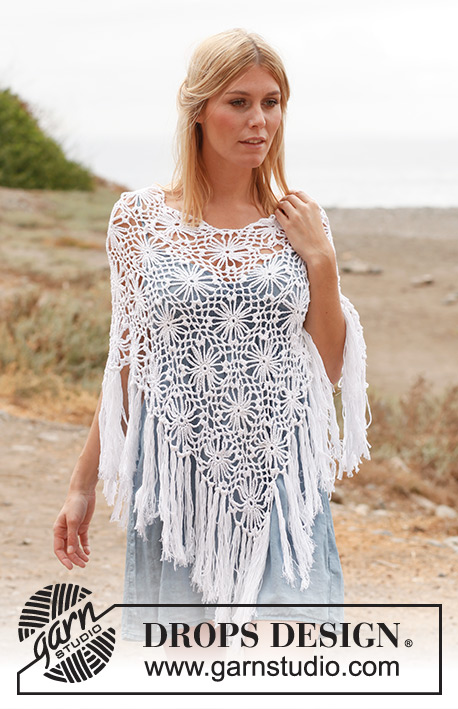
Poncho DROPS all’uncinetto con quadrati, in "Safran". Dalla S alla XXXL.
DROPS 137-16 |
|
|
---------------------------------------------------------- INIZIO BOLLA: Lavorare 3 cat, lavorare 1 m.a - ma non estrarre l’ultimo gettato (= 2 m sull’uncinetto), lavorare 1 altra m.a nella stessa maniera nella stessa m, estrarre il filo attraverso tutte le 3 m sull’uncinetto = 1° bolla sul giro. BOLLA: Lavorare 1 m.a - ma non estrarre l’ultimo gettato (= 2 m sull’uncinetto), lavorare altre 2 m.a nella stessa maniera nella stessa m, estrarre il filo attraverso tutte le 4 m sull’uncinetto. ---------------------------------------------------------- PONCHO: Il poncho si lavora in 2 parti che vengono cuciti a lavoro terminato. QUADRATO: Lavorare 5 cat con l’uncinetto 4 ed il filato Safran e formare un anello con 1 m.bss. 1° GIRO: 1 cat, 12 m.b nell’anello. 2° GIRO: * 15 cat, 1 m.bss nella m.b seguente *, ripetere da *-* tutto il giro, terminare con 10 cat e 1 m.a.d nella 1° m.b del 1° GIRO, girare = 12 archi di cat. 3° GIRO: M.bss fino alla metà del 1° arco di cat, lavorare nello stesso arco: [1 INIZIO BOLLA - Vedere le spiegazioni sopra, 4 cat, 1 BOLLA - Vedere le spiegazioni sopra] = 1° angolo, * lavorare [4 cat, 1 m.b nell’arco seguente] 2 volte, 4 cat, lavorare nell’arco di cat seguente: [1 bolla, 4 cat, 1 bolla] = angolo *. Ripetere da *-* tutto il giro. Quando si ripete da *-* l’ultima volta, NON lavorare [1 bolla, 4 cat, 1 bolla], MA terminare con 1 m.bss nella 1° bolla. Tagliare e fissare il filo. 1° PARTE: Lavorare in totale 28-32-40 quadrati. Cucire prima i quadrati per la lunghezza e poi per la larghezza. Posizionare i quadrati con 4-4-5 quadrati in larghezza e 7-8-8 quadrati in altezza. Mettere 1 quadrato sopra l’altro e lavorarli insieme così: Lavorare 1 m.b nell’arco di cat nell’angolo del 1° quadrato, 2 cat, 1 m.b nell’arco di cat nell’angolo del 2° quadrato, * 2 cat, 1 m.b nell’arco seguente del 1° quadrato, 2 cat, 1 m.b nell’arco seguente del 2° quadrato *, ripetere da *-*, terminare con 2 cat, 1 m.b nell’arco nell’angolo del 1° quadrato, 2 cat, 1 m.b nell’arco nell’angolo del 2° quadrato. NOTA: Fare attenzione che i passaggi tra un quadrato e l’altro siano belli quando vengono lavorati insieme per lunghezza. Il lavoro misura ca 36-36-45 cm in larghezza, e 63-72-72 cm in altezza. 2° PARTE: Lavorare la 2° parte identica alla 1° PARTE. CONFEZIONE: Lavorare le parti insieme così: Posizionare il lato corto della 1° parte contro il lato lungo della 2° parte (36-36-45 cm a partire dal basso. Lavorare le 2 parti insieme nella stessa maniera di prima (1 m.b nell’angolo, 2 cat e 1 m.b nell’arco seguente ecc.). Poi lavorare insieme il lato corto della 2° parte alla 1° parte nella stessa maniera, ma contro il lato lungo della 1° parte. FRANGE: 1 frangia = 6 fili di ca 40 cm. Piegare i fili in 2, infilare il cappio ottenuto in 1 arco di cat, e tirare le estremità attraverso il cappio (in modo da avere 12 fili in ogni frangia). Inserire frange sui lati diagonali del poncho così: Inserire 1 frangia nei 3 archi di cat tra gli angoli di ogni quadrato, e 1 frangia nell’arco si cat tra i quadrati. |
|
 |
|
Avete terminato questo modello?Allora taggate le vostre foto con #dropspattern #lilyofthevalleyponcho o inviatele alla #dropsfan gallery. Avete bisogno di aiuto con questo modello?Troverete 7 video tutorial, una sezione per i commenti/domande e molto altro guardando il modello su www.garnstudio.com © 1982-2026 DROPS Design A/S. Ci riserviamo tutti i diritti. Questo documento, compreso tutte le sue sotto-sezioni, è protetto dalle leggi sul copyright. Potete leggere quello che potete fare con i nostri modelli alla fine di ogni modello sul nostro sito. |
|


Con oltre 40 anni di esperienza nel design di modelli di maglia e uncinetto, DROPS Design offre la più estesa collezione di modelli gratuiti su internet - tradotti in 17 lingue. Ad oggi vi possiamo fornire 324 cataloghi e 12290 modelli - 9561 dei quali sono tradotti in Italiano.
Ci stiamo impegnando molto per darvi il meglio che vi possiamo offrire in termini di maglia e uncinetto, ispirazioni e consigli così come filati di grande qualità ad un prezzo incredibile! Volete utilizzare i nostri modelli per qualcosa d'altro oltre al vostro uso personale? Potete leggere tutto ciò che è consentito nel testo sul Copyright in basso su tutte le pagine dei nostri modelli. Buon lavoro!
Lasciare un commento sul modello DROPS 137-16
Noi saremmo felici di ricevere i tuoi commenti e opinioni su questo modello!
Se vuoi fare una domanda, fai per favore attenzione a selezionare la categoria corretta nella casella qui sotto per velocizzare il processo di risposta. I campi richiesti sono indicati da *.