
Categorie popolari
State cercando un filato?


Commenti / Domande (61)
![]() Kathleen Goulding ha scritto:
Kathleen Goulding ha scritto:
Hello. What would the best cast on edge be for this hooded aurora jacket.
12.08.2019 - 20:55DROPS Design ha risposto:
Dear Mrs Goulding, you can use your favorite technique to cast on, just don't forget -as always - to avoid a tighting edge. Happy knitting!
13.08.2019 - 08:12
![]() Brenda Wilkinson ha scritto:
Brenda Wilkinson ha scritto:
I am going to use And es to make Aurora. Can It be felted if I knit a size larger? Thanks.
25.04.2019 - 22:08DROPS Design ha risposto:
Dear Mrs Wilkinson, Andes is feltable but this pattern is not felted so that we don't have any experience of how it would work if felted and we are unfortunately not able to adapt every pattern to every single request. Read more about felting here and please contact your DROPS store for any further individual assistance. Happy knitting!
26.04.2019 - 08:52
![]() Karen ha scritto:
Karen ha scritto:
Could I do a two tie sweater with a dark curve panel on each side. Like an hour glass visual shaping? Like this )__( and the sleeve and hood and moddle of sweater a multi colored boucle?
28.02.2019 - 16:06DROPS Design ha risposto:
Dear Karen, you will find here all our jacket patterns with rounded front edges. Happy knitting!
01.03.2019 - 09:25
![]() Freya ha scritto:
Freya ha scritto:
Hallo, Ich habe zwei Fragen zum Vorderteil: 1. Welche Maschen werden auf den Hilfsfaden gelegt? Die zur Mitte/Knopfleiste hin gerichteten? 2. Was ist damit gemeint: "damit man den Faden nicht abschneiden muss strickt man die M. bevor man sie auf den Hilfsfaden legt"? Im Videotutorial ist der Hilfsfaden ein seperater Faden!?
19.11.2018 - 22:43DROPS Design ha risposto:
Liebe Freya, Sie können diese Maschen entweder auf einem Hilfsnadel/separaten Nadel/Hilfsfaden legen. Beim linken Vorderteil, stricken Sie am Anfang der Rückreihe (= vom Halsausschnitt bis Seite/Armausschnitt) die ersten 7 Maschen, dann legen Sie diese 7 M still, die Reihe bis zur Ende stricken, wenden, Hinreihe stricken, wenden, um am Anfang der nächste Rückreihe stricken Sie die ersten 3-4 M (siehe Grösse) und legen diese 3-4 M still (jetzt wurden 10-11 M stillgelegt) und die Reihe bis zur Ende stricken. Diese stillgelegten Maschen werden bei der Kaputze wieder gestrickt. Viel Spaß beim stricken!
20.11.2018 - 08:23
![]() ANNICK ha scritto:
ANNICK ha scritto:
SUR LA PHOTO LES BOUTONS SONT POSES SUR LE COTE AVANT DROIT ET DANS LES EXPLICATIONS C EST SUR CE COTE QUE L ON FAIT LES BOUTONNIÈRES .
27.09.2017 - 19:05DROPS Design ha risposto:
Bonjour Annick, les boutonnières sont généralement ouvertes sur la bordure devant droit pour les femmes, la photo a probablement été inversée. Bon tricot!
28.09.2017 - 10:33
![]() Nina ha scritto:
Nina ha scritto:
Ik heb een vraag over het laatste stukje van het voorpand. Ik begrijp niet wat jullie bedoelen met hulpdraad. Hoe moet ik dat doen?
27.12.2016 - 21:24
![]() Natalia Tiessen ha scritto:
Natalia Tiessen ha scritto:
Hallo alle zusammen! Hab diese tolle Jacke vor kurzem gestrickt Und bin total zufrieden!! Ich hab die Nähte nicht genäht, sondern auf rechter Seite zusammen gestrickt, Sieht ganz toll aus!
13.10.2014 - 13:32
![]() Annika ha scritto:
Annika ha scritto:
Hi, ich komme bei dem teil in dem man die Maschen auf den hilfsfaden legen soll nicht weiter :( könnten sie mir diesen teil bitte genauer erklären? Vielen Dank! Viele Grüße Annika
15.09.2014 - 20:06DROPS Design ha risposto:
Schauen Sie sich am besten ein Hilfsvideo an: unter Tipps & Hilfe => Strickvideos das Video "Maschen auf einen Faden stilllegen". Für das Vorderteil der Jacke müssen Sie die ersten 7 M der R stilllegen, beim nächsten Mal legen Sie 1 M zu diesen stillgelegten M dazu, das machen Sie dann noch 2x/3x, je nach Größe. Dann haben Sie insgesamt 10 bzw. 11 M auf dem Hilfsfaden. Ich hoffe, damit ist Ihre Frage beantwortet? Ansonsten fragen Sie einfach noch einmal nach. Gutes Gelingen!
16.09.2014 - 10:38Laslig ha scritto:
Hi, where do I find the size chart to see which size I should knit? Thanks
02.07.2014 - 15:24DROPS Design ha risposto:
Dear Mrs Laslig, you will find at the end of the pattern a measurement chart of the finished garment, with all measurements for each size, taken flat, from side to side (in cm). Happy knitting!
02.07.2014 - 18:42
![]() M. Wicht ha scritto:
M. Wicht ha scritto:
Hallo, die Jacke habe ich mit Eskimo gestrickt, super schön und schön warm. Ich freue mich schon auf das nächste Projekt. Lieben Gruß M. Wicht
04.05.2014 - 00:16
|
|
Aurora#aurorajacket |
|
 |
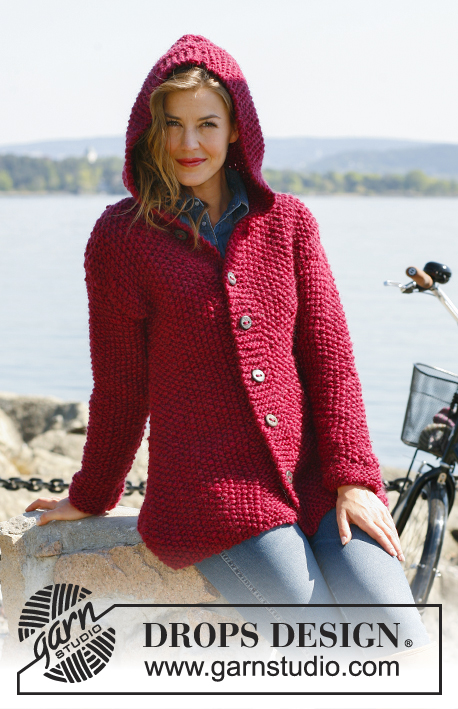 |
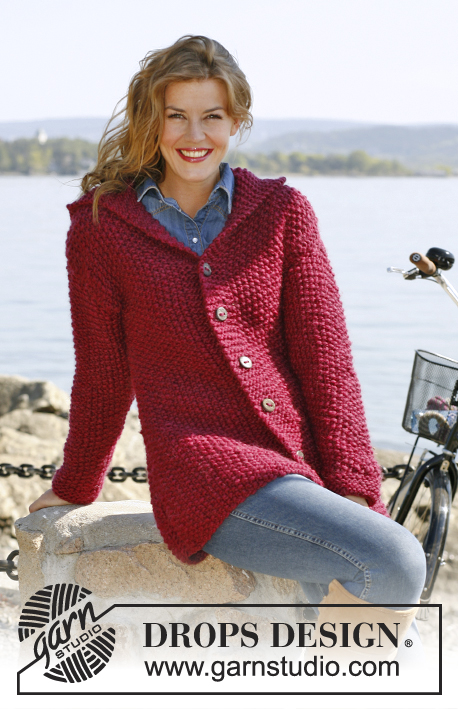
Giacca DROPS ai ferri, lavorata a grana di riso con cappuccio, in "Andes" o "Snow".
DROPS 132-9 |
|
|
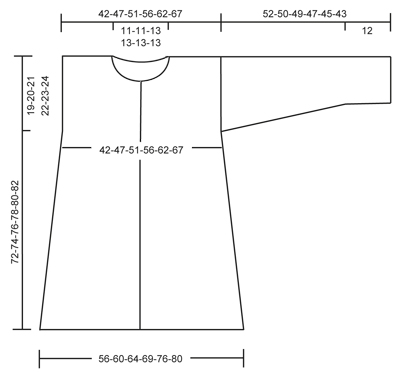
GRANA DI RISO: 1° ferro: * 1 m a dir, 1 m a rov *, ripetere da * a *. 2° ferro: Lavorare a rov le m a dir e a dir le m a rov. Ripetere il 2° ferro. PUNTO LEGACCIO (avanti e indietro sul ferro) Lavorare tutti i ferri a dir. SUGGERIMENTO PER PRENDERE LE MISURE: Per via del peso del capo, misurare il lavoro tenendolo sollevato; in caso contrario, la giacca risulterebbe troppo lunga una volta indossata. ASOLE: Chiudere per le asole, sul bordo anteriore destro. 1 asola = lavorare insieme a dir la 3a e la 4a m del bordo anteriore destro, fare poi 1 m gettata. Chiudere per le asole quando il lavoro misura: TAGLIA S: 19, 28, 37, 46, 55 e 64 cm TAGLIA M: 21, 30, 39, 48, 57 e 66 cm TAGLIA L: 23, 32, 41, 50, 59 e 68 cm TAGLIA XL: 20, 30, 40, 50, 60 e 70 cm TAGLIA XXL: 22, 32, 42, 52, 62 e 72 cm TAGLIA XXXL: 24, 34, 44, 54, 64 e 74 cm SUGGERIMENTO PER IL CAPPUCCIO: Per evitare che si formi un buco nel punto in cui le m sono state messe in sospeso per lo scollo, raccogliere un filo tra 2 m e lavorarlo insieme a 1 m sul ferro DIETRO: Si lavora avanti e indietro sul ferro. Avviare 50-54-58-62-68-72 m sui ferri n° 10 con il filato Andes. Lavorare a GRANA DI RISO – vedere spiegazioni precedenti! RICORDARSI LA TENSIONE DEL LAVORO! Quando il lavoro misura 8 cm – leggere il SUGGERIMENTO PER PRENDERE LE MISURE – diminuire 1 m da ciascun lato. Ripetere le diminuzioni ogni 8 cm per 6 volte = 38-42-46-50-56-60 m. Quando il lavoro misura 53-54-55-56-57-58 cm, inserire 1 segno da ciascun lato (i segni indicano l’inizio degli scalfi). Quando il lavoro misura 70-72-74-76-78-80 cm, chiudere le 8-8-10-10-10-10 m centrali per lo scollo e proseguire ogni spalla separatamente. Al ferro successivo, chiudere 1 m dal lato dello scollo = 14-16-17-19-22-24 m. Chiudere le m quando il lavoro misura 72-74-76-78-80-82 cm. DAVANTI SINISTRO: Si lavora avanti e indietro sul ferro. Avviare 30-32-34-36-39-41 m (comprendono 7 m del bordo centrale) con i ferri n° 10 e il filato Andes. Lavorare le 7 m del bordo centrale a PUNTO LEGACCIO – vedere spiegazioni precedenti – e le rimanenti m a grana di riso. Quando il lavoro misura 8 cm, cominciare a diminuire sul lato come fatto per il dietro = 24-26-28-30-33-35 m. Quando il lavoro misura 53-54-55-56-57-58 cm, inserire un segno (indica l’inizio dello scalfo). Continuare a lavorare finché il lavoro non misura 66-68-70-72-74-76 cm. Mettere poi in attesa su un fermamaglie le m iniziali di ciascun ferro, dal lato dello scollo (dopo averle lavorate così da evitare di tagliare il filo) come segue: 7 m per 1 volta, 1 m per 3-3-4-4-4-4 volte = per la spalla rimangono 14-16-17-19-22-24 m. Chiudere le m quando il lavoro misura 72-74-76-78-80-82 cm. DAVANTI DESTRO: Lavorare come il davanti sinistro, ma speculare. In aggiunta, diminuire per le asole, sul bordo – vedere spiegazioni precedenti. MANICHE: Si lavorano avanti e indietro sul ferro. Avviare 24-24-26-26-28-28 m con i ferri n° 10 e il filato Andes. Lavorare 8 ferri a punto legaccio, e proseguire a grana di riso. Allo stesso tempo, quando il lavoro misura 12 cm, aumentare 1 m da ciascun lato. Ripetere gli aumenti ogni 8-7-7-5-5-4 cm per 5-6-6-7-7-8 volte = 34-36-38-40-42-44 m. Quando il lavoro misura 52-50-49-47-45-43 cm, chiudere le m senza stringere troppo il filo. ATTENZIONE: misure più piccole per le taglie più grandi perché le spalle sono più larghe. CONFEZIONE: Cucire le spalle. Cucire le maniche – vedere i segni sul davanti e sul dietro per capire dove iniziano le maniche. Cucire i lati e i bordi delle maniche, bordo contro bordo, nell’asola anteriore della m esterna per evitare una cucitura troppo spessa. Cucire i bottoni. CAPPUCCIO: Riprendere da 35 a 42 m attorno al collo (queste m comprendono le m messe in sospeso sul davanti), con i ferri n° 10 e il filato Andes. Lavorare 1 ferro a dir sul rovescio del lavoro e ALLO STESSO TEMPO lavorare per evitare che si formi un buco nelle transizioni nella parte anteriore dello scollo – vedere SUGGERIMENTO PER IL CAPPUCCIO. Lavorare 8 ferri a punto legaccio. Al ferro successivo, sul diritto del lavoro, distribuire in modo uniforme degli aumenti, così da portare il numero di m a 48-50-52-54-56-58. ATTENZIONE: non aumentare in corrispondenza delle 7 m iniziali e finali (= bordi). Continuare a lavorare a punto legaccio le 7 m dei bordi; lavorare le rimanenti m a grana di riso finché il cappuccio non misura 47-47-48-48-49-49 cm. Chiudere le m. Piegare il cappuccio in due e cucirlo insieme; cucire bordo contro bordo per evitare una cucitura troppo spessa. |
|
 |
|
Avete terminato questo modello?Allora taggate le vostre foto con #dropspattern #aurorajacket o inviatele alla #dropsfan gallery. Avete bisogno di aiuto con questo modello?Troverete 10 video tutorial, una sezione per i commenti/domande e molto altro guardando il modello su www.garnstudio.com © 1982-2026 DROPS Design A/S. Ci riserviamo tutti i diritti. Questo documento, compreso tutte le sue sotto-sezioni, è protetto dalle leggi sul copyright. Potete leggere quello che potete fare con i nostri modelli alla fine di ogni modello sul nostro sito. |
|


Con oltre 40 anni di esperienza nel design di modelli di maglia e uncinetto, DROPS Design offre la più estesa collezione di modelli gratuiti su internet - tradotti in 17 lingue. Ad oggi vi possiamo fornire 324 cataloghi e 12290 modelli - 9561 dei quali sono tradotti in Italiano.
Ci stiamo impegnando molto per darvi il meglio che vi possiamo offrire in termini di maglia e uncinetto, ispirazioni e consigli così come filati di grande qualità ad un prezzo incredibile! Volete utilizzare i nostri modelli per qualcosa d'altro oltre al vostro uso personale? Potete leggere tutto ciò che è consentito nel testo sul Copyright in basso su tutte le pagine dei nostri modelli. Buon lavoro!
Lasciare un commento sul modello DROPS 132-9
Noi saremmo felici di ricevere i tuoi commenti e opinioni su questo modello!
Se vuoi fare una domanda, fai per favore attenzione a selezionare la categoria corretta nella casella qui sotto per velocizzare il processo di risposta. I campi richiesti sono indicati da *.