
Categorie popolari
State cercando un filato?


Commenti / Domande (61)
![]() Fengyi ha scritto:
Fengyi ha scritto:
I want to make the jacket with drops air, just wondering if the shape would be a bit different as the weight should be different? (600grams using air vs 900grams using Andes) Would you recommend using drops air to make this jacket?
17.04.2025 - 15:36DROPS Design ha risposto:
Dear Fengyi, this pattern is for a Group E yarn, so to use a group C yarn, like DROPS Air, you will need to work with double thread. DROPS Air, specifically, is a very light yarn so it won't have as much weight and won't fall as nicely. But as long as you work in double thread it should be possible to work with DROPS Air. Happy knitting!
20.04.2025 - 22:07
![]() MAYRA GARCIA ha scritto:
MAYRA GARCIA ha scritto:
POR FAVOR ME PODRIAN INDICAR EN LA PARTE DE LA ESPALDA CUANTOS PUNTOS HAY QUE DEJAR PARA LA CAPUCHA Y LOS HOMBROS PARA UNA TALLA XL GRACIAS
14.12.2024 - 04:34DROPS Design ha risposto:
Hola Mayra, la capucha se trabaja recogiendo puntos alrededor de todo el cuello, incluyendo los puntos en un gancho auxiliar en el delantero. En principio, usarás para recoger los 10 puntos cerrados en el cuello en la espalda. Después de cerrar los 10 puntos deberías tener 40 puntos (o 20 puntos en cada hombro); cierras 1 punto más en cada hombro = 19 puntos en cada hombro.
15.12.2024 - 22:23
![]() Rosemarie Olivebring ha scritto:
Rosemarie Olivebring ha scritto:
Denna var väldigt rolig och enkel att sticka. Härligt garn! 😊
14.03.2024 - 07:09
![]() Barbara Boyer ha scritto:
Barbara Boyer ha scritto:
I have knitted this cardigan and as a beginner found the pattern clear and easy to follow. I am delighted with the result
07.02.2023 - 14:31
![]() Maureen Pinwill ha scritto:
Maureen Pinwill ha scritto:
I have knitted this delightful jacket with Drops Andes Dark Brown Yarn. I am absolutely delighted with the finished garment. Congratulations to the designer. It is so cosy and warm. I am sure I will knit another in a different colour.
01.12.2022 - 19:07
![]() Batia ha scritto:
Batia ha scritto:
How can i buy wool ? beacuse i can't find the place in your web site. i would like to order 10 pices of DROPS Andes "misty rose" . thx for your help.
31.08.2022 - 14:05DROPS Design ha risposto:
Dear Batia, you will find the list of DROPS Stores shipping worldwide here - click on the desired store to open their website and place your order there. Don't hesitate to contact them per mail for any further information. Happy knitting!
31.08.2022 - 15:08
![]() Helen Goodson ha scritto:
Helen Goodson ha scritto:
When slipping the stitches onto a stitch holder towards the end on the left and right front pieces are the first 7 stitches slipped from the garter stitch rows (where the button holes are) or from the moss stitch side ?
18.02.2022 - 10:12DROPS Design ha risposto:
Dear Mrs Goodson, on left front piece, work the first 7 sts (then the first stitch) at the beginning of a row from wrong side then slip them/it on a thread; on right front piece, work the first 7 (then the first stitch) at the beginning of a row from right sdie and then slip them/it on a thread - so that you don't need to cut yarn. The first 7 sts from RS/WS are the 7 front band sts, then slip the next 3 or 4 sts (see size) = sts in moss stitch. When working hood, you will then knit up these stitches on both front pieces. Happy knitting!
18.02.2022 - 14:21
![]() Sandra ha scritto:
Sandra ha scritto:
Ya llevo los 70 cm de la espalda para talla S y no se cómo seguir con las disminuciones del cuello, no entiendo bien el final :(
22.01.2021 - 22:56DROPS Design ha risposto:
Ver la respuesta abajo.
23.01.2021 - 20:12
![]() Sandra ha scritto:
Sandra ha scritto:
Hola! Podríais resolverme la siguientes dudas? En la explicación final de la espalda que dice: En una vuelta se rematan para el cuello 8 pts al volver otros 8pts la siguiente vuelta 10pts y así sucesivamente? O solo una vez 8pts de ida y vuelta o sea 16 pts (para la tallaS). Por otra parte dice “rematar 1pts en la vta a partir del cuello= ¿¿14 veces de ida? Gracias por vuestra atención!
19.01.2021 - 23:45DROPS Design ha risposto:
Hola Sandra. Los patrones de DROPS están preparados para las tallas S-XXXL. Si hay varios números, significa que el primer número es para la talla S, el 2º para la talla M, etc. Si hay solo un número, entonces es igual para todas las tallas. En tu caso, en la espalda para el escote hay que cerrar primero 8 puntos y después 1 punto a cada lado en el escote (un total de 10 puntos), cada hombro se termina por separado. Los 14 puntos son los puntos restantes para el hombro.
23.01.2021 - 20:10
![]() Derock ha scritto:
Derock ha scritto:
Bonjour, j'aurai voulu tricoter la capuche séparément puis la coudre mais je ne sais pas combien de mailles je dois monter en taille m ? Merci à vous et bravo pour vos superbes modèles
17.01.2021 - 13:53DROPS Design ha risposto:
Bonjour Mme Derock, les mailles de la capuche doivent être relevées, et le nombre va varier en fonction de votre tension en hauteur notamment - vous pouvez peut-être essayez de mesurer la longueur de l'encolure et de calculer ainsi le nombre de mailles qu'il vous faudra. Bon tricot!
18.01.2021 - 09:52
|
|
Aurora#aurorajacket |
|
 |
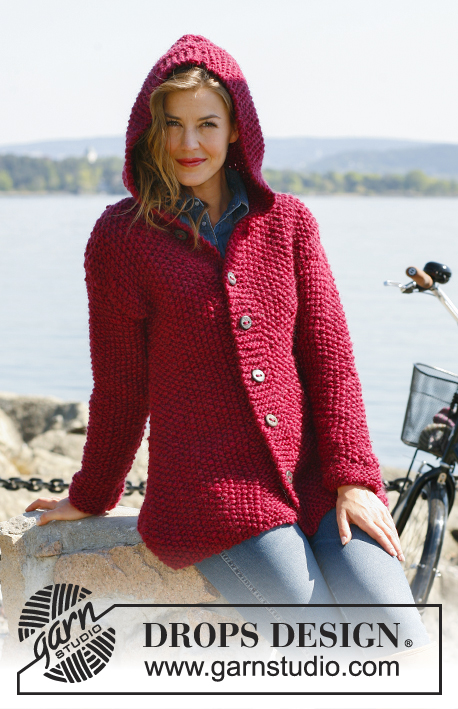 |
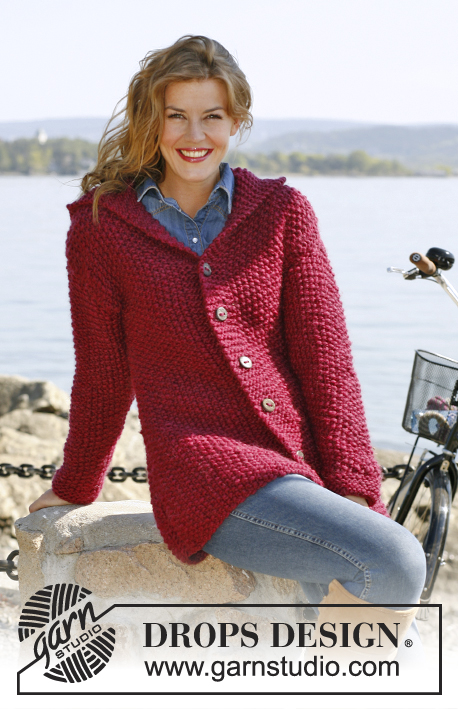
Giacca DROPS ai ferri, lavorata a grana di riso con cappuccio, in "Andes" o "Snow".
DROPS 132-9 |
|
|
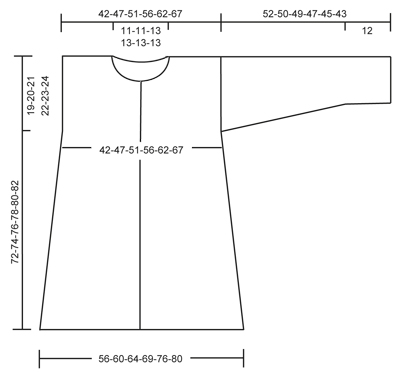
GRANA DI RISO: 1° ferro: * 1 m a dir, 1 m a rov *, ripetere da * a *. 2° ferro: Lavorare a rov le m a dir e a dir le m a rov. Ripetere il 2° ferro. PUNTO LEGACCIO (avanti e indietro sul ferro) Lavorare tutti i ferri a dir. SUGGERIMENTO PER PRENDERE LE MISURE: Per via del peso del capo, misurare il lavoro tenendolo sollevato; in caso contrario, la giacca risulterebbe troppo lunga una volta indossata. ASOLE: Chiudere per le asole, sul bordo anteriore destro. 1 asola = lavorare insieme a dir la 3a e la 4a m del bordo anteriore destro, fare poi 1 m gettata. Chiudere per le asole quando il lavoro misura: TAGLIA S: 19, 28, 37, 46, 55 e 64 cm TAGLIA M: 21, 30, 39, 48, 57 e 66 cm TAGLIA L: 23, 32, 41, 50, 59 e 68 cm TAGLIA XL: 20, 30, 40, 50, 60 e 70 cm TAGLIA XXL: 22, 32, 42, 52, 62 e 72 cm TAGLIA XXXL: 24, 34, 44, 54, 64 e 74 cm SUGGERIMENTO PER IL CAPPUCCIO: Per evitare che si formi un buco nel punto in cui le m sono state messe in sospeso per lo scollo, raccogliere un filo tra 2 m e lavorarlo insieme a 1 m sul ferro DIETRO: Si lavora avanti e indietro sul ferro. Avviare 50-54-58-62-68-72 m sui ferri n° 10 con il filato Andes. Lavorare a GRANA DI RISO – vedere spiegazioni precedenti! RICORDARSI LA TENSIONE DEL LAVORO! Quando il lavoro misura 8 cm – leggere il SUGGERIMENTO PER PRENDERE LE MISURE – diminuire 1 m da ciascun lato. Ripetere le diminuzioni ogni 8 cm per 6 volte = 38-42-46-50-56-60 m. Quando il lavoro misura 53-54-55-56-57-58 cm, inserire 1 segno da ciascun lato (i segni indicano l’inizio degli scalfi). Quando il lavoro misura 70-72-74-76-78-80 cm, chiudere le 8-8-10-10-10-10 m centrali per lo scollo e proseguire ogni spalla separatamente. Al ferro successivo, chiudere 1 m dal lato dello scollo = 14-16-17-19-22-24 m. Chiudere le m quando il lavoro misura 72-74-76-78-80-82 cm. DAVANTI SINISTRO: Si lavora avanti e indietro sul ferro. Avviare 30-32-34-36-39-41 m (comprendono 7 m del bordo centrale) con i ferri n° 10 e il filato Andes. Lavorare le 7 m del bordo centrale a PUNTO LEGACCIO – vedere spiegazioni precedenti – e le rimanenti m a grana di riso. Quando il lavoro misura 8 cm, cominciare a diminuire sul lato come fatto per il dietro = 24-26-28-30-33-35 m. Quando il lavoro misura 53-54-55-56-57-58 cm, inserire un segno (indica l’inizio dello scalfo). Continuare a lavorare finché il lavoro non misura 66-68-70-72-74-76 cm. Mettere poi in attesa su un fermamaglie le m iniziali di ciascun ferro, dal lato dello scollo (dopo averle lavorate così da evitare di tagliare il filo) come segue: 7 m per 1 volta, 1 m per 3-3-4-4-4-4 volte = per la spalla rimangono 14-16-17-19-22-24 m. Chiudere le m quando il lavoro misura 72-74-76-78-80-82 cm. DAVANTI DESTRO: Lavorare come il davanti sinistro, ma speculare. In aggiunta, diminuire per le asole, sul bordo – vedere spiegazioni precedenti. MANICHE: Si lavorano avanti e indietro sul ferro. Avviare 24-24-26-26-28-28 m con i ferri n° 10 e il filato Andes. Lavorare 8 ferri a punto legaccio, e proseguire a grana di riso. Allo stesso tempo, quando il lavoro misura 12 cm, aumentare 1 m da ciascun lato. Ripetere gli aumenti ogni 8-7-7-5-5-4 cm per 5-6-6-7-7-8 volte = 34-36-38-40-42-44 m. Quando il lavoro misura 52-50-49-47-45-43 cm, chiudere le m senza stringere troppo il filo. ATTENZIONE: misure più piccole per le taglie più grandi perché le spalle sono più larghe. CONFEZIONE: Cucire le spalle. Cucire le maniche – vedere i segni sul davanti e sul dietro per capire dove iniziano le maniche. Cucire i lati e i bordi delle maniche, bordo contro bordo, nell’asola anteriore della m esterna per evitare una cucitura troppo spessa. Cucire i bottoni. CAPPUCCIO: Riprendere da 35 a 42 m attorno al collo (queste m comprendono le m messe in sospeso sul davanti), con i ferri n° 10 e il filato Andes. Lavorare 1 ferro a dir sul rovescio del lavoro e ALLO STESSO TEMPO lavorare per evitare che si formi un buco nelle transizioni nella parte anteriore dello scollo – vedere SUGGERIMENTO PER IL CAPPUCCIO. Lavorare 8 ferri a punto legaccio. Al ferro successivo, sul diritto del lavoro, distribuire in modo uniforme degli aumenti, così da portare il numero di m a 48-50-52-54-56-58. ATTENZIONE: non aumentare in corrispondenza delle 7 m iniziali e finali (= bordi). Continuare a lavorare a punto legaccio le 7 m dei bordi; lavorare le rimanenti m a grana di riso finché il cappuccio non misura 47-47-48-48-49-49 cm. Chiudere le m. Piegare il cappuccio in due e cucirlo insieme; cucire bordo contro bordo per evitare una cucitura troppo spessa. |
|
 |
|
Avete terminato questo modello?Allora taggate le vostre foto con #dropspattern #aurorajacket o inviatele alla #dropsfan gallery. Avete bisogno di aiuto con questo modello?Troverete 10 video tutorial, una sezione per i commenti/domande e molto altro guardando il modello su www.garnstudio.com © 1982-2026 DROPS Design A/S. Ci riserviamo tutti i diritti. Questo documento, compreso tutte le sue sotto-sezioni, è protetto dalle leggi sul copyright. Potete leggere quello che potete fare con i nostri modelli alla fine di ogni modello sul nostro sito. |
|


Con oltre 40 anni di esperienza nel design di modelli di maglia e uncinetto, DROPS Design offre la più estesa collezione di modelli gratuiti su internet - tradotti in 17 lingue. Ad oggi vi possiamo fornire 324 cataloghi e 12290 modelli - 9561 dei quali sono tradotti in Italiano.
Ci stiamo impegnando molto per darvi il meglio che vi possiamo offrire in termini di maglia e uncinetto, ispirazioni e consigli così come filati di grande qualità ad un prezzo incredibile! Volete utilizzare i nostri modelli per qualcosa d'altro oltre al vostro uso personale? Potete leggere tutto ciò che è consentito nel testo sul Copyright in basso su tutte le pagine dei nostri modelli. Buon lavoro!
Lasciare un commento sul modello DROPS 132-9
Noi saremmo felici di ricevere i tuoi commenti e opinioni su questo modello!
Se vuoi fare una domanda, fai per favore attenzione a selezionare la categoria corretta nella casella qui sotto per velocizzare il processo di risposta. I campi richiesti sono indicati da *.