
Categorie popolari
State cercando un filato?


Commenti / Domande (34)
![]() Birgit ha scritto:
Birgit ha scritto:
Sehr geehrte Damen und Herren, ich komme mit dem zusammen nähen nicht zurecht, wie soll das Teil gefaltet werden A&B oder A&C , und dann zu B zusammen nähen, was ist mit D ? Ich begreife das alles nicht. Mfg Birgit
22.02.2026 - 17:19
![]() Rosemary Potter ha scritto:
Rosemary Potter ha scritto:
Please could you make the assembly instructions clearer please, or better still, add a video that works? I've got as far as sewing C to A, then A to B, but the rest of it is as clear as mud. Thank you!
16.05.2023 - 15:02DROPS Design ha risposto:
Dear Mrs Potter, in this video, we show the assembly of a similar hat, it might be the one that could help you. Happy assembly!
16.05.2023 - 16:04
![]() Catherine Elliott ha scritto:
Catherine Elliott ha scritto:
Is it possible to have a video of the assembly of the hat. I find the written instruction a bit confusing. I can see that it has been done before but I cannot view them.
31.03.2023 - 15:43
![]() Marny Fischer ha scritto:
Marny Fischer ha scritto:
Can the yarn be something thinner - for a chemo hat to be worn by friend here in southern California? She wants something that would be COOL. Any suggestions, if not this hat, would be appreciated.\\r\\n\\r\\nThank you from the bottom of my heart for all the gifts you share. I will have to live 10,000 years in order to make everything!
04.07.2018 - 09:24DROPS Design ha risposto:
Dear Mrs Fisher, you can use any other yarn group B as Karisma, try our Yarn converter to see alternatives (click then on each name to see the shadecard and get more informations about the yarn). Happy knitting!
04.07.2018 - 10:06
![]() Dragica Residovic ha scritto:
Dragica Residovic ha scritto:
Ik kom er niet uit.ik heb een lange geb. lap.uitdaging maar lukt me niet om deze muts in elkar te zetten.groetjes, dragica .bih
12.12.2014 - 23:15DROPS Design ha risposto:
Hoi Dragica. Heb je geprobeerd om het werkstuk op tafel te leggen en dan steeds één deel van het afwerken te doen voordat je verder gaat. Dat helpt mij vaak (het is voor mij moeilijk om dit uit te leggen op afstand).
18.12.2014 - 16:22
![]() Anewa ha scritto:
Anewa ha scritto:
Vielen Dank für die Hilfen, das Video war wirklich sehr hilfreich. Rechtzeitig zum Kälteeinbruch ist die Mütze nun fertig. Meine Ohren danken es euch!
25.11.2013 - 22:48
![]() Carla ha scritto:
Carla ha scritto:
Dit snap ik niet:Trek de draad op de boordsteek aan de bovenkant van de muts middenvoor aan en vouw de andere punt naar middenvoor (aan de binnenkant van de muts) naar beneden richting D in fig 1, naai de punt aan de binnenkant van de muts vast.
19.11.2013 - 10:18DROPS Design ha risposto:
Hoi Carla. Dit is wel een beetje moeilijk uitleggen op de blog. Je moet letterlijk doen wat er staat. Kijk op de tekening en op het resultaat op de foto. Of vraag bij je DROPS winkel (daar kunnen zij het laten zien). Ik hoop dat je uitkomt.
17.12.2013 - 11:01
![]() Janet ha scritto:
Janet ha scritto:
Do you have a more detailed instruction for putting this hat together? 131-#9 Tiffany Hat
13.09.2013 - 05:41DROPS Design ha risposto:
Dear Janet, follow carefully the explanations and charts, and if necessary, do not hesitate to contact the store where you bought your yarn. Happy knitting!
13.09.2013 - 08:57
![]() Dagmar Durek ha scritto:
Dagmar Durek ha scritto:
Ich kann in der Anleitung nicht die dari beschriebene fig. 1 mit den Punkten A bis C finden ?
27.01.2013 - 18:11DROPS Design ha risposto:
Liebe Frau Durek, vielen Dank für den Hinweis. Nun sollte das Diagramm sichtbar sein.
29.01.2013 - 08:11Yolis Souzar ha scritto:
Me gusta mucho, intenté hacerlo, pero no entiendo el gráfico. Saludos
23.10.2011 - 23:56
|
|||||||
Tiffany#tiffanyset |
|||||||
 |
 |
||||||
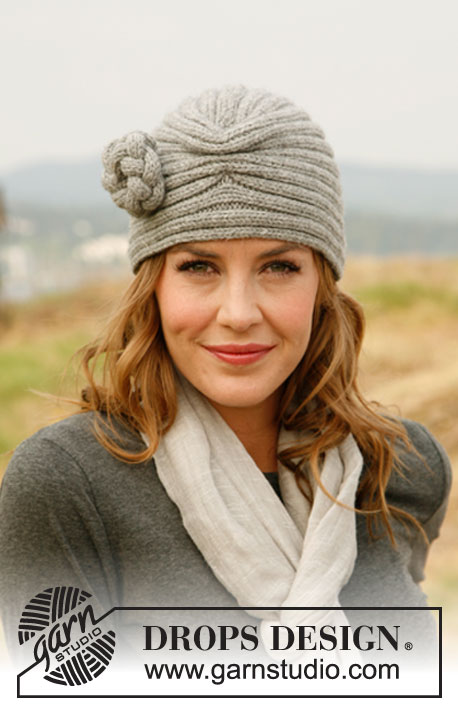
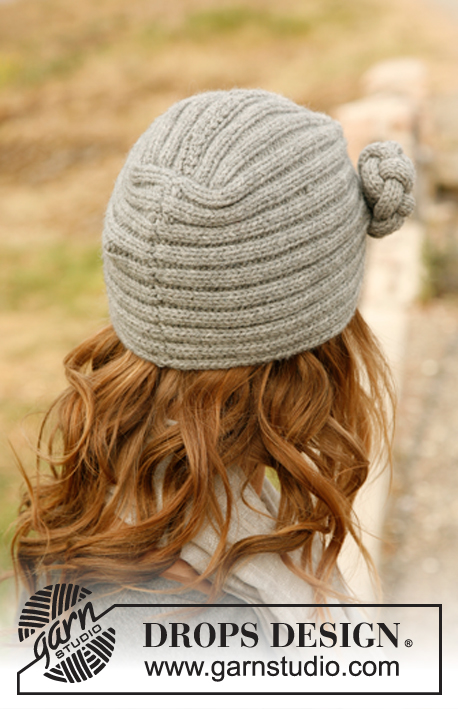
Cappello DROPS lavorato ai ferri con fiore in "Karisma".
DROPS 131-9 |
|||||||
|
CAPPELLO: Il cappello è lavorato da lato a lato dal centro dietro. Avviare 50-58 m. (compresa 1 m. di vivagno a ogni lato) con Karisma con i f. n° 4 mm. Sul 1° f. (= diritto del lavoro) lavorare a coste come segue: 1 m. di vivagno (lavorata a m. rasata fino alla fine del lavoro), * 2 m. dir., 2 m. rov. *, ripetere *-*, finire con 1 m. di vivagno (lavorata a m. legaccio fino alla fine del lavoro). Inserire un segnapunti alla fine del 1° f. = cima del cappello - vedere A in fig. 1 (bordo inferiore del cappello = C in fig. 1 = all’inizio del 1° f.). Nota: la fig. 1 mostra quindi il cappello piegato. Continuare a coste con 1 m. di vivagno a ogni lato in questo modo fino a quando il lavoro misura 26-27 cm. Ora inserire un altro segnapunti alla fine del f. dal diritto del lavoro (= centro davanti - vedere B in fig. 1). Continuare fino a quando il lavoro misura 52-54 cm, finire con 1 f. dal diritto del lavoro. Sul f. successivo (= rovescio del lavoro) intrecciare senza stringere tutte le m. con dir. su dir. e rov. su rov., tagliare il filo e tenere 50-60 cm per la confezione. CONFEZIONE: Piegare il lavoro a metà, cucire i bordi dal diritto del lavoro al centro dietro e in cima con dei punti come segue: cucire da C a A e continuare fino a B (centro davanti). Girare il lavoro (rovescio del lavoro in fuori) e cucire la punta al centro dietro, a circa 4 cm da A – vedere la fig. 2, piegare la punta in basso verso C e cucirla alla cucitura al centro dietro. Tirare forte la costa in cima al cappello al centro davanti, e piegare l’altra punta sul centro davanti (sull’interno del cappello) giù verso D in fig 1, cucire la punta all’interno del cappello. FIORE: Il fiore è una spirale formata da 3 cordini intrecciati. Lavorare 1 cordino come segue: avviare 6 m. con Karisma con i f. n° 4 mm, lavorare a m. rasata per circa 30 cm, intrecciare. Lavorare altri 2 cordini nello stesso modo. Intrecciare i cordini e cucire le estremità ad ogni lato. Arrotolare la treccia in una spirale e affrancarla al cappello (o a una spilla da balia). |
|||||||
Spiegazioni del diagramma |
|||||||
|
|||||||
 |
|||||||
Avete terminato questo modello?Allora taggate le vostre foto con #dropspattern #tiffanyset o inviatele alla #dropsfan gallery. Avete bisogno di aiuto con questo modello?Troverete 7 video tutorial, una sezione per i commenti/domande e molto altro guardando il modello su www.garnstudio.com © 1982-2026 DROPS Design A/S. Ci riserviamo tutti i diritti. Questo documento, compreso tutte le sue sotto-sezioni, è protetto dalle leggi sul copyright. Potete leggere quello che potete fare con i nostri modelli alla fine di ogni modello sul nostro sito. |
|||||||


Con oltre 40 anni di esperienza nel design di modelli di maglia e uncinetto, DROPS Design offre la più estesa collezione di modelli gratuiti su internet - tradotti in 17 lingue. Ad oggi vi possiamo fornire 324 cataloghi e 12290 modelli - 9561 dei quali sono tradotti in Italiano.
Ci stiamo impegnando molto per darvi il meglio che vi possiamo offrire in termini di maglia e uncinetto, ispirazioni e consigli così come filati di grande qualità ad un prezzo incredibile! Volete utilizzare i nostri modelli per qualcosa d'altro oltre al vostro uso personale? Potete leggere tutto ciò che è consentito nel testo sul Copyright in basso su tutte le pagine dei nostri modelli. Buon lavoro!
Lasciare un commento sul modello DROPS 131-9
Noi saremmo felici di ricevere i tuoi commenti e opinioni su questo modello!
Se vuoi fare una domanda, fai per favore attenzione a selezionare la categoria corretta nella casella qui sotto per velocizzare il processo di risposta. I campi richiesti sono indicati da *.