
Categorie popolari
State cercando un filato?


Commenti / Domande (23)
![]() Joanna ha scritto:
Joanna ha scritto:
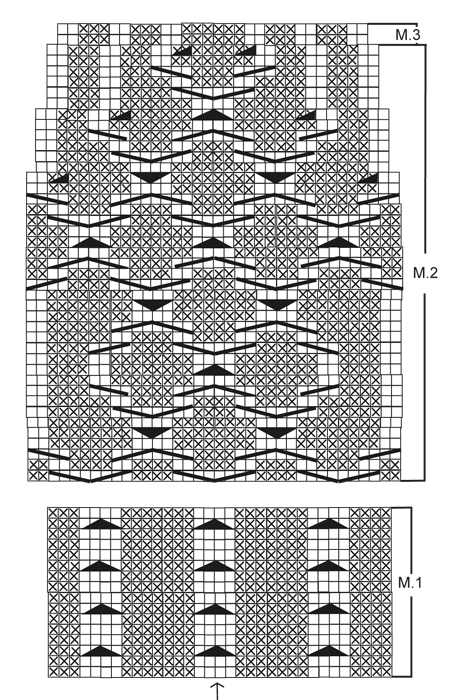
In M1, where do you place the stitch marker for the mid back? Do you place it at st #1 at the beginning of row, or on st #34?
01.01.2026 - 02:02DROPS Design ha risposto:
Hi Joanna, between the first and last stitch in round. Happy knitting!
05.01.2026 - 13:32
![]() Joanna ha scritto:
Joanna ha scritto:
M1 is for 33 sts. You said to cast on 88 sts. So if you repeat the pattern twice (66sts), what happens to the remaining 22 sts?
07.12.2025 - 19:49DROPS Design ha risposto:
Hi Joanna, you have to repeat M1 for the 3rd time (from the beginning) and work 22 remaining stitches. Please see the lesson HERE and 'When stitch count doesn’t match whole repeats of diagram'. Happy knitting!
07.12.2025 - 20:32
![]() Nicole ha scritto:
Nicole ha scritto:
Hallo, ik ben bezig met de sokken en ben bijna klaar met M2, dan begin ik met M3, met nog 68 st. op de naald. M3 is 30 st met daarbij 2 delen van 4 av. In het patroon staat dat ik bij een hoogte van 28-29-30 cm in de av delen 2x moet minderen, van 6 av naar 4 av, maar hoe kan dat als ik maar 4 av had?
08.02.2020 - 09:38DROPS Design ha risposto:
Dag Nicole<,/p>
Deze 6 averecht steken zitten in het midden van M.3, het is de bedoeling dat je daar mindert.
09.02.2020 - 11:26
![]() Aissela Laudo ha scritto:
Aissela Laudo ha scritto:
Grazie mille per il consiglio. Allora chiedo anche se mi potete indicare su quanti ferri a doppia punta metter su i punti iniziali (3, 4 o altro) e...come meglio dividerli su questi. Grazie ancora,sempre chiari e gentili.
27.04.2018 - 23:23DROPS Design ha risposto:
Buongiorno Aissela. Generalmente le maglie vengono divise in parti uguali sui ferri. Può usare 4 ferri a doppia punta; quando poi il numero delle maglie si riduce bastano 3 ferri. Valuti sempre in base a quale soluzione le consente di lavorare il più comodamente possibile. Buon lavoro!
28.04.2018 - 08:46
![]() Aissela Laudo ha scritto:
Aissela Laudo ha scritto:
Non appena avrò finito il modello Kaia inizierò questo bellissimo progetto. Posso chiedere se è possibile lavorarlo con ferri circolari anziché a doppia punta e nel caso che lunghezza cavo? Grazie in anticipo
23.04.2018 - 02:46DROPS Design ha risposto:
Buongiorno Aissela, potrebbe provare ad utilizzare i ferri circolari da 23 cm, ma in ogni caso ad un certo punto andranno utilizzati i ferri a doppia punta, a causa del numero di maglie troppo basso. Buon lavoro!
23.04.2018 - 11:17
![]() Liz ha scritto:
Liz ha scritto:
Just to clarify the previous answer, should the decreases in the large P sections be done on the same rows where the decreases are occurring in the M2 pattern? Or should they be done on a different row? Thank you!!
07.02.2018 - 01:47DROPS Design ha risposto:
Dear Liz, the decreases in the large P sections will occur on different places as in M2 pattern, they start when piece measures 12 cm and are repeated then every 4th cm a total of 3 times while decrease in M2 patterns are shown in diagram. Happy knitting!
07.02.2018 - 09:07
![]() Liz ha scritto:
Liz ha scritto:
I am enjoying working on this pattern. I am having trouble understanding where to decrease in the large P sections (where I would be decreasing from 92 sts on my needles to 68sts). I understand that at the end of section M2 there should be 68sts and I should be decreasing 3 times in the P sections does this happen on the same rows that there are decreases in the patterned sections? Thanks in advance for the help.
03.02.2018 - 02:41DROPS Design ha risposto:
Dear Liz, you dec 4 sts in each of the large P sections a total of 3 times (= 4 sts x 2 sections x 4 times = 12 sts dec in the large P sections) + dec 6 sts in each M.2 pattern - see diagram (= 6 sts x 2 repeats = 12 sts dec) = 92 sts - 12 - 12 = 68 sts remain when all dec in P-sections are done and after M.2 has been completed in height. Happy knitting!
05.02.2018 - 10:54
![]() Erin ha scritto:
Erin ha scritto:
Sorry to have to ask another question, I am trying to understand how the decreases occur in section M2. Which row do they occur in on the M2 diagram? Where I see 2 less stitches in each row of the diagram? Thank you!
21.01.2018 - 02:37DROPS Design ha risposto:
Hi Erin, The 2 squares with the dark triangle inside (the last symbol in the list where the instructions say purl 2 together) is where you decrease in M2. The symbol is first on row 29 where the 3rd and 4th stitches on the row and the 33rd and 34th stitches are purled together and then again on rows 35 and 41, where you purl 2 stitches together each time you reach the symbol. I hope this helps and happy knitting!
21.01.2018 - 07:15
![]() Erin ha scritto:
Erin ha scritto:
I'm new to knitting socks, as I'm reading the pattern should I be starting at the bottom of M1 diagram and work up (as it appears I do this for the M2 diagram)?
15.01.2018 - 04:24DROPS Design ha risposto:
Hi Erin, Yes, unless stated otherwise, the diagrams are always read from bottom right to bottom left and then on upwards. Happy knitting!
15.01.2018 - 06:09
![]() Trine ha scritto:
Trine ha scritto:
Nå har jeg telt og finlest om og om igjen, og det står når man begynner på M2 at man skal strikke sammen to og to masker over fletten i det feltet med vrange masker. Da blir det etter hva jeg forstår bare 10 masker igjen i dette feltet og 92 masker på pinnen. Så når jeg har strikket 12 cm, står det at jeg skal felle to masker i dette feltet og da ha 10 masker igjen. Men etter den forrige fellingen hadde jeg bare 10 masker igjen allerede. Hva har jeg gått glipp av?
15.09.2017 - 13:27DROPS Design ha risposto:
Hei Trine. Det at det står = 10 m er at det gjelder de 2 store vr-partiene som er på 10 masker, men etter fellingene er det 8 masker i hver at de 2 store vr-partiene (= 8 masker). God Fornøyelse!
20.09.2017 - 11:44
|
||||||||||||||||||||||
Riverdance#riverdancesocks |
||||||||||||||||||||||
 |
 |
|||||||||||||||||||||
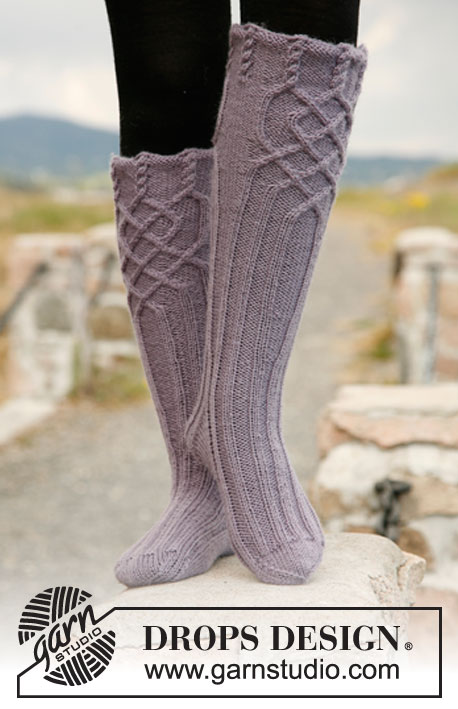
Calze DROPS con trecce in "Karisma".
DROPS 132-8 |
||||||||||||||||||||||
|
SCHEMA: Vedere diagramma M.1, M.2 e M.3 – i diagrammi sono illustrati dal diritto del lavoro e mostrano 1 ripetizione dello schema in larghezza e in altezza. DIMINUZIONI DEL TALLONE: 1° riga (= diritto del lavoro): Lavorare fino a quando rimangono 8 m., passare 1 m. a dir. senza lavorarla, 1 dir., accavallare la m. passata sopra quella appena lavorata, girare il lavoro. 2° riga (= rovescio del lavoro): Lavorare fino a quando rimangono 8 m., passare 1 m. a rov. senza lavorarla, 1 rov., accavallare la m. passata sopra quella appena lavorata, girare il lavoro. 3° riga (= diritto del lavoro): Lavorare fino a quando rimangono 7 m., passare 1 m. a dir., 1 dir. senza lavorarla, accavallare la m. passata sopra quella appena lavorata, girare il lavoro. 4° riga (= rovescio del lavoro): Lavorare fino a quando rimangono 7 m., passare 1 m. a rov. senza lavorarla, 1 rov., accavallare la m. passata sopra quella appena lavorata, girare il lavoro. Continuare le diminuzioni in questo modo con 1 m. in meno prima di ogni diminuzione, fino a quando ci sono 12 m. sul ferro. ---------------------------------------------------------- CALZE: Lavorate in tondo sui ferri a doppia punta. Avviare 88 m. Per tutte le taglie con i ferri a doppia punta misura 3 mm e il filato Karisma. Lavorare 1 giro a dir., quindi lavorare il diagramma M.1, inserire un segnapunti all’inizio del giro (al centro dietro), ALLO STESSO TEMPO sull’ultimo giro del diagramma M.1, aumentare 1 m. in ogni sezione a rov., lavorando 2 rov. nel primo rov. in ogni sezione a rov. (cioè aumentare in ogni sezione a rov. al centro dietro alla fine del giro) = 96 m.. Passare ai ferri a doppia punta misura 3.5 mm e continuare come segue: lavorare il diagramma M.2 sulle prime 36 m., lavorare a rov. le successive 12 m. – allo stesso tempo lavorare le 4 m. sulle trecce 2 a 2 a dir. (cioè diminuire 2 m.), lavorare il diagramma M.2 sulle successive 36 m. e a rov. sulle ultime 12 m. – allo stesso tempo lavorare le 4 m. sulle trecce 2 a 2 a dir. (cioè diminuire 2 m.) = 92 m.. Continuare in questo modo con il diagramma M.2 e le m. a rov. per ogni lato. FARE ATTENZIONE ALLA TENSIONE DEL LAVORO! Quando il lavoro misura 12 cm, diminuire 2 m. In ognuna delle sezioni larghe a rov. (= 10 m.) per lato – cioè lavorare le prime 2 e le ultime 2 m. a rov. insieme. Ripetere le diminuzioni ogni 4 cm per un totale di 3 volte. Quando il diagramma M.2 è stato lavorato, il lavoro misura circa 20 cm e ci sono 68 m. sul ferro. Continuare con il diagramma M.3 sul diagramma M.2 e sulle 4 m. a rov. per lato. Quando il lavoro misura 28-29-30 cm, diminuire 2 m. nella sezione larga a rov. davanti e dietro (cioè 6 m. a rov. diventano 4 m. a rov.) = 64 m.. Quando il lavoro misura 33-34-35 cm, diminuire tutte le sezioni a 4 rov. a 2 rov. (cioè diminuire 8 m.) = 56 m.. Quando il lavoro misura 38-40-42 cm, tenere le prime 26 m. (dall’inizio del giro) sul ferro per il tallone (vedere la freccia nel diagramma, questo indica il centro dietro e in centro davanti). Trasferire le 30 m. rimanenti su un ferro ausiliario (= centro sopra del piede). Continuare con lo schema come prima sulle 26 m. del tallone per 5-5,5-6 cm. Inserire un segnapunti, misurare il piede da qui. Quindi lavorare le DIMINUZIONI DEL TALLONE a maglia rasata su tutte le m. – vedere la spiegazione sopra! Dopo le diminuzioni per il tallone, riprendere 11-12-13 m. su ogni lato del tallone e passare le 30 m. dal ferro ausiliario sul ferro di lavoro = 64-66-68 m.. Inserire un segnapunti per lato delle 30 m. sul sopra del piede. Continuare lo schema come prima su queste m. e a maglia rasata sulle rimanenti m. – Allo stesso tempo lavorare a dir. le ultime 2 m. PRIMA del primo segnapunti sul sopra del piede insieme a dir. ritorto (cioè lavorare nel filo dietro al posto del davanti) e lavorare le prime 2 m. PRIMA del segnapunti sul sopra del piede insieme a dir.. Ripetere le diminuzioni a righe alterne per un totale di 8-9-8 volte = 48-48-52 m.. Continuare fino a quando il lavoro misura 18-20-22 cm dal segnapunti sul tallone (= circa 4-4-5 cm rimasti). Inserire un segnapunti per lato in modo che ci siano 24-24-26 m. sul sopra del piede e 24-24-26 m. sotto il piede. Lavorare a dir. tutte le m. e ALLO STESSO TEMPO diminuire per la punta per ogni lato dei segnapunti come segue: lavorare fino a quando rimangono 3 m. prima del segnapunti, lavorare 2 m. insieme a dir., 2 dir. (il segnapunti è tra queste 2 m.), 2 m. insieme a dir. ritorto. Ripetere le diminuzioni a righe alterne per un totale di 4-4-5 volte e poi ogni riga per un totale 6 volte = 8 m. rimaste sul ferro. Tagliare il filo e passarlo attraverso le m. rimaste, tirare e affrancare. |
||||||||||||||||||||||
Spiegazioni del diagramma |
||||||||||||||||||||||
|
||||||||||||||||||||||
 |
||||||||||||||||||||||
Avete terminato questo modello?Allora taggate le vostre foto con #dropspattern #riverdancesocks o inviatele alla #dropsfan gallery. Avete bisogno di aiuto con questo modello?Troverete 10 video tutorial, una sezione per i commenti/domande e molto altro guardando il modello su www.garnstudio.com © 1982-2026 DROPS Design A/S. Ci riserviamo tutti i diritti. Questo documento, compreso tutte le sue sotto-sezioni, è protetto dalle leggi sul copyright. Potete leggere quello che potete fare con i nostri modelli alla fine di ogni modello sul nostro sito. |
||||||||||||||||||||||


Con oltre 40 anni di esperienza nel design di modelli di maglia e uncinetto, DROPS Design offre la più estesa collezione di modelli gratuiti su internet - tradotti in 17 lingue. Ad oggi vi possiamo fornire 324 cataloghi e 12290 modelli - 9561 dei quali sono tradotti in Italiano.
Ci stiamo impegnando molto per darvi il meglio che vi possiamo offrire in termini di maglia e uncinetto, ispirazioni e consigli così come filati di grande qualità ad un prezzo incredibile! Volete utilizzare i nostri modelli per qualcosa d'altro oltre al vostro uso personale? Potete leggere tutto ciò che è consentito nel testo sul Copyright in basso su tutte le pagine dei nostri modelli. Buon lavoro!
Lasciare un commento sul modello DROPS 132-8
Noi saremmo felici di ricevere i tuoi commenti e opinioni su questo modello!
Se vuoi fare una domanda, fai per favore attenzione a selezionare la categoria corretta nella casella qui sotto per velocizzare il processo di risposta. I campi richiesti sono indicati da *.