
Categorie popolari
State cercando un filato?


Commenti / Domande (90)
![]() Dina ha scritto:
Dina ha scritto:
Hei! Jeg bare lurer på når jeg skal måle underveis; burde det gjøres når man holder strikketøyet oppe, eller liggende flatt? Det blir vel en viss tyngde i plagget, slik at det vil strekke seg litt i lengden..? Takk!
04.04.2016 - 16:56DROPS Design ha risposto:
Hej Dina, Bomull-Lin er ikke så tung så tøjet vil vokse, så det behøver du egentlig ikke tænke på, men vil du være helt sikker, så kan du selvfølgelig måle det når du holder det op. God fornøjelse!
05.04.2016 - 11:09
![]() Stephanie ha scritto:
Stephanie ha scritto:
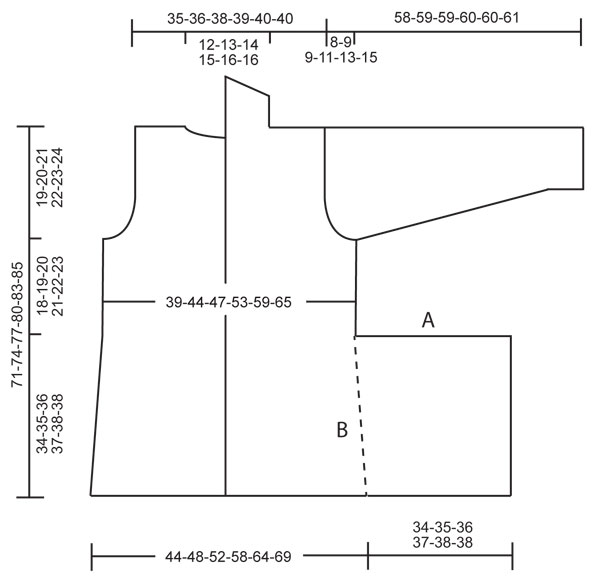
Hi Drops team! I have a question about the front pieces. I'm making the large and have cast on 97 st and knitted stockinette to 13-3/4in. Could you explain how you bind off the first 59 st from RS? Is it done every other row or all on one row. If it is done every other row it would seem to be too long. I can't figure out how to make it look like the picture. Thanks! ~steph
09.12.2015 - 23:31DROPS Design ha risposto:
Dear Stephanie, the 59 sts should be bind off on 1 row => first 59 sts at beg of a row from RS - this match the side "A" in measurement chart. This side will be then sewn together to the part "B" on back piece (side seams). Happy knitting!
10.12.2015 - 10:07
![]() Marina ha scritto:
Marina ha scritto:
Hallo liebes Drops-Team, ich hänge beim Halsausschnitt des rückenteils-fest . nachdem ich die mittleren maschen abgekettet habe, heißt es weiter, und ab hier versteh ich nur noch Bahnhof, das in der nächsten runde 1 masche abgekettet wird = in allen größen 20 maschen ???????? hoffe sie können mir auf die sprünge helfen und verbleibe mit freundlichen grüßen ...........
05.07.2015 - 19:12DROPS Design ha risposto:
Sie haben ja die mittleren M abgekettet und stricken nun jede Schulter einzeln weiter. Am Anfang der nächsten R, die am Halsrand beginnt, d.h. neben den abgeketteten M, ketten Sie nun noch 1 M ab. Dann bleiben für die Schulter noch 20 M übrig. Dies gilt für alle Größen, daher der Hinweis "in allen Größen 20 M". Bei der anderen Schulter gehen Sie ebenso vor, ketten also auch in der nächsten R, die am Halsrand beginnt, 1 M ab und haben dann noch 20 M übrig.
06.07.2015 - 22:43Mariola ha scritto:
Can I ask for a translation in Polish
27.12.2014 - 21:44Jean Halford-Thompson ha scritto:
I think the measurements on the schematic are incorrect. I haven't checked them but the depth of the armhole is marked for my size (fourth size) as 11cms. But the pattern says to cast off 13 stitches. With a gauge of 17sts to 10cms this cannot be 11cms. As it happened, I made this on my knitting machine so I drew my own schematic on the knit radar. That is how I noticed the problem. Apologies if I am wrong
15.12.2014 - 19:48
![]() Anna ha scritto:
Anna ha scritto:
Könnte man diese Jacke auch in Bomull-Lin stricken? Die Maschenprobe ist anscheinend doch ähnlich und ich würde ungern auf den Leinencharakter dieser Jacke verzichten wollen.
13.11.2014 - 17:04DROPS Design ha risposto:
Obwohl Bomull-Lin zu einer anderen Garngruppe als Lin gehört, wird in diesem Fall auch Bomull-Lin als Ersatz empfohlen, da damit der Charakter wirklich am besten erhalten bleibt. Da die Jacke in Lin eher locker gestrickt wird, müssten Sie auch mit der dickeren Bomull-Lin die Maschenprobe gut einhalten können. Insgesamt wird die Jacke dann aber eben etwas dicker und dichter. Beachten Sie, dass Sie den Mengenverbrauch neu berechnen müssen, Bomull-Lin hat eine LL von 85m/50g, Lin = 120m/50g.
16.11.2014 - 11:29
![]() Andrea Dahlhoff ha scritto:
Andrea Dahlhoff ha scritto:
Hallo liebes Drops-Team! Verstehe den Halsausschnitt nicht ganz. Wo wird zusammengenäht, wofür ist die Schräge?
20.09.2014 - 14:22DROPS Design ha risposto:
Ich bin nicht sicher, ob ich Ihre Frage verstanden habe... Bei diesem Modell arbeiten Sie vorne keinen Halsausschnitt, die Form ergibt sich durch das Tragen der Jacke. Die 20 M, die Sie abketten, sind die Schulter-M. Die M in Richtung Hals stricken Sie für den hinteren Kragen weiter und ketten ihn schräg ab, damit er eine bessere Passform bekommt. Die abgeketteten Schulter-M nähen Sie anschließend an die 20 abgeketteten Schulter-M des Rückenteils.
20.09.2014 - 23:31Sheila Wood ha scritto:
Would it be possible to knit this in Vivaldi mohair?
01.05.2014 - 10:29
![]() Jessica Uyede ha scritto:
Jessica Uyede ha scritto:
How many yards do i need for the large size specifically? (I have a certain amount of yarn that was given to me and would like to make sure i have enough)
03.03.2014 - 19:51DROPS Design ha risposto:
You would need approx 1575 yds for the largest size.
03.03.2014 - 22:38
![]() Rosemary ha scritto:
Rosemary ha scritto:
I don't see the LIN yarn on here. Is it discontinued?
24.01.2014 - 01:44DROPS Design ha risposto:
Dear Rosemary, DROPS Lin is discontinued, you will find a list of suggesions in the tab "Yarn alternatives" and help here to calculate amount of the alternative yarn. Happy knitting!
24.01.2014 - 09:17
|
|
Lady Jane#ladyjanecardigan |
|
 |
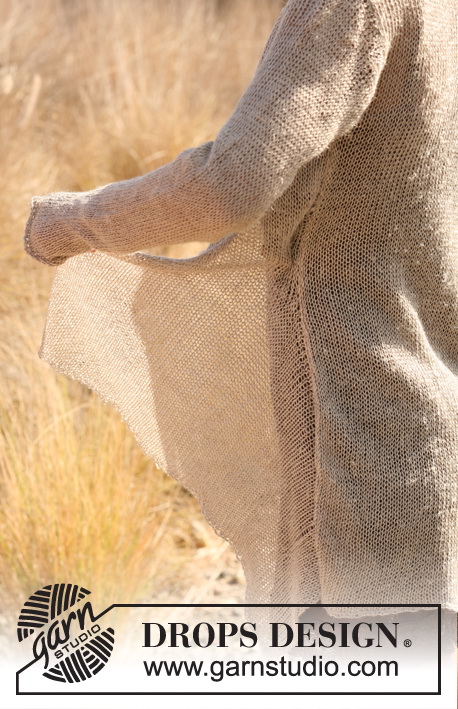 |
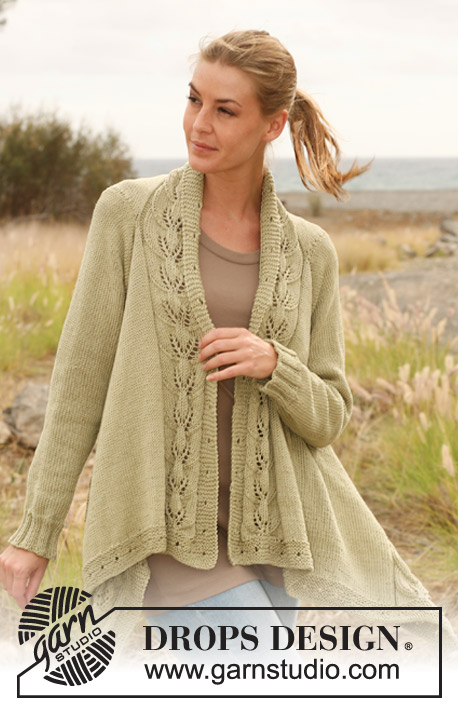
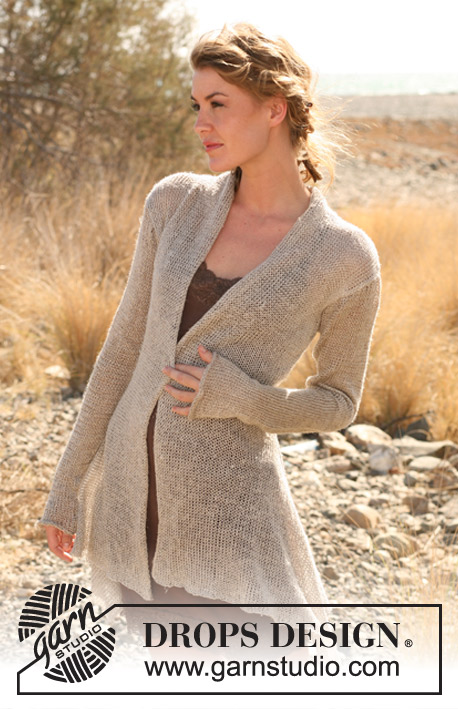
Giacca asimmetrica DROPS in "Lin" o "Muskat". Dalla S alla XXXL.
DROPS 129-3 |
|
|
DIETRO: Si lavora avanti e indietro sul ferro circolare. Avviare 76-84-90-100-110-120 m (incl. 1 m vivagno ai lati) sui ferri circolari n. 5 con filato Lin. Lavorare a maglia rasata. Quando il lavoro misura 10 cm, diminuire 1 m ad ogni lato. Ripetere la diminuzione ogni 7-7½-7½-8-8½-8½ cm per un totale di 4 volte = 68-76-82-92-102-112 m. RICORDATI LA TENSIONE DELLA MAGLIA! Inserire un segno nella m. vivagno su ogni lato quando il lavoro misura 34-35-36-37-38-38 cm (= segnaposto per la confezione). Quando il lavoro misura 52-54-56-58-60-61 cm, intrecciare le maglie e diminuire per gli scalfi delle maniche all’inizio di ogni riga su ogni lato come segue: 3 m. per 1 volta, 2 m. per 0-1-2-3-5-7 volte e dim. 1 m. 1-2-2-4-4-5 volte = 60-62-64-66-68-68 m. Quando il lavoro misura 69-72-75-78-81-83 cm, intrecciare le 18-20-22-24-26-26 m. centrali per formare il collo e lavorare quindi ogni spalla separatamente. Dim. 1 m. nella riga seguente dal lato del collo = 20 m. rimanenti sul f. per tutte le taglie. Intrecciare tutte le maglie quando il lavoro 71-74-77-80-83-85 cm. DAVANTI SINISTRO: Si lavora avanti e indietro sul ferro circolare. Avviare 91-97-103-109-115-121 maglie (incl. 1 m. vivagno ai lati) sul ferro circolare n. 5 con filato Lin. Lavorare a maglia rasata. Quando il lavoro misura 34-35-36-37-38-38 cm, intrecciare le prime 57-59-62-63-64-65 m. dal diritto = 34-38-41-46-51-56 m. Continuare a maglia rasata. Quando il lavoro misura 52-54-56-58-60-61 cm, intrecciare e diminuire per lo scalfo della manica sul lato come per il dietro = 30-31-32-33-34-34 m. Quando il lavoro misura 71-74-77-80-83-85 cm, intrecciare le prime 20 m. dal diritto per la spalla per tutte le taglie = 10-11-12-13-14-14 m. rimaste sul f. per il collo. Continuare a maglia rasata finché il collo misura 8-8-9-9-10-10 cm misurati a partire dalla spalla. Continuare a maglia rasata, ALLO STESSO TEMPO intrecciare 1 m. all’inizio di ogni riga dal diritto finché tutti I punti sono stati intrecciati. DAVANTI DESTRO: Lavorare come il davanti sinistro ma in modo speculare. MANICA: Si lavora avanti e indietro sui ferri circolari. Avviare 36-38-40-42-44-46 m. (incl. 1 m. vivagno ai lati) sui ferri circolari n. 5 con filato Lin. Lavorare a maglia rasata. Quando il lavoro misura 8 cm, aumentare di 1 m. su entrambi I lati. Ripetere l’aumento ogni 4-3½-3-2½-2½-2 cm per un totale di 10-12-13-15-15-17 volte = 56-62-66-72-74-80 m. Quando il lavoro misura 50-50-50-49-47-46 cm (NOTA! misura più corta per le taglie grandi perché lo scalfo della manica è più lungo e le spalle più larghe)intrecciare per lo scalfo della manica all’inizio di ogni ferro su ogni lato come segue: 3 m. per 1 volta, 2 m. per 2-2-3-3-3-3 volte, 1 m. per -3-4-2-5-7-9 volte. Quindi intrecciare 2 m. su ogni lato finché il lavoro misura 57-58-58-59-59-60 cm, poi intrecciare 3 m. per 1 volta su ogni lato. Intrecciare tutte le maglie. Ora il lavoro misura circa 58-59-59-60-60-61 cm. Lavorare allo stesso modo l’altra manica. CONFEZIONE: Cucire le spalle. Cucire insieme il collo al centro dietro e attaccarlo al retro della giacca. Cucire insieme lateralmente il davanti e il dietro ai lati dei punti a m. vivagno (ovvero cucire A (=bordo intrecciato del davanti) con B (=lato del dietro) – vedere diagramma. NOTA! Fate in modo che il bordo intrecciato di ogni davanti venga cucito fino al segno posizionato sul dietro, poi continuare la cucitura laterale come prima, ai lati della m. vivagno fino allo scalfo della manica. – vedere diagramma. Cucire le maniche ai lati dei punti a m. vivagno e quindi attaccare le maniche al resto della giacca. |
|
 |
|
Avete terminato questo modello?Allora taggate le vostre foto con #dropspattern #ladyjanecardigan o inviatele alla #dropsfan gallery. Avete bisogno di aiuto con questo modello?Troverete 13 video tutorial, una sezione per i commenti/domande e molto altro guardando il modello su www.garnstudio.com © 1982-2026 DROPS Design A/S. Ci riserviamo tutti i diritti. Questo documento, compreso tutte le sue sotto-sezioni, è protetto dalle leggi sul copyright. Potete leggere quello che potete fare con i nostri modelli alla fine di ogni modello sul nostro sito. |
|


Con oltre 40 anni di esperienza nel design di modelli di maglia e uncinetto, DROPS Design offre la più estesa collezione di modelli gratuiti su internet - tradotti in 17 lingue. Ad oggi vi possiamo fornire 324 cataloghi e 12290 modelli - 9561 dei quali sono tradotti in Italiano.
Ci stiamo impegnando molto per darvi il meglio che vi possiamo offrire in termini di maglia e uncinetto, ispirazioni e consigli così come filati di grande qualità ad un prezzo incredibile! Volete utilizzare i nostri modelli per qualcosa d'altro oltre al vostro uso personale? Potete leggere tutto ciò che è consentito nel testo sul Copyright in basso su tutte le pagine dei nostri modelli. Buon lavoro!
Lasciare un commento sul modello DROPS 129-3
Noi saremmo felici di ricevere i tuoi commenti e opinioni su questo modello!
Se vuoi fare una domanda, fai per favore attenzione a selezionare la categoria corretta nella casella qui sotto per velocizzare il processo di risposta. I campi richiesti sono indicati da *.