
Categorie popolari
State cercando un filato?


Commenti / Domande (24)
![]() Kathy ha scritto:
Kathy ha scritto:
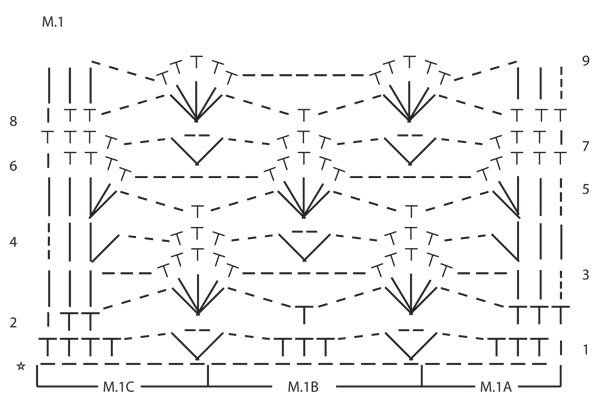
Hello! I am new to using charts and want to make sure I understand it correctly. At the end of row 2, I need to do a single crochet into the chain 1 from the beginning of row 1, is that correct? If so, I’m not sure why but it looks funny when I try to do it! Can’t quite figure out what I’m doing wrong. :) Thank you for your help!
12.04.2020 - 17:10DROPS Design ha risposto:
Dear Kathy, yes that's right - read more about crochet diagrams here. Happy crocheting!
14.04.2020 - 11:40
![]() Ingrid ha scritto:
Ingrid ha scritto:
Voor rij 2, 4,5,7,8 : de stokjes moeten die in de LUS eronder of de STEEK eronder?
27.03.2019 - 17:26DROPS Design ha risposto:
Dag Ingrid,
Als er een enkele steek onder zit (dus bijvoorbeeld een vaste of een stokje, dan haak je in de steek. En als er een lus onder zit dan haak je om de lus. Dus de stk-groep haak je bijvoorbeeld om de lossenlus.
28.03.2019 - 12:34
![]() Ingrid ha scritto:
Ingrid ha scritto:
Bij rij 2 : de stokjesgroep van 5, moeten die in de onderliggende LUS gehaakt worden of in een STEEK ?
27.03.2019 - 16:45
![]() Trine ha scritto:
Trine ha scritto:
Jeg har det samme spørgsmål som andre herinde. Så M1A og M1B skal gentages, så vil den lyde sådan: M1A, M1B, M1A, M1B og til sidst M1C.?
20.06.2018 - 12:05DROPS Design ha risposto:
Hei Trine. Det er kun M.B som gjentas 2 ganger. Du hekler slik: M.1A, M.1B, M1B, M1C. Du har da heklet over de 34 maskene du begynner med. God fornøyelse.
21.06.2018 - 14:30
![]() Demia ha scritto:
Demia ha scritto:
Reihe 3 und Reihe 9 müssten doch eigentlich identisch sein, oder? In Reihe 3 folgen den drei Randstäbchen aber drei Luftmaschen, in Reihe 9 sind es 4 Luftmaschen. Ist das gewollt? Und Frage an alle, die den Schal schon (mehrfach) gearbeitet haben: mit welcher Anzahl von Luftmaschen habt ihr gearbeitet? Danke!
13.08.2016 - 21:23DROPS Design ha risposto:
Liebe Demia, häkeln Sie wie angegeben nur in Reihe 3 nach/vor den Randstäbchen 3 Luftmaschen und in Reihe 9 nach/vor den Randstäbchen 4 Luftmaschen. Es wird dann Reihe 4 - 9 stets wiederholt.
15.08.2016 - 08:46
![]() Lars ha scritto:
Lars ha scritto:
They represent chain stiches (3)
10.07.2016 - 22:21
![]() Rebecca Watson ha scritto:
Rebecca Watson ha scritto:
What do the 3, short vertical lines mean at the beginning of rows 3, 4, 5, & 9? Rebecca
10.07.2016 - 18:18DROPS Design ha risposto:
Dear Mrs Watson, each line represents 1 ch, ie at the beg of row 3,4,5 & 9, start with 3 ch to replace 1st dc at beg of row. Happy crocheting!
11.07.2016 - 09:53
![]() Francesca ha scritto:
Francesca ha scritto:
Salve. Io non riesco a capire come si termina il lavoro non mi è chiaro. Mi potete aiutare
13.02.2016 - 21:52DROPS Design ha risposto:
Buongiorno Francesca. Quando il lavoro misura ca. 160 cm o la misura necessaria, completa in verticale il diagramma M.1, quindi lavora fino alla riga 9 del diagramma. A questo punto, taglia il filo e lo ferma come d’abitudine. Buon lavoro!
16.02.2016 - 13:21
![]() Olga ha scritto:
Olga ha scritto:
Your response is very much appreciated and the explanation as well. Thank you for the time you spent in reading and explaining it. olga
02.01.2016 - 20:18
![]() Olga ha scritto:
Olga ha scritto:
Is it possible to have this pattern in written form rather than the diagram? thank you
28.12.2015 - 11:47DROPS Design ha risposto:
Dear Olga, this pattern is only available as a diagram, each st/group of sts is explained under diagram text, read the odd numbered rows (1, 3,...) from the right towards the left and the even numbered rows (2, 4, ..) from the left towards the right. Happy crocheting!
02.01.2016 - 14:45
|
||||||||||||||||
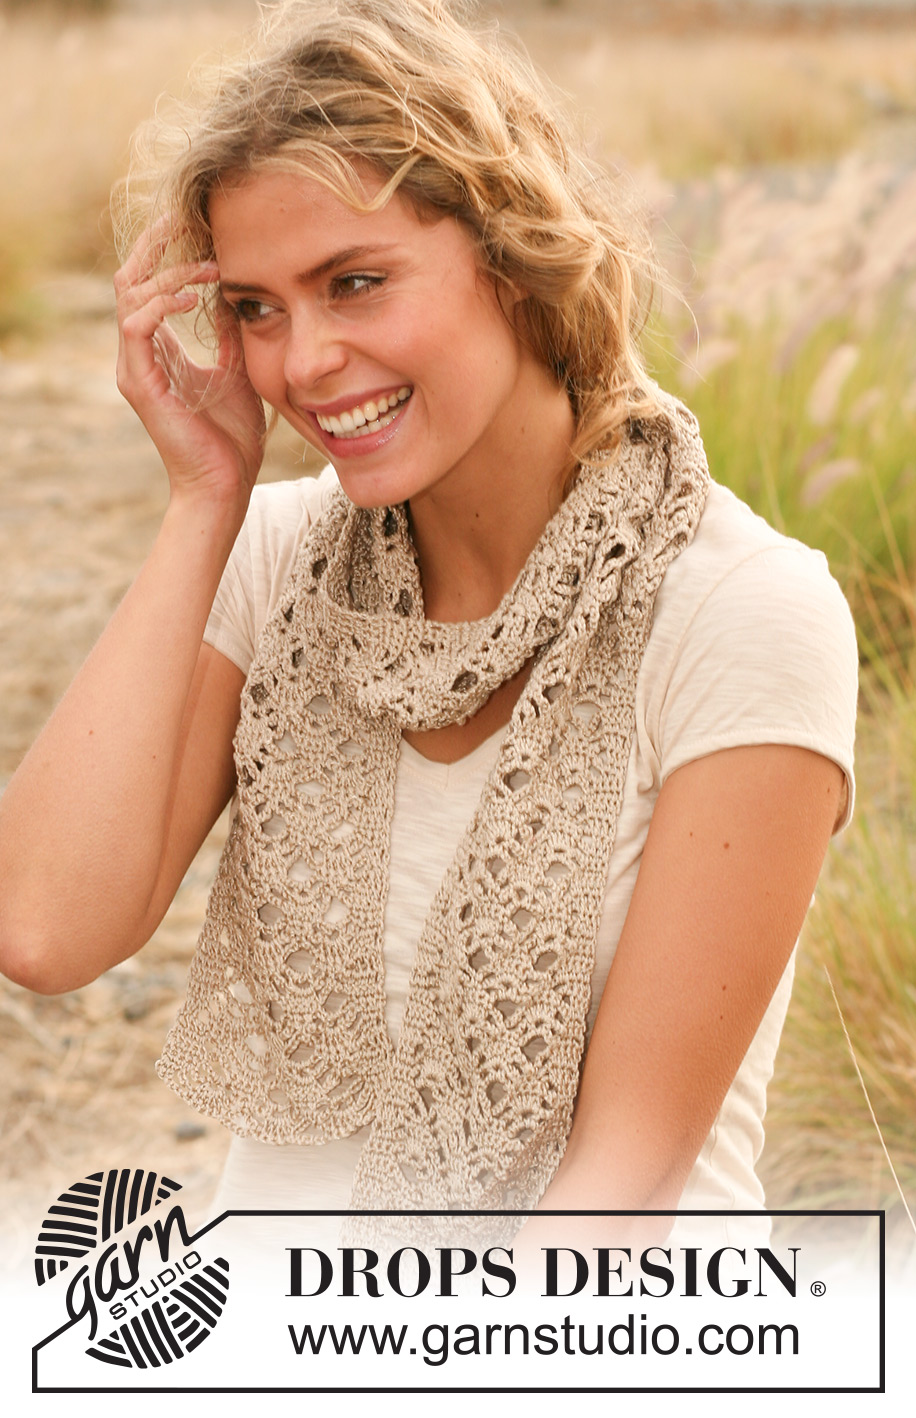
Country Joy#countryjoyscarf |
||||||||||||||||
 |
 |
|||||||||||||||
Sciarpa DROPS all’uncinetto, in "Cotton Viscose".
DROPS 130-29 |
||||||||||||||||
|
MOTIVO: Vedere il diagramma M.1. -------------------------------------------------------- SCIARPA: Con l’uncinetto n° 3,5 ed il filato Cotton Viscose avviare 34 cat (riga di cat indicata con una stella nel diagramma M.1). Proseguire a lavorare come segue: diagramma M.1A, ripetere il diagramma M.1B 2 volte e finire con il diagramma M.1C. Dopo aver lavorato le 9 righe del diagramma M.1 una volta in verticale, proseguire ripetendo le righe dalla 4 alla 9 del diagramma. Proseguire in questo modo finché il lavoro non misura ca.160 cm, finire dopo una intera ripetizione in verticale del motivo. Tagliare e fermare il filo. |
||||||||||||||||
Spiegazioni del diagramma |
||||||||||||||||
|
||||||||||||||||
 |
||||||||||||||||
Avete terminato questo modello?Allora taggate le vostre foto con #dropspattern #countryjoyscarf o inviatele alla #dropsfan gallery. Avete bisogno di aiuto con questo modello?Troverete 4 video tutorial, una sezione per i commenti/domande e molto altro guardando il modello su www.garnstudio.com © 1982-2026 DROPS Design A/S. Ci riserviamo tutti i diritti. Questo documento, compreso tutte le sue sotto-sezioni, è protetto dalle leggi sul copyright. Potete leggere quello che potete fare con i nostri modelli alla fine di ogni modello sul nostro sito. |
||||||||||||||||


Con oltre 40 anni di esperienza nel design di modelli di maglia e uncinetto, DROPS Design offre la più estesa collezione di modelli gratuiti su internet - tradotti in 17 lingue. Ad oggi vi possiamo fornire 324 cataloghi e 12290 modelli - 9561 dei quali sono tradotti in Italiano.
Ci stiamo impegnando molto per darvi il meglio che vi possiamo offrire in termini di maglia e uncinetto, ispirazioni e consigli così come filati di grande qualità ad un prezzo incredibile! Volete utilizzare i nostri modelli per qualcosa d'altro oltre al vostro uso personale? Potete leggere tutto ciò che è consentito nel testo sul Copyright in basso su tutte le pagine dei nostri modelli. Buon lavoro!
Lasciare un commento sul modello DROPS 130-29
Noi saremmo felici di ricevere i tuoi commenti e opinioni su questo modello!
Se vuoi fare una domanda, fai per favore attenzione a selezionare la categoria corretta nella casella qui sotto per velocizzare il processo di risposta. I campi richiesti sono indicati da *.