
Categorie popolari
State cercando un filato?


Commenti / Domande (131)
![]() Michelle Turner ha scritto:
Michelle Turner ha scritto:
Thank you for answering me. But I still don't understand 1-0-2-1-0-2 dc. Please explain more specificly, or can I contact Sue L since she has finished her jacket for her grand daughter. Thank you.
13.03.2014 - 00:26DROPS Design ha risposto:
Dear Mrs Turner, when it says : "5 dc on front band, 1-0-2-1-0-2 dc, repeat M.2 ..", if you work size S or XL, work 5 dc on front band, then 1 dc in next st - if you work size M or XXL, start M.2 - if you work size L or XXXL, work 5 dc on front band then 1 dc in next 2 sts, then M.2. Happy crocheting!
13.03.2014 - 09:09
![]() Mette ha scritto:
Mette ha scritto:
Jeg oplevede desværre også at jakken var meget bred foroven og meget smal forneden. Jakken blev så uproportioneret, at jeg måtte trevle op og opgive.
12.03.2014 - 00:39
![]() Michelle Turner ha scritto:
Michelle Turner ha scritto:
I love the tyle of your Drops jacket "Nepal" . Thank you for your free pattern. Please tell us why the number of the chains to start is greater than the number of second row ? For example : for size Med. beginning ch 107, second row is 79 dc. And what is 1-0-2-1-0-2. I have a hard time to figure it out. Thank you for your replying. Michelle
11.03.2014 - 15:42DROPS Design ha risposto:
Dear Mrs Turner, the fundation ch is often tighter than the next rows, to avoid a difference of width, you cast on more ch, but then skip some ch evenly distributed to get the correct number of sts at the end of 1st row. All numbers are given in the order of sizes, eg, 1 for size S, 0 for size M, 2 for size L etc. Happy crocheting!
11.03.2014 - 16:37
![]() Fenna ha scritto:
Fenna ha scritto:
Zoals ik kan bekijken is m1 de 5 steken van de bies. Maar na M1 heb ik veel te weinig steken en heb geen idee waar ik de fout in ga. ik haak maat M met naald 4,5.
17.02.2014 - 21:28DROPS Design ha risposto:
Hoi Fenna. M.1 is niet de voorbies. Je hebt 73 stk en haakt 10 toeren volgens M.1 (Voorbiezen: 5 stk aan iedere kant = voorbies, haak 1 stk in ieder stk – staan niet in het telpatroon), dus je haakt over de resterende 63 stk = 3 stk per herhaling = 21 herhalingen van M.1 en eindigt met 8 stk per herhaling = 168 + 10 voorbiesstk.
19.02.2014 - 14:34
![]() Fenna ha scritto:
Fenna ha scritto:
Ik ben met dit patroon begonnen. Maar, na de eerste 10 toeren M1 zou ik volgens patroon beschrijving 100 steken meer moeten hebben en dat klopt niet. mvg Fenna
17.02.2014 - 11:51DROPS Design ha risposto:
Hoi Fenna. Welke maat haak je en hoeveel stk heb je nu en wat had je moeten hebben? Dan kan ik het bekijken en eventueel laten weten hoe je moet haken.
17.02.2014 - 13:06
![]() Sue L ha scritto:
Sue L ha scritto:
Just finished making this for my granddaughter. It made up very easily. I read the entire pattern first and then wrote it up for ease in working with. I love the finished product! So happy I found your website!
04.02.2014 - 23:46
![]() Anja W ha scritto:
Anja W ha scritto:
Es steht gleich zu Anfang, dass man 10 R in M1 häkeln soll. Weiterhin steht, dass man 5 Stb auf beiden Seiten für die Blende häkeln soll. Häkel ich dann 5 Stäbchen und häkel dann gemäß M1 weiter und dann am Ende der Reihe wieder 5 Stäbchen oder aber häkel ich in die erste Masche 5 Stäbchen und beginne dann ab der nächsten Masche gemäß M1 zu häkeln? Bitte helft mir kurz. Vielen Dank!
29.01.2014 - 13:42DROPS Design ha risposto:
Liebe Anja, an der Blende wird je 1 Stb in 1 M gehäkelt und dann beginnt man mit M.1.
30.01.2014 - 07:56
![]() Krista Visser ha scritto:
Krista Visser ha scritto:
Beste meneer,mevrouw Kunt u mij uitleggen hoe ik van af toer 2(115 steken) meerder zodat ik bij toet 10 tot 210 steken ben gekomen. Dat is mij niet duidelijk. Groet, Krista
22.01.2014 - 11:55DROPS Design ha risposto:
Hoi Krista. Volg je teltekening M.1 en haakt deze 1 keer in de hoogte (zie teltekening onderaan), dan eindig je automatisch op de 210 stk vanwege de meerderingen (rij 1, 2, 5, 7 en 10)
22.01.2014 - 12:34
![]() Anne-Marie ha scritto:
Anne-Marie ha scritto:
Thanks for sizing info, this is my first crochet pattern for a garment - and I am looking forward to it!
02.01.2014 - 20:39
![]() Anne-Marie ha scritto:
Anne-Marie ha scritto:
PLease could you tell me what chest sizes apply to the sizes for the crochet DROPS jacket in Nepal? I don't seem to be able to find them anywhere. Thanks.
31.12.2013 - 20:36DROPS Design ha risposto:
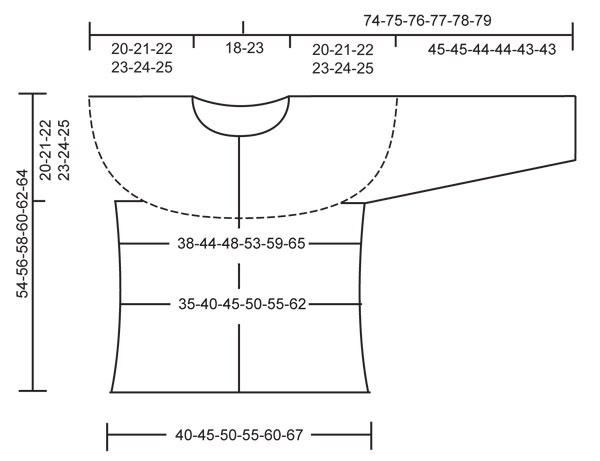
Dear Anne-Marie, you will find all finished measurements in the measurement chart at the bottom of the pattern. The measures are taken flat, from side to side. Happy crocheting!
02.01.2014 - 10:53
|
|||||||||||||
A Kiss For Midwinter#akissformidwintercardigan |
|||||||||||||
 |
 |
||||||||||||
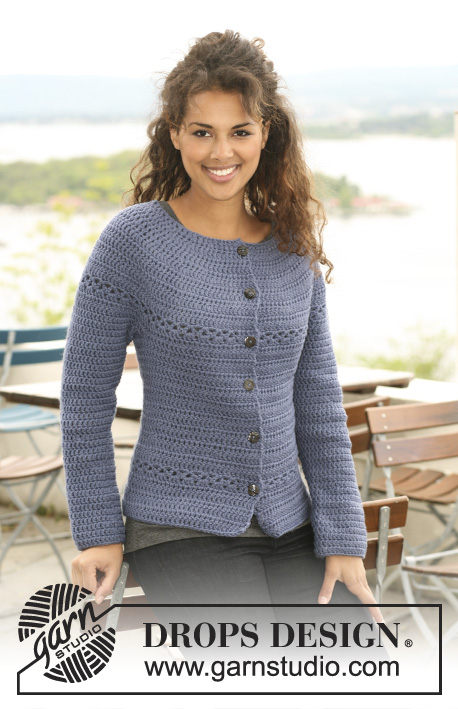
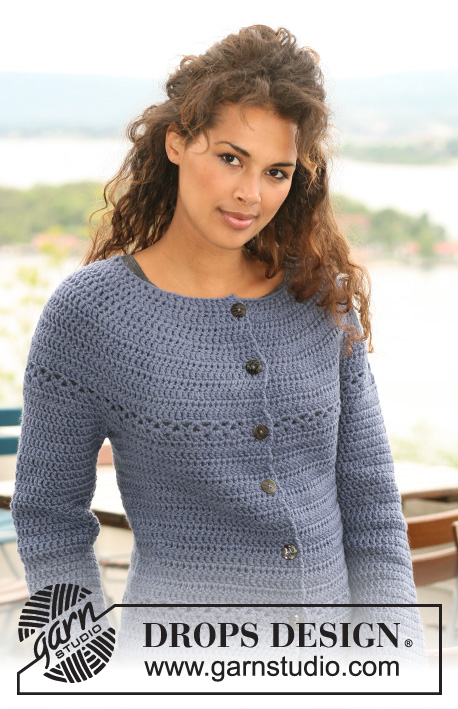
Giacca DROPS all’uncinetto in "Nepal". Taglie: Dalla XS alla XXXL.
DROPS 121-33 |
|||||||||||||
|
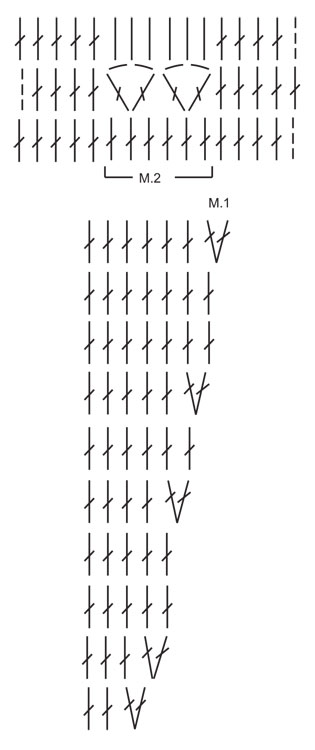
INFORMAZIONI PER IL LAVORO: Sostituire la prima m.a di ogni giro / riga con 3 cat. Finire ogni giro con 1 m.bss nella 3° cat dall’inizio del giro / dall’inizio della riga precedente. MOTIVO: Vedere i diagrammi M.1 e M.2. I diagrammi mostrano il motivo sul diritto del lavoro. SUGGERIMENTO PER LE DIMINUZIONI: Lavorare 1 m.a, ma aspettare a chiudere l’ultima gettata (= 2 m sull’uncinetto), lavorare la m.a. successiva e all’ultima chiusura, passare il filo attraverso tutte le m sull’uncinetto = è stata diminuita 1 m. ---------------------------------------------------------- DAVANTI e DIETRO: Si lavora dall’alto verso il basso, avanti e indietro dal centro, davanti. Avviare 91-99-107-115-123-131 cat (comprese 3 cat per girare il lavoro) con l’uncinetto n° 4,5 ed il filato Nepal. Lavorare la prima riga come segue: 1 m.a nella 4° cat, * saltare 1 cat, 1 m.a in ognuna delle 3 cat successive *, ripetere da *-*, saltare 1 cat e finire con 1 m.a nelle ultime 2 cat = 67-73-79-85-91-97 m.a – vedere il SUGGERIMENTO PER IL LAVORO. Lavorare 10 righe seguendo il diagramma M.1 (5 m.a da ciascun lato = bordi davanti, lavorare 1 m.a in ogni m.a – queste m non sono rappresentate nel diagramma). Completato il diagramma M.1, ci sono 162-178-194-210-226-242 m.a. Proseguire con 1 m.a in ogni m.a. Quando il lavoro misura 16-17-18-19-20-21 cm, proseguire come segue: 5 m.a per il bordo davanti, 1-0-2-1-0-2 m.a, ripetere il diagramma M.2 finché non rimangono 6-5-7-6-5-7 m.a, finire con 1-0-2-1-0-2 m.a e 5 m.a per il bordo davanti. Proseguire con 1 m.a in ogni m.a finché il lavoro non misura 20-21-22-23-24-25 cm. Lavorare la riga successiva come segue: 24-27-30-33-36-40 m.a (davanti), 8 cat (sotto della manica/scalfo), saltare 38-40-42-44-46-46 m.a della riga precedente (verranno usate successivamente per la manica), 38-44-50-56-62-70 m.a (dietro), 8 cat (sotto della manica / scalfo), saltare 38-40-42-44-46-46 m.a dal giro precedente (verranno usate successivamente per la manica) e 24-27-30-33-36-40 m.a (davanti). Proseguire con 1 m.a in ogni m.a / cat = 102-114-126-138-150-166 m.a. Inserire un segno al centro delle 8 cat nel sotto della manica, da ciascun lato (dietro = 46-52-58-64-70-78 m.a, davanti = 28-31-34-37-40-44 m.a). Proseguire con 1 m.a in ogni m.a. Quando il lavoro misura 34-36-38-40-42-44 cm, diminuire 8 m in modo uniforme (non diminuire sulle m dei bordi davanti) – vedere il SUGGERIMENTO PER LE DIMINUZIONI = 94-106-118-130-142-158 m.a. Quando il lavoro misura 40-42-44-46-48-50 cm, aumentare 12-12-12-12-12-14 m.a in modo uniforme (non aumentare sulle m dei bordi davanti) = 106-118-130-142-154-172 m.a. Quando il lavoro misura 43-45-47-49-51-53 cm, proseguire come segue: 5 m.a per il bordo davanti, ripetere il diagramma M.2 sulle m successive, finire con 5 m.a per il bordo davanti. Proseguire con 1 m.a in ogni m.a finché il lavoro non misura 54-56-58-60-62-64 cm; tagliare e fermare il filo. MANICA: Si lavora dall'alto verso il basso. Iniziare al centro, sotto la manica, come segue: 1 m.b nella 5° delle 8 cat sotto la manica / scalfo, 3 cat (= 1 m.a), proseguire con 1 m.a in ogni cat. ATTENZIONE: Prima di proseguire con il giro manica, lavorare 1 m.a nel passaggio, così da evitare che resti un buco. Proseguire con 1 m.a in ogni m.a del giro manica, lavorare 1 m.a nel passaggio e lavorare 1 m.a in ognuna delle restanti cat sotto la manica = 48-50-52-54-56-56 m.a. Inserire un segno al centro, sotto la manica. DA ADESSO IN AVANTI MISURARE IL LAVORO DA QUESTO PUNTO. Proseguire lavorando 1 m.a in ogni m.a. Quando il lavoro misura 4 cm, diminuire 1 m.a da ciascun lato del segno, vedere il SUGGERIMENTO PER LE DIMINUZIONI, e ripetere queste diminuzioni ogni 4,5-4,5-4-4-4-4 cm, per un totale di 8-8-9-9-9-9 volte = 32-34-34-36-38-38 m.a. Tagliare e fermare il filo quando la manica misura 45-45-44-44-43-43 cm – ATTENZIONE – Misure più piccole per le taglie più grandi perché il collo e le spalle sono più larghe. CONFEZIONE: Attaccare i bottoni sul bordo davanti sinistro – posizionare il bottone più alto a 1 cm dal collo e distanziare i restanti bottoni di ca. 8 cm l’uno dall’altro. Usare lo spazio tra 2 m.a sul bordo davanti come asola. |
|||||||||||||
Spiegazioni del diagramma |
|||||||||||||
|
|||||||||||||
 |
|||||||||||||
 |
|||||||||||||
Avete terminato questo modello?Allora taggate le vostre foto con #dropspattern #akissformidwintercardigan o inviatele alla #dropsfan gallery. Avete bisogno di aiuto con questo modello?Troverete 7 video tutorial, una sezione per i commenti/domande e molto altro guardando il modello su www.garnstudio.com © 1982-2026 DROPS Design A/S. Ci riserviamo tutti i diritti. Questo documento, compreso tutte le sue sotto-sezioni, è protetto dalle leggi sul copyright. Potete leggere quello che potete fare con i nostri modelli alla fine di ogni modello sul nostro sito. |
|||||||||||||


Con oltre 40 anni di esperienza nel design di modelli di maglia e uncinetto, DROPS Design offre la più estesa collezione di modelli gratuiti su internet - tradotti in 17 lingue. Ad oggi vi possiamo fornire 324 cataloghi e 12290 modelli - 9561 dei quali sono tradotti in Italiano.
Ci stiamo impegnando molto per darvi il meglio che vi possiamo offrire in termini di maglia e uncinetto, ispirazioni e consigli così come filati di grande qualità ad un prezzo incredibile! Volete utilizzare i nostri modelli per qualcosa d'altro oltre al vostro uso personale? Potete leggere tutto ciò che è consentito nel testo sul Copyright in basso su tutte le pagine dei nostri modelli. Buon lavoro!
Lasciare un commento sul modello DROPS 121-33
Noi saremmo felici di ricevere i tuoi commenti e opinioni su questo modello!
Se vuoi fare una domanda, fai per favore attenzione a selezionare la categoria corretta nella casella qui sotto per velocizzare il processo di risposta. I campi richiesti sono indicati da *.