
Categorie popolari
State cercando un filato?


Commenti / Domande (131)
![]() Ingrid ha scritto:
Ingrid ha scritto:
Hallo, ik heb een vraag over telpatroon M2. In de 3e (bovenste) regel haak je 6 st in de l-lussen van de 2e regel. Maar in regel 2 haak je zoals ik het begrijp 4 lossen en 4 stokjes (totaal 8 steken) Wat moet ik nou in welke steek doen? En klopt het dat je M2 2x boven elkaar moet haken? Alvast bedankt voor de hulp.
15.03.2015 - 17:47DROPS Design ha risposto:
Hoi Ingrid. Je haakt om de lussen en niet in de lossen, dus het aantal is niet van toepassing. Er stond ook niet om in de vertaling van het symbool, dat heb ik aangepast. Mijn excuses voor mijn vertraagde antwoord!
03.06.2015 - 14:58
![]() Annette Lohse ha scritto:
Annette Lohse ha scritto:
Hej Vil gerne i gang med denne flotte jakke, men er i tvivl om str. Der er ingen brystvidde angivet. Har ledt på siden efter generel størrelsesguide, men kan ingen finde. Kan i hjælpe? På forhånd tak. Mvh Annette
17.02.2015 - 16:52DROPS Design ha risposto:
Hej Annette. Nederst paa mönstret er der en maalskitse med alle maal i cm per störrelse.
18.02.2015 - 12:54
![]() Hilary ha scritto:
Hilary ha scritto:
Hi. Following the pattern, it says that after M1 continue till piece measures 18cm. But after the 10 rows of M1, my piece measures 23 cm. Will this be a problem?
07.02.2015 - 02:20DROPS Design ha risposto:
Dear Hilary, remember to check your tension, you should get and keep 12 tr x 7 rows = 10 x 10 cm. Happy crocheting!
07.02.2015 - 09:21Kari ha scritto:
When reading the pattern, I know that you start at the bottom right corner. When moving on to the second and so on rows do you continue to read it right to left or do you switch to left to right?
01.02.2015 - 19:51DROPS Design ha risposto:
Dear Kari, you read 1st row in diagram and every other row from the right towards the left, and 2nd row and every other row from the left towards the right. Happy crocheting!
02.02.2015 - 12:58
![]() Hilary ha scritto:
Hilary ha scritto:
Hi. This is the first time I am attempting one of your patterns. Your sizes are listed as XS/S M, L etc. Is it possible to know the exact measurements in inches or cm please?
28.01.2015 - 16:19DROPS Design ha risposto:
Hi Hilary. The measurements are listed on the schematic drawing at the bottom of the pattern. The measurements are in cm per size.
28.01.2015 - 16:31
![]() Sunny ha scritto:
Sunny ha scritto:
Hello again, Could you pls list the number of chains after each row during M.1? I keep getting wrong number of chains after 10 rows.
24.01.2015 - 21:31DROPS Design ha risposto:
Dear Sunny, I'm sorry I'm not sure which chains you are wondering - you crochet 3 turning ch at the end of each row and work 5 dc, repeat diag M.1, 5 dc. Diag. M.1 starts at the bottom corner on the right side and read towards the left (row 1 and every other row), then read from the left towards the right (row 2 and every other row). Row 1 is worked over 3 sts (and becomes 4 sts in each repeat), last row is worked over 7 sts (and becomes 8 sts in each repeat). Happy crocheting!
26.01.2015 - 09:57
![]() Sunny ha scritto:
Sunny ha scritto:
The cardigan is beautiful! At the row 2, we need to do 10 rows of M1 where the diagram is shown below the pattern. By the way, it starts with 3+1 DC till it becomes 7+1 with after 10 rows. I suppose this is a step to increase total number of chains. Can you explain how to achieve to from ch 67 to ch 162 (small size here). Thank you in advance.
22.01.2015 - 04:14DROPS Design ha risposto:
Dear Sunny, you will work M.1 as follows, starting at the bottom corner on the right side reading towards the left from RS, and from the left towards the right from WS: 5 dc, repeat M.1 (= 2 dc in next st, 1 dc in each of the next 2 sts) until 5 sts remains at the end of row, 1 dc in each of the last 5 sts. Continue upwards until the 10 rows of M.1 has been made, you will have 162 dc when M.1 has been worked 1 time in height over all sts. Happy crocheting!
22.01.2015 - 10:29
![]() Kate ha scritto:
Kate ha scritto:
In body piece - M.2., repeat M2 until 7 tr remain. Question, 7 stitches remain where? Can't be 7 stitches left to be worked. Sorry but I can't understand this one. Thank you. Doing well until this point, now I'm stuck!
19.01.2015 - 01:48DROPS Design ha risposto:
Dear Kate, you repeat M2 until 7 sts remain before the end of row, then work over the last 7 sts on row as follows: 2 tr in next st, 1 tr in each of the next 5 tr. Happy crocheting!
19.01.2015 - 14:08
![]() Monika ha scritto:
Monika ha scritto:
Ich verstehe den Abschnitt nach der Reihe mit den Luftmaschen für den Ärmeleinsatz nicht. Wenn ich die Maschenzahl für die Ärmelreihe addiere, komme ich in Größe L auf 194 Maschen. "Weiter je ein Stb/jede fM=126 Maschen" Wie komme ich von 194 auf 216 Maschen? Wieso fM?
16.01.2015 - 21:49DROPS Design ha risposto:
Sie haben ja eine bestimmte Anzahl M für die Ärmel übersprungen und dafür nur 8 Lm gehäkelt. Nun häkeln Sie also 30 Stb für das Vorderteil, 8 Stb für den Armausschnitt (in jede Lm 1 Stb), 50 Stb für das Rückenteil, 8 Stb für den anderen Armausschnitt und 30 Stb für das Vorderteil = 126 M. Die Angabe "fM" war ein Fehler, der gerade korrigiert wurde, es muss "Lm" heißen.
17.01.2015 - 18:26
![]() Bettina ha scritto:
Bettina ha scritto:
Buonasera,complimenti per questo modello facile e elegante!Quale taglia porta la modella nella foto? Non sono sicura di aver capito bene la misura da fare per me. La ringrazio
04.09.2014 - 21:34DROPS Design ha risposto:
Buonasera Bettina. Nel diagramma in basso, alla fine delle spiegazioni del modello, trova le taglie espresse in cm. Confrontando queste misure con quelle di un suo indumento analogo, dovrebbe riuscire ad individuare la taglia corretta da seguire. Buon lavoro!
04.09.2014 - 22:47
|
|||||||||||||
A Kiss For Midwinter#akissformidwintercardigan |
|||||||||||||
 |
 |
||||||||||||
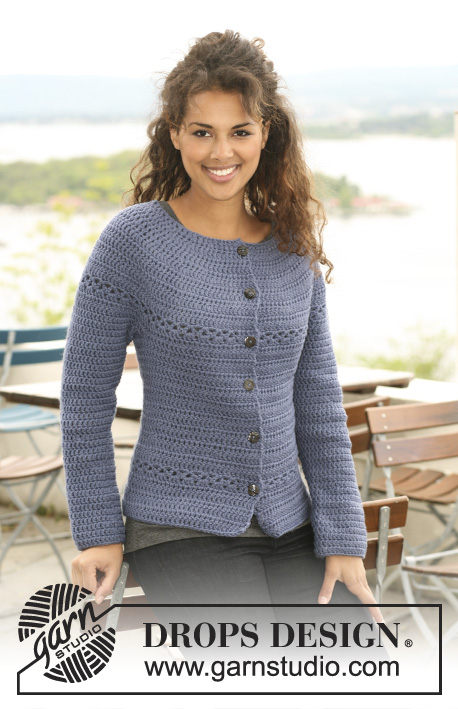
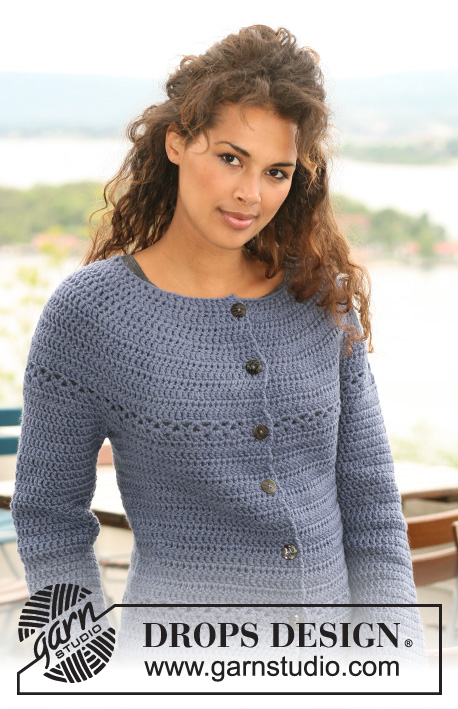
Giacca DROPS all’uncinetto in "Nepal". Taglie: Dalla XS alla XXXL.
DROPS 121-33 |
|||||||||||||
|
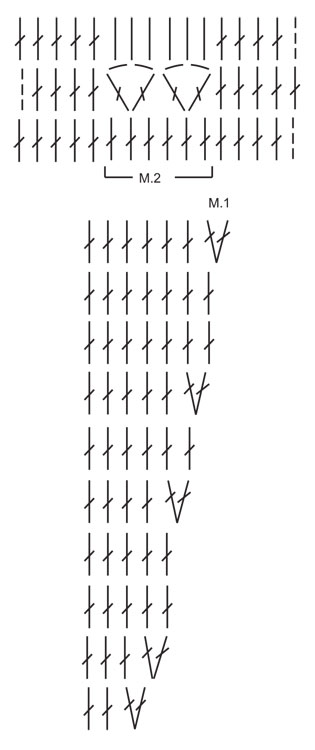
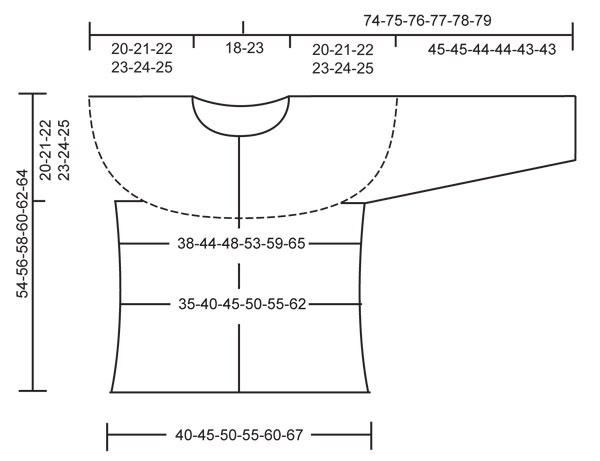
INFORMAZIONI PER IL LAVORO: Sostituire la prima m.a di ogni giro / riga con 3 cat. Finire ogni giro con 1 m.bss nella 3° cat dall’inizio del giro / dall’inizio della riga precedente. MOTIVO: Vedere i diagrammi M.1 e M.2. I diagrammi mostrano il motivo sul diritto del lavoro. SUGGERIMENTO PER LE DIMINUZIONI: Lavorare 1 m.a, ma aspettare a chiudere l’ultima gettata (= 2 m sull’uncinetto), lavorare la m.a. successiva e all’ultima chiusura, passare il filo attraverso tutte le m sull’uncinetto = è stata diminuita 1 m. ---------------------------------------------------------- DAVANTI e DIETRO: Si lavora dall’alto verso il basso, avanti e indietro dal centro, davanti. Avviare 91-99-107-115-123-131 cat (comprese 3 cat per girare il lavoro) con l’uncinetto n° 4,5 ed il filato Nepal. Lavorare la prima riga come segue: 1 m.a nella 4° cat, * saltare 1 cat, 1 m.a in ognuna delle 3 cat successive *, ripetere da *-*, saltare 1 cat e finire con 1 m.a nelle ultime 2 cat = 67-73-79-85-91-97 m.a – vedere il SUGGERIMENTO PER IL LAVORO. Lavorare 10 righe seguendo il diagramma M.1 (5 m.a da ciascun lato = bordi davanti, lavorare 1 m.a in ogni m.a – queste m non sono rappresentate nel diagramma). Completato il diagramma M.1, ci sono 162-178-194-210-226-242 m.a. Proseguire con 1 m.a in ogni m.a. Quando il lavoro misura 16-17-18-19-20-21 cm, proseguire come segue: 5 m.a per il bordo davanti, 1-0-2-1-0-2 m.a, ripetere il diagramma M.2 finché non rimangono 6-5-7-6-5-7 m.a, finire con 1-0-2-1-0-2 m.a e 5 m.a per il bordo davanti. Proseguire con 1 m.a in ogni m.a finché il lavoro non misura 20-21-22-23-24-25 cm. Lavorare la riga successiva come segue: 24-27-30-33-36-40 m.a (davanti), 8 cat (sotto della manica/scalfo), saltare 38-40-42-44-46-46 m.a della riga precedente (verranno usate successivamente per la manica), 38-44-50-56-62-70 m.a (dietro), 8 cat (sotto della manica / scalfo), saltare 38-40-42-44-46-46 m.a dal giro precedente (verranno usate successivamente per la manica) e 24-27-30-33-36-40 m.a (davanti). Proseguire con 1 m.a in ogni m.a / cat = 102-114-126-138-150-166 m.a. Inserire un segno al centro delle 8 cat nel sotto della manica, da ciascun lato (dietro = 46-52-58-64-70-78 m.a, davanti = 28-31-34-37-40-44 m.a). Proseguire con 1 m.a in ogni m.a. Quando il lavoro misura 34-36-38-40-42-44 cm, diminuire 8 m in modo uniforme (non diminuire sulle m dei bordi davanti) – vedere il SUGGERIMENTO PER LE DIMINUZIONI = 94-106-118-130-142-158 m.a. Quando il lavoro misura 40-42-44-46-48-50 cm, aumentare 12-12-12-12-12-14 m.a in modo uniforme (non aumentare sulle m dei bordi davanti) = 106-118-130-142-154-172 m.a. Quando il lavoro misura 43-45-47-49-51-53 cm, proseguire come segue: 5 m.a per il bordo davanti, ripetere il diagramma M.2 sulle m successive, finire con 5 m.a per il bordo davanti. Proseguire con 1 m.a in ogni m.a finché il lavoro non misura 54-56-58-60-62-64 cm; tagliare e fermare il filo. MANICA: Si lavora dall'alto verso il basso. Iniziare al centro, sotto la manica, come segue: 1 m.b nella 5° delle 8 cat sotto la manica / scalfo, 3 cat (= 1 m.a), proseguire con 1 m.a in ogni cat. ATTENZIONE: Prima di proseguire con il giro manica, lavorare 1 m.a nel passaggio, così da evitare che resti un buco. Proseguire con 1 m.a in ogni m.a del giro manica, lavorare 1 m.a nel passaggio e lavorare 1 m.a in ognuna delle restanti cat sotto la manica = 48-50-52-54-56-56 m.a. Inserire un segno al centro, sotto la manica. DA ADESSO IN AVANTI MISURARE IL LAVORO DA QUESTO PUNTO. Proseguire lavorando 1 m.a in ogni m.a. Quando il lavoro misura 4 cm, diminuire 1 m.a da ciascun lato del segno, vedere il SUGGERIMENTO PER LE DIMINUZIONI, e ripetere queste diminuzioni ogni 4,5-4,5-4-4-4-4 cm, per un totale di 8-8-9-9-9-9 volte = 32-34-34-36-38-38 m.a. Tagliare e fermare il filo quando la manica misura 45-45-44-44-43-43 cm – ATTENZIONE – Misure più piccole per le taglie più grandi perché il collo e le spalle sono più larghe. CONFEZIONE: Attaccare i bottoni sul bordo davanti sinistro – posizionare il bottone più alto a 1 cm dal collo e distanziare i restanti bottoni di ca. 8 cm l’uno dall’altro. Usare lo spazio tra 2 m.a sul bordo davanti come asola. |
|||||||||||||
Spiegazioni del diagramma |
|||||||||||||
|
|||||||||||||
 |
|||||||||||||
 |
|||||||||||||
Avete terminato questo modello?Allora taggate le vostre foto con #dropspattern #akissformidwintercardigan o inviatele alla #dropsfan gallery. Avete bisogno di aiuto con questo modello?Troverete 7 video tutorial, una sezione per i commenti/domande e molto altro guardando il modello su www.garnstudio.com © 1982-2026 DROPS Design A/S. Ci riserviamo tutti i diritti. Questo documento, compreso tutte le sue sotto-sezioni, è protetto dalle leggi sul copyright. Potete leggere quello che potete fare con i nostri modelli alla fine di ogni modello sul nostro sito. |
|||||||||||||


Con oltre 40 anni di esperienza nel design di modelli di maglia e uncinetto, DROPS Design offre la più estesa collezione di modelli gratuiti su internet - tradotti in 17 lingue. Ad oggi vi possiamo fornire 324 cataloghi e 12290 modelli - 9561 dei quali sono tradotti in Italiano.
Ci stiamo impegnando molto per darvi il meglio che vi possiamo offrire in termini di maglia e uncinetto, ispirazioni e consigli così come filati di grande qualità ad un prezzo incredibile! Volete utilizzare i nostri modelli per qualcosa d'altro oltre al vostro uso personale? Potete leggere tutto ciò che è consentito nel testo sul Copyright in basso su tutte le pagine dei nostri modelli. Buon lavoro!
Lasciare un commento sul modello DROPS 121-33
Noi saremmo felici di ricevere i tuoi commenti e opinioni su questo modello!
Se vuoi fare una domanda, fai per favore attenzione a selezionare la categoria corretta nella casella qui sotto per velocizzare il processo di risposta. I campi richiesti sono indicati da *.