
Categorie popolari
State cercando un filato?


Commenti / Domande (131)
![]() Nicky ha scritto:
Nicky ha scritto:
Ik bedoelde Ik heb aan het einde van de eerste toer van M1 7 stokjes op een rij... Klopt dat? aan de rechterkant heb ik 5 stokjes en dan 2 stokjes in 1 stokje...
03.09.2015 - 15:46DROPS Design ha risposto:
Hoi Nicky. Welke maat maak je? Dan kan ik het natellen.
03.09.2015 - 16:39
![]() Nicky ha scritto:
Nicky ha scritto:
Ik eindig bij M1 en dan bij de 1e rij aan de linkerkant na de 2 stokjes in 1 stokje met 2 stokjes en dan heb ik 5 stokjes over de boord, dus totaal heb ik dan 2 stokjes op een rij. Klopt dat? Moet ik de teruggaande toer, dus van links naar rechts als de 2e toer zien? Dank!
03.09.2015 - 11:31DROPS Design ha risposto:
Hoi Nicky. Ja, je haakt de eerste toer van M.1 van rechts naar links en je hebt 5 stk aan beide zijkanten voor de voorbies. Je hebt na de eerste toer 4 stk per herhaling van M.1 ipv 3 en toer 2 haak je van links naar rechts en hier meerder je van 4 naar 5 stk. Kijk ook hier hoe je onze telpatronen moet lezen.
03.09.2015 - 12:22
![]() Marjolein ha scritto:
Marjolein ha scritto:
In het begin moet je 10 toeren M1 haken dat komt met 91 steken uit maar je moet ook nog beginnen en eindigen met 5 stk en dan kom ik niet uit. Hoe moet ik dit doen? Want 91 - 10 is 81 en dat is dus niet deelbaar door de 7 steken in het patroon
06.07.2015 - 22:14DROPS Design ha risposto:
Hoi Marjolein. Je hebt 5 stk aan iedere kant = voorbies, dus je haakt M.1 over de overige 81 st. Eerste toer is 3 stk per herhaling (3 worden 4) = 27 herhalingen.
30.07.2015 - 14:01
![]() Eva ha scritto:
Eva ha scritto:
Jag läser virkinfo i början på mönstret. Förstår ej följande: Varje v avslutas med 1 sm i den 3e lm i början av v eller i början av föregående v. Ska jag inte göra en st som sista m i arbetet? Om jag bara gör sm så verkar kanten dra ihop sig väldigt mycket!
16.05.2015 - 13:28DROPS Design ha risposto:
Hej Eva, Jag förstår din fråga, det är mera relevant med sm om du virkar runt. Lycka till!
18.05.2015 - 10:58
![]() Aida ha scritto:
Aida ha scritto:
Ola nao consigo entender a passagem 5 pa para a orla da frente, 1-0-2-1-0-2 pa, repetir M.2 nos pontos seguintes até restarem 6-5-7-6-5-7 pa, Desde ja agradeco
11.05.2015 - 08:44
![]() Cathy ha scritto:
Cathy ha scritto:
Q1. I am doing size XXL. Before doing M2 I had 226 stitches. How many stitches should I have after completing Row 3 of M2 as i seem to have far more than I expected before doing the shaping in my Q2 below? Q2. When I do the row where you do 8 ch for the underarm do I also do 5 tr at the beginning and end for the front bands PLUS the 36 tr for the front pieces (41 tr in total) or do the 36 tr INCLUDE the 5 tr for the front bands? Thanks
21.04.2015 - 12:19DROPS Design ha risposto:
Dear Cathy, Q1: you should have same number of sts before/after M2, ie 226 sts in size XXL. M2 is worked over 6 sts and you still got 6 sts in each repeat on last row in M2. Q2: When crocheting the row with 8 ch for armhole, crochet from beg of row the 36 tr for front piece (= including the front bands). Happy crocheting!
21.04.2015 - 13:39
![]() Cathy ha scritto:
Cathy ha scritto:
I'm a left -handed crocheter and haven't used charts before. I know I need to reverse the direction following the M1 and M2 charts so that I would work Row 1 from left to right, but do I also have to mirror-image the symbols so that I start Row 1 (after the 5 tr for the band) with the 2 treble in one chain increase first as right handers will do? Thanks for your help.
14.04.2015 - 11:38DROPS Design ha risposto:
Dear Cathy, M2 is worked with 5 tr front band sts each side + 1-0-2-1-0-2 tr, so that you will get 6-5-7-6-5-7 tr at the beg and end of row and M2 inbetween. Happy crocheting!
14.04.2015 - 13:31
![]() France Blanchette ha scritto:
France Blanchette ha scritto:
Bonjour, j'aimerais savoir dans le modèle, sur la ligne "crocheter 10 rangs en suivant M.1 entre parenthèses 5 brides de chaque côté , je voudrais que vous me décriviez la ligne au complet car je ne comprend la ligne. Merci
14.04.2015 - 05:00DROPS Design ha risposto:
Bonjour Mme Blanchette, vous crochetez 5 B (= bordure devant), répétez ensuite M.1 sur les mailles suivantes jusqu'à ce qu'il reste 5 m, et terminez par 5 B (= bordure devant). Bon crochet!
14.04.2015 - 10:05
![]() Helen ha scritto:
Helen ha scritto:
Thanks for your help. I was getting the sizes muddled up. Now that you have pointed out I should end up with 114 and not 102 it makes sense.
23.03.2015 - 21:31
![]() Helen ha scritto:
Helen ha scritto:
Help! I have done m2 and have 178 stiches - so far so good. But I can't understand the next row. Tr 24 is ok but not sure about Chain 8. Do I do a chain of 8 coming out from stitch 25? But if I do that I will have 16 spare stitches. So do I do 8 slip stitches? I can see that 24 8 38 38 8 38 24 = 178. Pattern is 121-33 thanks.
22.03.2015 - 09:59DROPS Design ha risposto:
Dear Helen, the ch 8 you crochet are for under arm and skip the next 38 tr from previous row (= these 38 tr will be worked for sleeve afterwards), you will have a hole (the skipped 38 sts) that will be the sleeve, and the new 8 ch you have crocheted over the skipped 38 sts are for sleeve. You have now 114 sts. Happy crocheting!
23.03.2015 - 09:59
|
|||||||||||||
A Kiss For Midwinter#akissformidwintercardigan |
|||||||||||||
 |
 |
||||||||||||
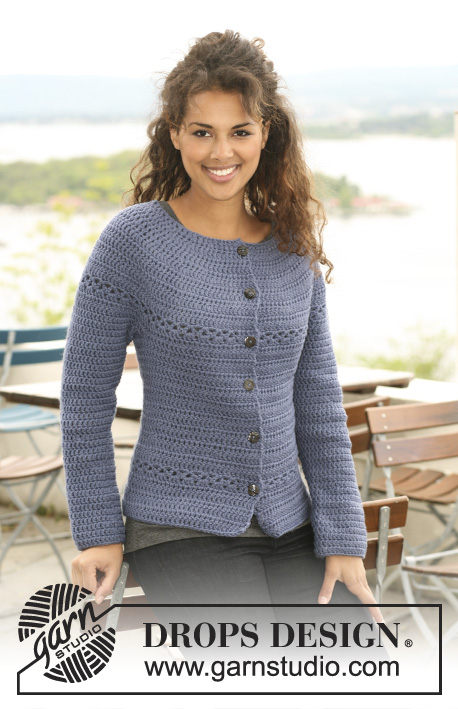
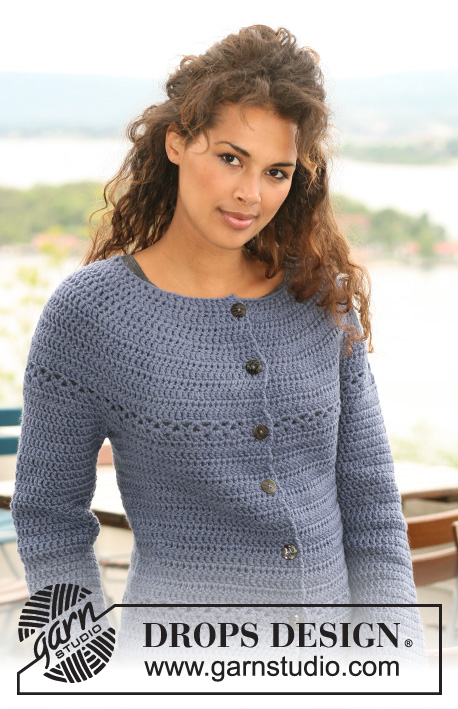
Giacca DROPS all’uncinetto in "Nepal". Taglie: Dalla XS alla XXXL.
DROPS 121-33 |
|||||||||||||
|
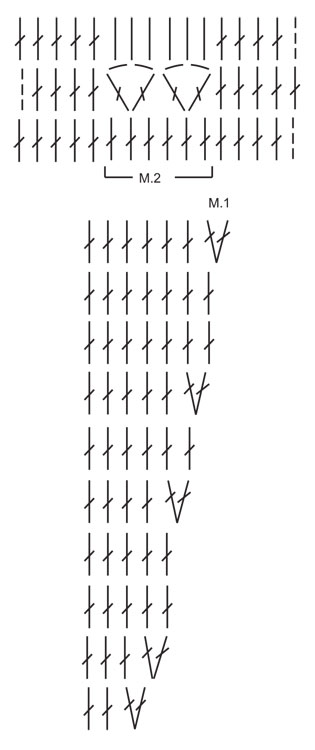
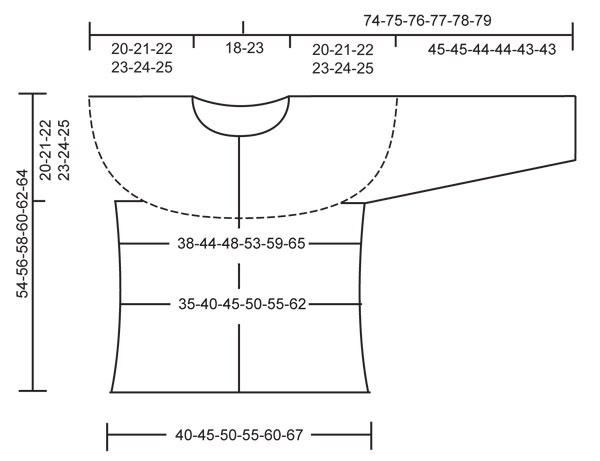
INFORMAZIONI PER IL LAVORO: Sostituire la prima m.a di ogni giro / riga con 3 cat. Finire ogni giro con 1 m.bss nella 3° cat dall’inizio del giro / dall’inizio della riga precedente. MOTIVO: Vedere i diagrammi M.1 e M.2. I diagrammi mostrano il motivo sul diritto del lavoro. SUGGERIMENTO PER LE DIMINUZIONI: Lavorare 1 m.a, ma aspettare a chiudere l’ultima gettata (= 2 m sull’uncinetto), lavorare la m.a. successiva e all’ultima chiusura, passare il filo attraverso tutte le m sull’uncinetto = è stata diminuita 1 m. ---------------------------------------------------------- DAVANTI e DIETRO: Si lavora dall’alto verso il basso, avanti e indietro dal centro, davanti. Avviare 91-99-107-115-123-131 cat (comprese 3 cat per girare il lavoro) con l’uncinetto n° 4,5 ed il filato Nepal. Lavorare la prima riga come segue: 1 m.a nella 4° cat, * saltare 1 cat, 1 m.a in ognuna delle 3 cat successive *, ripetere da *-*, saltare 1 cat e finire con 1 m.a nelle ultime 2 cat = 67-73-79-85-91-97 m.a – vedere il SUGGERIMENTO PER IL LAVORO. Lavorare 10 righe seguendo il diagramma M.1 (5 m.a da ciascun lato = bordi davanti, lavorare 1 m.a in ogni m.a – queste m non sono rappresentate nel diagramma). Completato il diagramma M.1, ci sono 162-178-194-210-226-242 m.a. Proseguire con 1 m.a in ogni m.a. Quando il lavoro misura 16-17-18-19-20-21 cm, proseguire come segue: 5 m.a per il bordo davanti, 1-0-2-1-0-2 m.a, ripetere il diagramma M.2 finché non rimangono 6-5-7-6-5-7 m.a, finire con 1-0-2-1-0-2 m.a e 5 m.a per il bordo davanti. Proseguire con 1 m.a in ogni m.a finché il lavoro non misura 20-21-22-23-24-25 cm. Lavorare la riga successiva come segue: 24-27-30-33-36-40 m.a (davanti), 8 cat (sotto della manica/scalfo), saltare 38-40-42-44-46-46 m.a della riga precedente (verranno usate successivamente per la manica), 38-44-50-56-62-70 m.a (dietro), 8 cat (sotto della manica / scalfo), saltare 38-40-42-44-46-46 m.a dal giro precedente (verranno usate successivamente per la manica) e 24-27-30-33-36-40 m.a (davanti). Proseguire con 1 m.a in ogni m.a / cat = 102-114-126-138-150-166 m.a. Inserire un segno al centro delle 8 cat nel sotto della manica, da ciascun lato (dietro = 46-52-58-64-70-78 m.a, davanti = 28-31-34-37-40-44 m.a). Proseguire con 1 m.a in ogni m.a. Quando il lavoro misura 34-36-38-40-42-44 cm, diminuire 8 m in modo uniforme (non diminuire sulle m dei bordi davanti) – vedere il SUGGERIMENTO PER LE DIMINUZIONI = 94-106-118-130-142-158 m.a. Quando il lavoro misura 40-42-44-46-48-50 cm, aumentare 12-12-12-12-12-14 m.a in modo uniforme (non aumentare sulle m dei bordi davanti) = 106-118-130-142-154-172 m.a. Quando il lavoro misura 43-45-47-49-51-53 cm, proseguire come segue: 5 m.a per il bordo davanti, ripetere il diagramma M.2 sulle m successive, finire con 5 m.a per il bordo davanti. Proseguire con 1 m.a in ogni m.a finché il lavoro non misura 54-56-58-60-62-64 cm; tagliare e fermare il filo. MANICA: Si lavora dall'alto verso il basso. Iniziare al centro, sotto la manica, come segue: 1 m.b nella 5° delle 8 cat sotto la manica / scalfo, 3 cat (= 1 m.a), proseguire con 1 m.a in ogni cat. ATTENZIONE: Prima di proseguire con il giro manica, lavorare 1 m.a nel passaggio, così da evitare che resti un buco. Proseguire con 1 m.a in ogni m.a del giro manica, lavorare 1 m.a nel passaggio e lavorare 1 m.a in ognuna delle restanti cat sotto la manica = 48-50-52-54-56-56 m.a. Inserire un segno al centro, sotto la manica. DA ADESSO IN AVANTI MISURARE IL LAVORO DA QUESTO PUNTO. Proseguire lavorando 1 m.a in ogni m.a. Quando il lavoro misura 4 cm, diminuire 1 m.a da ciascun lato del segno, vedere il SUGGERIMENTO PER LE DIMINUZIONI, e ripetere queste diminuzioni ogni 4,5-4,5-4-4-4-4 cm, per un totale di 8-8-9-9-9-9 volte = 32-34-34-36-38-38 m.a. Tagliare e fermare il filo quando la manica misura 45-45-44-44-43-43 cm – ATTENZIONE – Misure più piccole per le taglie più grandi perché il collo e le spalle sono più larghe. CONFEZIONE: Attaccare i bottoni sul bordo davanti sinistro – posizionare il bottone più alto a 1 cm dal collo e distanziare i restanti bottoni di ca. 8 cm l’uno dall’altro. Usare lo spazio tra 2 m.a sul bordo davanti come asola. |
|||||||||||||
Spiegazioni del diagramma |
|||||||||||||
|
|||||||||||||
 |
|||||||||||||
 |
|||||||||||||
Avete terminato questo modello?Allora taggate le vostre foto con #dropspattern #akissformidwintercardigan o inviatele alla #dropsfan gallery. Avete bisogno di aiuto con questo modello?Troverete 7 video tutorial, una sezione per i commenti/domande e molto altro guardando il modello su www.garnstudio.com © 1982-2026 DROPS Design A/S. Ci riserviamo tutti i diritti. Questo documento, compreso tutte le sue sotto-sezioni, è protetto dalle leggi sul copyright. Potete leggere quello che potete fare con i nostri modelli alla fine di ogni modello sul nostro sito. |
|||||||||||||


Con oltre 40 anni di esperienza nel design di modelli di maglia e uncinetto, DROPS Design offre la più estesa collezione di modelli gratuiti su internet - tradotti in 17 lingue. Ad oggi vi possiamo fornire 324 cataloghi e 12290 modelli - 9561 dei quali sono tradotti in Italiano.
Ci stiamo impegnando molto per darvi il meglio che vi possiamo offrire in termini di maglia e uncinetto, ispirazioni e consigli così come filati di grande qualità ad un prezzo incredibile! Volete utilizzare i nostri modelli per qualcosa d'altro oltre al vostro uso personale? Potete leggere tutto ciò che è consentito nel testo sul Copyright in basso su tutte le pagine dei nostri modelli. Buon lavoro!
Lasciare un commento sul modello DROPS 121-33
Noi saremmo felici di ricevere i tuoi commenti e opinioni su questo modello!
Se vuoi fare una domanda, fai per favore attenzione a selezionare la categoria corretta nella casella qui sotto per velocizzare il processo di risposta. I campi richiesti sono indicati da *.