
Categorie popolari
State cercando un filato?


Commenti / Domande (131)
Maria Jose ha scritto:
(5 p.a. a cada lado = la cenefa, trabajar 1 p.a. en cada p.a. - no incluidos en el diagrama). ? no entiendo que es la cenefa... en caso de ser el medio del hombro tomo 5 puntos altos a cada lado es asi?
17.07.2017 - 15:56DROPS Design ha risposto:
Hola Maria Jose. La cenefa son los 5 primeros y los 5 últimos puntos de la fila, es decir, 5 puntos a cada lado de la labor hacia el centro del delantero.
27.07.2017 - 12:40CAROL VAN BEEK ha scritto:
Is it possible to do this pattern in a Yarn Group B? Would doing a larger size make this possible? Thanks.
12.07.2017 - 01:49DROPS Design ha risposto:
Hi Carol, You can use yarn from group B, but then you need to adjust the number of stitches throughout the pattern so you get the right crochet tension. Either that or follow the pattern for a different size when you have worked out the tension you need. A bit of a job but possible if that is what you want to do. Kind regards, Deirdre
12.07.2017 - 06:17
![]() Ella ha scritto:
Ella ha scritto:
Laat maar, ik ben er zelf uitgekomen.
01.12.2016 - 20:40
![]() Ella ha scritto:
Ella ha scritto:
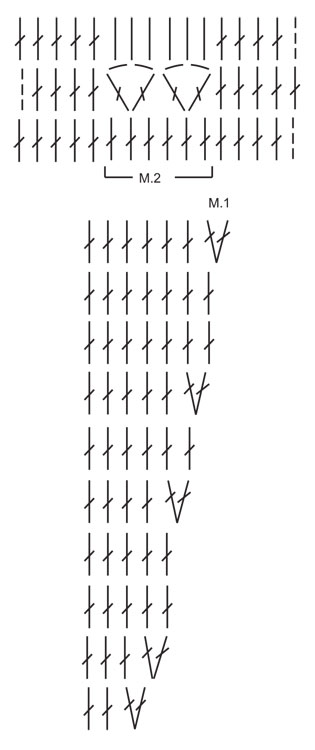
Ik bedoel het teken in telpatroon M2, twee schuine strepen met streepjes erdoorheen , die elk een andere kant op wijzen en twee dakjes er boven.
01.12.2016 - 16:08
![]() Ella ha scritto:
Ella ha scritto:
Er staan bij het patroon 4 tekens, het teken in M 2 is anders dan het onderste teken wat in M1 gebruikt wordt. Kunt u M 2 voor mij uitschrijven misschien, ik snap er echt niets van.
01.12.2016 - 15:20DROPS Design ha risposto:
Hoi Ella. En welk teken is dat precies? Ik zie alle tekens terug bij de symbolen. Er is een stokje in het stokje, een stokje om de l-lus, een lossen (l) of 2 stk in hetzelfde stk
01.12.2016 - 15:54
![]() Ella ha scritto:
Ella ha scritto:
Bij de tekenverklaring staat niet aangegeven hoe ik patroon M2 moet haken. Welke steek is dit?
01.12.2016 - 09:58DROPS Design ha risposto:
Hoi Ella. Jawel. Alle symbolen staan vermeld bij de symbolen onderaan het patroon - net boven de telpatronen.
01.12.2016 - 13:41
![]() Emily Hunt ha scritto:
Emily Hunt ha scritto:
HELP!!! Where do I find the number of balls for this (and all the other Drops patterns). Somewhere on this website, I found a statement saying "click on each picture of the design to see how many skeins of yarn is required for each of them". However, when I do that, I get a bigger picture and no number of balls!! I know I must be doing something wrong, but I have clicked everywhere on the page and nothing helps me!
19.10.2016 - 15:20DROPS Design ha risposto:
Dear Mrs Hunt, you will find required yarn and needle under tab "Materials" under picture, ie 550-650-700-750-800-900 g Nepal for this jacket depending on the size. 1 ball Nepal = 50 g, so that you will need 11 balls in 1st size, 13 balls in 2nd size, and so on. Happy crocheting!
19.10.2016 - 16:31
![]() Ana ha scritto:
Ana ha scritto:
Hola, estoy empezando ha hacer esta chaqueta y tengo un montón de dudas. He comprado la lana Cotton Merino y estoy utilizando una aguja de 3mm, por lo que no se corresponden el numero de puntos y tengo dificultades para encontrar la equivalencia, ¿me podéis aconsejar?. He empezado por el cuerpo, y no sé si el diagrama M1 se corresponde con el dibujo de arriba o el de abajo, de ser el de abajo, me podéis explicar como hacerlo? Y por último, no viene el patrón del canesú. Muchas gracias.
27.09.2016 - 22:18DROPS Design ha risposto:
Hola Ana. Esta chaqueta se trabaja de arriba abajo. En el diagrama M.1 ( el dibujo debajo del patrón) se explica como trabajar la parte de canesú (el diagrama se lee de abajo arriba, de derecha a izquierda las filas impar y de izquierda a derecha las filas par; en el diagrama se muestra una repetición completa, que se repíte varias vcs a lo largo de la fila).
07.10.2016 - 20:04Maria ha scritto:
Hello this is my first ever diagram so I'm really stuck on m2, can you please explain if I start m2 at the bottom right then line two I do left to right and then right to left again? Also could You please explain the exact stitches for each Line on m2 as I make them a lot more than 6 on each line. I use US terms . Thank you so much in advance Maria
10.01.2016 - 01:23DROPS Design ha risposto:
Dear Maria, M.2 is worked over 6 sts and 3 rows: Row1: 1 dc in each dc, Row2: *skip 1 dc, (1dc, 2ch, 1 dc) in next dc, skip 2 dc, (1dc,2ch, 1 dc) in next dc, skip 1 dc* repeat across. Row3: 3 dc in each 2-ch-spaces. Happy crocheting!
11.01.2016 - 10:31
![]() Elma ha scritto:
Elma ha scritto:
Ik las eerst het telpatroon M1 van boven naar beneden, maar klopt het dat ik het van onder naar boven moet lezen? Dus dat ik moet beginnen met 2 stokjes in ieder een stokje en dan 2 stokjes in 1 stokje (los van de voorbies)? Persoonlijk vind ik het wel verwarrend wanneer het inderdaad van onder naar boven gelezen moet worden.
15.12.2015 - 22:02DROPS Design ha risposto:
Hoi Elma. Alle onze telpatronen worden van beneden naar boven gelezen. Lees hier meer over hoe je onze telpatronen moet breien/haken.
16.12.2015 - 10:04
|
|||||||||||||
A Kiss For Midwinter#akissformidwintercardigan |
|||||||||||||
 |
 |
||||||||||||
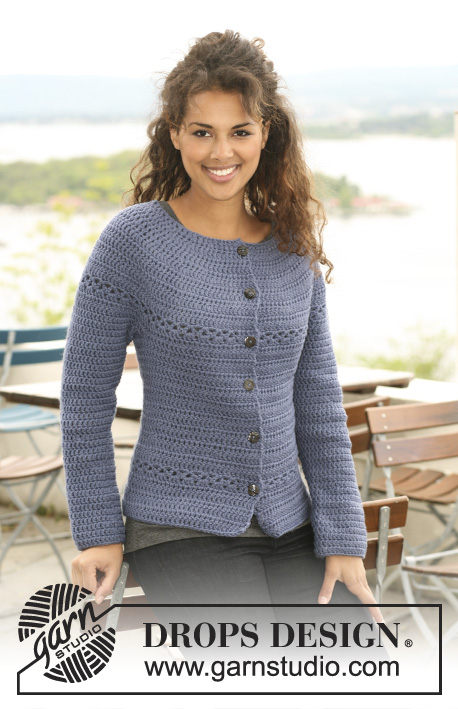
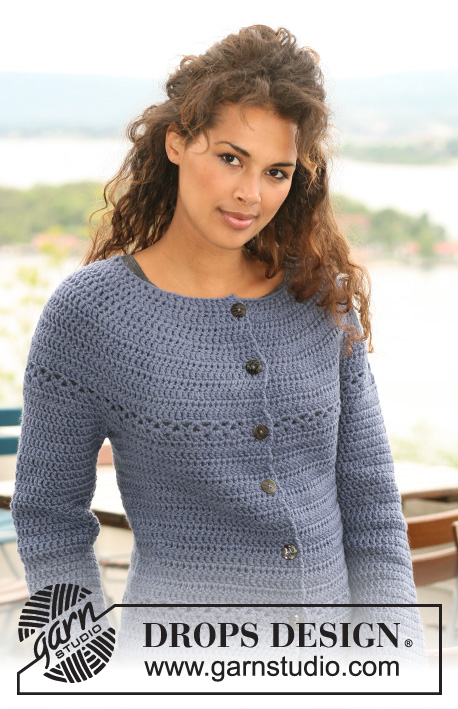
Giacca DROPS all’uncinetto in "Nepal". Taglie: Dalla XS alla XXXL.
DROPS 121-33 |
|||||||||||||
|
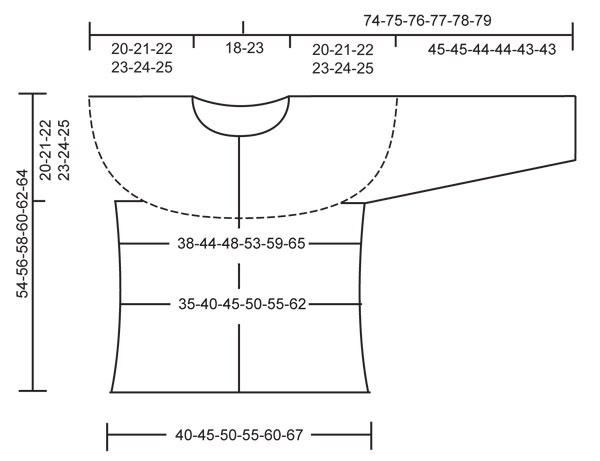
INFORMAZIONI PER IL LAVORO: Sostituire la prima m.a di ogni giro / riga con 3 cat. Finire ogni giro con 1 m.bss nella 3° cat dall’inizio del giro / dall’inizio della riga precedente. MOTIVO: Vedere i diagrammi M.1 e M.2. I diagrammi mostrano il motivo sul diritto del lavoro. SUGGERIMENTO PER LE DIMINUZIONI: Lavorare 1 m.a, ma aspettare a chiudere l’ultima gettata (= 2 m sull’uncinetto), lavorare la m.a. successiva e all’ultima chiusura, passare il filo attraverso tutte le m sull’uncinetto = è stata diminuita 1 m. ---------------------------------------------------------- DAVANTI e DIETRO: Si lavora dall’alto verso il basso, avanti e indietro dal centro, davanti. Avviare 91-99-107-115-123-131 cat (comprese 3 cat per girare il lavoro) con l’uncinetto n° 4,5 ed il filato Nepal. Lavorare la prima riga come segue: 1 m.a nella 4° cat, * saltare 1 cat, 1 m.a in ognuna delle 3 cat successive *, ripetere da *-*, saltare 1 cat e finire con 1 m.a nelle ultime 2 cat = 67-73-79-85-91-97 m.a – vedere il SUGGERIMENTO PER IL LAVORO. Lavorare 10 righe seguendo il diagramma M.1 (5 m.a da ciascun lato = bordi davanti, lavorare 1 m.a in ogni m.a – queste m non sono rappresentate nel diagramma). Completato il diagramma M.1, ci sono 162-178-194-210-226-242 m.a. Proseguire con 1 m.a in ogni m.a. Quando il lavoro misura 16-17-18-19-20-21 cm, proseguire come segue: 5 m.a per il bordo davanti, 1-0-2-1-0-2 m.a, ripetere il diagramma M.2 finché non rimangono 6-5-7-6-5-7 m.a, finire con 1-0-2-1-0-2 m.a e 5 m.a per il bordo davanti. Proseguire con 1 m.a in ogni m.a finché il lavoro non misura 20-21-22-23-24-25 cm. Lavorare la riga successiva come segue: 24-27-30-33-36-40 m.a (davanti), 8 cat (sotto della manica/scalfo), saltare 38-40-42-44-46-46 m.a della riga precedente (verranno usate successivamente per la manica), 38-44-50-56-62-70 m.a (dietro), 8 cat (sotto della manica / scalfo), saltare 38-40-42-44-46-46 m.a dal giro precedente (verranno usate successivamente per la manica) e 24-27-30-33-36-40 m.a (davanti). Proseguire con 1 m.a in ogni m.a / cat = 102-114-126-138-150-166 m.a. Inserire un segno al centro delle 8 cat nel sotto della manica, da ciascun lato (dietro = 46-52-58-64-70-78 m.a, davanti = 28-31-34-37-40-44 m.a). Proseguire con 1 m.a in ogni m.a. Quando il lavoro misura 34-36-38-40-42-44 cm, diminuire 8 m in modo uniforme (non diminuire sulle m dei bordi davanti) – vedere il SUGGERIMENTO PER LE DIMINUZIONI = 94-106-118-130-142-158 m.a. Quando il lavoro misura 40-42-44-46-48-50 cm, aumentare 12-12-12-12-12-14 m.a in modo uniforme (non aumentare sulle m dei bordi davanti) = 106-118-130-142-154-172 m.a. Quando il lavoro misura 43-45-47-49-51-53 cm, proseguire come segue: 5 m.a per il bordo davanti, ripetere il diagramma M.2 sulle m successive, finire con 5 m.a per il bordo davanti. Proseguire con 1 m.a in ogni m.a finché il lavoro non misura 54-56-58-60-62-64 cm; tagliare e fermare il filo. MANICA: Si lavora dall'alto verso il basso. Iniziare al centro, sotto la manica, come segue: 1 m.b nella 5° delle 8 cat sotto la manica / scalfo, 3 cat (= 1 m.a), proseguire con 1 m.a in ogni cat. ATTENZIONE: Prima di proseguire con il giro manica, lavorare 1 m.a nel passaggio, così da evitare che resti un buco. Proseguire con 1 m.a in ogni m.a del giro manica, lavorare 1 m.a nel passaggio e lavorare 1 m.a in ognuna delle restanti cat sotto la manica = 48-50-52-54-56-56 m.a. Inserire un segno al centro, sotto la manica. DA ADESSO IN AVANTI MISURARE IL LAVORO DA QUESTO PUNTO. Proseguire lavorando 1 m.a in ogni m.a. Quando il lavoro misura 4 cm, diminuire 1 m.a da ciascun lato del segno, vedere il SUGGERIMENTO PER LE DIMINUZIONI, e ripetere queste diminuzioni ogni 4,5-4,5-4-4-4-4 cm, per un totale di 8-8-9-9-9-9 volte = 32-34-34-36-38-38 m.a. Tagliare e fermare il filo quando la manica misura 45-45-44-44-43-43 cm – ATTENZIONE – Misure più piccole per le taglie più grandi perché il collo e le spalle sono più larghe. CONFEZIONE: Attaccare i bottoni sul bordo davanti sinistro – posizionare il bottone più alto a 1 cm dal collo e distanziare i restanti bottoni di ca. 8 cm l’uno dall’altro. Usare lo spazio tra 2 m.a sul bordo davanti come asola. |
|||||||||||||
Spiegazioni del diagramma |
|||||||||||||
|
|||||||||||||
 |
|||||||||||||
 |
|||||||||||||
Avete terminato questo modello?Allora taggate le vostre foto con #dropspattern #akissformidwintercardigan o inviatele alla #dropsfan gallery. Avete bisogno di aiuto con questo modello?Troverete 7 video tutorial, una sezione per i commenti/domande e molto altro guardando il modello su www.garnstudio.com © 1982-2026 DROPS Design A/S. Ci riserviamo tutti i diritti. Questo documento, compreso tutte le sue sotto-sezioni, è protetto dalle leggi sul copyright. Potete leggere quello che potete fare con i nostri modelli alla fine di ogni modello sul nostro sito. |
|||||||||||||


Con oltre 40 anni di esperienza nel design di modelli di maglia e uncinetto, DROPS Design offre la più estesa collezione di modelli gratuiti su internet - tradotti in 17 lingue. Ad oggi vi possiamo fornire 324 cataloghi e 12290 modelli - 9561 dei quali sono tradotti in Italiano.
Ci stiamo impegnando molto per darvi il meglio che vi possiamo offrire in termini di maglia e uncinetto, ispirazioni e consigli così come filati di grande qualità ad un prezzo incredibile! Volete utilizzare i nostri modelli per qualcosa d'altro oltre al vostro uso personale? Potete leggere tutto ciò che è consentito nel testo sul Copyright in basso su tutte le pagine dei nostri modelli. Buon lavoro!
Lasciare un commento sul modello DROPS 121-33
Noi saremmo felici di ricevere i tuoi commenti e opinioni su questo modello!
Se vuoi fare una domanda, fai per favore attenzione a selezionare la categoria corretta nella casella qui sotto per velocizzare il processo di risposta. I campi richiesti sono indicati da *.