
Categorie popolari
State cercando un filato?


Commenti / Domande (53)
![]() Ute ha scritto:
Ute ha scritto:
Liebes Team, einerseits steht in der Anleitung, dass der Pullover rund gestrickt wird, andererseits steht auch dort, drei Krausrippen. Und die Krausrippen werden als Hin- und Zurückreihen beschrieben. Sollen die Krausrippen als Reihen gestrickt werden und wird erst bei Musterbeginn rund gestrickt? Vielen Dank für Ihre Rückmeldung
21.08.2025 - 23:52DROPS Design ha risposto:
Liebe Ute, für die 3 Krausrippen am Anfang Rumpfteil stricken Sie (1 Runde rechts, 1 Runde links) x 3 = insgesamt 6 Runden für diese 3 Krausrippen. Viel Spaß beim Stricken!
22.08.2025 - 17:13
![]() Jane Fry ha scritto:
Jane Fry ha scritto:
Hi I would like to knit your 125-10. However I would like to mix the wool with alpaca. What other wool could I use as well for this pattern please. I would like the jumper to be of natural fibres. Thank you Jane Fry
13.10.2024 - 12:52DROPS Design ha risposto:
Dear Jane, you could work with 3 threads; 2 threads of DROPS Alpaca of yarn group A and 1 thread of DROPS Air or Alaska or Nepal or any other wool yarn of yarn group C. Happy knitting!
13.10.2024 - 23:59
![]() Marguerite Thur ha scritto:
Marguerite Thur ha scritto:
Hi...The bust size for the L is 41 3/4 inches. Is there an ease (added inches) to the finished bust size? Thank you.
24.04.2023 - 23:40DROPS Design ha risposto:
Hi Marguerite, The sizes given for those bust measurements will give the shape and ease shown in the picture. If you wish for a more roomy jumper it would be best to increase a size. Happy knitting!
25.04.2023 - 08:05
![]() Brigitte Mayer ha scritto:
Brigitte Mayer ha scritto:
Liebes Drops Design Team, ich habe angefangen diesen schönen Pullover zu stricken und hänge an den Armkugeln fest. Ich habe die Abnahme nicht verstanden. Nachdem ich für Größe S 1x3 Maschen 2x2 Maschen und 1x0 Maschen auf beiden Seiten abgekettet habe, nehme ich nur noch einmal 2 Maschen auf jeder Seite ab und stricke dann gerade weiter oder nehme 2 Maschen in jeder Runde ab bis die angegebene Länge ereicht ist? Viele Grüße Brigitte
02.12.2022 - 22:40DROPS Design ha risposto:
Liebe Frau Mayer, für den Armkugel ketten Sie so ab: zuerst 3 Maschen am Anfang der nächsten 4 Reihen (also 2 Mal beidseitig), dann ketten Sie 2 Maschen am Anfang jeder Reihe (Hin- sowie Rückreihe) ab, bis die Ärmel insgesamt 55 cm (von der Anschlagskante) misst, beachten Sie nur, daß Sie genauso viele Maschen bei der Hin- sowie bei der Rückreihe abketten; dann ketten Sie 3 Maschen am Anfang der 2 nächsten Reihe. Viel Spaß beim stricken!
06.12.2022 - 08:30
![]() Nadine22 ha scritto:
Nadine22 ha scritto:
Bonjour Je ne sais pas comment tricoter le pointM1 au niveau du col, pour ne pas me retrouver à la fin de mon travail quand je retournerai le col pour qu'il ne soit pas à l'envers, sur l'endroit du pull donc Merci de vite me donner la réponse Merci merci beaucoup
07.03.2020 - 19:11DROPS Design ha risposto:
Bonjour Nadine22, tricotez simplement M.1 comme avant, quand vous retournerez le col, le motif sera comme il doit l'être. Bon tricot!
09.03.2020 - 10:54
![]() Nadine22 ha scritto:
Nadine22 ha scritto:
Bonjour J'ai tricoté en rond jusqu'au x emmanchures et maintenant j'en suis à tricoter en aller et retour....mais en lisant la vidéo je ne comprends pas ...en effet faut-il lire le diagramme au premier rang de droite à gauche et au second rang de gauche à droite ou alors à tous les rangs de droite à gauche .Merci de votre réponse car je suis bloquée pour l'instant pour continuer mon ouvrage
19.01.2020 - 14:02DROPS Design ha risposto:
Bonjour Nadine22, tout dépend de quel rang vous avez tricoté sur l'endroit en dernier, mais sur l'envers, vous allez lire le diagramme de gauche à droite (en commençant par la maille concernée du diagramme: maille jersey, point mousse ou m envers). Vous devez conserver la logique du point fantaisie: (1 m jersey (= que vous tricotez à l'endroit tous les tours), 1 maille point mousse (que vous tricotez une fois à l'envers, 1 fois à l'endroit), 1 m envers (tous les tours à l'envers). Bon tricot!
20.01.2020 - 09:43
![]() Surene ha scritto:
Surene ha scritto:
I would like to make this pattern in either normal Chunky (6 - 6.5mm needle) or double knitting (4 - 4.5mm needle). How do one convert? Although I am not scared of doing intricate patterns, I am not a seasoned knitter to be able to do conversions.
31.03.2019 - 06:51DROPS Design ha risposto:
Dear Surene, we are unfortunately not able to adapt every pattern to every single request. For any further individual assistance please contact your DROPS store - even per mail or telephone. Happy knitting!
01.04.2019 - 16:05
![]() Gitte Abrahamsen ha scritto:
Gitte Abrahamsen ha scritto:
DROPS 125-10: strikkefastheden i bredden er Ok, længden er 8 cm på pind 8. Hvordan øger man længe? Er det ved at måle efterhånden?? Venligst et godt svar hurtigt
11.11.2018 - 22:23DROPS Design ha risposto:
Hej Gitte, ja hvis strikkefastheden stemmer i bredden, så kan det være en god ide at måle efterhånden. God fornøjelse!
13.11.2018 - 17:01
![]() Kasaundra ha scritto:
Kasaundra ha scritto:
I can't figure out why the yarn must be cut before starting the back, is there a reason that it has to be cut? I am also having trouble understanding the instructions for binding off for the neckline on the back piece. It would be a big help to see in a video what the pattern means about both, or at least just the neckline.
08.11.2018 - 15:59DROPS Design ha risposto:
Dear Kasaundra, just make sure you will continue the pattern as before - you might have to cut the yarn depending on which row in M.1 will be worked first after dividing piece. For neck on back piece, bind off the middle stitches for neck then each shoulder will be finished separately binding off some more sts at the beg of the row from neck towards shoulder. Happy knitting!
09.11.2018 - 08:24
![]() Lene ha scritto:
Lene ha scritto:
Hej, jeg er desværre ikke så erfaren med at strikke. Opskrift DROPS 125-10. Der står i opskriften at man skal strikke 6 pinde glatstrikning og så står der at man på sidste pind som jo vil være en vrangpindskal skal tage masker ud. Er det ikke normalt at man tager ud på en retsind og ikke en vrangpind. På forhånd tak. Med venlig hilsenLene
05.11.2018 - 16:08DROPS Design ha risposto:
Hej Lene, det er ikke noget problem i at tage ud på en vrangpind, der er til og med dem som synes det bliver pænere, men det er selvfølgelig en smags sag :)
07.11.2018 - 11:08
|
|||||||
DROPS 125-10 |
|||||||
|
|
|||||||
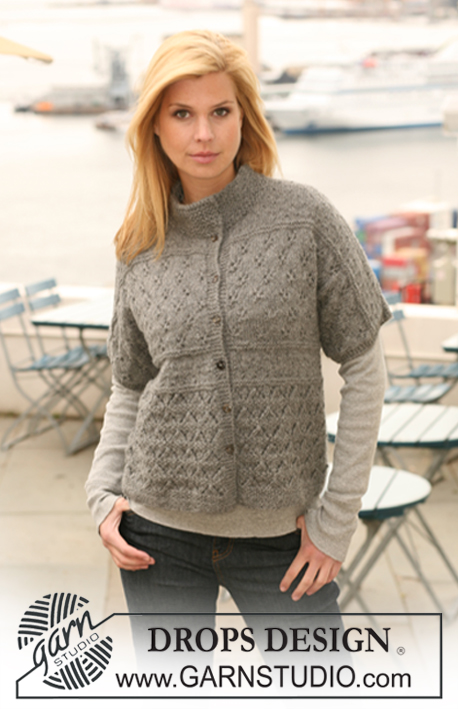
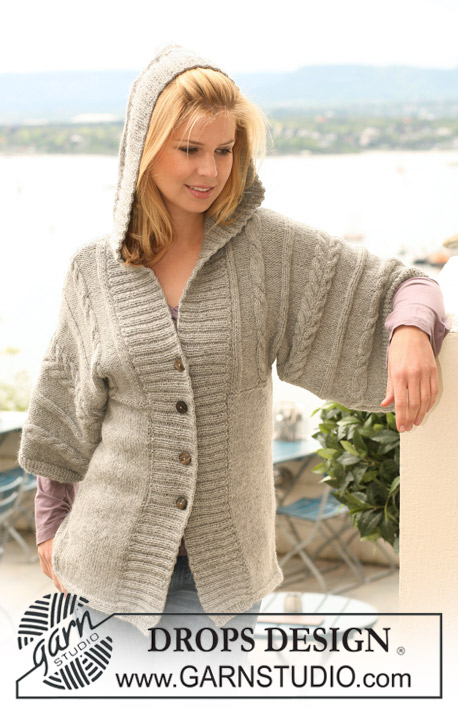
Maglione DROPS in "Snow". Taglie: Dalla S alla XXXL.
DROPS 125-10 |
|||||||
|
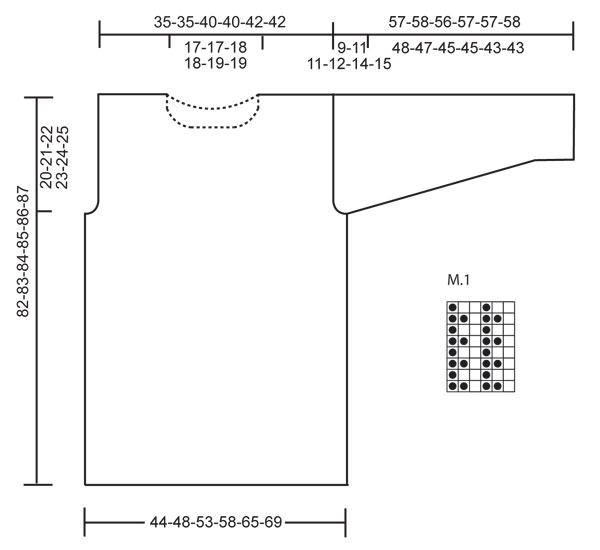
MOTIVO: Vedere il diagramma M.1 – il diagramma mostra il motivo sul diritto del lavoro. PUNTO LEGACCIO (in tondo): Lavorare * 1 giro a dir e 1 giro a rov *, ripetere da *-*. SUGGERIMENTO PER GLI AUMENTI 1: Aumentare 1 m facendo 1 m gettata; al giro successivo, lavorare la m gettata ritorta per evitare che si formi un buco. SUGGERIMENTO PER GLI AUMENTI 2: Aumentare 1 m a 1 m dal bordo facendo 1 m gettata; al giro successivo, lavorare la m gettata ritorta per evitare che si formi un buco. Lavorare le m aumentate seguendo il diagramma M.1 man mano che si procede con il lavoro. ------------------------------------------------------- DAVANTI E DIETRO: Si lavorano in tondo. Avviare 97-106-117-128-143-152 m sui ferri circolari n° 8 con il filato Snow. Lavorare 6 ferri a PUNTO LEGACCIO - vedere sopra. ALLO STESSO TEMPO, nel corso dell’ultimo ferro, aumentare 17-20-21-22-25-28 m in modo uniforme - vedere il SUGGERIMENTO PER GLI AUMENTI 1 = 114-126-138-150-168-180 m. Inserire un segno nella prima m e un segno nella m n° 57-63-69-75-84-90 (indicano i lati). Proseguire seguendo il diagramma M.1 in tondo. RICORDARSI LA TENSIONE DEL LAVORO! Quando il lavoro misura 62 cm, intrecciare 5 m da ciascun lato per gli scalfi (la m con il segno è la m centrale di queste 5 m). Tagliare il filo. Completare ogni parte separatamente. DIETRO: = 52-58-64-70-79-85 m. Proseguire seguendo il motivo come prima. ALLO STESSO TEMPO, intrecciare per gli scalfi, all’inizio di ogni ferro, da ciascun lato, come segue: 2 m 1-2-2-4-5-7 volte e 1 m 1-2-2-1-2-1 volte = 46-46-52-52-55-55 m. Proseguire finché il lavoro non misura 79-80-81-82-83-84 cm. Intrecciare ora le 20-20-22-22-23-23 m centrali per il collo e, al ferro successivo, intrecciare 2 m per il collo = per la spalla rimangono 12-12-14-14-15-15 m. Proseguire finché il lavoro non misura 82-83-84-85-86-87 cm; intrecciare le m. DAVANTI: = 52-58-64-70-79-85 m. Proseguire seguendo il motivo e intrecciare per gli scalfi, da ciascun lato, come indicato per il dietro = 46-46-52-52-55-55 m. Quando il lavoro misura 79 cm, mettere in attesa su un ferma maglie le 18-18-18-18-19-19 m centrali per il collo e finire ogni lato separatamente. Intrecciare per il collo, all’inizio di ogni ferro al centro davanti, come segue: 2 m 1 volte e 1 m 0-0-1-1-1-1 volte = per la spalla rimangono 12-12-14-14-15-15 m. Proseguire finché il lavoro non misura 82-83-84-85-86-87 cm; intrecciare le m. MANICHE: Si lavorano avanti e indietro sui ferri. Avviare 27-28-29-30-31-32 m (compresa 1 m vivagno da ciascun lato) sui ferri n° 8 con il filato Snow. Lavorare 6 ferri a PUNTO LEGACCIO - vedere sopra; ALLO STESSO TEMPO, nel corso dell’ultimo ferro, aumentare 2-4-6-8-7-9 m in modo uniforme = 29-32-35-38-38-41 m. Proseguire seguendo il diagramma M.1 con 1 m vivagno da ciascun lato. Quando il lavoro misura ca. 7 cm, aumentare 1 m da ciascun lato, e ripetere questi aumenti ogni 4,5-4,5-4-4-3-3 cm per un totale di 9-9-9-9-12-12 volte – vedere il SUGGERIMENTO PER GLI AUMENTI 2 = 47-50-53-56-62-65 m. Proseguire finché il lavoro non misura ca. 48-47-45-45-43-43 cm (ATTENZIONE! misure più corte per le taglie più grandi perché l’arrotondamento della manica è più lungo e le spalle sono più larghe). Intrecciare ora 3 m da ciascun lato per l’arrotondamento delle maniche, poi intrecciare, all’inizio di ogni ferro, da ciascun lato, come segue: 2 m 2-2-3-3-4-4 volte e 1 m 0-0-0-1-1-0 volte, poi 2 m all’inizio di ogni ferro da ciascun lato, finché il lavoro non misura ca. 55-56-54-55-55-56 cm. Intrecciare ora 3 m da ciascun lato 1 volta; intrecciare poi le restanti m. Il lavoro misura ca. 57-58-56-57-57-58 cm. CONFEZIONE: Cucire le spalle. Cucire le maniche. Cucire i lati delle maniche all’interno della m vivagno. COLLO: Si lavora in tondo. Con i ferri circolari n° 7 ed il filato Snow, riprendere da 40 a 60 m (comprese le m messe in attesa sul ferma maglie) intorno al collo. Lavorare 1 giro a rov, 1 giro a dir e 1 giro a rov; ALLO STESSO TEMPO, durante l’ultimo giro, portare il n° delle m a 50-56-62-68-74-76. Lavorare ora 1 giro a dir e proseguire a coste 1 m dir /1 m rov. Quando le coste misurano ca. 4 cm, aumentare 1 m dopo ogni m dir (aumentare facendo 1 m gettata). Al giro successivo, lavorare la m gettata a dir ritorto = 75-84-93-102-111-114 m. Lavorare ora il diagramma M.1 su tutte le m. Proseguire finché il collo non misura ca. da 24 a 26 cm; intrecciare le m seguendo il diagramma M.1. |
|||||||
Spiegazioni del diagramma |
|||||||
|
|||||||
 |
|||||||
Avete terminato questo modello?Allora taggate le vostre foto con #dropspattern o inviatele alla #dropsfan gallery. Avete bisogno di aiuto con questo modello?Troverete 23 video tutorial, una sezione per i commenti/domande e molto altro guardando il modello su www.garnstudio.com © 1982-2026 DROPS Design A/S. Ci riserviamo tutti i diritti. Questo documento, compreso tutte le sue sotto-sezioni, è protetto dalle leggi sul copyright. Potete leggere quello che potete fare con i nostri modelli alla fine di ogni modello sul nostro sito. |
|||||||


Con oltre 40 anni di esperienza nel design di modelli di maglia e uncinetto, DROPS Design offre la più estesa collezione di modelli gratuiti su internet - tradotti in 17 lingue. Ad oggi vi possiamo fornire 324 cataloghi e 12290 modelli - 9561 dei quali sono tradotti in Italiano.
Ci stiamo impegnando molto per darvi il meglio che vi possiamo offrire in termini di maglia e uncinetto, ispirazioni e consigli così come filati di grande qualità ad un prezzo incredibile! Volete utilizzare i nostri modelli per qualcosa d'altro oltre al vostro uso personale? Potete leggere tutto ciò che è consentito nel testo sul Copyright in basso su tutte le pagine dei nostri modelli. Buon lavoro!
Lasciare un commento sul modello DROPS 125-10
Noi saremmo felici di ricevere i tuoi commenti e opinioni su questo modello!
Se vuoi fare una domanda, fai per favore attenzione a selezionare la categoria corretta nella casella qui sotto per velocizzare il processo di risposta. I campi richiesti sono indicati da *.