
Categorie popolari
State cercando un filato?


Commenti / Domande (39)
![]() Emmi ha scritto:
Emmi ha scritto:
M-koko takakappale joka 2. kerros päätetään kummastakin päästä 2s kunnes työssä on jäljellä 64s? Eli 4 kerrosta ja nämä 8s on päätetty ja jatkan neulontaa normaalisti haluttuun pituutee ? Sekä tuo etukappaleen keskiedun uloimmat silmukat apupuikoille. Eli siis mikä on keskietu?
30.09.2025 - 21:59DROPS Design ha risposto:
Kyllä, jatka neulomista ilman kavennuksia, kunnes työ on halutun pituinen. Keskietu on etukappaleen keskellä edessä oleva reuna, eli sivun vastakkainen reuna.
03.10.2025 - 18:03
![]() Mary ha scritto:
Mary ha scritto:
Bonjour, Combien de pelotes faut il pour réaliser cette veste en taille 40? Merci d'avance
28.12.2023 - 10:58DROPS Design ha risposto:
Bonjour Mary, vous trouverez la quantité nécessaire pour chaque taille en haut de page; autrement dit, pour une taille S par ex il faut 750 g DROPS Alaska / 50 g la pelote = 15 pelotes DROPS Alaska (utilisez notre convertisseur si besoin); pour trouver votre taille, mesurez un vêtement similaire dont vous aimez la forme et comparez ces mesures à celles du schéma (voir cette leçon. Bon tricot!
02.01.2024 - 09:33
![]() Favre Véronique ha scritto:
Favre Véronique ha scritto:
Bonjour et merci pour ce modèle. J ai une question concernant l arrondi des manches. Je n ai que 2 mailles de rabattues pour le dos et 1 de chaque côté, donc je ne comprends pourquoi marquer autant l arrondi des manches? Serait ce mieux adapté des manches droites? Merci. Véronique
19.10.2022 - 06:16DROPS Design ha risposto:
Bonjour Mme Favre, le calcul de l'arrondi des manches ne correspond pas systématiquement aux mailles rabattues pour l'emmanchure (c'est un peu plus technique). Pour que les manches tombent joliment comme sur la photo, le haut de la manche doit être de 7-8-9-11-13-15 cm comme indiqué dans le schéma; bon tricot!
19.10.2022 - 10:04
![]() Lilli Grinderslev ha scritto:
Lilli Grinderslev ha scritto:
Hvad mener i med at luk 5 masket af til knaphul
18.02.2022 - 18:11DROPS Design ha risposto:
Hej Lilli, vi skriver: luk 5. (femte) maske af til knaphul :)
21.02.2022 - 15:39
![]() Emer ha scritto:
Emer ha scritto:
Hi, I'm just starting the hood and am a bit confused. Pattern says K 6 rows on all sts, is this 6 rows garter stitch. Do I continue M1 pattern towards the front of the hood. Thanks
14.09.2021 - 01:58DROPS Design ha risposto:
Dear Emer, you will now knit the next 6 rows (= you will have a total of 3 ridges in garter stitch) increasing evenly on last row. Then you will continue with pattern M.1 and 7 stitches in garter stitch on each side. Happy knitting!
14.09.2021 - 07:58
![]() Giliola Gambetta ha scritto:
Giliola Gambetta ha scritto:
C'è la possibilità di avere lo schema del cardigan con i ferri dritti?
05.02.2021 - 16:48
![]() Chantal ha scritto:
Chantal ha scritto:
Je ne comprends pas bien la fin des devants (gauche et droit) : "Rabattre pour l'encolure tous les rangs en début de rang à partir de l'encolure : 2 fois 4 m =" Il donc rabattre dans la bordure ? Ni le schéma ni la photo ne permettent de comprendre ce détail.
29.11.2020 - 17:14DROPS Design ha risposto:
Bonjour Chantal, les mailles de la bordure devant ont déjà été mises en attente à ce moment-là: quand l'ouvrage mesure 65 à 79 cm (cf taille), vous devez tricoter les 11-12-13 (cf taille) premières mailles sur l'envers (devant gauche) et les glisser en attente pour l'encolure, puis, au début de chaque rang sur l'envers vous rabattrez 4 mailles et ceci 2 fois (pour l'encolure vous aurez donc 11 à 13 m en attente + 8 m rabattues). Quand vous ferez la capuche, vous reprendrez les mailles en attente et relèverez les mailles dans les 8 m rabattues. Bon tricot!
30.11.2020 - 09:20
![]() Simone ha scritto:
Simone ha scritto:
Finally up to knitting the hood, I am having some trouble understanding the pattern from: continue in pattern on next row ..... when piece measures 38cm ... ? is this the measurement from where I picked up the stitchers at the neck and I am a bit lost about the 1 vertical pattern part? there is no diagram to help with the hood. Thanks
03.08.2020 - 10:59DROPS Design ha risposto:
Dear Simone, piece is then measured from the stitches picked up for hood - pattern is worked over 2 rows (see B in M.1) "after a vertical pattern" to stop after a row with purl stitches worked from RS. Happy knitting!
03.08.2020 - 13:23
![]() Simone ha scritto:
Simone ha scritto:
Hello once again, I am making good but slow progress with this lovely 'Purpleberry jacket'. My question this time is at the underarm cast off 6 sts for armholes, do I put the LF and RF onto sts holders? therefore attaching a new working yarn to work the back piece? Thanks so much
08.06.2020 - 09:57DROPS Design ha risposto:
Dear Simone, yes correct, you will now finish each piece separately, slip stitches of both front piece on a thread or on a stitch holder and join new yarn on back piece. Happy knitting!
08.06.2020 - 12:21
![]() Simone ha scritto:
Simone ha scritto:
Hello again, I am enjoying the pattern, after taking some time to understand. My question is about the dec 1 stitch at each side of markers - what type of dec are these ? K2tog or ?? Many thanks
30.04.2020 - 03:45DROPS Design ha risposto:
Dear Simone, you can decrease on each side of both markers like this: work until 2 sts remain before marker, K2 tog, marker, slip 1 as if to K, K1, psso. Happy knitting!
30.04.2020 - 10:32
|
||||||||||||||||
Hooded Blackberry Jacket#hoodedblackberryjacket |
||||||||||||||||
|
|
||||||||||||||||
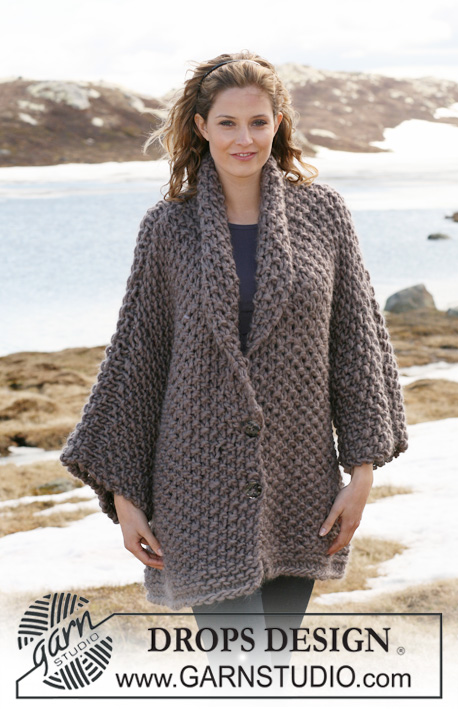
Giacca DROPS con cappuccio e punto mimosa in ”Alaska”. Dal S al XXXL.
DROPS 117-38 |
||||||||||||||||
|
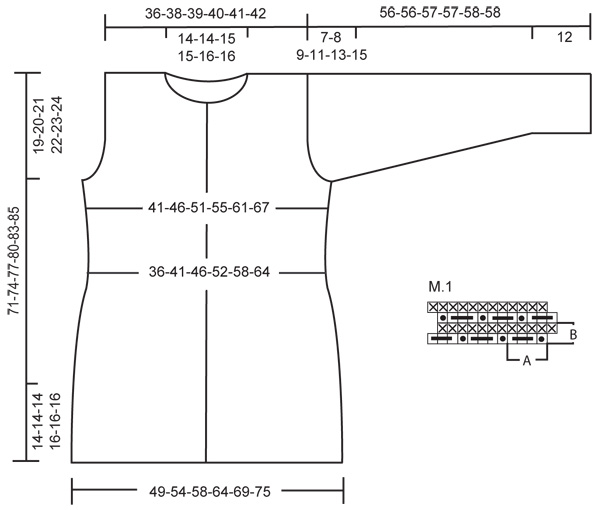
PUNTO LEGACCIO (avanti e indietro sul f): Lavorare tutti i f a diritto. MOTIVO: Ved diag M.1. NB! 1° f del diag = rovescio. ASOLE: Eseguire le asole sul bordo destro davanti. 1 asola = intrecciare la 5° m a partire dal bordo davanti, 1 gett. Posizionamento delle asole: Taglia S: 15, 23, 31, 39, 47, 55 e 63 cm. Taglia M: 18, 26, 34, 42, 50, 58 e 66 cm. Taglia L: 15, 24, 33, 42, 51, 60 e 69 cm. Taglia XL: 16, 24, 32, 40, 48, 56, 64 e 72 cm. Taglia XXL: 19, 27, 35, 43, 51, 59, 67 e 75 cm. Taglia XXXL: 21, 29, 37, 45, 53, 61, 69 e 77 cm. CONSIGLI AUMENTI: Aumentare facendo 1 gett. Al f seguente, lavorare il gettato dir ritorto per evitare un buco. GIACCA: Si lavora avanti e indietro sul ferro circolare. Lavorare le m vivagno di ogni lato con 2 fili fino alla fine (perché il bordo sia più fisso). Con il filo Alaska e il ferro circolare 5, avviare 182-198-210-230-250-270 m. Lavorare 5 f dir. Continuare con il MOTIVO al ferro successivo sul rovescio così: - ved spieg sopra: 7 m PUNTO LEGACCIO - M.1 finché non rimangano 7 m, terminare con 7 m punto legaccio. Le 7 m punto legaccio in mezzo davanti di ogni lato = bordo davanti da lavorare a punto legaccio fino alla fine. Continuare con il motivo così: quando il lavoro misura 14-14-14-16-16-16 cm - aggiustare dopo 1 motivo intero in altezza - lavorare il f successivo sul rovescio così: 7 m punto legaccio, M.1 sulle 16-16-20-20-24-24 m successive, maglia rasata sulle 136-152-156-176-188-208 m successive, M.1 sulle 16-16-20-20-24-24 m successive, terminare con 7 m punto legaccio. Lasciare 2 segni a 49-53-56-61-66-71 m da ogni lato (dietro = 84-92-98-108-118-128 m). Continuare con questo motivo. RICORDATI LA TENSIONE DELLA MAGLIA! ALLO STESS TEMPO, quando il lavoro misura 15-18-15-16-19-21 cm, intrecciare per la 1° ASOLA sul bordo destro davanti – ved spieg sopra! Quando il lavoro misura 18 cm, diminuire 1 m ad ogni lato del segno ad ogni lato. Ripetere queste diminuzioni ogni 2-2-2-2,5-2,5-2,5 cm in totale 11-11-10-10-10-10 volte = 138-154-170-190-210-230 m. Quando il lavoro misura 41-42-43-44-45-45 cm, aumentare 1 m ad ogni lato del segno ad ogni lato – VED. CONSIGLI AUMENTI! Ripetere questi aumenti ogni 2,5-2,5-2,5-5-5-6 cm in totale 4-4-4-3-3-3 volte = 154-170-186-202-222-242 m. Quando il lavoro misura 52-54-56-58-60-61 cm, intrecciare per gli scalfi 6 m ad ogni lato (= 3 m ad ogni lato del segno ad ogni lato). Terminare, poi, ogni parte separatamente. DIETRO: = 64-72-80-88-98-108 m. Intrecciare per gli scalfi ad ogni lato all’inizio di ogni f così: 2 m 0-1-2-3-5-7 volte e 1 m 1-2-3-4-4-4 volte = 62-64-66-68-70-72 m. Quando il lavoro misura 69-72-75-78-81-83 cm, intrecciare per lo scollo le 22-22-24-24-26-26 m centrali, poi terminare ogni spalla separatamente. Intrecciare 1 m al f successivo dallo scollo = rimangono 19-20-20-21-21-22 m per ogni spalla. Intrecciare tutte le m quando il lavoro misura 71-74-77-80-83-85 cm. DAVANTI SINISTRO: = 39-43-47-51-56-61 m. Intrecciare per gli scalfi come per il dietro, ALLO STESSO TEMPO, continuare con il motivo come prima. Quando il lavoro misura 65-68-71-74-77-79 cm, mettere in attesa per lo scollo 11-11-12-12-13-13 m in mezzo davanti su 1 filo (lavorare le m che non possono più essere lavorato nel motivo a rovescio sul diritto e diritto sul rovescio). Intrecciare per lo scollo ogni 2 ferri lato collo così: 4 m 2 volte = rimangono 19-20-20-21-21-22 m per la spalla. Intrecciare tutte le m quando il lavoro misura 71-74-77-80-83-85 cm. DAVANTI DESTRO: Lavorare come il davanti sinistro, ma in senso inverso. NOTA! Non dimenticare di intrecciare per le asole! MANICHE: Si lavora avanti e indietro sul f circolare. Con il filo Alaska e il f circolare 5, avviare 46-46-50-50-54-54 m (incl 1 m vivagno ad ogni lato). Lavorare 5 f dir e continuare con il motivo al f successivo sul rovescio così: 1 m vivagno, M.1 finché non rimanga 1 m, terminare con 1 m vivagno. Continuare con questo motivo. Quando il lavoro misura 12 cm - aggiustare dopo 1 motivo intero in altezza - continuare a maglia rasata (1° f = rovescio). Quando il lavoro misura 14 cm, aumentare 1 m ad ogni lato (aumentare all’interno della m vivagno). Ripetere questi aumenti ogni 5-3,5-3,5-3-2,5-2 cm in totale 7-9-9-10-11-13 volte = 60-64-68-70-76-80 m. Quando il lavoro misura 49-48-48-46-45-43 cm (misura più corta per le taglie grandi perché l’arrotondamento della manica è più lungo e le spalle più larghe) intrecciare per l’arrotondamento della manica all’inizio di ogni f ad ogni lato così: 4 m 1 volta, 2 m 2-3-3-3-3-3 volte, 1 m 0-0-0-2-4-6 volte. Intrecciare, di seguito, 2 m ad ogni lato finché il lavoro non misuri 55-55-56-56-57-57 cm. Intrecciare 3 m 1 volta ad ogni lato, intrecciare, poi, tutte le m rimanenti. Il lavoro misura ca 56-56-57-57-58-58 cm. CAPPUCCIO: Cucire le spalle. Il cappuccio si lavora avanti e indietro sul f circolare. Con il filo Alaska e il f circolare 5, riprendere 74-74-76-76-78-78 m intorno allo scollo (incluse le m in attesa sui fili). Lavorare 6 f dir su tutte le m, ALLO STESSO TEMPO, distribuire uniformemente 16-16-18-18-20-20 aumenti sull’ultimo f = 90-90-94-94-98-98 m. Continuare con il motivo al f successivo sul rov così: 7 m punto legaccio, M.1 finché non rimangano 7 m, terminare con 7 m punto legaccio. Continuare con questo motivo. Quando il lavoro misura 36-36-37-37-38-38 cm - aggiustare dopo 1 motivo intero in altezza - lavorare 1 f rovescio. Intrecciare tutte le m. CONFEZIONE: Piegare il cappuccio in due e cucire. Cucire le maniche nella m di vivagno. Attaccare le maniche cucendo e attaccare i bottoni. |
||||||||||||||||
Spiegazioni del diagramma |
||||||||||||||||
|
||||||||||||||||
 |
||||||||||||||||
Avete terminato questo modello?Allora taggate le vostre foto con #dropspattern #hoodedblackberryjacket o inviatele alla #dropsfan gallery. Avete bisogno di aiuto con questo modello?Troverete 22 video tutorial, una sezione per i commenti/domande e molto altro guardando il modello su www.garnstudio.com © 1982-2026 DROPS Design A/S. Ci riserviamo tutti i diritti. Questo documento, compreso tutte le sue sotto-sezioni, è protetto dalle leggi sul copyright. Potete leggere quello che potete fare con i nostri modelli alla fine di ogni modello sul nostro sito. |
||||||||||||||||


Con oltre 40 anni di esperienza nel design di modelli di maglia e uncinetto, DROPS Design offre la più estesa collezione di modelli gratuiti su internet - tradotti in 17 lingue. Ad oggi vi possiamo fornire 324 cataloghi e 12290 modelli - 9561 dei quali sono tradotti in Italiano.
Ci stiamo impegnando molto per darvi il meglio che vi possiamo offrire in termini di maglia e uncinetto, ispirazioni e consigli così come filati di grande qualità ad un prezzo incredibile! Volete utilizzare i nostri modelli per qualcosa d'altro oltre al vostro uso personale? Potete leggere tutto ciò che è consentito nel testo sul Copyright in basso su tutte le pagine dei nostri modelli. Buon lavoro!
Lasciare un commento sul modello DROPS 117-38
Noi saremmo felici di ricevere i tuoi commenti e opinioni su questo modello!
Se vuoi fare una domanda, fai per favore attenzione a selezionare la categoria corretta nella casella qui sotto per velocizzare il processo di risposta. I campi richiesti sono indicati da *.