
Categorie popolari
State cercando un filato?


Commenti / Domande (112)
Blanca Oses ha scritto:
Como puedo empezar . Soy aprendiz y me gusta mucho la falda para mí . No entiendo gracias
25.07.2017 - 01:54DROPS Design ha risposto:
Hola Blanca. Te recomiendo primero hacer los cuadrados necesarios para hacer la falda. Y después comenzar con la falda, que se trabaja de arriba abajo. Al final se unen los cuadrados con la falda.
25.07.2017 - 20:21
![]() Heather ha scritto:
Heather ha scritto:
I am confused on the first instruction - I have done 136 chains but am confused when it says 1dc in each of the next 1-1-1-5-5-3. So does that mean I double crochet the following 3 chains and then skip 5 chains before dc again? And then miss another 5 chains again? It certainly doesn't look right if I do this!
13.01.2017 - 21:42DROPS Design ha risposto:
Dear Heather, work first row as follows in the 1st size: 1 dc in 2nd ch from hook, 1 dc in each of the next ch, * skip 1 ch, 1 dc in each of the next 6 ch*, repeat from *-* a total of 19 times = 116 dc. Happy crocheting!
16.01.2017 - 08:56
![]() Nancy Krause ha scritto:
Nancy Krause ha scritto:
Warum wird abwechselnd eine Runde Stäbchen und eine Runde Feste Maschen gehäkelt? Das sieht auf den Bild doch nur nach Stäbchen aus. Hat das eine tiefere Bedeutung mit den abwechselnd häkeln.? Oder ist es egal ob man nur Stäbchen häkelt?
25.12.2016 - 10:12DROPS Design ha risposto:
Liebe Frau Krause, der Rock ist im Muster gestrickt, dh abwechselnd 1 Reihe mit Stb und 1 Reihe mit fM - so wird auch der Maschenprobe gehäkelt (= 18 M x 12 R im Muster = 10 x 10 cm) Viel Spaß beim häkeln!
29.12.2016 - 13:53Tanja ha scritto:
Danke für die schnelle Antwort. Stimmt, Luftmaschenrand ist immer zu fest und zu eng. Den Trick werde ich auch bei anderen Werken anwenden. Super, dass ihr schnelle Hilfeleistung gebt!
08.12.2016 - 09:24Tanja ha scritto:
Hallo, Frage zu den ersten 5 Reihen: wird nur in der ersten Reihe abgenommen (überspringen jeder 7. Luftmasche)? 2.Reihe: Stäbchen in jede fm der Vorreihe, 3. Reihe: fm in jedes Stb. der Vorreihe, etc. Danke.
08.12.2016 - 08:14DROPS Design ha risposto:
Liebe Tanja, damit der 1. Reihe nicht zu eng ist, häkelt man mehr Lm am Anfang, aber dann bei den ersten 5 Reihen muss die Maschenanzahl bleiben. Und genauso wie wird man dann häklen. Viel Spaß beim häkeln!
08.12.2016 - 09:03Maru Quintero ha scritto:
Don`t understand the pattern of the skirt ... too complicated for beginners. How bad because is beautiful
08.11.2016 - 04:15DROPS Design ha risposto:
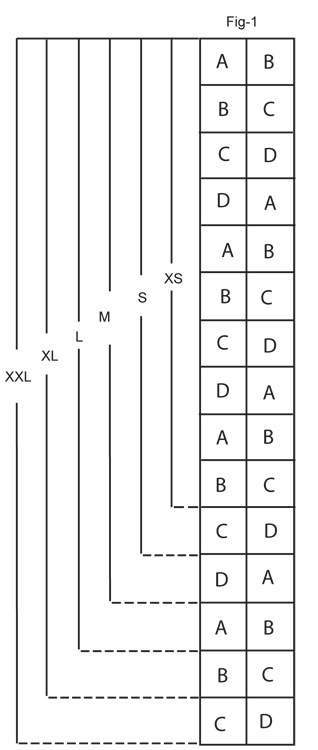
Dear Mrs Quintero, skirt is worked top down, back and forth with a seam on the side when work is done. After you have worked the skirt, crochet the number of squares required for your size following colours, then sew the squares tog into a strip as shown in fig.1 then sew this strip to the bottom of the skirt. Happy crocheting!
08.11.2016 - 09:48
![]() Anna ha scritto:
Anna ha scritto:
Ik draag maat 44/46 en zou graag willen weten of ik hiervoor maat XL of XXL moet aanhouden.
10.04.2016 - 08:39DROPS Design ha risposto:
Hoi Anna. Kijk onderaan het patroon op de maattekening. Hier staan alle afmetingen in cm, je kan deze vergelijken met je eigen en de goede maat kiezen. Veel haakplezier.
12.04.2016 - 11:07
![]() Anne ha scritto:
Anne ha scritto:
Hej. mig igen :). Det er denne video jeg mener: -->må ikke indsætte link, men titlen på videoen er: "Hæklede bedstemorruder med farveskift"
16.09.2015 - 18:40
![]() Anne ha scritto:
Anne ha scritto:
Jeg er netop igang med at hækle nederdelen. Jeg er lige blevet færdig med ruderne, men opdagedevførst lige nu at der er en instruktionsvideo på drops hjemmeside der viser hvordan man hækler ruder med farveskift. Kan denne video ikke også vedlægges til denne opskrift, istedet for den der viser hækling af ruder i en farve. Mvh. Anne
14.09.2015 - 09:50
![]() Brenda ha scritto:
Brenda ha scritto:
I am confused as to where to place the markers. I will be making the large size. Do I put a marker at stitch 14, another after 28 stitches, then another after 14 stitches? This would only be 3 markers. Can you please explain the markers in a manner that would be like this: mark at 14 stitches, then count 28 stitches and mark that stitch, etc? Thank you.
26.03.2015 - 03:44DROPS Design ha risposto:
Dear Brenda, in size L, put the 6 markers as follows: 1st after 14 sts, 2nd after 28 sts, 3rd after 28 sts, 4th after 28 sts, 5th after 28 sts, 6th after 28 sts, 14 sts remain after 6th marker to the end of row = 168 sts. Happy knitting!
26.03.2015 - 09:02
|
|
Licorice Squares |
|
|
|
|
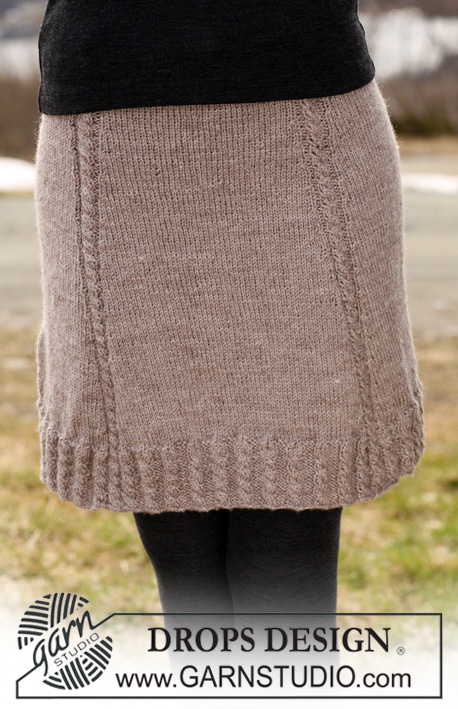
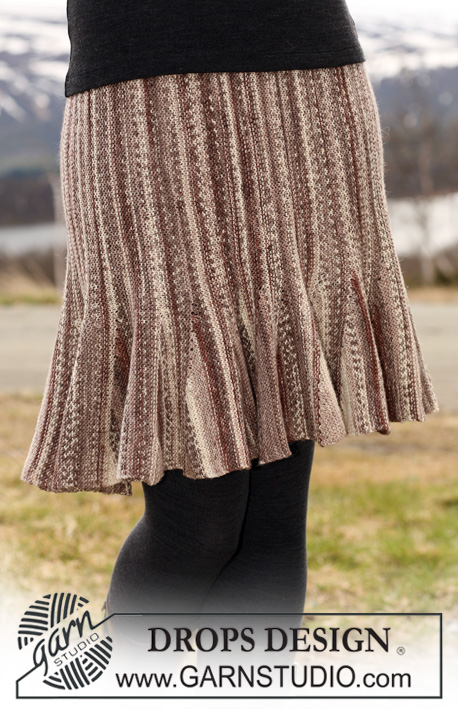
Gonna DROPS lavorata all’uncinetto in "Karisma" con quadrati a punto fantasia lungo il bordo inferiore. Taglie: XS-XXL.
DROPS 115-43 |
|
|
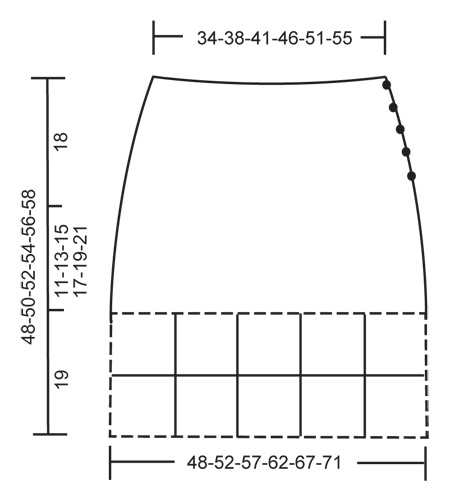
MOTIVO: RIGA 1: 1 m.a. in ogni m.b., finire la riga con 1 cat. con cui girare. RIGA 2: 1 m.b. in ogni m.a., finire la riga con 3 cat. con cui girare. SUGGERIMENTO PER GLI AUMENTI: Aumentare lavorando 2 m.a. in 1 m.b. GONNA: Lavorata avanti e indietro dall’alto in basso, e cucita ai lati alla fine. Lavorare 136-157-178-196-217-236 catenelle lasse con l’antracite con l’uncinetto n°4 mm. Lavorare la 1° riga come segue: 1 m.b. nella seconda cat. dall’uncinetto, 1 m.b. in ognuna delle successive 1-1-1-5-5-3 cat., * saltare 1 cat., 1 m.b. in ognuna delle successive 6 cat. *, ripetere *-* = 116-134-152-168-186-202 m.b. Continuare con il MOTIVO – leggere sopra – fino alla fine del lavoro. RICORDARSI DELLA TENSIONE DEL LAVORO! Dopo 5 righe (l’ultima riga è una riga a m.b.) inserire 6 segnapunti come segue: il primo segnapunti dopo 11-12-14-14-16-19 m., poi 19-22-25-28-31-33 m. tra ogni segnapunti = 10-12-13-14-15-18 m. dopo l’ultimo segnapunti. Sul f. successivo aumentare 1 m.a. prima di tutti i segnapunti – LEGGERE IL SUGGERIMENTO PER GLI AUMENTI e ripetere gli aumenti ogni 2 righe (aumentare dopo e prima del segnapunti in modo alternato) per un totale di 9 volte = 170-188-206-222-240-256 m. Continuare fino a quando il lavoro misura 29-31-33-35-37-39 cm (o la lunghezza desiderata), tagliare il filo. COLORI DEI QUADRATI: QUADRATO A: inizio + giro 1 = antracite, giro 2 = grigio medio, giro 3 = bianco, giro 4 = nero, giro 5 = antracite. QUADRATO B: inizio + giro 1 = nero, giro 2 = antracite, giro 3 = bianco, giro 4 = grigio medio, giro 5 = antracite. QUADRATO C: inizio + giro 1 = bianco, giro 2 = antracite, giro 3 = nero, giro 4 = grigio medio, giro 5 = antracite. QUADRATO D: inizio + giro 1 = bianco, giro 2 = antracite, giro 3 = grigio medio, giro 4 = nero, giro 5 = antracite. QUADRATI ALL’UNCINETTO: avviare 6 cat. con l’uncinetto n° 4 mm e formare un anello con 1 m.bss. nella 1° cat. GIRO 1: 3 cat., 2 m.a. nell’anello, * 3 cat., 3 m.a. *, ripetere *-* per un totale di 3 volte e finire con 3 cat. e 1 m.bss. nella 3° cat. dall’inizio del giro. Girare il lavoro. GIRO 2: 3 cat., 2 m.a. nel primo occhiello di cat., 3 cat., 3 m.a .nello stesso occhiello di cat., * 1 cat., 3 m.a. nell’occhiello di cat. successivo, 3 cat., 3 m.a. nello stesso occhiello di cat. *, ripetere *-* per un totale di 3 volte, finire con 1 cat. e 1 m.bss. nella 3° cat. dall’inizio del giro. Girare il lavoro. GIRO 3: 3 cat., 2 m.a. nel primo occhiello di cat., 1 cat., * 3 m.a. nell’occhiello di cat. successivo, 3 cat., 3 m.a. nello stesso occhiello di cat., 1 cat., 3 m.a. nell’occhiello di cat. successivo, 1 cat. *, ripetere *-* per un totale di 3 volte, 3 m.a. nell’occhiello di cat. successivo, 3 cat., 3 m.a. nello stesso occhiello di cat., 1 cat., finire con 1 m.bss. nella 3° cat. dall’inizio del giro. Girare il lavoro. GIRO 4: 3 cat., 2 m.a. nel primo occhiello di cat., 1 cat., * 3 m.a. nell’occhiello di cat. successivo, 3 cat., 3 m.a. nello stesso occhiello di cat., 1 cat., 3 m.a. nell’occhiello di cat. successivo, 1 cat., 3 m.a. nell’occhiello di cat. successivo, 1 cat. *, ripetere *-* per un totale di 3 volte, 3 m.a. nell’occhiello di cat. successivo, 3 cat., 3 m.a. nello stesso occhiello di cat., 1 cat., 3 m.a. nell’occhiello di cat. successivo, 1 cat., finire con 1 m.bss. nella 3° cat. dall’inizio del giro. Girare il lavoro. GIRO 5: lavorare 1 m.b. in ogni m.a. e 1 m.b. in ogni cat., finire con 1 m.bss. nella 1° m.b. 1 quadrato = circa 9,5 x 9,5 cm. N° DI QUADRATI: lavorare 5-5-6-7-7-7 quadrati A, 6-6-6-7-8-8 quadrati B, 5-6-6-6-7-8 quadrati C e 4-5-6-6-6-7 quadrati D = un totale di 20-22-24-26-28-30 quadrati. CONFEZIONE: cucire la gonna insieme a lato, margine a margine, ma lasciare un’apertura di 15 cm in alto. Unire i quadrati, margine a margine fino a una striscia come mostrato nella fig-1, e poi unirli a formare un anello. Ora attaccare i quadrati alla parte inferiore della gonna, margine a margine. OCCHIELLI: lavorare gli occhielli sul lato dell’apertura verso il davanti come segue (iniziare dalla parte inferiore dell’apertura): 1 m.b. in ognuna delle prime 2 m., 3 cat., saltare 1 cm, * lavorare 1 m.b. in ogni m. per 2 cm, 3 cat., saltare 1 cm *, ripetere *-* per un totale di 4 volte, e finire con 2 m.b. in alto. Girare e lavorare la riga di ritorno come prima: 1 m.b. in ogni m.b. e 3 m.b. in ogni occhiello di cat., tagliare il filo. BORDO DEI BOTTONI: lavorare 5 righe a m.b. lungo il lato dell’apertura verso il dietro, tagliare il filo. Attaccare i bottoni. |
|
 |
|
 |
|
Avete terminato questo modello?Allora taggate le vostre foto con #dropspattern o inviatele alla #dropsfan gallery. Avete bisogno di aiuto con questo modello?Troverete 8 video tutorial, una sezione per i commenti/domande e molto altro guardando il modello su www.garnstudio.com © 1982-2026 DROPS Design A/S. Ci riserviamo tutti i diritti. Questo documento, compreso tutte le sue sotto-sezioni, è protetto dalle leggi sul copyright. Potete leggere quello che potete fare con i nostri modelli alla fine di ogni modello sul nostro sito. |


Con oltre 40 anni di esperienza nel design di modelli di maglia e uncinetto, DROPS Design offre la più estesa collezione di modelli gratuiti su internet - tradotti in 17 lingue. Ad oggi vi possiamo fornire 324 cataloghi e 12290 modelli - 9561 dei quali sono tradotti in Italiano.
Ci stiamo impegnando molto per darvi il meglio che vi possiamo offrire in termini di maglia e uncinetto, ispirazioni e consigli così come filati di grande qualità ad un prezzo incredibile! Volete utilizzare i nostri modelli per qualcosa d'altro oltre al vostro uso personale? Potete leggere tutto ciò che è consentito nel testo sul Copyright in basso su tutte le pagine dei nostri modelli. Buon lavoro!
Lasciare un commento sul modello DROPS 115-43
Noi saremmo felici di ricevere i tuoi commenti e opinioni su questo modello!
Se vuoi fare una domanda, fai per favore attenzione a selezionare la categoria corretta nella casella qui sotto per velocizzare il processo di risposta. I campi richiesti sono indicati da *.