
Categorie popolari
State cercando un filato?


Commenti / Domande (33)
![]() Judith Thompson ha scritto:
Judith Thompson ha scritto:
I cannot figure out the row after the fans - I see the V stitch but then what? 7 chains? Doesn't seen enough?
24.01.2015 - 10:33DROPS Design ha risposto:
Dear Mrs Thompson, on row 2 and 4 in diag, start with 4 ch, 1 tr in sl st from previous row, 7 ch, *in next sc work 1 tr, 1 ch, 1 tr, 7 ch*, repeat from *-* around and join with a sl st in 3rd ch from beg of round. Happy crocheting!
26.01.2015 - 09:32
![]() Antje Schupp ha scritto:
Antje Schupp ha scritto:
Unsere Stricklady aus dem Dropsladen hat sie in blau und mit einem Band gemacht, das ist noch viel schöner ;O). Ich nehm das Muster und mach eine eckige Tasche draus ( in beige, hab ich noch ;O)).
06.07.2014 - 23:31
![]() Mary ha scritto:
Mary ha scritto:
Hi! I'm so excited to start making this bag! I do have one question though, I haven't followed a pattern like this before and I'm confused by the explanation of rounds 5-11 saying at the same time increase by x amount. Could you please explain in further detail?
13.04.2014 - 10:30DROPS Design ha risposto:
Dear Mary, from round 5 you continue as before with inc, ie, Rd 5 will be worked as follows: *2 dc in first dc, 1 dc in each of the next 4 dc* repeat from *-*, Rd 6:*2 dc in first dc, 1 dc each of the next 5 dc*, and so on, you will have 1 more dc between 2 inc on each inc round. Happy crocheting!
14.04.2014 - 09:07
![]() Barbara Miller ha scritto:
Barbara Miller ha scritto:
FYI, I boldly went where I'd never gone before and got it done. I have been crocheting for about 50 years and never had used a chart. Now I understand them and whole new world of opportunities is open for me. I modified the straps to a sling because that's what my daughter wanted and she LOVES it. Now I'm making one for myself. Thanks! Your patterns really rock. I was so initimidated by the chart and you've helped me get over my fears.
05.06.2013 - 17:38
![]() Barbara Miller ha scritto:
Barbara Miller ha scritto:
I was wondering if there are written instructions for the fan portion of this bag. Or a tutorial on how to do it. I cannot make sense of the chart. Thanks.
20.05.2013 - 05:11DROPS Design ha risposto:
Dear Mrs Miller, there are no written instruction for the fan portion but you'll find above the diagrams all diagram texts to figure out how to work the diagrams. Happy crocheting!
21.05.2013 - 10:18
![]() Marjan ha scritto:
Marjan ha scritto:
José bedankt! Ik ga het proberen. Inmiddels ben ik begonnen maar kom gelijk bij de 2e toer een vraag tegen. Ik kan niet terugvinden of je de stokjes in de voorste, de achterste of allebei de lussen moet insteken?
09.01.2013 - 12:19DROPS Design ha risposto:
Haak standaard door beide lussen, zie ook onze haakvideo's
10.01.2013 - 21:58
![]() Marjan ha scritto:
Marjan ha scritto:
Lijkt me een prachtige tas! Ik wil 'm graag gaan maken, wel 1 probleem. Op mijn Mac krijg ik het niet voor elkaar het patroon te downloaden. Heeft iemand het in PDF voor mij? Of een tip om het toch te downloaden? Alvast bedankt!
04.01.2013 - 16:40José ha risposto:
Hallo Marjan, kies NIET afdrukken patroon. Maar ga in je Safari werkbalk naar Archief en kies: druk af en dan kom je in je print programma. Succes.
04.01.2013 - 19:31
![]() Conny ha scritto:
Conny ha scritto:
Goedemorgen, Deze tas ben ik aan het haken en ben toegekomen aan het veren patroon. Kunt u mij vertellen hoe ik de tweede toer gaat starten? Ik snap van de tekening niet zo veel, ben een beginner in het haken. Alvast super bedankt!
20.08.2012 - 10:39DROPS Design ha risposto:
In TIP VOOR HET HAKEN-1 en 2, kan je lezen hoe een toer moet beginnen. In de teltekening zie je de 1 of 3 losse ook staan als 1 of 3 stipjes (rechts bij de ster of pij het pijltje start). Je haakt het diagram vanaf start vanaf rechts naar links, eerst met 3+1 lossen, 1 dstk, 7 l, 1 dstk, 1 l, 1 dstk in de vaste van vorige toer enzo voort.
21.08.2012 - 16:37
![]() DROPS Design NL ha scritto:
DROPS Design NL ha scritto:
De eerste toer staat al beschreven in het patroon zelf. Je haakt eerst de bodem (t/m toer 18). Vervolgens haak je door volgens telpatroon M.1A en M.1B. De telpatronen staan onderaan incl. vertaling van de symbolen. Je begint bij "start" met 4 lossen en 1 stokje in de hv van de vorige toer. Eindig en begin zoals beschreven onder TIP VOOR HET HAKEN. Haak in de ronde en lees het telpatroon van rechts naar links. Gr. Tine
04.03.2010 - 13:21
![]() Walgraef Tina ha scritto:
Walgraef Tina ha scritto:
Kunt u een beetje meer uitleg geven over het Verenpatroon a.u.b.? Welke steken doe je in de eerstee ronde en welke dan in de tweede ronde want daar is toch een verschil tussen?
04.03.2010 - 12:20
|
||||||||||||||||||||||
Maurea#maureabag |
||||||||||||||||||||||
 |
 |
|||||||||||||||||||||
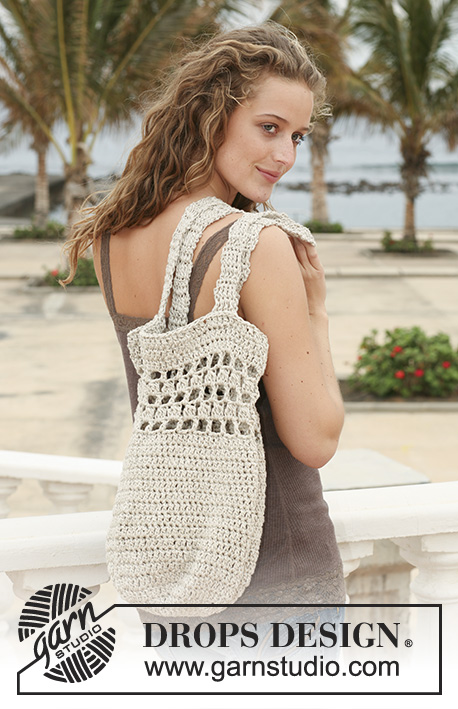
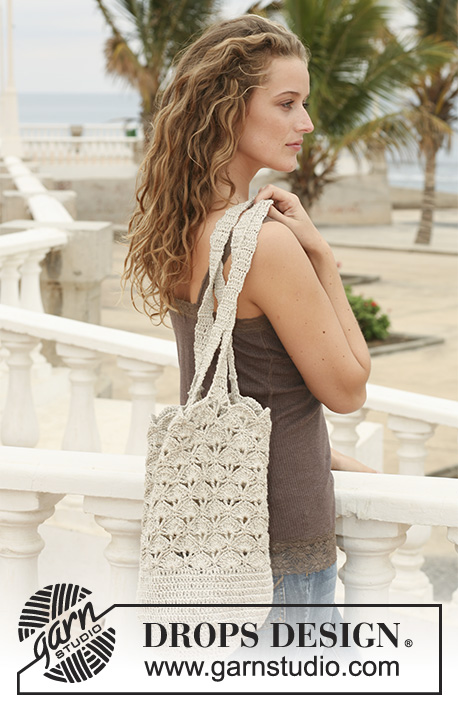
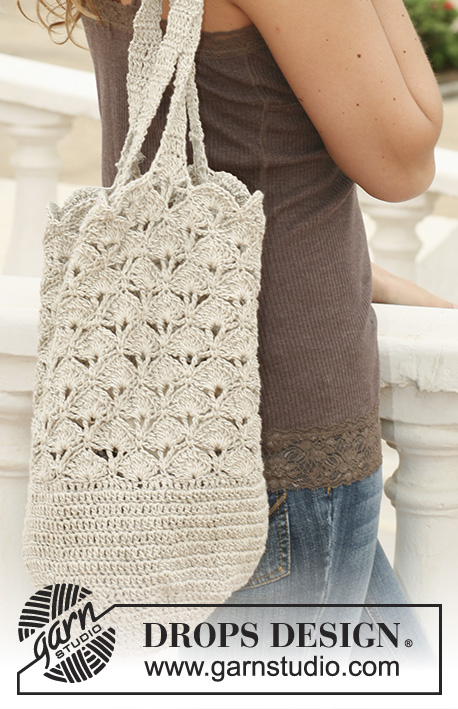
Borsa da shopping lavorata all’uncinetto con motivo traforato in DROPS Bomull-Lin.
DROPS 113-3 |
||||||||||||||||||||||
|
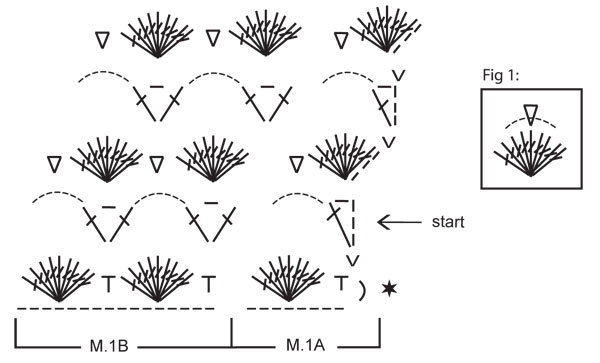
CONSIGLIO UNCINETTO-1: Sostituire la 1° m.a di ogni giro con 3 cat, e unire ogni giro con 1 m.bss nella 3° cat d’inizio giro. CONSIGLIO UNCINETTO-2: Sostituire la 1° m.a del giro con 3 cat. MOTIVO: Vedere diag M.1A e M.1B. Lavorare 1 volta M.1A all’inizio del giro, poi M.1B. Ripetere M.1B finché il giro non sia finito. ------------------------------------------------------- BORSA: Avviare 6 cat con l’uncinetto 4 ed il filato Bomull-Lin e formare un anello con 1 m.bss nella 1° cat. 1° giro: Lavorare 20 m.a nell’anello – VEDERE CONSIGLIO UNCINETTO-1! 2° giro: * 2 m.a nella 1° m.a, 1 m.a nella m.a seguente *, ripetere da *-* in totale 10 volte = 30 m.a. RICORDATI LA TENSIONE DELLA MAGLIA! 3° giro: * 2 m.a nella 1° m.a, 1 m.a in ognuna delle 2 m.a seguenti *, ripetere da *-* in totale 10 volte = 40 m.a. 4° giro: * 2 m.a nella 1° m.a, 1 m.a in ognuna delle 3 m.a seguenti *, ripetere da *-* in totale 10 volte = 50 m.a. 5°-10° giro: Lavorare come prima, ALLO STESSO TEMPO, continuare a aumentare 10 m.a ogni giro come prima = 110 m.a. 11° giro: Lavorare 1 m.a in ogni m.a, ALLO STESSO TEMPO, distribuire 2 aumenti (m.a) uniformemente = 112 m.a. 12°- 18° giro: Lavorare in tondo senza aumentare. Continuare poi con il motivo di ventagli così: 1 cat, 1 m.b nella 1° m.a, * saltare 3 m.a, lavorare 9 m.a.d nella seguente m.a (= 1 ventaglio), saltare 3 m.a, 1 m.b nella m.a seguente *, ripetere da *-* in totale 14 volte, ma l’ultima volta, unire con 1 m.bss nella 1° m.b = 14 ventagli sul giro. Continuare con M.1A e M.1B – Ved spieg sopra! Ripetere M.1A e M.1B in altezza finché non ci siano in totale 10 ventagli in altezza. Tagliare e fissare il filo. TRACOLLA: Avviare 8 cat con l’uncinetto 4 ed il filato Bomull-Lin. Lavorare 1 m.a nella 4° cat dall’uncinetto, poi 1 m.a in ognuna delle 4 seguenti cat = 6 m.a. Continuare avanti e indietro con 1 m.a in ogni m.a – LES CONSIGLIO UNCINETTO-2! Continuare così finché la tracolla non misuri ca 60 cm. Lavorare una 2° tracolla identica. * Cucire 1 delle estremità della tracolla in alto di un ventaglio, saltare 3 ventagli, cucire l’altra estremità in alto sopra il ventaglio seguente. * Saltare 2 ventagli, ripetere da *-* per l’altra tracolla. Fissare bene i fili. |
||||||||||||||||||||||
Spiegazioni del diagramma |
||||||||||||||||||||||
|
||||||||||||||||||||||
 |
||||||||||||||||||||||
Avete terminato questo modello?Allora taggate le vostre foto con #dropspattern #maureabag o inviatele alla #dropsfan gallery. Avete bisogno di aiuto con questo modello?Troverete 9 video tutorial, una sezione per i commenti/domande e molto altro guardando il modello su www.garnstudio.com © 1982-2026 DROPS Design A/S. Ci riserviamo tutti i diritti. Questo documento, compreso tutte le sue sotto-sezioni, è protetto dalle leggi sul copyright. Potete leggere quello che potete fare con i nostri modelli alla fine di ogni modello sul nostro sito. |
||||||||||||||||||||||


Con oltre 40 anni di esperienza nel design di modelli di maglia e uncinetto, DROPS Design offre la più estesa collezione di modelli gratuiti su internet - tradotti in 17 lingue. Ad oggi vi possiamo fornire 324 cataloghi e 12290 modelli - 9561 dei quali sono tradotti in Italiano.
Ci stiamo impegnando molto per darvi il meglio che vi possiamo offrire in termini di maglia e uncinetto, ispirazioni e consigli così come filati di grande qualità ad un prezzo incredibile! Volete utilizzare i nostri modelli per qualcosa d'altro oltre al vostro uso personale? Potete leggere tutto ciò che è consentito nel testo sul Copyright in basso su tutte le pagine dei nostri modelli. Buon lavoro!
Lasciare un commento sul modello DROPS 113-3
Noi saremmo felici di ricevere i tuoi commenti e opinioni su questo modello!
Se vuoi fare una domanda, fai per favore attenzione a selezionare la categoria corretta nella casella qui sotto per velocizzare il processo di risposta. I campi richiesti sono indicati da *.