
Categorie popolari
State cercando un filato?


Commenti / Domande (58)
![]() Tina Gross ha scritto:
Tina Gross ha scritto:
Please disregard my previous message about this pattern. I was able to figure it out. Thank you. Tina Gross
29.06.2013 - 22:51
![]() Decker ha scritto:
Decker ha scritto:
Vielen Dank, jetzt endlich habe ich es kapiert. Danke, Danke, Danke
08.02.2013 - 07:08
![]() Decker ha scritto:
Decker ha scritto:
Sorry, es hatte sich ein Fehlerteufel in meiner Nachricht von Gestern eingeschlichen, es sollte heißen: bitte helfen sie mir nur "noch" und nicht "nich" das eine mal. Entschuldigung!
07.02.2013 - 13:21
![]() Decker ha scritto:
Decker ha scritto:
Leider kann mir Lidl (Discounter) nicht helfen, ich möchte ja nur wissen ob ich die 6 M nachher wieder aufnehmen muss und zusätzlich die 82M für die Halsrundung? Bitte helfen Sie mir nur nich das 1 mal. Vielen Dank.
06.02.2013 - 15:41Robert ha risposto:
Siehe Abschnitt Halskante:( inkl. M. auf dem Hilfsfaden).
07.02.2013 - 16:38
![]() Decker ha scritto:
Decker ha scritto:
Laut Foto sieht es für mich aus, das die 6M direkt über den Schlitz abgekettet werden und dann folgt die Rundung für den Hals bis zur Schulternaht. Das mit der Halskante würde ich so lesen, das ich nach dem schlitz anfange und rundherum auch über den Rückhals bis zur nächsten Kante 82 Maschen aufnehmen soll und dann 4Runden Hin und Rück rechts stricke, oder?
05.02.2013 - 11:54DROPS Design ha risposto:
Hallo Frau Decker, dürfen wir Sie bitten, sich für weitere individuelle Strickhilfe an den Laden zu wenden, in dem Sie die Wolle gekauft haben? Dort hilft man Ihnen gerne bei der Umsetzung der Anleitung weiter.
05.02.2013 - 15:13
![]() Decker ha scritto:
Decker ha scritto:
Sorry ich verstehe das leider immer noch nicht,dass heißt nach dem der Schlitz fertig ist, nehme ich über den schlitz 6 M auf einen Hilfsfaden ab und stricke mit den einzelnen Maschenabnamen wie beschrieben ist weiter hoch bis zu Schulter? Leider kann ich mir das immer noch nicht bildlich vorstellen?
05.02.2013 - 11:15DROPS Design ha risposto:
Hallo Frau Decker, ja, Sie legen die 6 Maschen auf einen Hilfsfaden (die Maschen werden stillgelegt bis die Halskante gestrickt wird).
05.02.2013 - 15:11
![]() Decker ha scritto:
Decker ha scritto:
Habe das Rückenteil Problemlos fertig gestrickt und das Vorderteil angefangen, jetzt steht in der Anleitung das ich nach 60cm die aüssersten 6M gegen die Mitte auf einen Hilfsfaden legen soll. Welche M sind denn jetzt nun gemeint und was mache ich dann mit die Maschen? Sorry bin Anfänger. Vielen Dank im voraus für die Antwort
04.02.2013 - 15:53DROPS Design ha risposto:
Liebe Frau Decker, Es sind die Maschen über dem vorderen Schlitz. Diese werden stillgelegt und nachher wieder auf die Nadel genommen um die Halskante zu stricken. Das wird weiter unten in der Anleitung (unter Halskante)noch genauer beschrieben.
04.02.2013 - 23:11
![]() Decker ha scritto:
Decker ha scritto:
Vielen Dank für die schnelle Antwort, bitte erklären sie mir noch: was heißt gegen den Hals abketten. Vielen Dank! Ich bin Anfängerin
29.01.2013 - 16:10DROPS Design ha risposto:
Hallo Frau Decker, das bedeutet zum Halsausschnitt zu, also nicht beim Armausschnitt.
30.01.2013 - 09:34
![]() Bärbel Decker ha scritto:
Bärbel Decker ha scritto:
Bitte erklären Sie mir was das in der Strickanleitung bedeutet: "mit e (was bedeutet das e) 4M. in Krausrippe gegen die Mitte fertig gestrickt2. Bitte bitte antworten Sie sonst kann ich das nicht stricken. Vielen Dank!
22.01.2013 - 16:28DROPS Design ha risposto:
Hallo Frau Decker, da ist unserer Übersetzerin nur ein Buchstabe reingerutscht, das e bedeutet nichts und ist jetzt rausgelöscht.
23.01.2013 - 09:57
![]() DROPS Design NL ha scritto:
DROPS Design NL ha scritto:
Beste Karin. Er is ook een link onderaan dit patroon naar een video voor het breien van het golvenpatroon. Hier zie je dan precies hoe het moet.
14.05.2012 - 12:12
|
|||||||||||||
Pacific Waves#pacificwavestop |
|||||||||||||
|
|
|||||||||||||
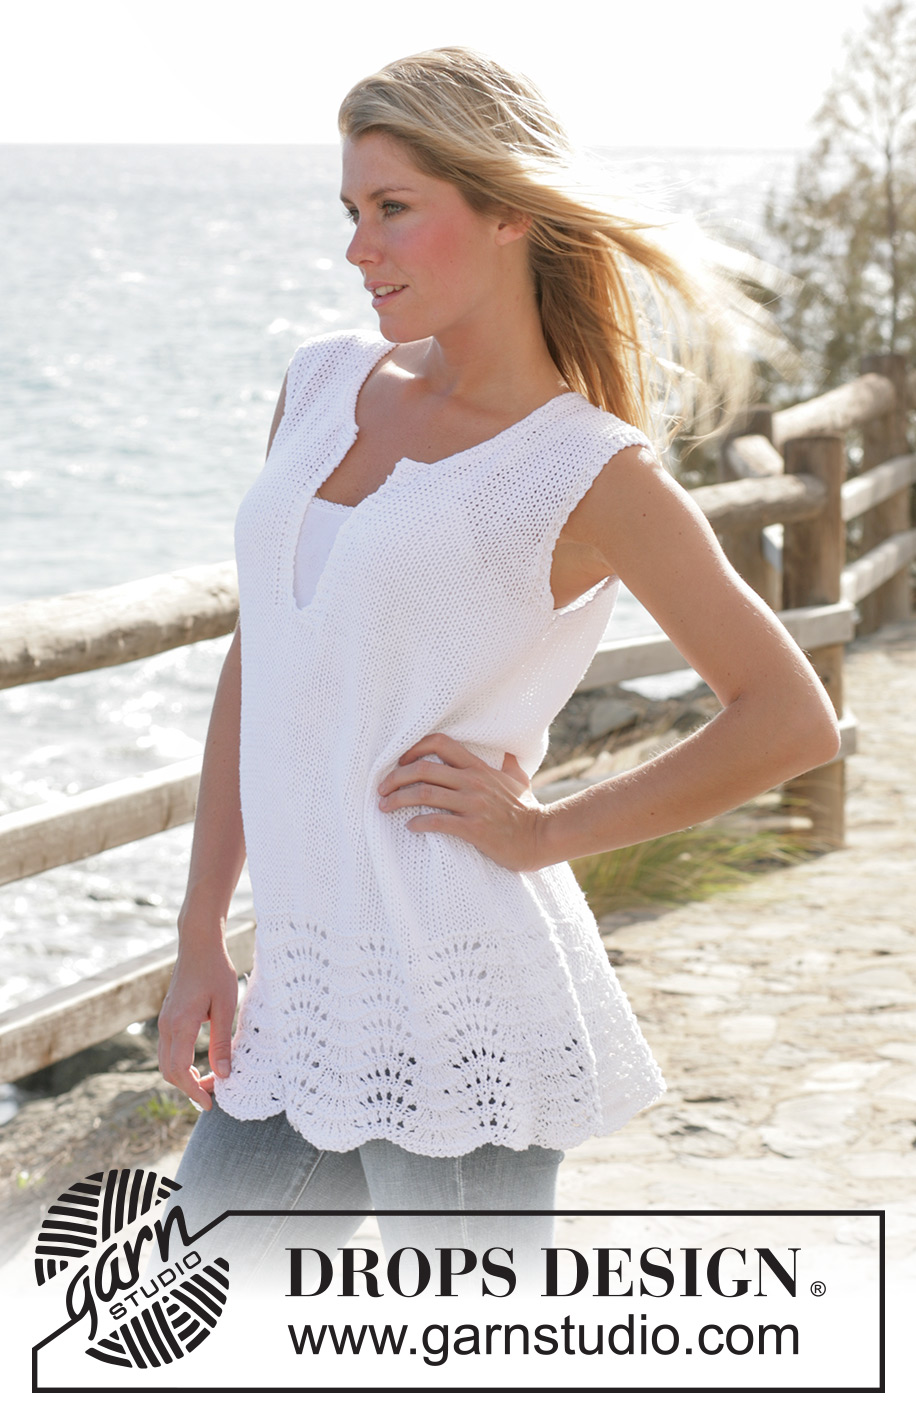
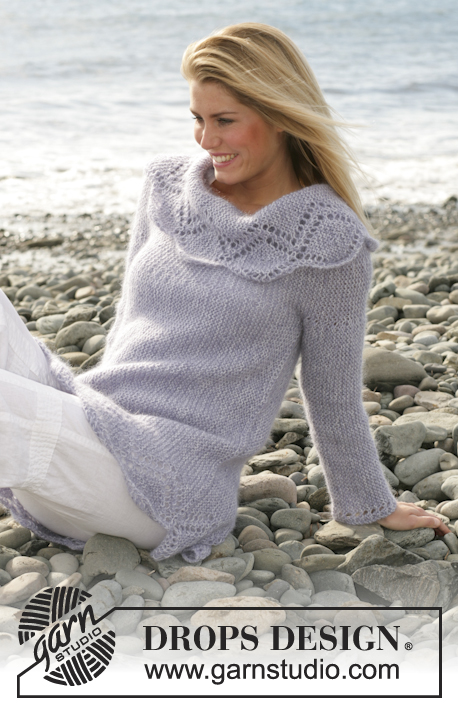
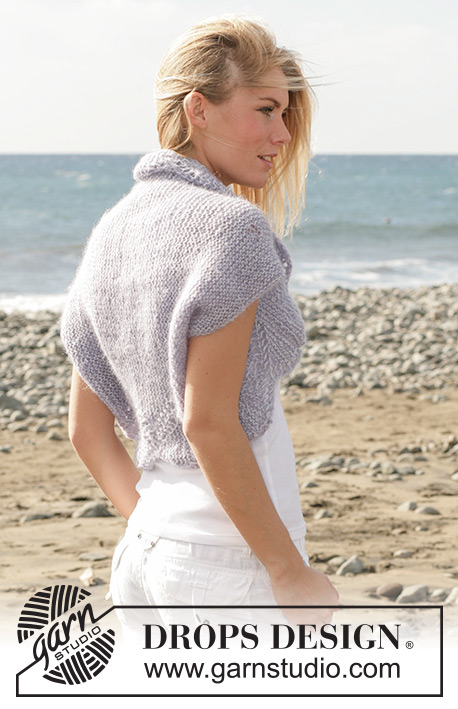
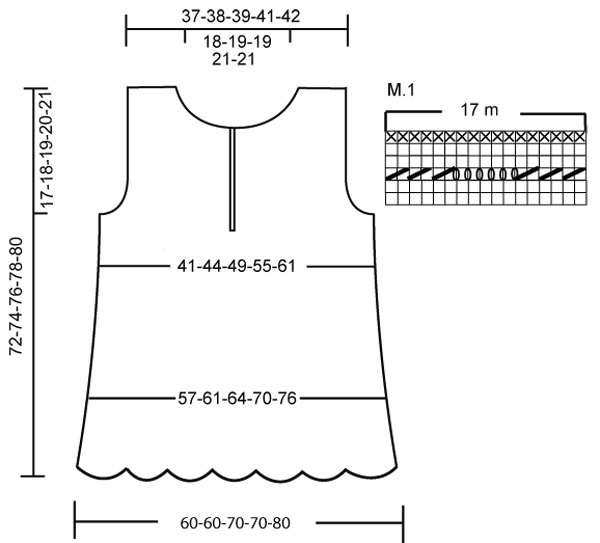
Tunica DROPS lavorata ai ferri con motivo ad onde in "Bomull- Lin". Taglie: dalla S alla XXL.
DROPS 101-4 |
|||||||||||||
|
CAMPIONE: 17 m. x 22 f. con i f. misura 5,5 mm a m. rasata =10 x 10 cm. MOTIVO: Vedere il diagramma M.1. Il diagramma del motivo è visto dal diritto del lavoro. Suggerimento per le diminuzioni (applicato allo scalfo): Fare tutte le diminuzioni dal diritto del lavoro. Diminuire come segue dopo 3 m. a m. legaccio: passare 1 m. a dir. senza lavorarla, 1 m. dir., accavallare la m. passata sopra quella appena lavorata. Diminuire come segue dopo 3 m. a m. legaccio: 2 m. insieme a dir. M. legaccio avanti e indietro sui f.: lavorare tutti i f. a dir. _____________________________________________________________________ DIETRO: Avviare 104-104-121-121-138 m. con 2 ferri (i ferri misura 5 mm e i ferri misura 5,5 mm) con il filato Bomull-Lin. (Avviare con 2 ferri per conferire elasticità al bordo di avvio). Eliminare il ferro misura 5,5 mm e lavorare 4 f. a m. legaccio con i ferri misura 5 mm. Continuare a lavorare M.1 – leggere la spiegazione sopra con 1 m. di vivagno da ogni lato. 1 f. = diritto del lavoro. Quando il lavoro misura 20 cm aggiustare il n° di m. a 99-105-111-121-131 m. e continuare a m. rasata con i ferri misura 5,5 mm fino alla fine. Allo stesso tempo intrecciare 1 m. da ogni lato ogni 2,5 cm per un totale di 14-14-13-13-13 volte = 71-77-85-95-105 m. Quando il lavoro misura 54-55-56-57-58 cm lavorare 2 f. a m. legaccio sulle 6-7-7-9-9 m. di vivagno da ogni lato (a m. rasata sulle altre m.). Sul f. successivo intrecciare 3-4-4-6-6 m. di vivagno da ogni lato per lo scalfo. Continuare sempre a lavorare le 3 m. di vivagno a m. legaccio. Diminuire 1 m. per lo scalfo ogni 2 ferri – leggere il suggerimento per le diminuzioni: 1-2-5-7-11 volte = 63-65-67-69-71 m. Quando il lavoro misura 70-72-74-76-78 cm intrecciare le 29-31-31-33-33 m. centrali per il collo e intrecciare 1 m. sul f. successivo per la scollatura = 16-16-17-17-18 m. rimaste su ogni spalla. Intrecciare quando il lavoro misura 72-74-76-78-80 cm. DAVANTI: Avviare e lavorare come per il dietro fino a quando il lavoro misura 43-45-46-48-49 cm. Lavorare 2 f. a m. legaccio sulle 9 m. centrali (a m. rasata sulle m. rimaste e intrecciare e continuare gli intrecci ai bordi). Intrecciare la m. centrale sul f. successivo. Finire ogni davanti in modo separato con 4 m. a m. legaccio verso il centro davanti. Allo stesso tempo quando il lavoro misura 54-55-56-57-58 cm lavorare 2 f. a m. legaccio sulle 6-7-7-9-9 m. più esterne e intrecciare per lo scalfo come per il dietro. Finire il lavoro lavorando le 3 m. di vivagno a m. legaccio. Quando il lavoro misura 60-62-63-64-66 cm mettere 6-6-6-7-7 m. dal centro davanti su un fermamaglie per il collo e diminuire per modellare la scollatura ogni 2 ferri come segue: 2 m. 3 volte, 1 m. 3-4-4-4-4 volte. Alla fine delle diminuzioni ci saranno 16-16-17-17-18 m. rimaste sulla spalla. Intrecciare quando il lavoro misura 72-74-76-78-80 cm. CONFEZIONE: Cucire i margini delle spalle e dei lati. Bordo del collo: riprendere 82-95 m. attorno alla scollatura (comprese le m. sul fermamaglie) con i ferri misura 5,5 mm e il filato Bomull-Lin. Lavorare 4 f. a m. legaccio avanti e indietro. Intrecciare. |
|||||||||||||
Spiegazioni del diagramma |
|||||||||||||
|
|||||||||||||
 |
|||||||||||||
Avete terminato questo modello?Allora taggate le vostre foto con #dropspattern #pacificwavestop o inviatele alla #dropsfan gallery. Avete bisogno di aiuto con questo modello?Troverete 19 video tutorial, una sezione per i commenti/domande e molto altro guardando il modello su www.garnstudio.com © 1982-2026 DROPS Design A/S. Ci riserviamo tutti i diritti. Questo documento, compreso tutte le sue sotto-sezioni, è protetto dalle leggi sul copyright. Potete leggere quello che potete fare con i nostri modelli alla fine di ogni modello sul nostro sito. |
|||||||||||||


Con oltre 40 anni di esperienza nel design di modelli di maglia e uncinetto, DROPS Design offre la più estesa collezione di modelli gratuiti su internet - tradotti in 17 lingue. Ad oggi vi possiamo fornire 324 cataloghi e 12252 modelli - 9523 dei quali sono tradotti in Italiano.
Ci stiamo impegnando molto per darvi il meglio che vi possiamo offrire in termini di maglia e uncinetto, ispirazioni e consigli così come filati di grande qualità ad un prezzo incredibile! Volete utilizzare i nostri modelli per qualcosa d'altro oltre al vostro uso personale? Potete leggere tutto ciò che è consentito nel testo sul Copyright in basso su tutte le pagine dei nostri modelli. Buon lavoro!
Lasciare un commento sul modello DROPS 101-4
Noi saremmo felici di ricevere i tuoi commenti e opinioni su questo modello!
Se vuoi fare una domanda, fai per favore attenzione a selezionare la categoria corretta nella casella qui sotto per velocizzare il processo di risposta. I campi richiesti sono indicati da *.