
Categorie popolari
State cercando un filato?


Commenti / Domande (62)
Lusi ha scritto:
Continue to crochet around the edge of the leg in Puddel as follows. 1st round: 1 sc in each sc around all of the leg (incl the slit at the centre front). Finish with a sl st in the first sc. 2nd round: *3 ch, 1 sc in the following sc*, repeat from *-*, and finish with a sl st in the first ch from beg of round. Cut the thread. can you explain this i dont quite understand
19.03.2014 - 12:13DROPS Design ha risposto:
Dear Lusi, with Puddel, you will work first 1 round sc all around of the leg (=1 sc in each sc around), then on 2nd round work a ch-loop edge: *ch 3, 1 sc in next sc*, repeat from *-* around. Happy crocheting!
19.03.2014 - 13:47Luci ha scritto:
What does it mean to crochet back until 1sc left?
19.03.2014 - 11:48DROPS Design ha risposto:
Dear Lucy, work 1 row sc leaving 1 sc unworked at the end of row. Happy crocheting!
19.03.2014 - 11:55Luci ha scritto:
What does it mean to crochet back until 1sc left?
19.03.2014 - 11:46
![]() Lucia Green ha scritto:
Lucia Green ha scritto:
When I join at the back of the heel I end up with a weird little point at the bottom. It's not rounded like the slipper in the picture appears. I've gone over and over the pattern and don't see that I'm missing a step. It seems like to have a pretty rounded heel I'm going to have to alter the pattern. Did I miss something?
31.10.2013 - 13:32DROPS Design ha risposto:
Dear Mrs Green, a little point may appear when crocheting heel together, but when wearing them, it shouldn't be that visible. Happy crocheting!
31.10.2013 - 15:49
![]() Soraya Va A Compartir 300 Monedas! ha scritto:
Soraya Va A Compartir 300 Monedas! ha scritto:
Este patron tiene una forma elegante y la figura del pie se ve bonita quiero probar haber como queda!
05.08.2013 - 22:55
![]() Maria ha scritto:
Maria ha scritto:
Hallo, wenn in Runde 2 steht: "5 fM häkeln", heißt das dann 1 LM + 4 fM oder 1 LM + 5 fM? Wie wird das generell in Ihren Anleitungen gehandhabt? Vielen Dank im Voraus
17.01.2013 - 12:05DROPS Design ha risposto:
Liebe Maria, in der Häkelinfo finden Sie die Information dazu: „Die erste fM jeder R. wird mit 1 Lm ersetzt“, es wird also nicht in jeder Runde nochmals speziell erwähnt. Viel Spaß beim Häkeln!
17.01.2013 - 13:16Guadalupe Suárez ha scritto:
Según puedo entender falta la vuelta 9 ya que si continuamos tejiendo con 20 puntos quedará un cono pequeño que no da aumento al pie en la parte del empeine...corríganme si estoy mal, gracias
15.12.2012 - 19:28
![]() DROPS Design ha scritto:
DROPS Design ha scritto:
Til hele tøffelen måler ca 22-25-28 cm.
19.01.2012 - 09:18
![]() Lovise ha scritto:
Lovise ha scritto:
Hvor mange masker skal jeg hekle frem og tilbake på hælen?
19.01.2012 - 00:03Shaima ha scritto:
I couldn't make the end of this sock .. i mean this final row that have mini sagged threads .. could anyone help me ??
21.12.2011 - 22:18
|
|
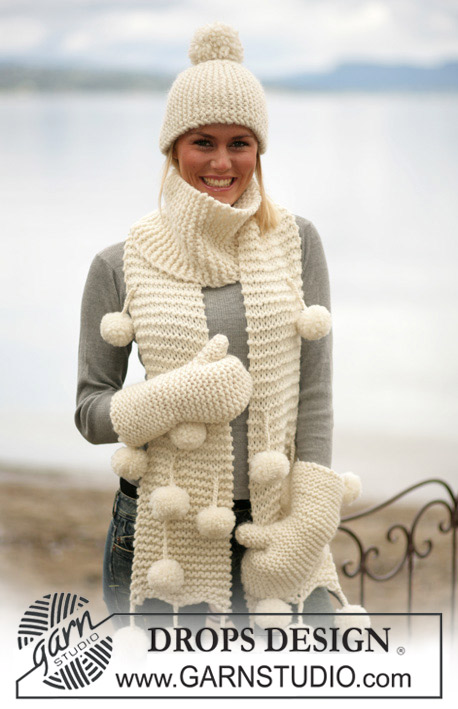
Pom Pom Adore Slippers |
|
|
|
|
Pantofole DROPS lavorate all’uncinetto in "Snow" e "Puddel".
DROPS 98-7 |
|
|
La parte del piede di questo modello viene usata anche per i modelli 98-25, 98-26 e 98-27. INFORMAZIONI PER IL LAVORO: Sostituire la 1° m.b all’inizio del giro/riga con 1 cat. Finire ogni giro con 1 m.bss nella cat di inizio del giro precedente (1 m.bss nella cat d’inizio della riga precedente quando si lavora avanti e indietro). PIEDE: Iniziare con la punta, lavorare in Snow e l’uncinetto n° 8 mm come segue: 1° giro: lavorare 3 cat e fare un occhiello con 1 m.bss nella 1° cat. 2° giro: lavorare 5-5-6 m.b attorno all’occhiello – leggere le INFORMAZIONI PER IL LAVORO! 3° giro: 2 m.b in ogni m.b = 10-10-12 m.b. 4° giro: *1 m.b nella 1° m.b, 2 m.b nella m.b successiva*, ripetere *-* = 15-15-18 m.b. 5°–7° giro: lavorare 1 m.b in ogni m.b. 8° giro: *1 m.b nella 1° m.b, 1 m.b nella 2° m.b e 2 m.b nella 3° m.b*, ripetere *-* = 20-20-24 m.b. Continuare a lavorare 1 m.b in ogni m.b fino a quando il lavoro misura circa 11-13-14 cm. TALLONE: Ora dividere il lavoro e lavorare avanti e indietro dal centro sopra del piede – ricordarsi delle INFORMAZIONI PER IL LAVORO – 1 m.b in ogni m.b. Quando la pantofola misura circa 22-25-28 cm metterla piatta e unirla al centro dietro con una riga di m.b attraverso entrambi gli strati. Tagliare il filo e affrancare. GAMBA: Lavorare 1 giro di m.b attorno all’apertura della pantofola (iniziare al centro davanti).. Continuare il giro con 1 m.b in ogni m.b fino a quando la gamba misura 11 cm, continuare a lavorare avanti e indietro dal centro davanti come segue: 1° riga: girare il lavoro e tornare indietro fino a quando rimane 1 m (che dovrebbe non essere lavorata da qui in poi). 2° riga: girare il lavoro e tornare indietro sulle m della riga precedente fino a quando rimane 1 m (che dovrebbe non essere lavorata da qui in poi) = 2 m al centro davanti. 3° riga: girare il lavoro e lavorare sulle m della riga precedente. Tagliare il filo. Continuare a lavorare attorno al bordo della gamba con il Puddel come segue. 1° giro: 1 m.b in ogni m.b attorno a tutta la gamba (compreso il taglio al centro davanti). Finire con 1 m.bss nella 1° m.b. 2° giro: *3 cat, 1 m.b nella m seguente*, ripetere *-*, e finire con 1 m.bss nella 1° cat dall’inizio del giro. Tagliare il filo. CONFEZIONE: Fare un pompom con un diametro di circa 5 cm in Puddel (vedere le pagina delle tecniche di Garnstudio). Cucire il pompom alla pantofola al centro davanti tra la gamba e il piede. |
|
Avete terminato questo modello?Allora taggate le vostre foto con #dropspattern o inviatele alla #dropsfan gallery. Avete bisogno di aiuto con questo modello?Troverete 9 video tutorial, una sezione per i commenti/domande e molto altro guardando il modello su www.garnstudio.com © 1982-2026 DROPS Design A/S. Ci riserviamo tutti i diritti. Questo documento, compreso tutte le sue sotto-sezioni, è protetto dalle leggi sul copyright. Potete leggere quello che potete fare con i nostri modelli alla fine di ogni modello sul nostro sito. |


Con oltre 40 anni di esperienza nel design di modelli di maglia e uncinetto, DROPS Design offre la più estesa collezione di modelli gratuiti su internet - tradotti in 17 lingue. Ad oggi vi possiamo fornire 324 cataloghi e 12290 modelli - 9561 dei quali sono tradotti in Italiano.
Ci stiamo impegnando molto per darvi il meglio che vi possiamo offrire in termini di maglia e uncinetto, ispirazioni e consigli così come filati di grande qualità ad un prezzo incredibile! Volete utilizzare i nostri modelli per qualcosa d'altro oltre al vostro uso personale? Potete leggere tutto ciò che è consentito nel testo sul Copyright in basso su tutte le pagine dei nostri modelli. Buon lavoro!
Lasciare un commento sul modello DROPS 98-7
Noi saremmo felici di ricevere i tuoi commenti e opinioni su questo modello!
Se vuoi fare una domanda, fai per favore attenzione a selezionare la categoria corretta nella casella qui sotto per velocizzare il processo di risposta. I campi richiesti sono indicati da *.